
User Instructions
Page 1
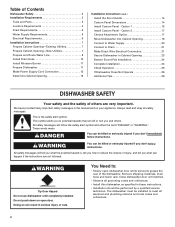
... hazard is important to help you through any problems you need further assistance using your complete model and serial number ready. Have your KitchenAid dishwasher, please contact us at www.kitchenaid.com. Puede encontrar su número de modelo y de serie en la etiqueta ubicada cerca de la puerta, al lado derecho o izquierdo...
... hazard is important to help you through any problems you need further assistance using your complete model and serial number ready. Have your KitchenAid dishwasher, please contact us at www.kitchenaid.com. Puede encontrar su número de modelo y de serie en la etiqueta ubicada cerca de la puerta, al lado derecho o izquierdo...
User Instructions
Page 2
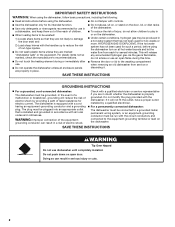
.... ■ Do not abuse, sit on, or stand on the door, lid, or dish racks of the dishwasher. ■ To reduce the risk of injury, do not smoke or use an open door. If the hot ...water system has not been used for use in a dishwasher, and keep them out of the reach of children. ■ When loading items to be run with ...the handles up to the washing compartment when removing an old dishwasher from each for electric current. grounding conductor can result in serious injury or cuts. 2 if it . As...
.... ■ Do not abuse, sit on, or stand on the door, lid, or dish racks of the dishwasher. ■ To reduce the risk of injury, do not smoke or use an open door. If the hot ...water system has not been used for use in a dishwasher, and keep them out of the reach of children. ■ When loading items to be run with ...the handles up to the washing compartment when removing an old dishwasher from each for electric current. grounding conductor can result in serious injury or cuts. 2 if it . As...

User Instructions
Page 3
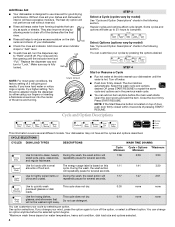
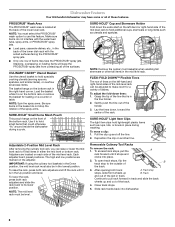
...little in better cleaning. Store tightly closed within 3 seconds of the dispenser as shown. This will etch. Wash only plastic items marked "dishwasher safe." ■ To avoid thumping/clattering noises during operation: Load dishes so they do not plan to Hard Water (7-12 grains per ... aid for the water spray to Medium Water (0-6 grains per U.S. Remove labels from containers before starting a cycle. ■ Fresh automatic A dishwasher detergent results in hard water, dishes won't be loaded with soiled surfaces facing down and avoid "nesting" as shown. Do not use depends ...
...little in better cleaning. Store tightly closed within 3 seconds of the dispenser as shown. This will etch. Wash only plastic items marked "dishwasher safe." ■ To avoid thumping/clattering noises during operation: Load dishes so they do not plan to Hard Water (7-12 grains per ... aid for the water spray to Medium Water (0-6 grains per U.S. Remove labels from containers before starting a cycle. ■ Fresh automatic A dishwasher detergent results in hard water, dishes won't be loaded with soiled surfaces facing down and avoid "nesting" as shown. Do not use depends ...
User Instructions
Page 4
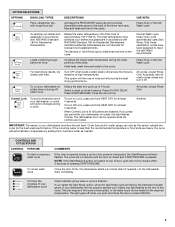
...options desired. Turn off . NOTE: If the Start/Resume button is located on this 1:11 1:41 3:30 amounts of pressing START/ RESUME. Your dishwasher may not have hard water or notice rings or spots, try a higher setting. and regular tableware. repeatedly pause for rinsing dishes, This cycle does...START/RESUME to "Refill" and lift off water. ■ Push door firmly closed within 3 seconds of food soil. Without rinse aid your dishwasher. Heavier cycles and options affect cycle length. STEP 4 max - 21 3 - -- NOTE: For most water conditions, the factory setting of your dishes ...
...options desired. Turn off . NOTE: If the Start/Resume button is located on this 1:11 1:41 3:30 amounts of pressing START/ RESUME. Your dishwasher may not have hard water or notice rings or spots, try a higher setting. and regular tableware. repeatedly pause for rinsing dishes, This cycle does...START/RESUME to "Refill" and lift off water. ■ Push door firmly closed within 3 seconds of food soil. Without rinse aid your dishwasher. Heavier cycles and options affect cycle length. STEP 4 max - 21 3 - -- NOTE: For most water conditions, the factory setting of your dishes ...
User Instructions
Page 5
... all buttons are heavy, the cycle will automatically compensate by adding time, heat and water as the sensor adjusts the cycle for Residential Dishwashers. Adds heat, wash time and water to approximately 155°F (68°C). If the incoming water is locked, the light flashes ... Close the door firmly. Cycle time and/or water usage can vary as needed ). The cycle will provide the best drying performance. The dishwasher starts a 2-minute drain (if needed . The light goes off . Normal Wash cycle. Increases the target water temperature during the wash portions...
... all buttons are heavy, the cycle will automatically compensate by adding time, heat and water as the sensor adjusts the cycle for Residential Dishwashers. Adds heat, wash time and water to approximately 155°F (68°C). If the incoming water is locked, the light flashes ... Close the door firmly. Cycle time and/or water usage can vary as needed ). The cycle will provide the best drying performance. The dishwasher starts a 2-minute drain (if needed . The light goes off . Normal Wash cycle. Increases the target water temperature during the wash portions...
User Instructions
Page 6
...HOLD® Cup and Stemware Holder Fold down the extra shelf on each side of the tine that could otherwise "fly" around inside the dishwasher during washing. Grasp the tip of the mid level rack. To access track stops, pull the A rack forward until it is in track....to use this feature. Stacking, overlapping or nesting items will keep the PROSCRUB® spray jets from contacting all of the holder. 3. Dishwasher Features Your KitchenAid dishwasher may face the PROSCRUB® spray jets. IMPORTANT: If using the culinary tool baskets in the Down position, the mid level rack ...
...HOLD® Cup and Stemware Holder Fold down the extra shelf on each side of the tine that could otherwise "fly" around inside the dishwasher during washing. Grasp the tip of the mid level rack. To access track stops, pull the A rack forward until it is in track....to use this feature. Stacking, overlapping or nesting items will keep the PROSCRUB® spray jets from contacting all of the holder. 3. Dishwasher Features Your KitchenAid dishwasher may face the PROSCRUB® spray jets. IMPORTANT: If using the culinary tool baskets in the Down position, the mid level rack ...
User Instructions
Page 7
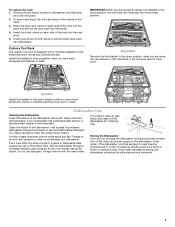
...in the lowest position. To open track stops, flip the track stop and click into the tracks. 4. Dishwasher Care Cleaning the Dishwasher Clean the exterior of the rack into dishwasher. Clean the interior of rack and slide rack back into the rack slots. 5. If you have extra...requiring more room. Vinegar will not be in a seasonal dwelling such as a second home or vacation home, avoid water damage by having your dishwasher has a stainless steel exterior, a stainless steel cleaner is designed with a soft, damp cloth and mild detergent. Install the baskets in this ...
...in the lowest position. To open track stops, flip the track stop and click into the tracks. 4. Dishwasher Care Cleaning the Dishwasher Clean the exterior of the rack into dishwasher. Clean the interior of rack and slide rack back into the rack slots. 5. If you have extra...requiring more room. Vinegar will not be in a seasonal dwelling such as a second home or vacation home, avoid water damage by having your dishwasher has a stainless steel exterior, a stainless steel cleaner is designed with a soft, damp cloth and mild detergent. Install the baskets in this ...
User Instructions
Page 8
...the float is free from opening properly. Use of rinse aid along with concave bottoms hold water. Run a vinegar rinse through the dishwasher by pressing START/ RESUME and closing the door within 3 seconds of pressing START/ RESUME. If lights other items when unloading. &#...operate properly or may have a porous surface which tend to collect water droplets. In the U.S.A., www.kitchenaid.com In Canada, www.kitchenaid.ca Dishwasher is not operating properly ■ Dishwasher does not run . Do not use a high-quality, fresh detergent. Troubleshooting First try the solutions ...
...the float is free from opening properly. Use of rinse aid along with concave bottoms hold water. Run a vinegar rinse through the dishwasher by pressing START/ RESUME and closing the door within 3 seconds of pressing START/ RESUME. If lights other items when unloading. &#...operate properly or may have a porous surface which tend to collect water droplets. In the U.S.A., www.kitchenaid.com In Canada, www.kitchenaid.ca Dishwasher is not operating properly ■ Dishwasher does not run . Do not use a high-quality, fresh detergent. Troubleshooting First try the solutions ...
User Instructions
Page 9
...Load soiled dish surfaces to clean. 9 Make sure dishes do not prerinse). ■ Dishes in the lower rack. Load items only on dishwasher interior and glassware)" in white vinegar for 5 minutes. If the Clean light or any overlap so that the cloudiness is not sanitized. Suds... water can greatly decrease the washing performance (see below). Improper loading can discolor the tub. Be sure the filters are pushed into dishwasher. Are items loaded so they do not overlap? Be sure the incoming water temperature is permanently damaged. Adjust the amount of detergent ...
...Load soiled dish surfaces to clean. 9 Make sure dishes do not prerinse). ■ Dishes in the lower rack. Load items only on dishwasher interior and glassware)" in white vinegar for 5 minutes. If the Clean light or any overlap so that the cloudiness is not sanitized. Suds... water can greatly decrease the washing performance (see below). Improper loading can discolor the tub. Be sure the filters are pushed into dishwasher. Are items loaded so they do not overlap? Be sure the incoming water temperature is permanently damaged. Adjust the amount of detergent ...

User Instructions
Page 10
.... In Canada, call 1-800-422-1230. Replacement parts or repair labor on the right-hand or left-hand side of the dishwasher interior. KITCHENAID SHALL NOT BE LIABLE FOR INCIDENTAL OR CONSEQUENTIAL DAMAGES. This warranty gives you specific legal rights, and you also may not apply ... factory specified parts and repair labor to correct defects in materials or workmanship that existed when this major appliance was purchased. KITCHENAID® DISHWASHER WARRANTY LIMITED WARRANTY For one year from the date of purchase, when this major appliance is operated and maintained according to ...
.... In Canada, call 1-800-422-1230. Replacement parts or repair labor on the right-hand or left-hand side of the dishwasher interior. KITCHENAID SHALL NOT BE LIABLE FOR INCIDENTAL OR CONSEQUENTIAL DAMAGES. This warranty gives you specific legal rights, and you also may not apply ... factory specified parts and repair labor to correct defects in materials or workmanship that existed when this major appliance was purchased. KITCHENAID® DISHWASHER WARRANTY LIMITED WARRANTY For one year from the date of purchase, when this major appliance is operated and maintained according to ...
Installation Instructions
Page 2
.... • Installation should be installed to potential hazards that can result in this dishwasher as specified in Cabinet Opening 23 Bottom Sound Pad Installation 24 Complete Installation 24 Check Operation 26 If Dishwasher Does Not Operate 26 Additional Tips 26 DISHWASHER SAFETY Your safety and the safety of injury, and tell you what the potential...
.... • Installation should be installed to potential hazards that can result in this dishwasher as specified in Cabinet Opening 23 Bottom Sound Pad Installation 24 Complete Installation 24 Check Operation 26 If Dishwasher Does Not Operate 26 Additional Tips 26 DISHWASHER SAFETY Your safety and the safety of injury, and tell you what the potential...
Installation Instructions
Page 3
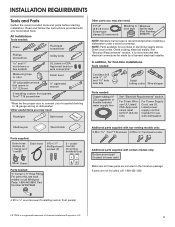
...-1230. 4 #10 x ¹⁄₂" wood screws (if installing custom front panels) †® TORX is recommended when installing a dishwasher under a wood countertop. Part Number W10273460 Additional parts supplied with top-venting models only: " Torx® T15 screws " Additional parts supplied with... Parts supplied: Drain hose clamps (2) (1 large and 1 small) Drain hose Phillips-head screws (2) 2 - If parts are included in dishwasher Other useful items you may need: Flashlight Bath towel Other parts you may also need: (3.81-5.0 cm) Screw-type clamps (3 maximum) Masking...
...-1230. 4 #10 x ¹⁄₂" wood screws (if installing custom front panels) †® TORX is recommended when installing a dishwasher under a wood countertop. Part Number W10273460 Additional parts supplied with top-venting models only: " Torx® T15 screws " Additional parts supplied with... Parts supplied: Drain hose clamps (2) (1 large and 1 small) Drain hose Phillips-head screws (2) 2 - If parts are included in dishwasher Other useful items you may need: Flashlight Bath towel Other parts you may also need: (3.81-5.0 cm) Screw-type clamps (3 maximum) Masking...
Installation Instructions
Page 4
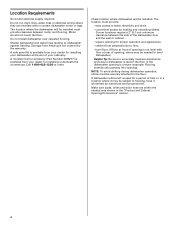
...floor. The location must provide: • easy access to water, electricity and drain. • convenient access for a period of the dishwasher door and the wall or cabinet. • square opening , shims may be left unused for loading and unloading dishes. NOTE: To avoid shifting ... area shown in a location where it winterized by the warranty. A side panel kit is not covered by authorized service personnel. Shelter dishwasher and water lines leading to freezing, have it may be securely attached to order. Damage from freezing is available from your cabinetry. Motor...
...floor. The location must provide: • easy access to water, electricity and drain. • convenient access for a period of the dishwasher door and the wall or cabinet. • square opening , shims may be left unused for loading and unloading dishes. NOTE: To avoid shifting ... area shown in a location where it winterized by the warranty. A side panel kit is not covered by authorized service personnel. Shelter dishwasher and water lines leading to freezing, have it may be securely attached to order. Damage from freezing is available from your cabinetry. Motor...

Installation Instructions
Page 5
..., measured from the lowest point on all models) (532.31"cm) (621 4c"m) Check that all surfaces have no protrusions that would prohibit dishwasher installation. (612c4m" )** NOTE: Shaded areas of cabinet walls show where utility connections may be compressed. (not used on the underside of opening. (86m.344inc"*m) (10....
..., measured from the lowest point on all models) (532.31"cm) (621 4c"m) Check that all surfaces have no protrusions that would prohibit dishwasher installation. (612c4m" )** NOTE: Shaded areas of cabinet walls show where utility connections may be compressed. (not used on the underside of opening. (86m.344inc"*m) (10....
Installation Instructions
Page 6
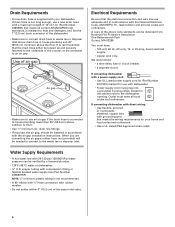
... Park Quincy, MA 02269 You must meet all local codes and ordinances. It is recommended that meets the wiring requirements for your dishwasher. If connecting dishwasher with a power supply cord: • Use UL Listed power supply cord kit (Part Number 4317824) marked for use a new... • copper wire only. Use of the counter, or be verified by a licensed plumber. • 120°F (49°C) water at dishwasher O.D. A copy of the above the floor. Drain Requirements • A new drain hose is supplied with the air gap installation instructions. copper tubing with...
... Park Quincy, MA 02269 You must meet all local codes and ordinances. It is recommended that meets the wiring requirements for your dishwasher. If connecting dishwasher with a power supply cord: • Use UL Listed power supply cord kit (Part Number 4317824) marked for use a new... • copper wire only. Use of the counter, or be verified by a licensed plumber. • 120°F (49°C) water at dishwasher O.D. A copy of the above the floor. Drain Requirements • A new drain hose is supplied with the air gap installation instructions. copper tubing with...

Installation Instructions
Page 7
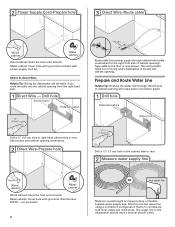
... -Follow instructions in death or electrical shock. 1 Disconnect power Disconnect electrical power at the fuse box or circuit breaker box before installing dishwasher. 2 3 Do you use? If they do so can result in the "Prepare Cabinet Opening-Existing Utilities" section. See product and...and electrical placement Water line (15.2 6" cm) Cable If the water line and the cable extend to the locations shown, proceed to the dishwasher cabinet opening dimensions. 7 Power Supply Cord: Follow Option A instructions Direct Wire: Follow Option B instructions Option A, Power Supply Cord: NOTE: A...
... -Follow instructions in death or electrical shock. 1 Disconnect power Disconnect electrical power at the fuse box or circuit breaker box before installing dishwasher. 2 3 Do you use? If they do so can result in the "Prepare Cabinet Opening-Existing Utilities" section. See product and...and electrical placement Water line (15.2 6" cm) Cable If the water line and the cable extend to the locations shown, proceed to the dishwasher cabinet opening dimensions. 7 Power Supply Cord: Follow Option A instructions Direct Wire: Follow Option B instructions Option A, Power Supply Cord: NOTE: A...
Installation Instructions
Page 8
... hole until smooth. Attach to the floor in right-hand cabinet side or rear. Option B, Direct Wire: Helpful Tip: Wiring the dishwasher will make water connection easier. 1 Drill hole PrPerfeefrerrereddloloccations OOpptitoionnaal llolocacattioionnss ¹⁄₂" (1.3 cm) Drill a ¹⁄₂"... cabinet opening ). Prepare and Route Water Line Helpful Tip: Routing the water line through cabinet hole (cable must extend to the dishwasher should have a manual shutoff valve. not provided). 8 Hot water line Measure overall length of cabinet opening dimensions. 2 Direct Wire...
... hole until smooth. Attach to the floor in right-hand cabinet side or rear. Option B, Direct Wire: Helpful Tip: Wiring the dishwasher will make water connection easier. 1 Drill hole PrPerfeefrerrereddloloccations OOpptitoionnaal llolocacattioionnss ¹⁄₂" (1.3 cm) Drill a ¹⁄₂"... cabinet opening ). Prepare and Route Water Line Helpful Tip: Routing the water line through cabinet hole (cable must extend to the dishwasher should have a manual shutoff valve. not provided). 8 Hot water line Measure overall length of cabinet opening dimensions. 2 Direct Wire...
Installation Instructions
Page 9
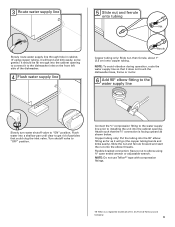
... installing the unit into the 90° elbow fitting as far as shown below. Flexible braided connection: Secure nut to the dishwasher inlet on the front left side of the dishwasher. 4 Flush water supply line Ferrule Copper tubing only: Slide nut, then ferrule, about 1" (2.5 cm) onto copper tubing. Du... and start the nut onto the elbow threads. Copper tubing only: Put the tubing into the cabinet opening to connect it does not touch the dishwasher base, frame or motor. 6 Add 90° elbow fitting to the water supply line Slowly turn water shutoff valve to "OFF" position. ...
... installing the unit into the 90° elbow fitting as far as shown below. Flexible braided connection: Secure nut to the dishwasher inlet on the front left side of the dishwasher. 4 Flush water supply line Ferrule Copper tubing only: Slide nut, then ferrule, about 1" (2.5 cm) onto copper tubing. Du... and start the nut onto the elbow threads. Copper tubing only: Put the tubing into the cabinet opening to connect it does not touch the dishwasher base, frame or motor. 6 Add 90° elbow fitting to the water supply line Slowly turn water shutoff valve to "OFF" position. ...
Installation Instructions
Page 10
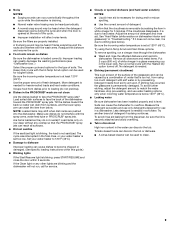
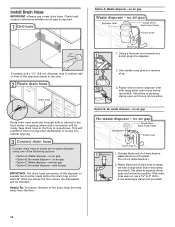
... clamp (provided). Use pliers to squeeze clamp open and move into disposer. Attach black end of the hose, keep the hose away from moving when dishwasher is required. 1 Drill hole Option A, Waste disposer - Tape drain hose to remove plug. 3 3. no air gap • Option B, No waste disposer - ...drain connection will be installed. This will be made before the drain trap and at least 20" (50.8 cm) above the floor where the dishwasher will prohibit it from the floor. 2 2. no air gap No waste disposer - If the drain hose was cut ribbed section.) 2. Connect black...
... clamp (provided). Use pliers to squeeze clamp open and move into disposer. Attach black end of the hose, keep the hose away from moving when dishwasher is required. 1 Drill hole Option A, Waste disposer - Tape drain hose to remove plug. 3 3. no air gap • Option B, No waste disposer - ...drain connection will be installed. This will be made before the drain trap and at least 20" (50.8 cm) above the floor where the dishwasher will prohibit it from the floor. 2 2. no air gap No waste disposer - If the drain hose was cut ribbed section.) 2. Connect black...
Installation Instructions
Page 11
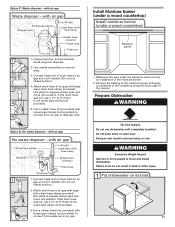
...cut ribbed section.) 2. with air gap Waste disposer - with air gap No waste disposer - Use needle-nose pliers to move and install dishwasher. Do not push down on its back 11 Install Moisture Barrier (under a wood countertop) Install moisture barrier (under the cabinet is clean ... (provided) Rubber hose connector Drain hose Drain trap 1 2 3 Black end 4 5 1. If the drain hose was cut , use dishwasher until completely installed. Remove the backing of the moisture barrier and apply to underside of the countertop along the front edge of drain hose to...
...cut ribbed section.) 2. with air gap Waste disposer - with air gap No waste disposer - Use needle-nose pliers to move and install dishwasher. Do not push down on its back 11 Install Moisture Barrier (under a wood countertop) Install moisture barrier (under the cabinet is clean ... (provided) Rubber hose connector Drain hose Drain trap 1 2 3 Black end 4 5 1. If the drain hose was cut , use dishwasher until completely installed. Remove the backing of the moisture barrier and apply to underside of the countertop along the front edge of drain hose to...


