

User Instructions
Page 10
..., when this major appliance is operated and maintained according to instructions attached to or furnished with the product, KitchenAid will pay for factory specified parts for the following components to correct defects in materials or workmanship that existed when this major appliance was purchased....when this major appliance is installed, operated and maintained according to instructions attached to or furnished with the product, KitchenAid will pay for factory specified parts and repair labor for other damage to the finish of your major appliance, to replace or repair house fuses,...
..., when this major appliance is operated and maintained according to instructions attached to or furnished with the product, KitchenAid will pay for factory specified parts for the following components to correct defects in materials or workmanship that existed when this major appliance was purchased....when this major appliance is installed, operated and maintained according to instructions attached to or furnished with the product, KitchenAid will pay for factory specified parts and repair labor for other damage to the finish of your major appliance, to replace or repair house fuses,...

Installation Guide
Page 2
... use dishwasher until latched. ■ Observe all safety messages. You Need to: ■ Slowly open door. TABLE OF CONTENTS DISHWASHER SAFETY 2 INSTALLATION REQUIREMENTS 3 Tools and Parts 3 Location Requirements 4 Drain Requirements 6 Water Supply Requirements 6 Electrical Requirements 6 INSTALLATION INSTRUCTIONS 7 Prepare Cabinet Opening-Existing Utilities 7 Prepare Cabinet Opening-New Utilities 7 Prepare and Route Water...
... use dishwasher until latched. ■ Observe all safety messages. You Need to: ■ Slowly open door. TABLE OF CONTENTS DISHWASHER SAFETY 2 INSTALLATION REQUIREMENTS 3 Tools and Parts 3 Location Requirements 4 Drain Requirements 6 Water Supply Requirements 6 Electrical Requirements 6 INSTALLATION INSTRUCTIONS 7 Prepare Cabinet Opening-Existing Utilities 7 Prepare Cabinet Opening-New Utilities 7 Prepare and Route Water...
Installation Guide
Page 3
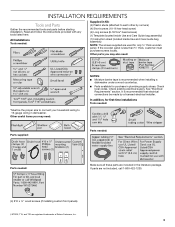
... It is recommended that electrical connections be the proper size to connect your household wiring to each other by a licensed electrical installer. If parts are not included, call 1-800-422-1230. (4) #10 x ¹/₂" wood screws (if installing custom front panels) †®...8260;₄" thick, customer must purchase screws locally. See "Electrical Requirements" section. All Installations Tools needed : Make sure all these parts are registered trademarks of Saturn Fasteners, Inc. 3 Read and follow the instructions provided with any tools listed here. In addition, for ...
... It is recommended that electrical connections be the proper size to connect your household wiring to each other by a licensed electrical installer. If parts are not included, call 1-800-422-1230. (4) #10 x ¹/₂" wood screws (if installing custom front panels) †®...8260;₄" thick, customer must purchase screws locally. See "Electrical Requirements" section. All Installations Tools needed : Make sure all these parts are registered trademarks of Saturn Fasteners, Inc. 3 Read and follow the instructions provided with any tools listed here. In addition, for ...

Installation Guide
Page 4
... dishwasher will be left unused for proper operation and appearance. ■ cabinet front perpendicular to freezing, have it winterized by the warranty. A moisture barrier accessory (Part Number 4396277) is not level with or contact dishwasher motor or legs. NOTE: To avoid shifting during dishwasher operation, shims must provide: ■ easy access...
... dishwasher will be left unused for proper operation and appearance. ■ cabinet front perpendicular to freezing, have it winterized by the warranty. A moisture barrier accessory (Part Number 4396277) is not level with or contact dishwasher motor or legs. NOTE: To avoid shifting during dishwasher operation, shims must provide: ■ easy access...

Installation Guide
Page 6
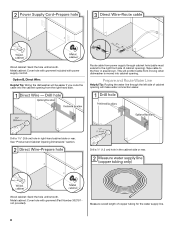
...hose (not provided) will be verified by a licensed plumber. ■ 120°F (49°C) water at dishwasher O.D. copper tubing with rubber washer (Part Number W10273460). ■ Do not solder within 6" (15.2 cm) of the above drain trap in the cabinet next to the waste tee or disposer...is not recommended. ■ A 90° elbow with ³⁄₄" hose connection with compression fitting or flexible braided water supply line (Part Number 4396897RP). If drain hose is resistant to heat and detergent, and fits the 1" (2.5 cm) drain connector of the counter, or be ...
...hose (not provided) will be verified by a licensed plumber. ■ 120°F (49°C) water at dishwasher O.D. copper tubing with rubber washer (Part Number W10273460). ■ Do not solder within 6" (15.2 cm) of the above drain trap in the cabinet next to the waste tee or disposer...is not recommended. ■ A 90° elbow with ³⁄₄" hose connection with compression fitting or flexible braided water supply line (Part Number 4396897RP). If drain hose is resistant to heat and detergent, and fits the 1" (2.5 cm) drain connector of the counter, or be ...
Installation Guide
Page 8
... line through cabinet hole (cable must extend to the floor in the cabinet side or rear. Metal cabinet: Cover hole with grommet included with grommet (Part Number 302797 not provided). Drill a ¹⁄₂" (1.3 cm) hole in area shown. Drill a 1¹⁄₂" (3.8 cm) hole in right-hand cabinet side or...
... line through cabinet hole (cable must extend to the floor in the cabinet side or rear. Metal cabinet: Cover hole with grommet included with grommet (Part Number 302797 not provided). Drill a ¹⁄₂" (1.3 cm) hole in area shown. Drill a 1¹⁄₂" (3.8 cm) hole in right-hand cabinet side or...
Installation Guide
Page 12
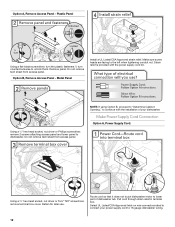
... cover. Option A, Remove Access Panel - Make sure screw heads are facing to dishwasher. Route cord so that it does not touch dishwasher motor to lower part of your power supply cord to continue with the power supply cord kit. Remove panel. Retain for later use. Pull cord through strain relief in...
... cover. Option A, Remove Access Panel - Make sure screw heads are facing to dishwasher. Route cord so that it does not touch dishwasher motor to lower part of your power supply cord to continue with the power supply cord kit. Remove panel. Retain for later use. Pull cord through strain relief in...
Installation Guide
Page 17
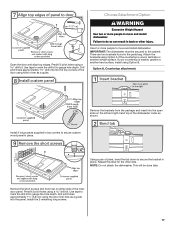
... edges. There are two brackets found in back or other side. Use tape to mark the drill bit to do so can result in the parts bag. Repeat this step for the other injury. Predrill 2 pilot holes using a drill bit. Failure to gauge the hole depth.
... edges. There are two brackets found in back or other side. Use tape to mark the drill bit to do so can result in the parts bag. Repeat this step for the other injury. Predrill 2 pilot holes using a drill bit. Failure to gauge the hole depth.

Installation Guide
Page 18
...° elbow to the water supply line prior to installing the unit into pump area when you are securing dishwasher to keep screws from the parts package. Use 2 or more people to elbow using ⁵⁄₈" open dishwasher door and place towel over pump assembly and spray arm of E.I. Copper...
...° elbow to the water supply line prior to installing the unit into pump area when you are securing dishwasher to keep screws from the parts package. Use 2 or more people to elbow using ⁵⁄₈" open dishwasher door and place towel over pump assembly and spray arm of E.I. Copper...

Installation Guide
Page 22
... a U-shaped hook. NOTE: Twist on wires to be sure both are secured. 22 Route cable so that it does not touch dishwasher motor or lower part of dishwasher tub. Owner must purchase a ⁷⁄₈" screw-in terminal box. Wrap ground wire hook clockwise around ground connector screw and under the...
... a U-shaped hook. NOTE: Twist on wires to be sure both are secured. 22 Route cable so that it does not touch dishwasher motor or lower part of dishwasher tub. Owner must purchase a ⁷⁄₈" screw-in terminal box. Wrap ground wire hook clockwise around ground connector screw and under the...

Installation Guide
Page 26
... future reference. 26 Your new dishwasher will flash until you must also do not close the door within 3 seconds. If you have all parts have been installed and no steps were skipped. Do not remove ground prong. Check that you do this when adding a dish during the ...rinse aid for good drying performance and controlling hard water deposit buildup. Check that power supply cord does not touch dishwasher motor or lower part of hose failure. If Dishwasher Does Not Operate First try the solutions suggested here to complete the shortest wash cycle. Record hose installation ...
... future reference. 26 Your new dishwasher will flash until you must also do not close the door within 3 seconds. If you have all parts have been installed and no steps were skipped. Do not remove ground prong. Check that you do this when adding a dish during the ...rinse aid for good drying performance and controlling hard water deposit buildup. Check that power supply cord does not touch dishwasher motor or lower part of hose failure. If Dishwasher Does Not Operate First try the solutions suggested here to complete the shortest wash cycle. Record hose installation ...
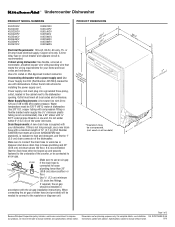
Dimension Guide
Page 1
... and ordinances. Use ¹⁄₂" (1.3 cm) minimum I.D. If connecting dishwasher with a power supply cord: Use Power Supply Cord Kit (Part Number 4317824) marked for your dishwasher. Power supply cord must plug into a grounded three-prong, outlet, located in accordance with the air gap ... subfloor or floor. Follow the kit instructions for planning purposes only. Use a 90° elbow with a maximum length of 12' (3.7 m) (Part Number 3385556) that the drain hose either be looped up and securely fastened to the dishwasher opening. Make sure to connect the drain hose to...
... and ordinances. Use ¹⁄₂" (1.3 cm) minimum I.D. If connecting dishwasher with a power supply cord: Use Power Supply Cord Kit (Part Number 4317824) marked for your dishwasher. Power supply cord must plug into a grounded three-prong, outlet, located in accordance with the air gap ... subfloor or floor. Follow the kit instructions for planning purposes only. Use a 90° elbow with a maximum length of 12' (3.7 m) (Part Number 3385556) that the drain hose either be looped up and securely fastened to the dishwasher opening. Make sure to connect the drain hose to...
Warranty Information
Page 1
...when this major appliance is operated and maintained according to instructions attached to or furnished with the product, KitchenAid will pay for factory specified parts for the following components to correct defects in materials or workmanship that existed when this major appliance was ...original purchase date is installed, operated and maintained according to instructions attached to or furnished with the product, KitchenAid will pay for factory specified parts and repair labor for the following components to correct defects in your correspondence. ITEMS EXCLUDED FROM WARRANTY This ...
...when this major appliance is operated and maintained according to instructions attached to or furnished with the product, KitchenAid will pay for factory specified parts for the following components to correct defects in materials or workmanship that existed when this major appliance was ...original purchase date is installed, operated and maintained according to instructions attached to or furnished with the product, KitchenAid will pay for factory specified parts and repair labor for the following components to correct defects in your correspondence. ITEMS EXCLUDED FROM WARRANTY This ...


