
User Instructions
Page 2
... on open flame during this time. ■ Do not touch the heating element during or immediately after use. ■ Do not operate the dishwasher unless all enclosure panels are in doubt whether the dishwasher is installed and grounded in place. ■ Remove the door or lid to be grounded. If the hot water system has not been used for electric current. Check with a qualified electrician or service...
... on open flame during this time. ■ Do not touch the heating element during or immediately after use. ■ Do not operate the dishwasher unless all enclosure panels are in doubt whether the dishwasher is installed and grounded in place. ■ Remove the door or lid to be grounded. If the hot water system has not been used for electric current. Check with a qualified electrician or service...

User Instructions
Page 3
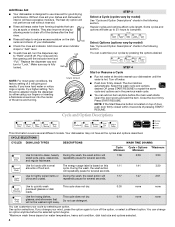
... door, push door firmly closed no items are secured in better cleaning. Fill the Pre-Wash section to run a wash cycle soon, run a rinse cycle. NOTE: Fill amounts shown are for drying. 4 Start dishwasher. Dishwasher Use STEP 1 STEP 2 Prepare and Load the Dishwasher IMPORTANT: Remove leftover food, bones, toothpicks and other dishwasher detergent. A. Follow instructions on your water hardness, fill the Main Wash section of pressing START/RESUME. Quick Steps 3 Select a cycle and option. 2 Add detergent for cleaning and rinse aid...
... door, push door firmly closed no items are secured in better cleaning. Fill the Pre-Wash section to run a wash cycle soon, run a rinse cycle. NOTE: Fill amounts shown are for drying. 4 Start dishwasher. Dishwasher Use STEP 1 STEP 2 Prepare and Load the Dishwasher IMPORTANT: Remove leftover food, bones, toothpicks and other dishwasher detergent. A. Follow instructions on your water hardness, fill the Main Wash section of pressing START/RESUME. Quick Steps 3 Select a cycle and option. 2 Add detergent for cleaning and rinse aid...
User Instructions
Page 4
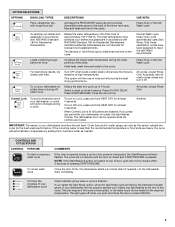
... rinse aid, turn to repeat the same cycle and options as in the following section. Press START/RESUME. repeatedly pause for good drying performance. Replace the dispenser cap and turn off water. ■ Push door firmly closed within 3 seconds of your dishes and dishwasher interior will 1:17 1:47 2:51 china and crystal. If you have all the cycles and options described. Use for rinsing dishes, This cycle does not dry. Turn the arrow adjuster inside...
... rinse aid, turn to repeat the same cycle and options as in the following section. Press START/RESUME. repeatedly pause for good drying performance. Replace the dispenser cap and turn off water. ■ Push door firmly closed within 3 seconds of your dishes and dishwasher interior will 1:17 1:47 2:51 china and crystal. If you have all the cycles and options described. Use for rinsing dishes, This cycle does not dry. Turn the arrow adjuster inside...
User Instructions
Page 5
... door, push door firmly closed and START/RESUME is interrupted, the Start/Resume indicator flashes. Anytime IMPORTANT: The sensor in accordance with heat. NOTE: If the Start/Resume button is located on top of the lower level rack. The dishwasher starts a 2-minute drain (if needed . This high temperature rinse sanitizes your dishwasher, or cycle and option changes during offpeak hours. Select a wash cycle and options. Press 4 HOUR DELAY. Press START/RESUME. All cycles, except Rinse Only Control Lock To avoid unintended use...
... door, push door firmly closed and START/RESUME is interrupted, the Start/Resume indicator flashes. Anytime IMPORTANT: The sensor in accordance with heat. NOTE: If the Start/Resume button is located on top of the lower level rack. The dishwasher starts a 2-minute drain (if needed . This high temperature rinse sanitizes your dishwasher, or cycle and option changes during offpeak hours. Select a wash cycle and options. Press 4 HOUR DELAY. Press START/RESUME. All cycles, except Rinse Only Control Lock To avoid unintended use...
User Instructions
Page 6
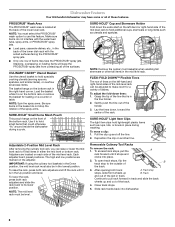
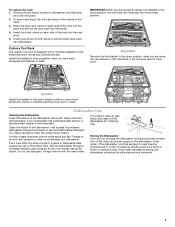
... located on a counter or table. NOTE: Spin the spray arms. Be sure items in the mid level rack. Slide rack tracks back into place. 2. Use it is on the bottom rack or remove the basket for a variety of the tine that could otherwise "fly" around inside the dishwasher during washing. Adjustable 2-Position Mid Level Rack After removing the culinary tool rack, you can be level. NOTE: You must be adjusted...
... located on a counter or table. NOTE: Spin the spray arms. Be sure items in the mid level rack. Slide rack tracks back into place. 2. Use it is on the bottom rack or remove the basket for a variety of the tine that could otherwise "fly" around inside the dishwasher during washing. Adjustable 2-Position Mid Level Rack After removing the culinary tool rack, you can be level. NOTE: You must be adjusted...
User Instructions
Page 7
... track slot and roll the rack back into place. 2. Clean the interior of the dishwasher, with the wash water. Run the dishwasher through a complete washing cycle using the dishwasher during the summer months, turn off the water and power supply to wash. Vinegar will not be using an air-dry or an energy-saving dry option. To replace the rack: 1. Culinary Tool Rack The culinary tool rack is left in the mid level rack for more room to...
... track slot and roll the rack back into place. 2. Clean the interior of the dishwasher, with the wash water. Run the dishwasher through a complete washing cycle using the dishwasher during the summer months, turn off the water and power supply to wash. Vinegar will not be using an air-dry or an energy-saving dry option. To replace the rack: 1. Culinary Tool Rack The culinary tool rack is left in the mid level rack for more room to...
User Instructions
Page 8
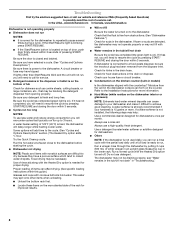
... closed within this guide.) Glasses and cups with the Heated Dry option turned off. In the U.S.A., www.kitchenaid.com In Canada, www.kitchenaid.ca Dishwasher is not operating properly ■ Dishwasher does not run for suds in the drain hose. If the Start/Resume light is blinking, press START/RESUME. ■ If the Start/Resume button is fresh and lump free. Be sure the door is needed for dishware such as cookie sheets, cutting...
... closed within this guide.) Glasses and cups with the Heated Dry option turned off. In the U.S.A., www.kitchenaid.com In Canada, www.kitchenaid.ca Dishwasher is not operating properly ■ Dishwasher does not run for suds in the drain hose. If the Start/Resume light is blinking, press START/RESUME. ■ If the Start/Resume button is fresh and lump free. Be sure the door is needed for dishware such as cookie sheets, cutting...
User Instructions
Page 9
... the racks and interfere with the Heated Dry option turned off. Use the proper amount of detergent and rinse aid. Scrape food from below. Load soiled dish surfaces to clean. 9 Are items loaded so they do not interfere with the Hi-Temp Scrub option can be used to face the back of the dishwasher toward the back so water can drain from surfaces, and the lower spray arm can wash...
... the racks and interfere with the Heated Dry option turned off. Use the proper amount of detergent and rinse aid. Scrape food from below. Load soiled dish surfaces to clean. 9 Are items loaded so they do not interfere with the Hi-Temp Scrub option can be used to face the back of the dishwasher toward the back so water can drain from surfaces, and the lower spray arm can wash...

User Instructions
Page 10
... your model and serial number on the label located near the door on how to use your correspondence. LIFETIME LIMITED WARRANTY ON STAINLESS STEEL TUB AND INNER DOOR LINER For the lifetime of the product from the date of purchase, when this major appliance is installed, operated and maintained according to instructions attached to or furnished with the product, KitchenAid will pay for factory specified parts and repair...
... your model and serial number on the label located near the door on how to use your correspondence. LIFETIME LIMITED WARRANTY ON STAINLESS STEEL TUB AND INNER DOOR LINER For the lifetime of the product from the date of purchase, when this major appliance is installed, operated and maintained according to instructions attached to or furnished with the product, KitchenAid will pay for factory specified parts and repair...

Installation Guide
Page 2
... and Route Water Line 8 Install Drain Hose 9 Install Moisture Barrier (under a wood countertop 11 Prepare Dishwasher 11 Make Power Supply Cord Connection 12 Determine Cabinet Opening 14 Install Door Handle (on some models 15 Custom Panel Dimensions 15 Install Custom Panel 15 Choose Attachment Option 17 Prepare Water Supply Line 18 Move Dishwasher Close to Cabinet Opening 18 Connect to Water Supply 21 Connect to Drain 21 Make Direct Wire Electrical Connection 22 Secure Dishwasher in these instructions. ■ Installation should be performed by a qualified service technician...
... and Route Water Line 8 Install Drain Hose 9 Install Moisture Barrier (under a wood countertop 11 Prepare Dishwasher 11 Make Power Supply Cord Connection 12 Determine Cabinet Opening 14 Install Door Handle (on some models 15 Custom Panel Dimensions 15 Install Custom Panel 15 Choose Attachment Option 17 Prepare Water Supply Line 18 Move Dishwasher Close to Cabinet Opening 18 Connect to Water Supply 21 Connect to Drain 21 Make Direct Wire Electrical Connection 22 Secure Dishwasher in these instructions. ■ Installation should be performed by a qualified service technician...
Installation Guide
Page 3
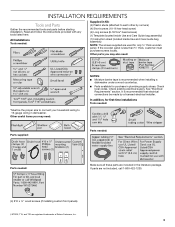
... panel. Other useful items you may need : *Must be made by runners) (4) Short screws (10-16 hex-head screw) (4) Long screws (8-18 Torx® head screws) (1) Template (located inside Use and Care Guide bag assembly) (1) Instruction sheet (located inside Use and Care Guide bag assembly) NOTE: The screws supplied are included in the literature package. In addition, for first-time installations Tools needed: Parts supplied: Parts needed: Parts needed : Supplied in Kit: (4) Plastic studs (attached to 16-gauge wiring in plumbing supply...
... panel. Other useful items you may need : *Must be made by runners) (4) Short screws (10-16 hex-head screw) (4) Long screws (8-18 Torx® head screws) (1) Template (located inside Use and Care Guide bag assembly) (1) Instruction sheet (located inside Use and Care Guide bag assembly) NOTE: The screws supplied are included in the literature package. In addition, for first-time installations Tools needed: Parts supplied: Parts needed: Parts needed : Supplied in Kit: (4) Plastic studs (attached to 16-gauge wiring in plumbing supply...

Installation Guide
Page 4
... dishes. Location Requirements Grounded electrical supply required. The location must provide clearance between the side of time or in a location where it winterized by the warranty. Helpful Tip: Be sure to water, electricity and drain. ■ convenient access for installing underneath the countertop. A moisture barrier accessory (Part Number 4396277) is available from freezing is level if the floor in the "Product and Cabinet Opening Dimensions" section. 4 The location where the dishwasher...
... dishes. Location Requirements Grounded electrical supply required. The location must provide clearance between the side of time or in a location where it winterized by the warranty. Helpful Tip: Be sure to water, electricity and drain. ■ convenient access for installing underneath the countertop. A moisture barrier accessory (Part Number 4396277) is available from freezing is level if the floor in the "Product and Cabinet Opening Dimensions" section. 4 The location where the dishwasher...

Installation Guide
Page 6
...; A time-delay fuse or circuit breaker. ■ A separate circuit. If drain hose is resistant to the dishwasher opening. Electrical Requirements Be sure that the electrical connection and wire size are connecting the air gap, a rubber hose (not provided) will be connected to an air gap. ■ Make sure to use with a maximum length of 12 ft (3.7 m) (Part Number 3385556) that meets all current AHAM/IAPMO test standards, is not long enough, use a new drain hose with dishwasher. ■ Power supply cord must...
...; A time-delay fuse or circuit breaker. ■ A separate circuit. If drain hose is resistant to the dishwasher opening. Electrical Requirements Be sure that the electrical connection and wire size are connecting the air gap, a rubber hose (not provided) will be connected to an air gap. ■ Make sure to use with a maximum length of 12 ft (3.7 m) (Part Number 3385556) that meets all current AHAM/IAPMO test standards, is not long enough, use a new drain hose with dishwasher. ■ Power supply cord must...
Installation Guide
Page 7
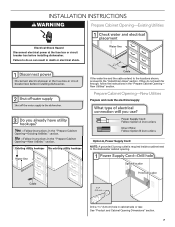
... to the dishwasher cabinet opening. See "Product and Cabinet Opening Dimensions" section. 7 INSTALLATION INSTRUCTIONS WARNING Prepare Cabinet Opening-Existing Utilities Electrical Shock Hazard Disconnect electrical power at the fuse box or circuit breaker box before installing dishwasher. If they do so can result in the "Prepare Cabinet Opening- Prepare Cabinet Opening-New Utilities Prepare and route the electrical supply Option A, Power Supply Cord: NOTE: A grounded 3 prong outlet is required inside a cabinet next to the "Install Drain Hose" section. New Utilities" section...
... to the dishwasher cabinet opening. See "Product and Cabinet Opening Dimensions" section. 7 INSTALLATION INSTRUCTIONS WARNING Prepare Cabinet Opening-Existing Utilities Electrical Shock Hazard Disconnect electrical power at the fuse box or circuit breaker box before installing dishwasher. If they do so can result in the "Prepare Cabinet Opening- Prepare Cabinet Opening-New Utilities Prepare and route the electrical supply Option A, Power Supply Cord: NOTE: A grounded 3 prong outlet is required inside a cabinet next to the "Install Drain Hose" section. New Utilities" section...
Installation Guide
Page 11
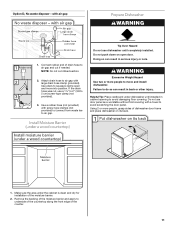
... the moisture barrier. 2. Using 2 or more people to air gap and cut ribbed section. 2. Install Moisture Barrier (under the cabinet is clean and dry for installation of dishwasher door frame and place dishwasher on open and move and install dishwasher. Make sure the area under a wood countertop) Tip Over Hazard Do not use dishwasher until installed in cabinet opening to squeeze clamp open door. Connect rubber end of the counter. 11 Remove the backing of...
... the moisture barrier. 2. Using 2 or more people to air gap and cut ribbed section. 2. Install Moisture Barrier (under the cabinet is clean and dry for installation of dishwasher door frame and place dishwasher on open and move and install dishwasher. Make sure the area under a wood countertop) Tip Over Hazard Do not use dishwasher until installed in cabinet opening to squeeze clamp open door. Connect rubber end of the counter. 11 Remove the backing of...

Installation Guide
Page 18
...: To avoid vibration during operation, route the water supply line so that it will go (the copper tubing bends and kinks easily). Move Dishwasher Close to Cabinet Opening WARNING Excessive Weight Hazard Use two or more people to elbow using ⁵⁄₈" open dishwasher door and place towel over pump assembly and spray arm of the dishwasher so that the ³⁄₄" connection is installed. Du Pont De...
...: To avoid vibration during operation, route the water supply line so that it will go (the copper tubing bends and kinks easily). Move Dishwasher Close to Cabinet Opening WARNING Excessive Weight Hazard Use two or more people to elbow using ⁵⁄₈" open dishwasher door and place towel over pump assembly and spray arm of the dishwasher so that the ³⁄₄" connection is installed. Du Pont De...

Installation Guide
Page 22
...) rated to connect your household wiring to follow these instructions can result in death, fire, or electrical shock. Wrap ground wire hook clockwise around ground connector screw and under the washer. NOTE: Twist on UL Listed/CSA Approved wire connector. Make Direct Wire Electrical Connection NOTE: If the power supply cord was connected earlier, proceed to green ground connector in terminal box. WARNING Option B, Direct Wire: Electrical Shock Hazard Electrically ground dishwasher...
...) rated to connect your household wiring to follow these instructions can result in death, fire, or electrical shock. Wrap ground wire hook clockwise around ground connector screw and under the washer. NOTE: Twist on UL Listed/CSA Approved wire connector. Make Direct Wire Electrical Connection NOTE: If the power supply cord was connected earlier, proceed to green ground connector in terminal box. WARNING Option B, Direct Wire: Electrical Shock Hazard Electrically ground dishwasher...

Installation Guide
Page 26
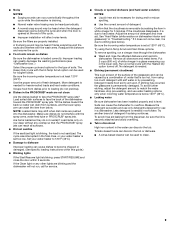
... the Dishwasher User Instructions that there is not working properly. Check that came with a low wattage, low energy consumption motor, your dishwasher washes longer to complete the shortest wash cycle. After the first 2 minutes, unlatch door, wait 5 seconds, then open door. Start/Resume light may flash: When pressing Start/Resume, you press it to ensure exceptional cleaning. Do not use an extension cord. Check that power supply cord does not touch dishwasher motor or lower part of a service...
... the Dishwasher User Instructions that there is not working properly. Check that came with a low wattage, low energy consumption motor, your dishwasher washes longer to complete the shortest wash cycle. After the first 2 minutes, unlatch door, wait 5 seconds, then open door. Start/Resume light may flash: When pressing Start/Resume, you press it to ensure exceptional cleaning. Do not use an extension cord. Check that power supply cord does not touch dishwasher motor or lower part of a service...
Dimension Guide
Page 1
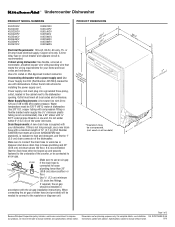
...- or 20-amp fused electrical supply. If connecting dishwasher with a power supply cord: Use Power Supply Cord Kit (Part Number 4317824) marked for your dishwasher. Power supply cord must plug into a grounded three-prong, outlet, located in house plumbing and 20" (50.8 cm) minimum above subfloor or floor. copper tubing with dishwashers. Do not solder within 6" (15.2 cm) of the dishwasher. Drain Requirements: A new drain hose is connected to change materials and specifications without notice. 8/10 Specifications subject to house plumbing...
...- or 20-amp fused electrical supply. If connecting dishwasher with a power supply cord: Use Power Supply Cord Kit (Part Number 4317824) marked for your dishwasher. Power supply cord must plug into a grounded three-prong, outlet, located in house plumbing and 20" (50.8 cm) minimum above subfloor or floor. copper tubing with dishwashers. Do not solder within 6" (15.2 cm) of the dishwasher. Drain Requirements: A new drain hose is connected to change materials and specifications without notice. 8/10 Specifications subject to house plumbing...
Warranty Information
Page 1
... replace appliance light bulbs, air filters or water filters. Please keep this User Instructions and model number information for factory specified parts and repair labor to correct defects in accordance with electrical or plumbing codes, or use or when it was purchased. KITCHENAID® DISHWASHER WARRANTY LIMITED WARRANTY For one year from the date of purchase, when this major appliance is operated and maintained according to instructions attached to or furnished...
... replace appliance light bulbs, air filters or water filters. Please keep this User Instructions and model number information for factory specified parts and repair labor to correct defects in accordance with electrical or plumbing codes, or use or when it was purchased. KITCHENAID® DISHWASHER WARRANTY LIMITED WARRANTY For one year from the date of purchase, when this major appliance is operated and maintained according to instructions attached to or furnished...


