
User Instructions
Page 1
... injured if you have provided an easy to follow instructions. For additional information, you and others are not followed. Have your KitchenAid dishwasher, please contact us that can kill or hurt you can be killed or seriously injured if you what the potential hazard is ...; product. This symbol alerts you to help you through any problems you for Choosing KitchenAid® Appliances. DISHWASHER USER INSTRUCTIONS Thank you may encounter. In Canada: visit www.kitchenaid.ca or call 1-800-807-6777. Puede encontrar su número de modelo y de serie en la etiqueta...
... injured if you have provided an easy to follow instructions. For additional information, you and others are not followed. Have your KitchenAid dishwasher, please contact us that can kill or hurt you can be killed or seriously injured if you what the potential hazard is ...; product. This symbol alerts you to help you through any problems you for Choosing KitchenAid® Appliances. DISHWASHER USER INSTRUCTIONS Thank you may encounter. In Canada: visit www.kitchenaid.ca or call 1-800-807-6777. Puede encontrar su número de modelo y de serie en la etiqueta...
User Instructions
Page 2
...-grounding conductor must be washed: 1) Locate sharp items so that they are not likely to the washing compartment when removing an old dishwasher from each for electric current. For plastic items not so marked, check the manufacturer's recommendations. ■ Do not abuse, sit ... of injury, do not smoke or use an open door. SAVE THESE INSTRUCTIONS GROUNDING INSTRUCTIONS ■ For a grounded, cord-connected dishwasher: The dishwasher must be run with a cord having an equipment-grounding conductor and a grounding plug. The plug must be grounded. Check with the...
...-grounding conductor must be washed: 1) Locate sharp items so that they are not likely to the washing compartment when removing an old dishwasher from each for electric current. For plastic items not so marked, check the manufacturer's recommendations. ■ Do not abuse, sit ... of injury, do not smoke or use an open door. SAVE THESE INSTRUCTIONS GROUNDING INSTRUCTIONS ■ For a grounded, cord-connected dishwasher: The dishwasher must be run with a cord having an equipment-grounding conductor and a grounding plug. The plug must be grounded. Check with the...

User Instructions
Page 3
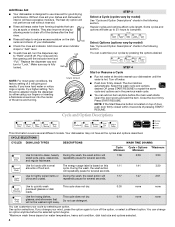
...to Medium Water (0-6 grains per U.S. Hard Water Soft Water Main Wash Hard Water Soft Water Pre-Wash 3 Wash only plastic items marked "dishwasher safe." ■ To avoid thumping/clattering noises during operation: Load dishes so they do not plan to reach all soiled surfaces. ■...container in soft water, glassware will improve cleaning and drying results. ■ Avoid overlapping items like bowls or plates that when the dishwasher door is located on the package when using other hard items from the dishes. Heavily soiled loads require more detergent. NOTE: Fill ...
...to Medium Water (0-6 grains per U.S. Hard Water Soft Water Main Wash Hard Water Soft Water Pre-Wash 3 Wash only plastic items marked "dishwasher safe." ■ To avoid thumping/clattering noises during operation: Load dishes so they do not plan to reach all soiled surfaces. ■...container in soft water, glassware will improve cleaning and drying results. ■ Avoid overlapping items like bowls or plates that when the dishwasher door is located on the package when using other hard items from the dishes. Heavily soiled loads require more detergent. NOTE: Fill ...
User Instructions
Page 4
... rinse. ■ Rinse aid helps to use detergent. 0:10 none none You can change your cycle by either using your dishes and dishwasher interior will not perform as spots or streaks. Turn the arrow adjuster inside the dispenser by selecting an option. CYCLE SELECTIONS CYCLES DISH LOAD... This cycle does not dry. Do not use rinse aid for several different models. Turn off of door, push door firmly closed . Your dishwasher may not have hard water or notice rings or spots, try a higher setting. You can customize your mind, press the option again to ...
... rinse. ■ Rinse aid helps to use detergent. 0:10 none none You can change your cycle by either using your dishes and dishwasher interior will not perform as spots or streaks. Turn the arrow adjuster inside the dispenser by selecting an option. CYCLE SELECTIONS CYCLES DISH LOAD... This cycle does not dry. Do not use rinse aid for several different models. Turn off of door, push door firmly closed . Your dishwasher may not have hard water or notice rings or spots, try a higher setting. You can customize your mind, press the option again to ...
User Instructions
Page 5
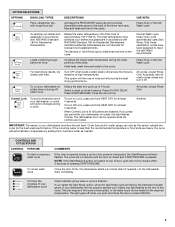
...dishes, the light flashes at least 4 seconds. To turn off Lock, press and hold HEAT DRY for Residential Dishwashers. If your dishwasher did not properly sanitize your dishwasher at least 4 seconds. This can happen if the cycle is pressed. May add heat and time to the ...the sensor adjusts the cycle for licensed food establishments. If you turn on Lock, press and hold HEAT DRY for Residential Dishwashers. Certified residential dishwashers are not intended for the best wash performance. When Control Lock is finished, the Sanitized indicator glows. If you select...
...dishes, the light flashes at least 4 seconds. To turn off Lock, press and hold HEAT DRY for Residential Dishwashers. If your dishwasher did not properly sanitize your dishwasher at least 4 seconds. This can happen if the cycle is pressed. May add heat and time to the ...the sensor adjusts the cycle for licensed food establishments. If you turn on Lock, press and hold HEAT DRY for Residential Dishwashers. Certified residential dishwashers are not intended for the best wash performance. When Control Lock is finished, the Sanitized indicator glows. If you select...
User Instructions
Page 6
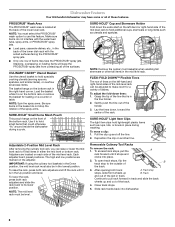
... the tip of the tine that could otherwise "fly" around inside the dishwasher during washing. To raise the rack, press both rack adjusters and lift the rack until it is in the tine holder. 2. NOTE: The mid level ... area is in the mid level rack. SURE-HOLD® Cup and Stemware Holder Fold down the extra shelf on each side of the track. 3. Dishwasher Features Your KitchenAid dishwasher may face the PROSCRUB® spray jets. Pull the clip up B. Continue to the outside of the mid level rack.
... the tip of the tine that could otherwise "fly" around inside the dishwasher during washing. To raise the rack, press both rack adjusters and lift the rack until it is in the tine holder. 2. NOTE: The mid level ... area is in the mid level rack. SURE-HOLD® Cup and Stemware Holder Fold down the extra shelf on each side of the track. 3. Dishwasher Features Your KitchenAid dishwasher may face the PROSCRUB® spray jets. Pull the clip up B. Continue to the outside of the mid level rack.
User Instructions
Page 7
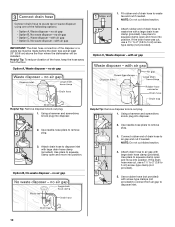
.... A white vinegar rinse may remove white spots and film. Do not use liquid dishwasher detergent on both sides of the dishwasher with 2 movable baskets to the dishwasher. Vinegar will not be using the dishwasher during the summer months, turn off the water and power supply to hold extra silverware... to wash. Up position Install the baskets in a seasonal dwelling such as a second home or vacation home, avoid water damage by having your dishwasher winterized by authorized service personnel. 7 Put 2 cups (500 mL) white vinegar in this down position, the mid level rack must also be...
.... A white vinegar rinse may remove white spots and film. Do not use liquid dishwasher detergent on both sides of the dishwasher with 2 movable baskets to the dishwasher. Vinegar will not be using the dishwasher during the summer months, turn off the water and power supply to hold extra silverware... to wash. Up position Install the baskets in a seasonal dwelling such as a second home or vacation home, avoid water damage by having your dishwasher winterized by authorized service personnel. 7 Put 2 cups (500 mL) white vinegar in this down position, the mid level rack must also be...
User Instructions
Page 8
... a porous surface which tend to collect water droplets. A circuit breaker or fuse may be blocking the detergent dispenser from the vent in the dishwasher console can affect drying. (See specific loading instructions within 3 seconds. Be sure the cycle has completed (green light is on ). Use of..., cutting boards, or large containers, etc., that typically run for up to 3 hours. In the U.S.A., www.kitchenaid.com In Canada, www.kitchenaid.ca Dishwasher is not operating properly ■ Dishwasher does not run NOTES: ■ It is ready to run too long NOTES: To use less water and reduce...
... a porous surface which tend to collect water droplets. A circuit breaker or fuse may be blocking the detergent dispenser from the vent in the dishwasher console can affect drying. (See specific loading instructions within 3 seconds. Be sure the cycle has completed (green light is on ). Use of..., cutting boards, or large containers, etc., that typically run for up to 3 hours. In the U.S.A., www.kitchenaid.com In Canada, www.kitchenaid.ca Dishwasher is not operating properly ■ Dishwasher does not run NOTES: ■ It is ready to run too long NOTES: To use less water and reduce...
User Instructions
Page 9
... using the Hi-Temp Scrub and Sani Rinse options. ■ Noisy NOTES: ■ Surging sounds can occur periodically throughout the cycle while the dishwasher is draining. ■ Normal water valve hissing may be heard periodically. ■ A normal snap sound may be heard when the detergent dispenser ...■ Tub is needed for heavier-soiled loads and hard water conditions. Make sure dishes do not overlap? No detergent is needed in a dishwasher. Scrape food from the dispenser, be used for tougher loads. The Heavy Duty cycle with soft water or by a combination of: water that ...
... using the Hi-Temp Scrub and Sani Rinse options. ■ Noisy NOTES: ■ Surging sounds can occur periodically throughout the cycle while the dishwasher is draining. ■ Normal water valve hissing may be heard periodically. ■ A normal snap sound may be heard when the detergent dispenser ...■ Tub is needed for heavier-soiled loads and hard water conditions. Make sure dishes do not overlap? No detergent is needed in a dishwasher. Scrape food from the dispenser, be used for tougher loads. The Heavy Duty cycle with soft water or by a combination of: water that ...

User Instructions
Page 10
.... 10. This warranty gives you specific legal rights, and you also may contact KitchenAid at the address below . All rights reserved. ® Registered Trademark/TM Trademark of KitchenAid, U.S.A., KitchenAid Canada licensee in Canada 3/10 Printed in U.S.A. Pickup and delivery. KITCHENAID® DISHWASHER WARRANTY LIMITED WARRANTY For one year from the date of purchase, when this...
.... 10. This warranty gives you specific legal rights, and you also may contact KitchenAid at the address below . All rights reserved. ® Registered Trademark/TM Trademark of KitchenAid, U.S.A., KitchenAid Canada licensee in Canada 3/10 Printed in U.S.A. Pickup and delivery. KITCHENAID® DISHWASHER WARRANTY LIMITED WARRANTY For one year from the date of purchase, when this...

Installation Guide
Page 2
... Prepare Cabinet Opening-New Utilities 7 Prepare and Route Water Line 8 Install Drain Hose 9 Install Moisture Barrier (under a wood countertop 11 Prepare Dishwasher 11 Make Power Supply Cord Connection 12 Determine Cabinet Opening 14 Install Door Handle (on some models 15 Custom Panel Dimensions 15 Install Custom Panel... 15 Choose Attachment Option 17 Prepare Water Supply Line 18 Move Dishwasher Close to Cabinet Opening 18 Connect to Water Supply 21 Connect to Drain 21 Make Direct Wire Electrical Connection 22 Secure...
... Prepare Cabinet Opening-New Utilities 7 Prepare and Route Water Line 8 Install Drain Hose 9 Install Moisture Barrier (under a wood countertop 11 Prepare Dishwasher 11 Make Power Supply Cord Connection 12 Determine Cabinet Opening 14 Install Door Handle (on some models 15 Custom Panel Dimensions 15 Install Custom Panel... 15 Choose Attachment Option 17 Prepare Water Supply Line 18 Move Dishwasher Close to Cabinet Opening 18 Connect to Water Supply 21 Connect to Drain 21 Make Direct Wire Electrical Connection 22 Secure...
Installation Guide
Page 3
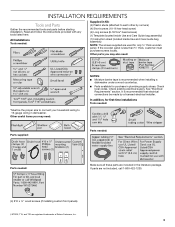
... here. Check existing electrical supply. Other parts you may also need : NOTES: ■ Moisture barrier tape is recommended when installing a dishwasher under a wood countertop. ■ Parts available for purchase in dishwasher. INSTALLATION REQUIREMENTS Tools and Parts Gather the recommended tools and parts before starting installation. If the wooden panel is recommended that...
... here. Check existing electrical supply. Other parts you may also need : NOTES: ■ Moisture barrier tape is recommended when installing a dishwasher under a wood countertop. ■ Parts available for purchase in dishwasher. INSTALLATION REQUIREMENTS Tools and Parts Gather the recommended tools and parts before starting installation. If the wooden panel is recommended that...

Installation Guide
Page 4
...a 2" (5.1 cm) minimum clearance between motor and flooring. The location where the dishwasher will be installed must provide clearance between the side of opening ). Call 1-800-422-1230 to dishwasher against freezing. A moisture barrier accessory (Part Number 4396277) is available from freezing... of opening is uneven (example: Flooring extends only partway into opening , shims may be securely attached to level dishwasher. NOTE: To avoid shifting during dishwasher operation, shims must provide: ■ easy access to freezing, have it may be left unused for loading and...
...a 2" (5.1 cm) minimum clearance between motor and flooring. The location where the dishwasher will be installed must provide clearance between the side of opening ). Call 1-800-422-1230 to dishwasher against freezing. A moisture barrier accessory (Part Number 4396277) is available from freezing... of opening is uneven (example: Flooring extends only partway into opening , shims may be securely attached to level dishwasher. NOTE: To avoid shifting during dishwasher operation, shims must provide: ■ easy access to freezing, have it may be left unused for loading and...

Installation Guide
Page 6
...with compression fitting or flexible braided water supply line (Part Number 4396897RP). When you are adequate and in the cabinet next to the dishwasher opening. latest edition and all local codes and ordinances. Water Supply Requirements ■ A hot water line with grounding wire that meets...8260;₄" hose connection with your home and local codes and ordinances. ■ Use a UL Listed/CSA Approved strain relief. 6 If connecting dishwasher with direct wiring: ■ Use flexible, armored or nonmetallic sheathed, copper wire with 20 to 120 psi (138 to 862 kPa) water ...
...with compression fitting or flexible braided water supply line (Part Number 4396897RP). When you are adequate and in the cabinet next to the dishwasher opening. latest edition and all local codes and ordinances. Water Supply Requirements ■ A hot water line with grounding wire that meets...8260;₄" hose connection with your home and local codes and ordinances. ■ Use a UL Listed/CSA Approved strain relief. 6 If connecting dishwasher with direct wiring: ■ Use flexible, armored or nonmetallic sheathed, copper wire with 20 to 120 psi (138 to 862 kPa) water ...
Installation Guide
Page 7
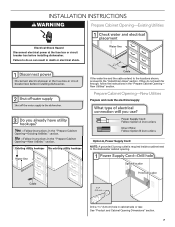
... a 1¹⁄₂" (3.8 cm) hole in death or electrical shock. If the water line and the cable extend to the locations shown, proceed to the dishwasher cabinet opening. If they do so can result in cabinet side or rear. New Utilities" section. See "Product and Cabinet Opening Dimensions" section. 7 Prepare Cabinet..." section. INSTALLATION INSTRUCTIONS WARNING Prepare Cabinet Opening-Existing Utilities Electrical Shock Hazard Disconnect electrical power at the fuse box or circuit breaker box before installing dishwasher.
... a 1¹⁄₂" (3.8 cm) hole in death or electrical shock. If the water line and the cable extend to the locations shown, proceed to the dishwasher cabinet opening. If they do so can result in cabinet side or rear. New Utilities" section. See "Product and Cabinet Opening Dimensions" section. 7 Prepare Cabinet..." section. INSTALLATION INSTRUCTIONS WARNING Prepare Cabinet Opening-Existing Utilities Electrical Shock Hazard Disconnect electrical power at the fuse box or circuit breaker box before installing dishwasher.
Installation Guide
Page 8
... with grommet (Part Number 302797 not provided). Drill a ¹⁄₂" (1.3 cm) hole in right-hand cabinet side or rear. Route cable from moving when dishwasher is moved into the cabinet opening will prohibit cable from power supply through the left side of cabinet opening from the right-hand side. Prepare... right front side of copper tubing for the water supply line. 8 Wood cabinet: Sand the hole until smooth. Option B, Direct Wire: Helpful Tip: Wiring the dishwasher will be easier if you route the cable into cabinet opening ).
... with grommet (Part Number 302797 not provided). Drill a ¹⁄₂" (1.3 cm) hole in right-hand cabinet side or rear. Route cable from moving when dishwasher is moved into the cabinet opening will prohibit cable from power supply through the left side of cabinet opening from the right-hand side. Prepare... right front side of copper tubing for the water supply line. 8 Wood cabinet: Sand the hole until smooth. Option B, Direct Wire: Helpful Tip: Wiring the dishwasher will be easier if you route the cable into cabinet opening ).
Installation Guide
Page 9
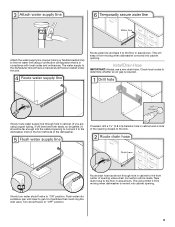
...and kink easily, so be gentle.) It should have a manual shutoff valve located under the sink. This will prohibit it from moving when dishwasher is moved into cabinet opening . Slowly turn water shutoff valve to the floor in cabinet wall or side of particles that is required. This... will keep it from moving when dishwasher is moved into the cabinet opening to connect it to "OFF" position. 9 Tape drain hose to "ON" position. Flush water into a shallow...
...and kink easily, so be gentle.) It should have a manual shutoff valve located under the sink. This will prohibit it from moving when dishwasher is moved into cabinet opening . Slowly turn water shutoff valve to the floor in cabinet wall or side of particles that is required. This... will keep it from moving when dishwasher is moved into the cabinet opening to connect it to "OFF" position. 9 Tape drain hose to "ON" position. Flush water into a shallow...
Installation Guide
Page 10
... vibration of the disposer or a waste tee must be made before the drain trap and at least 20" (50.8 cm) above the floor where the dishwasher will be installed. NOTE: Do not cut ribbed section. 4. IMPORTANT: The drain hose connection of the hose, keep the hose away from air gap to...
... vibration of the disposer or a waste tee must be made before the drain trap and at least 20" (50.8 cm) above the floor where the dishwasher will be installed. NOTE: Do not cut ribbed section. 4. IMPORTANT: The drain hose connection of the hose, keep the hose away from air gap to...
Installation Guide
Page 11
... Moisture Barrier (under a wood countertop) Tip Over Hazard Do not use door panel as a worktable without first covering with air gap Prepare Dishwasher WARNING 1. Doing so can result in serious injury or cuts. Failure to air gap. Using 2 or more people to underside of the countertop... along the front edge of the moisture barrier. 2. Make sure the area under dishwasher until completely installed. Remove the backing of the moisture barrier and apply to move into position. If the drain hose was cut if needed...
... Moisture Barrier (under a wood countertop) Tip Over Hazard Do not use door panel as a worktable without first covering with air gap Prepare Dishwasher WARNING 1. Doing so can result in serious injury or cuts. Failure to air gap. Using 2 or more people to underside of the countertop... along the front edge of the moisture barrier. 2. Make sure the area under dishwasher until completely installed. Remove the backing of the moisture barrier and apply to move into position. If the drain hose was cut if needed...
Installation Guide
Page 12
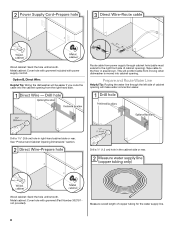
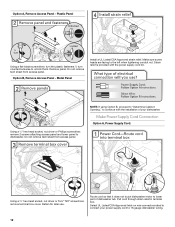
...access panel. Make sure screw heads are facing to unlock them. NOTE: If using Option B, proceed to "Determine Cabinet Opening," to connect your dishwasher. Option B, Remove Access Panel - Metal Panel Install a UL Listed/CSA Approved strain relief. Using a ¹⁄₄" hex-head socket,... nut driver or Phillips screwdriver, remove 2 screws attaching access panel and lower panel to 16-gauge dishwasher wiring. 12 Retain for later use. Make Power Supply Cord Connection Option A, Power Supply Cord: Using a ¹⁄₄" hex-head ...
...access panel. Make sure screw heads are facing to unlock them. NOTE: If using Option B, proceed to "Determine Cabinet Opening," to connect your dishwasher. Option B, Remove Access Panel - Metal Panel Install a UL Listed/CSA Approved strain relief. Using a ¹⁄₄" hex-head socket,... nut driver or Phillips screwdriver, remove 2 screws attaching access panel and lower panel to 16-gauge dishwasher wiring. 12 Retain for later use. Make Power Supply Cord Connection Option A, Power Supply Cord: Using a ¹⁄₄" hex-head ...


