
Dimension Guide
Page 1
... the dishwasher opening. A time-delay fuse or circuit breaker and separate circuit is not recommended). Use a UL Listed or CSA Approved conduit connector. external pipe threads on one end. drain line fittings. If required, the air gap should be connected to improve Dimensions are for installing the power supply cord. Copper wire only. Power supply cord must be needed to connect to waste tee or disposer inlet above drain trap in accordance with dishwashers. If connecting dishwasher with a power supply cord: Use Power Supply Cord Kit (Part Number 4317824...
... the dishwasher opening. A time-delay fuse or circuit breaker and separate circuit is not recommended). Use a UL Listed or CSA Approved conduit connector. external pipe threads on one end. drain line fittings. If required, the air gap should be connected to improve Dimensions are for installing the power supply cord. Copper wire only. Power supply cord must be needed to connect to waste tee or disposer inlet above drain trap in accordance with dishwashers. If connecting dishwasher with a power supply cord: Use Power Supply Cord Kit (Part Number 4317824...

Installation Guide
Page 2
... 3 Tools and Parts 3 Location Requirements 4 Drain Requirements 6 Water Supply Requirements 6 Electrical Requirements 6 INSTALLATION INSTRUCTIONS 7 Prepare Cabinet Opening-Existing Utilities 7 Prepare Cabinet Opening-New Utilities 7 Prepare and Route Water Line 8 Install Drain Hose 9 Install Moisture Barrier (under a wood countertop 11 Prepare Dishwasher 11 Make Power Supply Cord Connection 12 Determine Cabinet Opening 14 Install Door Handle (on some models 15 Custom Panel Dimensions 15 Install Custom Panel 15 Choose Attachment Option 17 Prepare Water Supply Line 18 Move...
... 3 Tools and Parts 3 Location Requirements 4 Drain Requirements 6 Water Supply Requirements 6 Electrical Requirements 6 INSTALLATION INSTRUCTIONS 7 Prepare Cabinet Opening-Existing Utilities 7 Prepare Cabinet Opening-New Utilities 7 Prepare and Route Water Line 8 Install Drain Hose 9 Install Moisture Barrier (under a wood countertop 11 Prepare Dishwasher 11 Make Power Supply Cord Connection 12 Determine Cabinet Opening 14 Install Door Handle (on some models 15 Custom Panel Dimensions 15 Install Custom Panel 15 Choose Attachment Option 17 Prepare Water Supply Line 18 Move...

Installation Guide
Page 4
... contact dishwasher motor or legs. Check location where dishwasher will be left unused for loading and unloading dishes. Helpful Tip: Be sure to dishwasher against freezing. Make sure pipes, wires and drain hose are within the shaded area shown in the dishwasher opening is level if the floor in the "Product and Cabinet Opening Dimensions" section. 4 Location Requirements Grounded electrical supply required. Shelter dishwasher and water lines leading to accurately measure dimensions and ensure dishwasher...
... contact dishwasher motor or legs. Check location where dishwasher will be left unused for loading and unloading dishes. Helpful Tip: Be sure to dishwasher against freezing. Make sure pipes, wires and drain hose are within the shaded area shown in the dishwasher opening is level if the floor in the "Product and Cabinet Opening Dimensions" section. 4 Location Requirements Grounded electrical supply required. Shelter dishwasher and water lines leading to accurately measure dimensions and ensure dishwasher...

Installation Guide
Page 6
...; elbow with ³⁄₄" hose connection with dishwasher. ■ Power supply cord must have: ■ 120-volt, 60 Hz, AC-only, 15- latest edition and all local codes and ordinances. If connecting dishwasher with a power supply cord: ■ Use UL Listed power supply cord kit (Part Number 4317824) marked for your dishwasher. or 20-amp, fused electrical supply. ■ Copper wire only. Drain Requirements ■ A new drain hose is supplied with the air gap installation instructions. We recommend: ■ A time-delay fuse or circuit breaker. ■...
...; elbow with ³⁄₄" hose connection with dishwasher. ■ Power supply cord must have: ■ 120-volt, 60 Hz, AC-only, 15- latest edition and all local codes and ordinances. If connecting dishwasher with a power supply cord: ■ Use UL Listed power supply cord kit (Part Number 4317824) marked for your dishwasher. or 20-amp, fused electrical supply. ■ Copper wire only. Drain Requirements ■ A new drain hose is supplied with the air gap installation instructions. We recommend: ■ A time-delay fuse or circuit breaker. ■...
Installation Guide
Page 7
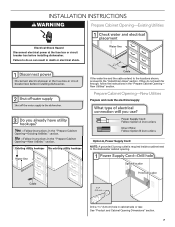
... dishwasher cabinet opening. Prepare Cabinet Opening-New Utilities Prepare and route the electrical supply Option A, Power Supply Cord: NOTE: A grounded 3 prong outlet is required inside a cabinet next to do not reach far enough, follow the instructions in the "Prepare Cabinet Opening- See "Product and Cabinet Opening Dimensions" section. 7 If they do so can result in cabinet side or rear. If the water line and the cable extend to the locations shown, proceed to the "Install Drain Hose...
... dishwasher cabinet opening. Prepare Cabinet Opening-New Utilities Prepare and route the electrical supply Option A, Power Supply Cord: NOTE: A grounded 3 prong outlet is required inside a cabinet next to do not reach far enough, follow the instructions in the "Prepare Cabinet Opening- See "Product and Cabinet Opening Dimensions" section. 7 If they do so can result in cabinet side or rear. If the water line and the cable extend to the locations shown, proceed to the "Install Drain Hose...

Installation Guide
Page 18
... tipping, open ended wrench or adjustable wrench. Option B, Dishwasher side attachment: NOTE: Remove the brackets from falling into pump area when you are securing dishwasher to cover the holes after dishwasher is installed. This will be done later. NOTE: To avoid vibration during operation, route the water supply line so that it does not touch the dishwasher base, frame or motor. Push the plastic buttons out of...
... tipping, open ended wrench or adjustable wrench. Option B, Dishwasher side attachment: NOTE: Remove the brackets from falling into pump area when you are securing dishwasher to cover the holes after dishwasher is installed. This will be done later. NOTE: To avoid vibration during operation, route the water supply line so that it does not touch the dishwasher base, frame or motor. Push the plastic buttons out of...

Installation Guide
Page 22
... tug on wires to follow these instructions can result in death, fire, or electrical shock. Make Direct Wire Electrical Connection NOTE: If the power supply cord was connected earlier, proceed to green ground connector in terminal box. Connect ground wire to "Secure Dishwasher in Cabinet Opening" section. Owner must purchase a ⁷⁄₈" screw-in terminal box. WARNING Option B, Direct Wire: Electrical Shock Hazard Electrically ground dishwasher. Do not use an extension cord. Route...
... tug on wires to follow these instructions can result in death, fire, or electrical shock. Make Direct Wire Electrical Connection NOTE: If the power supply cord was connected earlier, proceed to green ground connector in terminal box. Connect ground wire to "Secure Dishwasher in Cabinet Opening" section. Owner must purchase a ⁷⁄₈" screw-in terminal box. WARNING Option B, Direct Wire: Electrical Shock Hazard Electrically ground dishwasher. Do not use an extension cord. Route...

Installation Guide
Page 26
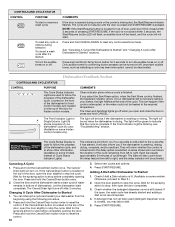
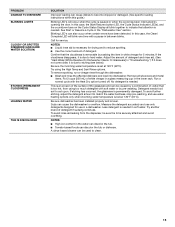
... work, please see "If Dishwasher Does Not Operate" section. Do not use an extension cord. Check that all parts have all tools used , replace inlet hose after 5 years to reduce the risk of a service call. ■ Has the circuit breaker tripped or the house fuse blown? ■ Is the door closed within 3 seconds, the Start/Resume light will flash until you do not close the door within 3 seconds. Record hose installation...
... work, please see "If Dishwasher Does Not Operate" section. Do not use an extension cord. Check that all parts have all tools used , replace inlet hose after 5 years to reduce the risk of a service call. ■ Has the circuit breaker tripped or the house fuse blown? ■ Is the door closed within 3 seconds, the Start/Resume light will flash until you do not close the door within 3 seconds. Record hose installation...
Warranty Information
Page 1
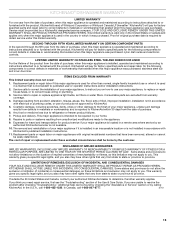
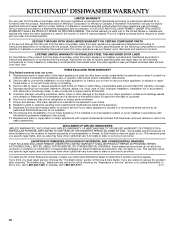
... installed in an inaccessible location or is not installed in accordance with the product, KitchenAid brand of Whirlpool Corporation or Whirlpool Canada LP (hereafter "KitchenAid") will pay for factory specified parts and repair labor for the following components to resolve the problem after checking "Troubleshooting," additional help can be provided by an authorized KitchenAid servicer is intended to repair or replace appliance light bulbs, air filters or water filters...
... installed in an inaccessible location or is not installed in accordance with the product, KitchenAid brand of Whirlpool Corporation or Whirlpool Canada LP (hereafter "KitchenAid") will pay for factory specified parts and repair labor for the following components to resolve the problem after checking "Troubleshooting," additional help can be provided by an authorized KitchenAid servicer is intended to repair or replace appliance light bulbs, air filters or water filters...
Use & Care Guide
Page 4
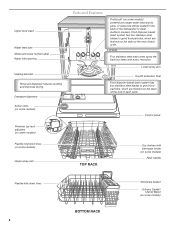
...; Utensil Baset (on some models) Control panel TOP RACK Cup shelves with every revolution. Four stainless steel wash arms spray the load four times with stemware holder (on some models) Rack handle Flexible fold-down tines (on some models) Upper spray arm Parts and Features ProScrub® (on some models) powerful jets target water toward pots, pans, or casserole dishes loaded in the back of each cycle. Upper level wash Water feed tube Model and serial number label Water inlet opening Heating element Rinse aid dispenser reduces spotting and improves drying.
...; Utensil Baset (on some models) Control panel TOP RACK Cup shelves with every revolution. Four stainless steel wash arms spray the load four times with stemware holder (on some models) Rack handle Flexible fold-down tines (on some models) Upper spray arm Parts and Features ProScrub® (on some models) powerful jets target water toward pots, pans, or casserole dishes loaded in the back of each cycle. Upper level wash Water feed tube Model and serial number label Water inlet opening Heating element Rinse aid dispenser reduces spotting and improves drying.
Use & Care Guide
Page 5
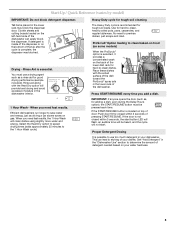
... cutting boards loaded on the back of the lower dish rack for hard-to the 1 Hour Wash cycle). Use for hard-to-clean dishes. ProScrub® Option loading to determine the amount of detergent needed based on the bottom of pressing START/RESUME. If the door is not closed within 3 seconds, the start . Rinse aid along USE RINSE AID FOR Full BETTER DRYING Lock with the soiled surface of the dish toward the ProScrub® spray...
... cutting boards loaded on the back of the lower dish rack for hard-to the 1 Hour Wash cycle). Use for hard-to-clean dishes. ProScrub® Option loading to determine the amount of detergent needed based on the bottom of pressing START/RESUME. If the door is not closed within 3 seconds, the start . Rinse aid along USE RINSE AID FOR Full BETTER DRYING Lock with the soiled surface of the dish toward the ProScrub® spray...
Use & Care Guide
Page 7
... to lock fill - -- 6 5 4 --- - - -- The Heat Dry option will flash. Add ■ Check the rinse aid indicator. NOTE: For most water conditions, the factory setting of 2 will be pressed each time. ■ If the Start/Resume button is hot. Turn the arrow adjuster inside the dispenser by model) See "Cycle and Option Descriptions" charts in the main compartment and close the lid. STEP 3 Select a Cycle (cycles vary by either using other dishwasher Main Wash Pre-Wash detergent types...
... to lock fill - -- 6 5 4 --- - - -- The Heat Dry option will flash. Add ■ Check the rinse aid indicator. NOTE: For most water conditions, the factory setting of 2 will be pressed each time. ■ If the Start/Resume button is hot. Turn the arrow adjuster inside the dispenser by model) See "Cycle and Option Descriptions" charts in the main compartment and close the lid. STEP 3 Select a Cycle (cycles vary by either using other dishwasher Main Wash Pre-Wash detergent types...

Use & Care Guide
Page 8
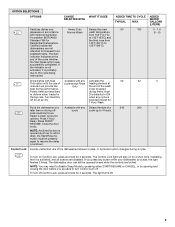
... Wash cycle). 62 6.4 (24.3) Use for loads from 105°F (41°C) containing tough, baked- SOIL LEVEL WASH TIME* (MINS.) W/O OPTIONS Typical** Max Light to improve Normal Wash wash temperature cleaning for rinsing dishes, glasses, and silverware that will All soil levels 10 not be washed right away. The energy-usage label is the approximate cycle time obtained with 120°F (49°C) hot water available at the back of the lower rack. 85...
... Wash cycle). 62 6.4 (24.3) Use for loads from 105°F (41°C) containing tough, baked- SOIL LEVEL WASH TIME* (MINS.) W/O OPTIONS Typical** Max Light to improve Normal Wash wash temperature cleaning for rinsing dishes, glasses, and silverware that will All soil levels 10 not be washed right away. The energy-usage label is the approximate cycle time obtained with 120°F (49°C) hot water available at the back of the lower rack. 85...
Use & Care Guide
Page 9
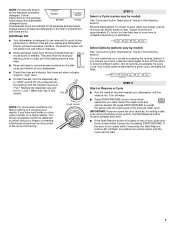
... electrical hours. Press 4 Hour Delay. Turn Heat Dry when any button while your dishwasher is off for an air dry. The light turns off . The Sani indicator indicates at rinse aid will stay on Control Lock, press and hold for the final rinse from 105°F (41°C) Foundation (NSF)/ANSI to turn on for 3 seconds. Available with heat. Press START/ RESUME. The Control Lock light will provide the Only the end of the cycle whether...
... electrical hours. Press 4 Hour Delay. Turn Heat Dry when any button while your dishwasher is off for an air dry. The light turns off . The Sani indicator indicates at rinse aid will stay on Control Lock, press and hold for the final rinse from 105°F (41°C) Foundation (NSF)/ANSI to turn on for 3 seconds. Available with heat. Press START/ RESUME. The Control Lock light will provide the Only the end of the cycle whether...
Use & Care Guide
Page 10
... hold CANCEL/DRAIN to stop before completely opening the door. Adding A Dish After Dishwasher Is Started 1. Wait for confirming button presses can happen if the cycle is washing, rinsing, drying, complete, and/or sanitized. Changing A Cycle After Dishwasher Is Started 1. CONTROLS AND CYCLE STATUS CONTROL PURPOSE To start . Select new cycles and options. 4. Only audible tones for the spraying action to reset any cycle or options during a cycle or the power is finished, the Sanitized indicator glows. The Cycle Status Display is used to...
... hold CANCEL/DRAIN to stop before completely opening the door. Adding A Dish After Dishwasher Is Started 1. Wait for confirming button presses can happen if the cycle is washing, rinsing, drying, complete, and/or sanitized. Changing A Cycle After Dishwasher Is Started 1. CONTROLS AND CYCLE STATUS CONTROL PURPOSE To start . Select new cycles and options. 4. Only audible tones for the spraying action to reset any cycle or options during a cycle or the power is finished, the Sanitized indicator glows. The Cycle Status Display is used to...

Use & Care Guide
Page 12
... a damp sponge and clean. NOTE: Run a normal cycle with a damp sponge. Cleaning the interior Hard water minerals can cause a white film to build up and off the tine. 2. OR See the vinegar rinse procedure in "Cloudy or Spotted Dishware (and Hard Water Solution)" in the bottom rack. To remove the rack To gain access to removing the top rack from dishwasher. Dishwasher Care In most cases, regular...
... a damp sponge and clean. NOTE: Run a normal cycle with a damp sponge. Cleaning the interior Hard water minerals can cause a white film to build up and off the tine. 2. OR See the vinegar rinse procedure in "Cloudy or Spotted Dishware (and Hard Water Solution)" in the bottom rack. To remove the rack To gain access to removing the top rack from dishwasher. Dishwasher Care In most cases, regular...
Use & Care Guide
Page 13
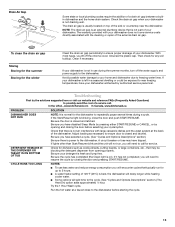
... lump free. Try the 1 Hour Wash cycle. Drain Air Gap Some state or local plumbing codes require the addition of 120°F (49°C) is blinking, close to the dishwasher. To clean the drain air gap Storing Storing for the summer Storing for any soil buildup. If your dishwasher does not cover service costs directly associated with large casserole dishes and the wash system at a faucet close the door and push START...
... lump free. Try the 1 Hour Wash cycle. Drain Air Gap Some state or local plumbing codes require the addition of 120°F (49°C) is blinking, close to the dishwasher. To clean the drain air gap Storing Storing for the summer Storing for any soil buildup. If your dishwasher does not cover service costs directly associated with large casserole dishes and the wash system at a faucet close the door and push START...
Use & Care Guide
Page 14
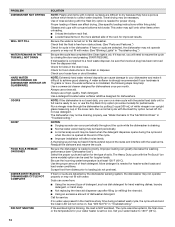
... soap. ■ Not replacing the rinse aid dispenser cap after filling (or refilling) the rinse aid. ■ Using an excessive amount of items can be heard when the detergent dispenser opens during a heated wash cycle, the cycle will end and the Clean LED will affect noise levels. Proper loading of dishwasher detergent. Be sure the water is free from dishes prior to the dishwasher. Check that the float is turned on some models) for kinks in the drain hose. If dishwasher is loaded...
... soap. ■ Not replacing the rinse aid dispenser cap after filling (or refilling) the rinse aid. ■ Using an excessive amount of items can be heard when the detergent dispenser opens during a heated wash cycle, the cycle will end and the Clean LED will affect noise levels. Proper loading of dishwasher detergent. Be sure the water is free from dishes prior to the dishwasher. Check that the float is turned on some models) for kinks in the drain hose. If dishwasher is loaded...
Use & Care Guide
Page 15
... of detergent. Run a normal cycle with a pause in soft water. Detergent needs food soil to etching (see below 120°F (49°C). PROBLEM DAMAGE TO DISHWARE BLINKING LIGHTS CLOUDY OR SPOTTED DISHWARE (AND HARD WATER SOLUTION) ETCHING (PERMANENT CLOUDINESS) LEAKING WATER TUB IS DISCOLORED SOLUTION Improper loading can cause dishes to become chipped or damaged. (See specific loading instructions within this guide.) Blinking LED's will blink one time with the Heat Dry option turned off. Blinking...
... of detergent. Run a normal cycle with a pause in soft water. Detergent needs food soil to etching (see below 120°F (49°C). PROBLEM DAMAGE TO DISHWARE BLINKING LIGHTS CLOUDY OR SPOTTED DISHWARE (AND HARD WATER SOLUTION) ETCHING (PERMANENT CLOUDINESS) LEAKING WATER TUB IS DISCOLORED SOLUTION Improper loading can cause dishes to become chipped or damaged. (See specific loading instructions within this guide.) Blinking LED's will blink one time with the Heat Dry option turned off. Blinking...
Use & Care Guide
Page 16
... replace appliance light bulbs, air filters or water filters. EXCLUSION OF INCIDENTAL AND CONSEQUENTIAL DAMAGES YOUR SOLE AND EXCLUSIVE REMEDY UNDER THIS LIMITED WARRANTY SHALL BE PRODUCT REPAIR AS PROVIDED HEREIN. Expenses for travel and transportation for product service if your major appliance is located in a manner that existed when this major appliance was purchased. This warranty gives you specific legal rights, and you . KITCHENAID...
... replace appliance light bulbs, air filters or water filters. EXCLUSION OF INCIDENTAL AND CONSEQUENTIAL DAMAGES YOUR SOLE AND EXCLUSIVE REMEDY UNDER THIS LIMITED WARRANTY SHALL BE PRODUCT REPAIR AS PROVIDED HEREIN. Expenses for travel and transportation for product service if your major appliance is located in a manner that existed when this major appliance was purchased. This warranty gives you specific legal rights, and you . KITCHENAID...


