
Installation Guide
Page 3
...Copp O.D. Additional parts supplied with top-venting models only: " Torx® T15 screws " 4 #10 x ¹⁄₂" wood screws (if installing custom front panels) †® TORX is recommended when installing a dishwasher under - 2 - It is less than ³⁄₄" thick,... customer must purchase screws locally. under a wood countertop. clamps (2) Phillips- For Direct Wire: use UL Listed/ CSA...
...Copp O.D. Additional parts supplied with top-venting models only: " Torx® T15 screws " 4 #10 x ¹⁄₂" wood screws (if installing custom front panels) †® TORX is recommended when installing a dishwasher under - 2 - It is less than ³⁄₄" thick,... customer must purchase screws locally. under a wood countertop. clamps (2) Phillips- For Direct Wire: use UL Listed/ CSA...

Installation Guide
Page 14
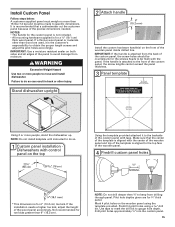
... a section in the insulation blanket can be securely attached to floor to avoid movement when the dishwasher is in use. Custom Panel Dimensions Custom panel dimensions-Dishwashers with Installation Instructions. Put wheels in the area shown to bring the dishwasher up to 34" (86.4 cm) below...cm) 14 Built-up floors: If the kitchen floor is higher than the cabinet opening's floor - Insert the short end of the wood panel accordingly. Place handle on mounting studs with the setscrews facing down. Dishwasher Height Adjustment Chart Minimum Wheel Number of turns Perforation cutout height ...
... a section in the insulation blanket can be securely attached to floor to avoid movement when the dishwasher is in use. Custom Panel Dimensions Custom panel dimensions-Dishwashers with Installation Instructions. Put wheels in the area shown to bring the dishwasher up to 34" (86.4 cm) below...cm) 14 Built-up floors: If the kitchen floor is higher than the cabinet opening's floor - Insert the short end of the wood panel accordingly. Place handle on mounting studs with the setscrews facing down. Dishwasher Height Adjustment Chart Minimum Wheel Number of turns Perforation cutout height ...
Installation Guide
Page 15
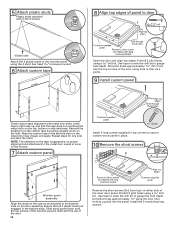
... the template provided attached it is attached to the front of the custom panel, the screw lengths cannot exceed the panel thickness. 3 Panel template Top Of Panel Tapa del panel Dessus de panneau WOOD PANEL TEMPLATE PLANTILLA DE MADERA DEL PANEL CALIBRE EN BOIS DE PANNEAU Centerline Línea central Axe central Pilot holes... Using 2 or more people to the backside of the custom panel with control panel on both sides and all edges of the wood panel accordingly. Use tape to mark the drill bit to do so can result in back or other than...
... the template provided attached it is attached to the front of the custom panel, the screw lengths cannot exceed the panel thickness. 3 Panel template Top Of Panel Tapa del panel Dessus de panneau WOOD PANEL TEMPLATE PLANTILLA DE MADERA DEL PANEL CALIBRE EN BOIS DE PANNEAU Centerline Línea central Axe central Pilot holes... Using 2 or more people to the backside of the custom panel with control panel on both sides and all edges of the wood panel accordingly. Use tape to mark the drill bit to do so can result in back or other than...
Installation Guide
Page 16
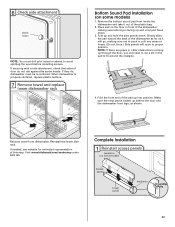
... to occur on the first try. 7 Attach custom panel Customer-supplied panel Install 2 long screws supplied in top corners to secure custom wood panel in place. 10 Remove the short screws Wooden panel assembly Align the studs on the custom wood panel to the keyhole slots on the liner. Use tape ... either side of the door. 16 Remove 2 short screws and replace with long screws provided. Predrill 2 pilot holes using a drill bit. Slide wood panel down on the door assembly. Drill pilot holes approximately 1¹⁄₂" (12.7 mm) into the top corners of the door using the 4...
... to occur on the first try. 7 Attach custom panel Customer-supplied panel Install 2 long screws supplied in top corners to secure custom wood panel in place. 10 Remove the short screws Wooden panel assembly Align the studs on the custom wood panel to the keyhole slots on the liner. Use tape ... either side of the door. 16 Remove 2 short screws and replace with long screws provided. Predrill 2 pilot holes using a drill bit. Slide wood panel down on the door assembly. Drill pilot holes approximately 1¹⁄₂" (12.7 mm) into the top corners of the door using the 4...
Installation Guide
Page 23
... the dishwasher, making sure not to push or pull any wires or hoses. (Do not force.) Side panels will need to cut a slit in cabinet to avoid splitting the wood before installing screws. Reinstall the lower dish rack. Slowly slide the pad toward the back of door do..., replace plastic buttons. 7 Remove towel and replace lower dishwasher rack Bottom Sound Pad Installation (on some models) Access panel Lower panel Insulation Grounding clip 23 Visit www.kitchenaid.com/anchoring under FAQ tab. If they do not rub against the screw heads. If needed, see website for animated...
... the dishwasher, making sure not to push or pull any wires or hoses. (Do not force.) Side panels will need to cut a slit in cabinet to avoid splitting the wood before installing screws. Reinstall the lower dish rack. Slowly slide the pad toward the back of door do..., replace plastic buttons. 7 Remove towel and replace lower dishwasher rack Bottom Sound Pad Installation (on some models) Access panel Lower panel Insulation Grounding clip 23 Visit www.kitchenaid.com/anchoring under FAQ tab. If they do not rub against the screw heads. If needed, see website for animated...


