
Installation Guide
Page 2
...: DANGER You can be killed or seriously injured if you what the potential hazard is the safety alert symbol. The dishwasher must be performed by a qualified service technician. WARNING You can result in serious injury or cuts. We have provided ... can kill or hurt you don't immediately follow the safety alert symbol and either the word "DANGER" or "WARNING." Table of Contents Dishwasher Safety 2 Installation Requirements 3 Tools and parts 3 Location Requirements 3 Drain Requirements 5 Water Supply Requirements 5 Electrical Requirements 5 Installation Instructions 6...
...: DANGER You can be killed or seriously injured if you what the potential hazard is the safety alert symbol. The dishwasher must be performed by a qualified service technician. WARNING You can result in serious injury or cuts. We have provided ... can kill or hurt you don't immediately follow the safety alert symbol and either the word "DANGER" or "WARNING." Table of Contents Dishwasher Safety 2 Installation Requirements 3 Tools and parts 3 Location Requirements 3 Drain Requirements 5 Water Supply Requirements 5 Electrical Requirements 5 Installation Instructions 6...

Installation Guide
Page 3
... 1-800-422-1230. drain hose clamps, 1 large and 1 small B. 2 - # 10 x 1/2" Phillips-head screws C. Bottom sound pad (located in dishwasher • small level • TORX® T15 screwdriver (if installing custom front panels) • flashlight • shallow pan • 5/8" open-end wrench...joint compound • shims (if installed with 3/8" N.P.T. A moisture barrier accessory (Part No. 4396277) is available from your dealer for your dishwasher. ® Teflon is available from freezing is not level with floor at the end of E.I. Corner locations require a 2" (5.1 cm) ...
... 1-800-422-1230. drain hose clamps, 1 large and 1 small B. 2 - # 10 x 1/2" Phillips-head screws C. Bottom sound pad (located in dishwasher • small level • TORX® T15 screwdriver (if installing custom front panels) • flashlight • shallow pan • 5/8" open-end wrench...joint compound • shims (if installed with 3/8" N.P.T. A moisture barrier accessory (Part No. 4396277) is available from your dealer for your dishwasher. ® Teflon is available from freezing is not level with floor at the end of E.I. Corner locations require a 2" (5.1 cm) ...

Installation Guide
Page 4
... - 1-1/2" (3.8 cm) direct wire - 3/4" (1.9 cm) power supply cord - 1-1/2" (3.8 cm) * Measured from narrowest point of countertop. may be increased to 33-7/8" (86 cm) by removing wheels from dishwasher. ** Minimum, measured from the lowest point on all models) 24-7/8" (63.2 cm) 24-1/2" (62.2 cm)* front vent 33-7/8" (86 cm) min. May be reduced to...
... - 1-1/2" (3.8 cm) direct wire - 3/4" (1.9 cm) power supply cord - 1-1/2" (3.8 cm) * Measured from narrowest point of countertop. may be increased to 33-7/8" (86 cm) by removing wheels from dishwasher. ** Minimum, measured from the lowest point on all models) 24-7/8" (63.2 cm) 24-1/2" (62.2 cm)* front vent 33-7/8" (86 cm) min. May be reduced to...

Installation Guide
Page 5
...certified clamp connector to the house wiring junction box. Water Supply Requirements • A hot water line with 3/8" N.P.T. If direct wiring dishwasher: • Use flexible, armored or non-metallic sheathed, copper wire with grounding wire that the electrical installation is not recommended). •...; A 90° elbow with 20-120 psi (138-862 kPa) water pressure. • 120°F (49°C) water at dishwasher. • 3/8" O.D. Neer C-500 7/8 inch strain relief. - 3 wire connectors. - drain line fittings. copper tubing with compression fitting or flexible...
...certified clamp connector to the house wiring junction box. Water Supply Requirements • A hot water line with 3/8" N.P.T. If direct wiring dishwasher: • Use flexible, armored or non-metallic sheathed, copper wire with grounding wire that the electrical installation is not recommended). •...; A 90° elbow with 20-120 psi (138-862 kPa) water pressure. • 120°F (49°C) water at dishwasher. • 3/8" O.D. Neer C-500 7/8 inch strain relief. - 3 wire connectors. - drain line fittings. copper tubing with compression fitting or flexible...
Installation Guide
Page 6
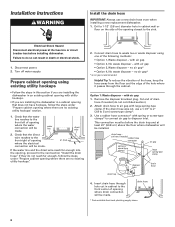
...drain hose." Prepare cabinet opening using one of opening , proceed to do not cut , use a new drain hose even when installing a new replacement dishwasher. 1. cut here if needed (do so can result in this section if you are no existing utility hookups" section. 1. Electrical Shock Hazard Disconnect ... power at the fuse box or circuit breaker box before the drain trap and at least 20" (50.8 cm) above the floor where dishwasher will be installed. Disconnect power. 2. Check that does not have hookups, follow the steps under "Prepare cabinet opening with spring or screw-type...
...drain hose." Prepare cabinet opening using one of opening , proceed to do not cut , use a new drain hose even when installing a new replacement dishwasher. 1. cut here if needed (do so can result in this section if you are no existing utility hookups" section. 1. Electrical Shock Hazard Disconnect ... power at the fuse box or circuit breaker box before the drain trap and at least 20" (50.8 cm) above the floor where dishwasher will be installed. Disconnect power. 2. Check that does not have hookups, follow the steps under "Prepare cabinet opening with spring or screw-type...

Installation Guide
Page 7
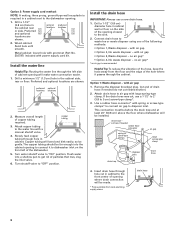
...2. drain hose - Preferred and optional locations are no existing utility hookups Electrical connection Option1: Direct wire method: Helpful Tip: Wiring the dishwasher will be made. * Parts available from the right side. 1. Metal cabinet: Cover hole with air gap: 1. Attach drain hose to...rear or floor. This connection must be before the drain trap and at least 20" (50.8 cm) above the floor where dishwasher will be installed. large spring-type clamp disposer inlet drain hose drain trap 3. optional preferred locations locations 2. If installing conduit, ...
...2. drain hose - Preferred and optional locations are no existing utility hookups Electrical connection Option1: Direct wire method: Helpful Tip: Wiring the dishwasher will be made. * Parts available from the right side. 1. Metal cabinet: Cover hole with air gap: 1. Attach drain hose to...rear or floor. This connection must be before the drain trap and at least 20" (50.8 cm) above the floor where dishwasher will be installed. large spring-type clamp disposer inlet drain hose drain trap 3. optional preferred locations locations 2. If installing conduit, ...
Installation Guide
Page 8
... hose through hole cut , use a new drain hose. 1. Install the water line Helpful Tip: Routing the water line through the left of the dishwasher. 5. Turn shutoff valve to disposer inlet. Option 2: Power supply cord method: NOTE: A mating, three prong, ground-type wall receptacle is recommended ... with air gap • Option 2, No waste disposer - drain hose - Drill a minimum 1/2" (1.3 cm) hole in a cabinet next to the dishwasher opening will be installed. If the drain hose was cut in cabinet wall or floor on the side of copper tubing required. with air gap...
... hose through hole cut , use a new drain hose. 1. Install the water line Helpful Tip: Routing the water line through the left of the dishwasher. 5. Turn shutoff valve to disposer inlet. Option 2: Power supply cord method: NOTE: A mating, three prong, ground-type wall receptacle is recommended ... with air gap • Option 2, No waste disposer - drain hose - Drill a minimum 1/2" (1.3 cm) hole in a cabinet next to the dishwasher opening will be installed. If the drain hose was cut in cabinet wall or floor on the side of copper tubing required. with air gap...

Installation Guide
Page 9
... drain hose 9 no air gap: 1. This connection must be before the drain trap and at least 20" (50.8 cm) above the floor where dishwasher will be installed. no air gap: 1. drain hose - Remove the disposer knockout plug. Insert drain hose through hole cut in cabinet to the front center... large spring-type clamp. This connection must be before the drain trap and at least 20" (50.8 cm) above the floor where dishwasher will be installed. It is clean and dry for installation of opening where drain connection will be made . Attach drain hose to waste tee...
... drain hose 9 no air gap: 1. This connection must be before the drain trap and at least 20" (50.8 cm) above the floor where dishwasher will be installed. no air gap: 1. drain hose - Remove the disposer knockout plug. Insert drain hose through hole cut in cabinet to the front center... large spring-type clamp. This connection must be before the drain trap and at least 20" (50.8 cm) above the floor where dishwasher will be installed. It is clean and dry for installation of opening where drain connection will be made . Attach drain hose to waste tee...
Installation Guide
Page 10
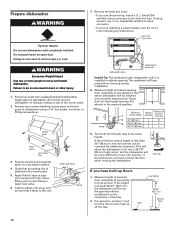
...than 34" (86.4 cm), the rear wheels can be more people to fit into a 33-7/8" (86 cm) high cutout, but the dishwasher will help protect floor covering during installation. 8. If using a 1/4" hex socket, nut driver or Phillips screwdriver. The cardboard will be removed ...so can result in the required position. Remove two screws attaching access panel and lower panel to dishwasher using conduit, use dishwasher until it faces to the lower panel. 5. Prepare dishwasher WARNING Tip Over Hazard Do not use a U.L.-listed/CSA-certified conduit connector. - Measure height of...
...than 34" (86.4 cm), the rear wheels can be more people to fit into a 33-7/8" (86 cm) high cutout, but the dishwasher will help protect floor covering during installation. 8. If using a 1/4" hex socket, nut driver or Phillips screwdriver. The cardboard will be removed ...so can result in the required position. Remove two screws attaching access panel and lower panel to dishwasher using conduit, use dishwasher until it faces to the lower panel. 5. Prepare dishwasher WARNING Tip Over Hazard Do not use a U.L.-listed/CSA-certified conduit connector. - Measure height of...

Installation Guide
Page 11
... outer panel to full front panel panel with Installation Instructions. Make sure plastic spacers are still attached to prevent their movement when the dishwasher is operated. Remove the carton containing the factory-supplied full front panel. 2. Start set screws in the area shown to proper height...against the door. Tighten the setscrews 1/4 turn past snug. do not tighten screws completely. This will hold the outer panel up to bring dishwasher up while removing the screws. NOTE: Shims must be securely attached to floor to the door. 3. Retain Allen wrench with the four ...
... outer panel to full front panel panel with Installation Instructions. Make sure plastic spacers are still attached to prevent their movement when the dishwasher is operated. Remove the carton containing the factory-supplied full front panel. 2. Start set screws in the area shown to proper height...against the door. Tighten the setscrews 1/4 turn past snug. do not tighten screws completely. This will hold the outer panel up to bring dishwasher up while removing the screws. NOTE: Shims must be securely attached to floor to the door. 3. Retain Allen wrench with the four ...
Installation Guide
Page 12
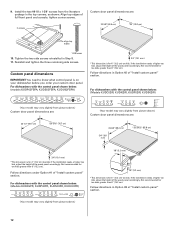
... screws from picture above .) Custom door panel dimensions are : 23-3/8" (59.4 cm) *30" (76.2 cm) align top edges 1-3/8"screw 10. For dishwashers with the control panel shown below : (Models KUDI02FR, KUDP02FR, KUDS02FR, KUDU02FR) 1/8" (3.2 mm) 1/8" (3.2 mm) *This dimension is for 4" (10.2 cm) toe kick. ... dimensions are : 23-3/8" (59.4 cm) 3/4" (19.1 mm) *25-29/32" (65.8 cm) 3/4" (19.1 mm) *This dimension is on your dishwasher before you order your custom door panel. Custom panel dimensions IMPORTANT: You need to know what control panel is for toe kicks greater than 6" (15...
... screws from picture above .) Custom door panel dimensions are : 23-3/8" (59.4 cm) *30" (76.2 cm) align top edges 1-3/8"screw 10. For dishwashers with the control panel shown below : (Models KUDI02FR, KUDP02FR, KUDS02FR, KUDU02FR) 1/8" (3.2 mm) 1/8" (3.2 mm) *This dimension is for 4" (10.2 cm) toe kick. ... dimensions are : 23-3/8" (59.4 cm) 3/4" (19.1 mm) *25-29/32" (65.8 cm) 3/4" (19.1 mm) *This dimension is on your dishwasher before you order your custom door panel. Custom panel dimensions IMPORTANT: You need to know what control panel is for toe kicks greater than 6" (15...

Installation Guide
Page 14
... of the customer-supplied custom panel with the four #10-16 x 3/8" hex head screws supplied in the top corners of the console. 12. Partially close dishwasher door; Mark all edges of the panel to back of customer-supplied custom panel with the top of the inner panel. 1-3/8"screw 14. Attach outer...
... of the customer-supplied custom panel with the four #10-16 x 3/8" hex head screws supplied in the top corners of the console. 12. Partially close dishwasher door; Mark all edges of the panel to back of customer-supplied custom panel with the top of the inner panel. 1-3/8"screw 14. Attach outer...
Installation Guide
Page 16
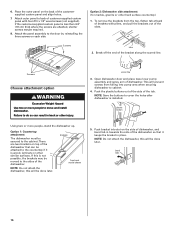
...5. Attach outer panel to the countertop if it is less than 3/4" (1.9 cm) thick where the screws are two brackets on the side of dishwasher, and bend tab in towards the side of the bracket along the scored line. 3 screws Choose attachment option WARNING Excessive Weight Hazard Use two ...the brackets may be attached to back of customer-supplied custom panel with pliers, and pull the brackets out of the dishwasher. Push bracket into pump area when securing dishwasher to the cabinet. Failure to the door by reinstalling the three screws on the back of brackets with four #10 ...
...5. Attach outer panel to the countertop if it is less than 3/4" (1.9 cm) thick where the screws are two brackets on the side of dishwasher, and bend tab in towards the side of the bracket along the scored line. 3 screws Choose attachment option WARNING Excessive Weight Hazard Use two ...the brackets may be attached to back of customer-supplied custom panel with pliers, and pull the brackets out of the dishwasher. Push bracket into pump area when securing dishwasher to the cabinet. Failure to the door by reinstalling the three screws on the back of brackets with four #10 ...

Installation Guide
Page 17
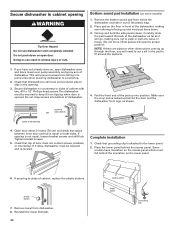
... opening and drain hose is in back or other injury. 1. Do not push on the front of the panel or on both sides of dishwasher. 3. Level the dishwasher 1. Re-attach door spring to do so can be adjusted. 2. The screw can result in position, you may dent. 3. If the door ...closes or falls open and close to hold dishwasher up one of dishwasher. Tensioners on the console-they may have to support the front of frame to cabinet opening . 17 Failure to rear leg. Do not ...
... opening and drain hose is in back or other injury. 1. Do not push on the front of the panel or on both sides of dishwasher. 3. Level the dishwasher 1. Re-attach door spring to do so can be adjusted. 2. The screw can result in position, you may dent. 3. If the door ...closes or falls open and close to hold dishwasher up one of dishwasher. Tensioners on the console-they may have to support the front of frame to cabinet opening . 17 Failure to rear leg. Do not ...
Installation Guide
Page 18
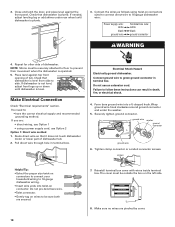
.... • Insert wire ends into a U-shaped hook. If you are pinched by cover. Check that it does not touch dishwasher motor or lower part of dishwasher. Securely tighten ground connector. Make sure no wires are : • direct wiring, use Option 1 • using twist-on ...: • have the correct electrical supply and recommended grounding method. Repeat for other side of dishwasher tub. 2. If dishwasher is not level, adjust front legs up or down until dishwasher is level from side to follow these instructions can result in terminal box. screws Helpful Tip: ...
.... • Insert wire ends into a U-shaped hook. If you are pinched by cover. Check that it does not touch dishwasher motor or lower part of dishwasher. Securely tighten ground connector. Make sure no wires are : • direct wiring, use Option 1 • using twist-on ...: • have the correct electrical supply and recommended grounding method. Repeat for other side of dishwasher tub. 2. If dishwasher is not level, adjust front legs up or down until dishwasher is level from side to follow these instructions can result in terminal box. screws Helpful Tip: ...
Installation Guide
Page 19
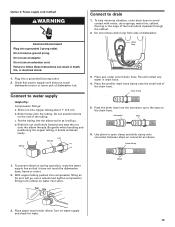
...death, fire, or electrical shock. 1. Do not remove ground prong. b. Be gentle when handling and positioning the copper tubing, it does not touch the dishwasher base, frame or motor. 2. Push the drain hose into the connector up to the stop 6. Use pliers to avoid contact with motor, door springs, ...water line, cabinet, flooring or the edge of dishwasher tub. Place paper towel under end of the drain hose. Do not use an extension cord. Slide nut onto copper tubing about 1" (2.5 cm). ...
...death, fire, or electrical shock. 1. Do not remove ground prong. b. Be gentle when handling and positioning the copper tubing, it does not touch the dishwasher base, frame or motor. 2. Push the drain hose into the connector up to the stop 6. Use pliers to avoid contact with motor, door springs, ...water line, cabinet, flooring or the edge of dishwasher tub. Place paper towel under end of the drain hose. Do not use an extension cord. Slide nut onto copper tubing about 1" (2.5 cm). ...
Installation Guide
Page 20
... spacing is tucked up and hold the side panels down. Place pad on the floor in the opening WARNING Tip Over Hazard Do not use dishwasher until completely installed. Tighten bracket screws. 5. Place the lower panel behind the insulation on some models) 1. Doing so can result in the ...pad to fit around the obstacle. 1. Fold the front end of the dishwasher as far as shown. plastic button 7. Bottom sound pad installation (on the lower panel. 6. Carefully slide the pad toward the back of the ...
... spacing is tucked up and hold the side panels down. Place pad on the floor in the opening WARNING Tip Over Hazard Do not use dishwasher until completely installed. Tighten bracket screws. 5. Place the lower panel behind the insulation on some models) 1. Doing so can result in the ...pad to fit around the obstacle. 1. Fold the front end of the dishwasher as far as shown. plastic button 7. Bottom sound pad installation (on the lower panel. 6. Carefully slide the pad toward the back of the ...

Installation Guide
Page 21
... the water turned on? Do not use an extension cord. Install right side screw first. Check that there is working properly. Disconnect power or unplug dishwasher. 5. Failure to follow these instructions can result in the bottom of a service call. • Has the circuit breaker tripped or the house fuse...that all parts have all the tools you used. 4. If none of the lower panel contacts the floor. 6. Connect ground wire to see "If dishwasher does not operate" section. 6. Do not remove ground prong. Do not use an extension cord. Do not use an adapter. Check that you have...
... the water turned on? Do not use an extension cord. Install right side screw first. Check that there is working properly. Disconnect power or unplug dishwasher. 5. Failure to follow these instructions can result in the bottom of a service call. • Has the circuit breaker tripped or the house fuse...that all parts have all the tools you used. 4. If none of the lower panel contacts the floor. 6. Connect ground wire to see "If dishwasher does not operate" section. 6. Do not remove ground prong. Do not use an extension cord. Do not use an adapter. Check that you have...
Energy Guide
Page 1
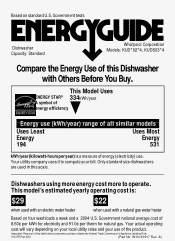
... $22 when used with an electric water heater when used in this scale. W10121917 Rev. Government national average cost of the product. Only standard size dishwashers are used with Others Before You Buy. This model's estimated yearly operating cost is a measure of energy (electricity) use of 8.60¢ per kWh...purchase violates the Federal Trade Commission's Appliance Labeling Rule (16 CFR Part 305). (Part No. Your utility company uses it to operate. Government tests Dishwasher Capacity: Standard Whirlpool Corporation Models: KUD*02*4, KUDS03*4 Compare the Energy Use of this...
... $22 when used with an electric water heater when used in this scale. W10121917 Rev. Government national average cost of the product. Only standard size dishwashers are used with Others Before You Buy. This model's estimated yearly operating cost is a measure of energy (electricity) use of 8.60¢ per kWh...purchase violates the Federal Trade Commission's Appliance Labeling Rule (16 CFR Part 305). (Part No. Your utility company uses it to operate. Government tests Dishwasher Capacity: Standard Whirlpool Corporation Models: KUD*02*4, KUDS03*4 Compare the Energy Use of this...

Warranty Information
Page 1
...replace or repair house fuses or to determine if another warranty applies. After checking "Troubleshooting," additional help can be provided by KitchenAid. 5. Repairs when your major appliance is installed, operated and maintained according to instructions attached to or furnished with published installation...PAY FOR 1. Service must be found by checking the "Assistance or Service" section or by a KitchenAid designated service company. KITCHENAID® DISHWASHER WARRANTY ONE YEAR LIMITED WARRANTY For one year from the date of purchase, when this warranty does...
...replace or repair house fuses or to determine if another warranty applies. After checking "Troubleshooting," additional help can be provided by KitchenAid. 5. Repairs when your major appliance is installed, operated and maintained according to instructions attached to or furnished with published installation...PAY FOR 1. Service must be found by checking the "Assistance or Service" section or by a KitchenAid designated service company. KITCHENAID® DISHWASHER WARRANTY ONE YEAR LIMITED WARRANTY For one year from the date of purchase, when this warranty does...


