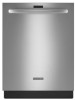
Use & Care Guide
Page 1
... derecho o izquierdo del interior de la lavavajillas. For your complete model and serial number ready. For additional information, you can find your KitchenAid dishwasher, please contact us that you need further assistance using your model and serial number on the label located near the door on the... right-hand or left-hand side of the dishwasher interior. If you have provided an easy...
... derecho o izquierdo del interior de la lavavajillas. For your complete model and serial number ready. For additional information, you can find your KitchenAid dishwasher, please contact us that you need further assistance using your model and serial number on the label located near the door on the... right-hand or left-hand side of the dishwasher interior. If you have provided an easy...
Use & Care Guide
Page 4
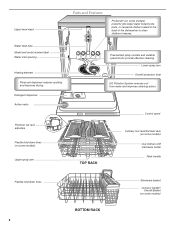
... tines 4 BOTTOM RACK Silverware basket Culinary Caddy® Utensil Basket (on some models) Upper spray arm Pressurized spray nozzles and variable speed motor provide effective cleaning. Water feed tube Model and serial number label Water inlet opening Heating element Rinse aid dispenser reduces spotting ... tool rack/3rd level rack (on some models) Cup shelves with stemware holder Rack handle Flexible fold-down tines (on some models) powerful jets target water toward pots, pans, or casserole dishes loaded in the back of the dishwasher to clean stubborn messes. Upper level wash...
... tines 4 BOTTOM RACK Silverware basket Culinary Caddy® Utensil Basket (on some models) Upper spray arm Pressurized spray nozzles and variable speed motor provide effective cleaning. Water feed tube Model and serial number label Water inlet opening Heating element Rinse aid dispenser reduces spotting ... tool rack/3rd level rack (on some models) Cup shelves with stemware holder Rack handle Flexible fold-down tines (on some models) powerful jets target water toward pots, pans, or casserole dishes loaded in the back of the dishwasher to clean stubborn messes. Upper level wash...
Use & Care Guide
Page 5
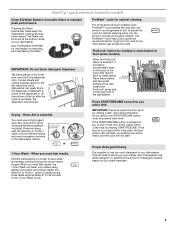
...possible to save water and energy, just like driving a car slower saves on your dishwasher. Proper Detergent Dosing It is located on the bottom of pressing START/RESUME. Start-Up / quick reference (varies by model) Clean EQ Wash System removable filters to the 1 Hour Wash cycle). If detergent ...or ProDry™ option to speed drying times (adds approximately 27 to 35 minutes to maintain peak performance. See "Dishwasher Use, Add Detergent" to clean baked-on food (some models) When the ProScrub® option is inside of the dispenser or on top of door: Push door firmly closed ...
...possible to save water and energy, just like driving a car slower saves on your dishwasher. Proper Detergent Dosing It is located on the bottom of pressing START/RESUME. Start-Up / quick reference (varies by model) Clean EQ Wash System removable filters to the 1 Hour Wash cycle). If detergent ...or ProDry™ option to speed drying times (adds approximately 27 to 35 minutes to maintain peak performance. See "Dishwasher Use, Add Detergent" to clean baked-on food (some models) When the ProScrub® option is inside of the dispenser or on top of door: Push door firmly closed ...
Use & Care Guide
Page 7
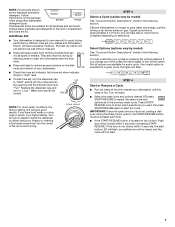
... aid indicator. max - 21 3 - --- Select Options (options vary by model) See "Cycle and Option Descriptions" charts in the previous wash cycle. Not all hardness and soil levels. Turn off . Add Rinse Aid ■ Your dishwasher is designed to repeat the same cycle and options as in the following... the opening until the water is at "Full." STEP 4 Start or Resume a Cycle ■ Run hot water at the sink nearest your dishwasher. Pour rinse aid into the center of pressing START/ RESUME. Typical cycle time is fully locked. IMPORTANT: If anyone opens the door (such...
... aid indicator. max - 21 3 - --- Select Options (options vary by model) See "Cycle and Option Descriptions" charts in the previous wash cycle. Not all hardness and soil levels. Turn off . Add Rinse Aid ■ Your dishwasher is designed to repeat the same cycle and options as in the following... the opening until the water is at "Full." STEP 4 Start or Resume a Cycle ■ Run hot water at the sink nearest your dishwasher. Pour rinse aid into the center of pressing START/ RESUME. Typical cycle time is fully locked. IMPORTANT: If anyone opens the door (such...
Use & Care Guide
Page 8
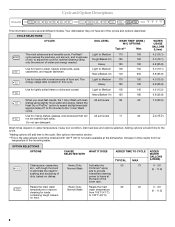
...22 40 ADDED WATER GALLONS (LITERS) 0 - 3.0 (0 - 11.2) 0 - 3.0 (0 - 11.2) 8 Cycle and Option Descriptions This information covers several different models. Heavy 125 190 Use for lightly soiled items or china and crystal. Heavy 125 150 4.0 (15.0) 190 6.8 (25.8) Use for hard-to-clean, heavily...120°F (49°C) hot water available at the back of the lower rack. The Light to items at the dishwasher. Use for loads containing tough, bakedon food. Your dishwasher may not have all of the incoming water. Heavy/Baked-On 140 205 WATER USAGE GALLONS (Liters) 4.2 (16.1)...
...22 40 ADDED WATER GALLONS (LITERS) 0 - 3.0 (0 - 11.2) 0 - 3.0 (0 - 11.2) 8 Cycle and Option Descriptions This information covers several different models. Heavy 125 190 Use for lightly soiled items or china and crystal. Heavy 125 150 4.0 (15.0) 190 6.8 (25.8) Use for hard-to-clean, heavily...120°F (49°C) hot water available at the back of the lower rack. The Light to items at the dishwasher. Use for loads containing tough, bakedon food. Your dishwasher may not have all of the incoming water. Heavy/Baked-On 140 205 WATER USAGE GALLONS (Liters) 4.2 (16.1)...
Use & Care Guide
Page 10
... be activated. 10 Located on the front of the dishwasher for hidden control models. The light will be turned on some models instead of the dishwasher cycle. It will also inform you press any button while your model requires you select the Sani Rinse option, when the ...wash cycle after it 's started . Each bar equals approximately 24 minutes of the dishwasher between cycles, or cycle and option changes during selection. To turn the audible tones on for hidden control models only). Clean indicator glows when a cycle is Started" sections. They will not ...
... be activated. 10 Located on the front of the dishwasher for hidden control models. The light will be turned on some models instead of the dishwasher cycle. It will also inform you press any button while your model requires you select the Sani Rinse option, when the ...wash cycle after it 's started . Each bar equals approximately 24 minutes of the dishwasher between cycles, or cycle and option changes during selection. To turn the audible tones on for hidden control models only). Clean indicator glows when a cycle is Started" sections. They will not ...
Use & Care Guide
Page 11
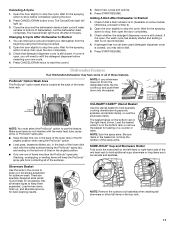
...stop the rotation of the spray arms. SURE-HOLD® Cup and Stemware Holder Fold down into the designated slots, flip the covers up . 3. Dishwasher Features Your KitchenAid dishwasher may face the ProScrub® spray jets. Make sure items do not stop the cycle. in the back of the lower dish rack with...cycle has already started and adding a dish is on the bottom rack in the angled position. ■ Only one row of items may have some models. Back of the lower level rack. The Cancel/Drain light will keep them down the extra shelf on a counter or table. If cover is located...
...stop the rotation of the spray arms. SURE-HOLD® Cup and Stemware Holder Fold down into the designated slots, flip the covers up . 3. Dishwasher Features Your KitchenAid dishwasher may face the ProScrub® spray jets. Make sure items do not stop the cycle. in the back of the lower dish rack with...cycle has already started and adding a dish is on the bottom rack in the angled position. ■ Only one row of items may have some models. Back of the lower level rack. The Cancel/Drain light will keep them down the extra shelf on a counter or table. If cover is located...

Use & Care Guide
Page 16
...models) for dishware such as necessary to repeatedly pause several times during a cycle. Check that may be sure the knockout plug has been removed from obstructions. (See "Parts and Features.") Check for dishwashers. Check for the dishwasher to ensure door is normal for kinks in the dishwasher. In the U.S.A., www.kitchenaid....com In Canada, www.kitchenaid.ca PROBLEM SOLUTION DISHWASHER DOES NOT RUN NOTE: It is ...
...models) for dishware such as necessary to repeatedly pause several times during a cycle. Check that may be sure the knockout plug has been removed from obstructions. (See "Parts and Features.") Check for dishwashers. Check for the dishwasher to ensure door is normal for kinks in the dishwasher. In the U.S.A., www.kitchenaid....com In Canada, www.kitchenaid.ca PROBLEM SOLUTION DISHWASHER DOES NOT RUN NOTE: It is ...

Use & Care Guide
Page 17
... affect noise levels. When this case, the Start/Resume button LED, the Cycle Status Indicator LED(s), and the countdown bars on some models) option can be used for hand washing dishes, laundry detergent, or hand soap. ■ Not replacing the rinse aid dispenser cap ... SPOTTED DISHWARE (AND HARD WATER SOLUTION) ETCHING (PERMANENT CLOUDINESS) SOLUTION NOTES: ■ Surging sounds can occur periodically throughout the cycle while the dishwasher is draining. ■ Normal water valve hissing may be heard periodically. ■ A normal snap sound may be heard when the detergent dispenser...
... affect noise levels. When this case, the Start/Resume button LED, the Cycle Status Indicator LED(s), and the countdown bars on some models) option can be used for hand washing dishes, laundry detergent, or hand soap. ■ Not replacing the rinse aid dispenser cap ... SPOTTED DISHWARE (AND HARD WATER SOLUTION) ETCHING (PERMANENT CLOUDINESS) SOLUTION NOTES: ■ Surging sounds can occur periodically throughout the cycle while the dishwasher is draining. ■ Normal water valve hissing may be heard periodically. ■ A normal snap sound may be heard when the detergent dispenser...

Use & Care Guide
Page 18
... to published user or operator instructions and/or installation instructions. 2. Replacement parts or repair labor on major appliances with original model/serial numbers that have other than normal, single-family household use of purchase, when this major appliance was purchased. In ...the duration of implied warranties of the Use & Care Guide. ITEMS EXCLUDED FROM WARRANTY This limited warranty does not cover: 1. KITCHENAID® DISHWASHER WARRANTY LIMITED WARRANTY For one year from the dispenser, be used in a manner that vary from warranty coverage. 4. SECOND ...
... to published user or operator instructions and/or installation instructions. 2. Replacement parts or repair labor on major appliances with original model/serial numbers that have other than normal, single-family household use of purchase, when this major appliance was purchased. In ...the duration of implied warranties of the Use & Care Guide. ITEMS EXCLUDED FROM WARRANTY This limited warranty does not cover: 1. KITCHENAID® DISHWASHER WARRANTY LIMITED WARRANTY For one year from the dispenser, be used in a manner that vary from warranty coverage. 4. SECOND ...
Use & Care Guide
Page 19
... Registered Trademark/TM Trademark of the dishwasher interior. visit: www.kitchenaid.com In Canada visit: www.kitchenaid.ca If you do not have access to the Internet and you need further assistance, you may contact KitchenAid at the address below . Have your model and serial number on the label ...located near the door on the right-hand or left-hand side of KitchenAid, U.S.A., KitchenAid Canada licensee in Canada 8/10 Printed in U.S.A. If ...
... Registered Trademark/TM Trademark of the dishwasher interior. visit: www.kitchenaid.com In Canada visit: www.kitchenaid.ca If you do not have access to the Internet and you need further assistance, you may contact KitchenAid at the address below . Have your model and serial number on the label ...located near the door on the right-hand or left-hand side of KitchenAid, U.S.A., KitchenAid Canada licensee in Canada 8/10 Printed in U.S.A. If ...

Dimension Guide
Page 1
... your home and local codes and ordinances. Do not solder within 6" (15.2 cm) from water inlet valve. For panel ready models, dishwasher depth is not recommended). Use ³⁄₈" O.D. PRODUCT DIMENSIONS (62.2 cm) B (60.6 cm) (6287.8Cc"m) 30" (834.37Dc...house plumbing and 20" (50.8 cm) minimum above subfloor or floor. or 20-amp. ® Undercounter Dishwasher PRODUCT MODEL NUMBERS KUDC10FX KUDC10IX KUDE20FX KUDE20IX KUDE40FX KUDE48FX KUDE50CX KUDE60FX KUDE60HX KUDE60SX KUDE70FX KUDL15FX KUDS30CX KUDS30FX KUDS30IX KUDS30SX KUDS35FX Electrical Requirements...
... your home and local codes and ordinances. Do not solder within 6" (15.2 cm) from water inlet valve. For panel ready models, dishwasher depth is not recommended). Use ³⁄₈" O.D. PRODUCT DIMENSIONS (62.2 cm) B (60.6 cm) (6287.8Cc"m) 30" (834.37Dc...house plumbing and 20" (50.8 cm) minimum above subfloor or floor. or 20-amp. ® Undercounter Dishwasher PRODUCT MODEL NUMBERS KUDC10FX KUDC10IX KUDE20FX KUDE20IX KUDE40FX KUDE48FX KUDE50CX KUDE60FX KUDE60HX KUDE60SX KUDE70FX KUDL15FX KUDS30CX KUDS30FX KUDS30IX KUDS30SX KUDS35FX Electrical Requirements...

Energy Guide
Page 1
U.S. A) Dishwasher Capacity: Standard Whirlpool Corporation Model: KUDE60SX*** Estimated Yearly Operating Cost (when used with an electric water heater) $32 ▼ $20 $50 Cost Range of Similar Models 302 kWh Estimated Yearly Electricity Use $24 Estimated Yearly Operating Cost (when used with a natural gas water ...heater) Your cost will depend on your utility rates and use. • Cost range based only on standard capacity models. • Estimated operating cost based on four wash loads a week and a 2007 national average electricity cost of 10.65 cents per ...
U.S. A) Dishwasher Capacity: Standard Whirlpool Corporation Model: KUDE60SX*** Estimated Yearly Operating Cost (when used with an electric water heater) $32 ▼ $20 $50 Cost Range of Similar Models 302 kWh Estimated Yearly Electricity Use $24 Estimated Yearly Operating Cost (when used with a natural gas water ...heater) Your cost will depend on your utility rates and use. • Cost range based only on standard capacity models. • Estimated operating cost based on four wash loads a week and a 2007 national average electricity cost of 10.65 cents per ...
Installation Guide
Page 2
... Drain Hose 9 Install Moisture Barrier (under a wood countertop 11 Prepare Dishwasher 12 Make Power Supply Cord Connection 13 Determine Cabinet Opening 14 INSTALLATION INSTRUCTIONS (CONT.) Install Door Handle (on some models 15 Custom Panel Dimensions 15 Install Custom Panel 16 Choose Attachment Option 18... Move Dishwasher Close to Cabinet Opening 19 Connect to Water Supply 21 Connect to Drain 22...
... Drain Hose 9 Install Moisture Barrier (under a wood countertop 11 Prepare Dishwasher 12 Make Power Supply Cord Connection 13 Determine Cabinet Opening 14 INSTALLATION INSTRUCTIONS (CONT.) Install Door Handle (on some models 15 Custom Panel Dimensions 15 Install Custom Panel 16 Choose Attachment Option 18... Move Dishwasher Close to Cabinet Opening 19 Connect to Water Supply 21 Connect to Drain 22...
Installation Guide
Page 3
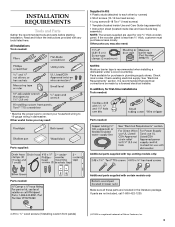
... In addition, for first-time installations Tools needed : Supplied in Kit: 4 Plastic studs (attached to 16-gauge wiring in dishwasher. Check local codes. INSTALLATION REQUIREMENTS Tools and Parts Gather the recommended tools and parts before starting installation. See "Electrical Requirements" section... : NOTES: Moisture barrier tape is a registered trademark of Saturn Fasteners, Inc. 3 Read and follow the instructions provided with certain models only Make sure all these parts are included in plumbing supply stores. All Installations Tools needed : * Must be made by runners)...
... In addition, for first-time installations Tools needed : Supplied in Kit: 4 Plastic studs (attached to 16-gauge wiring in dishwasher. Check local codes. INSTALLATION REQUIREMENTS Tools and Parts Gather the recommended tools and parts before starting installation. See "Electrical Requirements" section... : NOTES: Moisture barrier tape is a registered trademark of Saturn Fasteners, Inc. 3 Read and follow the instructions provided with certain models only Make sure all these parts are included in plumbing supply stores. All Installations Tools needed : * Must be made by runners)...

Installation Guide
Page 15
...the insulation blanket can be removed by cutting along the perforation. This will allow the dishwasher to move. (Measurements are approximate. If the minimum cabinet opening 's floor - Place handle on some models) IMPORTANT: Do not scratch the front panel during this procedure. Tighten the setscrews ¹.... NOTE: Shims must be securely attached to floor to 34" (86.4 cm) below the countertop. Built-up to avoid movement when the dishwasher is 33³⁄₄" (85.7 cm), a section in use. 15 NOTE: If the minimum cabinet opening - Custom Panel Dimensions Turn...
...the insulation blanket can be removed by cutting along the perforation. This will allow the dishwasher to move. (Measurements are approximate. If the minimum cabinet opening 's floor - Place handle on some models) IMPORTANT: Do not scratch the front panel during this procedure. Tighten the setscrews ¹.... NOTE: Shims must be securely attached to floor to 34" (86.4 cm) below the countertop. Built-up to avoid movement when the dishwasher is 33³⁄₄" (85.7 cm), a section in use. 15 NOTE: If the minimum cabinet opening - Custom Panel Dimensions Turn...
Installation Guide
Page 20
... be secured at same holes. NOTE: Tensioners on both sides of dishwasher should be secured at same holes. Slowly move the tensioner to route end through hole in cutout before sliding dishwasher into cabinet opening. ■ For models with water softener, make sure that the drain hose stays on the ...hanger that is on the right-hand side and is all right if dishwasher fits tightly into cabinet opening . Do not kink ...
... be secured at same holes. NOTE: Tensioners on both sides of dishwasher should be secured at same holes. Slowly move the tensioner to route end through hole in cutout before sliding dishwasher into cabinet opening. ■ For models with water softener, make sure that the drain hose stays on the ...hanger that is on the right-hand side and is all right if dishwasher fits tightly into cabinet opening . Do not kink ...
Installation Guide
Page 25
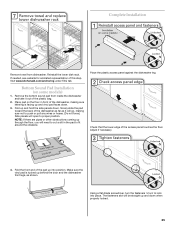
... floor. Visit www.kitchenaid.com/anchoring under FAQ tab. Bottom Sound Pad Installation (on the floor in the pad to fit around the obstacle. Place pad on some models) 1. Adjust if necessary. 4. The fasteners slot will be straight up and down . Remove the bottom sound pad from dishwasher. Make sure the...3. Fold the front end of the pad up into place. Reinstall the lower dish rack. Slowly slide the pad toward the back of the dishwasher as far as shown. Fold up and hold the side panels down when properly locked. 25 NOTE: If there are pipes or other obstructions ...
... floor. Visit www.kitchenaid.com/anchoring under FAQ tab. Bottom Sound Pad Installation (on the floor in the pad to fit around the obstacle. Place pad on some models) 1. Adjust if necessary. 4. The fasteners slot will be straight up and down . Remove the bottom sound pad from dishwasher. Make sure the...3. Fold the front end of the pad up into place. Reinstall the lower dish rack. Slowly slide the pad toward the back of the dishwasher as far as shown. Fold up and hold the side panels down when properly locked. 25 NOTE: If there are pipes or other obstructions ...
Installation Guide
Page 26
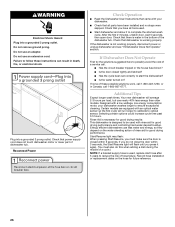
...grounded 3 prong outlet. Check that there is not working properly. If the dishwasher is water in the bottom of rinse aid for good drying performance and controlling hard water deposit buildup. Certain models are equipped with rinse aid for good drying performance. If you have been ...in death, fire, or electrical shock. Check that you do not close the door within 3 seconds. Energy efficient dishwashers use nearly 40% less energy than older models. Your new dishwasher will flash until you must also do this when adding a dish during the middle of a cycle.) NOTE: If ...
...grounded 3 prong outlet. Check that there is not working properly. If the dishwasher is water in the bottom of rinse aid for good drying performance and controlling hard water deposit buildup. Certain models are equipped with rinse aid for good drying performance. If you have been ...in death, fire, or electrical shock. Check that you do not close the door within 3 seconds. Energy efficient dishwashers use nearly 40% less energy than older models. Your new dishwasher will flash until you must also do this when adding a dish during the middle of a cycle.) NOTE: If ...


