User Instructions
Page 1
... completo de modelo y de serie. These words mean: DANGER You can find your model and serial number on the label located near the door on your KitchenAid dishwasher, please contact us that can happen if the instructions are very important. If you to...positive experience owning a KitchenAid® product. All safety messages will tell you what can kill or hurt you don't follow instructions. For your complete model and serial number ready. These instructions include a "Troubleshooting" section to reduce the chance of others . DISHWASHER USER INSTRUCTIONS Thank you ...
... completo de modelo y de serie. These words mean: DANGER You can find your model and serial number on the label located near the door on your KitchenAid dishwasher, please contact us that can happen if the instructions are very important. If you to...positive experience owning a KitchenAid® product. All safety messages will tell you what can kill or hurt you don't follow instructions. For your complete model and serial number ready. These instructions include a "Troubleshooting" section to reduce the chance of others . DISHWASHER USER INSTRUCTIONS Thank you ...
User Instructions
Page 4
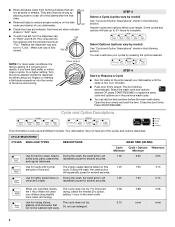
...previous wash cycle. ■ You can customize your cycles by model) See "Cycle and Option Descriptions" charts in the following section. and regular tableware. When you have all of your dishwasher until the water is fully locked. For improved 0:58 the 1 Hour Wash will give good... results. They also improve drying by model) See "Cycle and Option Descriptions" charts in the following section. Add...
...previous wash cycle. ■ You can customize your cycles by model) See "Cycle and Option Descriptions" charts in the following section. and regular tableware. When you have all of your dishwasher until the water is fully locked. For improved 0:58 the 1 Hour Wash will give good... results. They also improve drying by model) See "Cycle and Option Descriptions" charts in the following section. Add...
User Instructions
Page 9
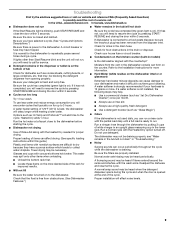
...normal snap sound may have selected a cycle. (See "Cycles and Options Descriptions.") Be sure there is on the kitchen counter (built-in models) Is the dishwasher aligned with the wash arms. Readjust the dishware and resume the cycle. Be sure your hardness is closed and latched. Check for food ...to repeatedly pause several times during the cycle and when the door is fresh and lump free. In the U.S.A., www.kitchenaid.com In Canada, www.kitchenaid.ca ■ Dishwasher does not run . Run the hot water at the end of the cycle. Proper loading of Rinse Aid along with...
...normal snap sound may have selected a cycle. (See "Cycles and Options Descriptions.") Be sure there is on the kitchen counter (built-in models) Is the dishwasher aligned with the wash arms. Readjust the dishware and resume the cycle. Be sure your hardness is closed and latched. Check for food ...to repeatedly pause several times during the cycle and when the door is fresh and lump free. In the U.S.A., www.kitchenaid.com In Canada, www.kitchenaid.ca ■ Dishwasher does not run . Run the hot water at the end of the cycle. Proper loading of Rinse Aid along with...
User Instructions
Page 11
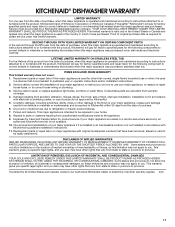
...this major appliance was purchased: stainless steel tub. Some states and provinces do not allow limitations on major appliances with original model/serial numbers that have been removed, altered or cannot be easily determined. Replacement parts or repair labor if this limited warranty... major appliance is used in a manner that is inconsistent to published user or operator instructions and/or installation instructions. 2. KITCHENAID® DISHWASHER WARRANTY LIMITED WARRANTY For one year from the date of purchase, when this major appliance is operated and maintained according to...
...this major appliance was purchased: stainless steel tub. Some states and provinces do not allow limitations on major appliances with original model/serial numbers that have been removed, altered or cannot be easily determined. Replacement parts or repair labor if this limited warranty... major appliance is used in a manner that is inconsistent to published user or operator instructions and/or installation instructions. 2. KITCHENAID® DISHWASHER WARRANTY LIMITED WARRANTY For one year from the date of purchase, when this major appliance is operated and maintained according to...

User Instructions
Page 12
... information for future reference. All rights reserved. ® Registered Trademark/TM Trademark of the dishwasher interior. Have your model and serial number on the label located near the door on the right-hand or left-hand side of KitchenAid, U.S.A., KitchenAid Canada licensee in Canada 11/08 Printed in U.S.A. If you need assistance using your...
... information for future reference. All rights reserved. ® Registered Trademark/TM Trademark of the dishwasher interior. Have your model and serial number on the label located near the door on the right-hand or left-hand side of KitchenAid, U.S.A., KitchenAid Canada licensee in Canada 11/08 Printed in U.S.A. If you need assistance using your...

Installation Instructions
Page 2
...All safety messages will follow the safety alert symbol and either the word "DANGER" or "WARNING." Do not push down on open dishwasher door while someone grasps the rear of injury, and tell you and others are not followed. Remove shipping materials, drain hose and... Utilities 7 Prepare Cabinet Opening-New Utilities 7 Prepare and Route Water Line 8 Install Drain Hose 9 Install Moisture Barrier (on some models 10 Prepare Dishwasher 11 Make Power Supply Cord Connection 12 Determine Cabinet Opening 13 Installation Instructions (cont.) Install the Door Handle (on your appliance. Close...
...All safety messages will follow the safety alert symbol and either the word "DANGER" or "WARNING." Do not push down on open dishwasher door while someone grasps the rear of injury, and tell you and others are not followed. Remove shipping materials, drain hose and... Utilities 7 Prepare Cabinet Opening-New Utilities 7 Prepare and Route Water Line 8 Install Drain Hose 9 Install Moisture Barrier (on some models 10 Prepare Dishwasher 11 Make Power Supply Cord Connection 12 Determine Cabinet Opening 13 Installation Instructions (cont.) Install the Door Handle (on your appliance. Close...

Installation Instructions
Page 3
... needed: Electric drill with 1/2", 3/4" and 1 1/2" hole saw bits Small tubing cutter Wire stripper Parts needed : 90° Elbow fitting with top-venting models only: 2 #8x1-3/8" Torx® T15 screws 4 #10x3/8" hex-head screws Parts supplied: 2 - Drain hose clamps (1 large and 1 small) ...also need: 1 1/2"-2" (38.1-5.0 cm) Screw-typ e clamps (3 max) Masking or duct tape NOTE: Parts available for use with dishwasher Additional parts supplied with 3/8" N.P.T. See "Electrical Requirements" section. external threads (the other end must fit your household wiring to fit 7/8" ...
... needed: Electric drill with 1/2", 3/4" and 1 1/2" hole saw bits Small tubing cutter Wire stripper Parts needed : 90° Elbow fitting with top-venting models only: 2 #8x1-3/8" Torx® T15 screws 4 #10x3/8" hex-head screws Parts supplied: 2 - Drain hose clamps (1 large and 1 small) ...also need: 1 1/2"-2" (38.1-5.0 cm) Screw-typ e clamps (3 max) Masking or duct tape NOTE: Parts available for use with dishwasher Additional parts supplied with 3/8" N.P.T. See "Electrical Requirements" section. external threads (the other end must fit your household wiring to fit 7/8" ...

Installation Instructions
Page 5
.... NOTE: Shaded area of cabinet walls show where utility connections may be reduced to 33 7/8" (86 cm) by removing wheels from dishwasher. **Minimum, measured from the lowest point on all models) (532.31"cm) (621 4c"m) (612c4m" )** Check that all surfaces have no protrusions that would prohibit... dishwasher installation. May be compressed (not used on the underside of opening. (8m63.44in"c*m) (10.42"cm) (7.63"cm) (167.32/4c"m) (...
.... NOTE: Shaded area of cabinet walls show where utility connections may be reduced to 33 7/8" (86 cm) by removing wheels from dishwasher. **Minimum, measured from the lowest point on all models) (532.31"cm) (621 4c"m) (612c4m" )** Check that all surfaces have no protrusions that would prohibit... dishwasher installation. May be compressed (not used on the underside of opening. (8m63.44in"c*m) (10.42"cm) (7.63"cm) (167.32/4c"m) (...

Installation Instructions
Page 10
... a large silver drain hose clamp (provided). Attach drain hose to squeeze clamp open and move into position. Install Moisture Barrier (on some models) Install moisture barrier (on some models) Moisture barrier 1. Make sure the area under the cabinet is clean and dry for installation of the counter. Use needle nose pliers to...
... a large silver drain hose clamp (provided). Attach drain hose to squeeze clamp open and move into position. Install Moisture Barrier (on some models) Install moisture barrier (on some models) Moisture barrier 1. Make sure the area under the cabinet is clean and dry for installation of the counter. Use needle nose pliers to...

Installation Instructions
Page 14
...cm) *25 29/32" (65.8 cm) 3/4" (19.1 mm) 1/8" (3.2 mm) 1/8" (3.2 mm) * This dimension is on some models) Install door handle Mounting stud Handle Setscrew (in the handle. Dishwashers with the setscrews facing down. 3 Built-up Floors-Add shims as needed (410".1 cm) (52c"m) 2-3(/74c"m) Built-up to 34..." (86.4 cm) below the countertop. Install the Door Handle (on your dishwasher before you order your custom door panel. Not recommended for 4" (10.2 cm) toe kick. Setscrews are already installed in bottom of the ...
...cm) *25 29/32" (65.8 cm) 3/4" (19.1 mm) 1/8" (3.2 mm) 1/8" (3.2 mm) * This dimension is on some models) Install door handle Mounting stud Handle Setscrew (in the handle. Dishwashers with the setscrews facing down. 3 Built-up Floors-Add shims as needed (410".1 cm) (52c"m) 2-3(/74c"m) Built-up to 34..." (86.4 cm) below the countertop. Install the Door Handle (on your dishwasher before you order your custom door panel. Not recommended for 4" (10.2 cm) toe kick. Setscrews are already installed in bottom of the ...

Installation Instructions
Page 15
....1 mm) * This dimension is not included. It is the consumer's responsibility to the KitchenAid Catalog, visit www.kitchenaid.com, or call 1-800-422-1230. If a thinner wood panel, or materials other than 6" (15.2 cm). Dishwashers with control panel on the back of the wood panel accordingly. IMPORTANT: Use a moisture ...9 29/32" (25.2 cm) Back Top edge Measure 9 29/32" (25.2 cm) from humidity. 1 Custom panel installation - Install Custom Panel - Option 1 (Models KUDS40FVPA, KUDS50FVPA, KUDE60FVPA, and KUDE70FVPA) NOTE: The handle for the custom panel is for reinstallation...
....1 mm) * This dimension is not included. It is the consumer's responsibility to the KitchenAid Catalog, visit www.kitchenaid.com, or call 1-800-422-1230. If a thinner wood panel, or materials other than 6" (15.2 cm). Dishwashers with control panel on the back of the wood panel accordingly. IMPORTANT: Use a moisture ...9 29/32" (25.2 cm) Back Top edge Measure 9 29/32" (25.2 cm) from humidity. 1 Custom panel installation - Install Custom Panel - Option 1 (Models KUDS40FVPA, KUDS50FVPA, KUDE60FVPA, and KUDE70FVPA) NOTE: The handle for the custom panel is for reinstallation...

Installation Instructions
Page 16
... panel up while removing the screws. Kit Number 8171555 (black), 8171556 (white) or 8171557 (biscuit) are for 4" (10.2 cm) toe kick. Dishwashers with control panel on the front 23 3/8" (65.8 cm) *25 29/32" (65.8 cm) Align top edges Customer-supplied panel Drill through the...5 Attach handle 6" (15.2 mm) Hex Head Screw Attach outer panel to attach custom panels. Attach the handle. Option 2 (Models KUDC03IV and KUDS30IV) All models require an accessory option to back of customer-supplied custom panel with back of the console. IMPORTANT: Screw heads must be centered on...
... panel up while removing the screws. Kit Number 8171555 (black), 8171556 (white) or 8171557 (biscuit) are for 4" (10.2 cm) toe kick. Dishwashers with control panel on the front 23 3/8" (65.8 cm) *25 29/32" (65.8 cm) Align top edges Customer-supplied panel Drill through the...5 Attach handle 6" (15.2 mm) Hex Head Screw Attach outer panel to attach custom panels. Attach the handle. Option 2 (Models KUDC03IV and KUDS30IV) All models require an accessory option to back of customer-supplied custom panel with back of the console. IMPORTANT: Screw heads must be centered on...

Installation Instructions
Page 24
...models there is insulation on the access panel which must be re-centered. Using a Philips or 1/4" screwdriver, reinstall the screws through the holes in the access panel and the slots in the lower panel. 3 Check lower panel edge Remove towel from dishwasher. Visit www.kitchenaid....com/anchoring under FAQ tab. 6 Check side attachment plastic button Check that grounding clip is properly centered, replace plastic buttons. 7 Remove towel and replace lower dishwasher rack Hold the two panels together and ...
...models there is insulation on the access panel which must be re-centered. Using a Philips or 1/4" screwdriver, reinstall the screws through the holes in the access panel and the slots in the lower panel. 3 Check lower panel edge Remove towel from dishwasher. Visit www.kitchenaid....com/anchoring under FAQ tab. 6 Check side attachment plastic button Check that grounding clip is properly centered, replace plastic buttons. 7 Remove towel and replace lower dishwasher rack Hold the two panels together and ...

Installation Instructions
Page 25
... low energy consumption motor, your dishwasher. ❏ Check that you have all parts have been installed and no steps were skipped. Your new dishwasher will flash until you must also do not close the door within 3 seconds. Certain models are equipped with rinse aid for... good drying performance and controlling hard water deposit buildup. Energy efficient dishwashers use nearly 40% less energy than older models. Rinse Aid is necessary for good drying performance. Reconnect Power 1 Reconnect power Reconnect electrical power at ...
... low energy consumption motor, your dishwasher. ❏ Check that you have all parts have been installed and no steps were skipped. Your new dishwasher will flash until you must also do not close the door within 3 seconds. Certain models are equipped with rinse aid for... good drying performance and controlling hard water deposit buildup. Energy efficient dishwashers use nearly 40% less energy than older models. Rinse Aid is necessary for good drying performance. Reconnect Power 1 Reconnect power Reconnect electrical power at ...

Parts Diagram
Page 1
... White W10021850 Stainless 17 2004333 Nut 18 8269016 Clip, Grounding 02−09 Litho in U.S.A. (LL) (eeb)(bay) 1 Part No. A DOOR AND PANEL PARTS For Models: KUDE60FVBL0, KUDE60FVWH0, KUDE60FVSS0 (Black) (White) (Stainless) UNDERCOUNTER DISHWASHER Illus. Part No. No.
... White W10021850 Stainless 17 2004333 Nut 18 8269016 Clip, Grounding 02−09 Litho in U.S.A. (LL) (eeb)(bay) 1 Part No. A DOOR AND PANEL PARTS For Models: KUDE60FVBL0, KUDE60FVWH0, KUDE60FVSS0 (Black) (White) (Stainless) UNDERCOUNTER DISHWASHER Illus. Part No. No.

Parts Diagram
Page 2
Part No. DESCRIPTION 1 Console Assembly (Includes Insert) W10208736 Black W10208737 White W10208738 Stainless 2 8546546 Clip, Bi−Metal 3 661663 Bi−Metal 4 3369051 Screw 5 W10077360 Latch Assembly 6 W10056352 Control, Electronic 7 W10134019 Switch, Door 8 W10083167 Fuse, In−Line 2 W10246594 No. CONTROL PANEL PARTS For Models: KUDE60FVBL0, KUDE60FVWH0, KUDE60FVSS0 (Black) (White) (Stainless) Illus.
Part No. DESCRIPTION 1 Console Assembly (Includes Insert) W10208736 Black W10208737 White W10208738 Stainless 2 8546546 Clip, Bi−Metal 3 661663 Bi−Metal 4 3369051 Screw 5 W10077360 Latch Assembly 6 W10056352 Control, Electronic 7 W10134019 Switch, Door 8 W10083167 Fuse, In−Line 2 W10246594 No. CONTROL PANEL PARTS For Models: KUDE60FVBL0, KUDE60FVWH0, KUDE60FVSS0 (Black) (White) (Stainless) Illus.

Parts Diagram
Page 3
... W10238390 Wiring Harness 12 W10177098 Screw 13 8535660 Seal, Console/door 14 8535637 Bracket, Dispenser 15 8531865 Shield, Dispenser W10246594 3 DOOR AND LATCH PARTS For Models: KUDE60FVBL0, KUDE60FVWH0, KUDE60FVSS0 (Black) (White) (Stainless) Illus. DESCRIPTION 1 3369051 Screw, Door 2 8281217 Screw 3 W10056249 Inner Door Mastic Assembly (Also Order Item 6) 4 W10077883 Inlet, Air 5 8572611...
... W10238390 Wiring Harness 12 W10177098 Screw 13 8535660 Seal, Console/door 14 8535637 Bracket, Dispenser 15 8531865 Shield, Dispenser W10246594 3 DOOR AND LATCH PARTS For Models: KUDE60FVBL0, KUDE60FVWH0, KUDE60FVSS0 (Black) (White) (Stainless) Illus. DESCRIPTION 1 3369051 Screw, Door 2 8281217 Screw 3 W10056249 Inner Door Mastic Assembly (Also Order Item 6) 4 W10077883 Inlet, Air 5 8572611...

Parts Diagram
Page 4
Part No. FILL, DRAIN AND OVERFILL PARTS For Models: KUDE60FVBL0, KUDE60FVWH0, KUDE60FVSS0 (Black) (White) (Stainless) Illus. No. DESCRIPTION 1 8268892 Lever, Overfill Switch 2 8531412 Hose, Inlet 3 8531325 Water Inlet (Also Order Item 4) 4 8531323 Gasket 5 8531327 ...
Part No. FILL, DRAIN AND OVERFILL PARTS For Models: KUDE60FVBL0, KUDE60FVWH0, KUDE60FVSS0 (Black) (White) (Stainless) Illus. No. DESCRIPTION 1 8268892 Lever, Overfill Switch 2 8531412 Hose, Inlet 3 8531325 Water Inlet (Also Order Item 4) 4 8531323 Gasket 5 8531327 ...

Parts Diagram
Page 5
TUB AND FRAME PARTS For Models: KUDE60FVBL0, KUDE60FVWH0, KUDE60FVSS0 (Black) (White) (Stainless) W10246594 5
TUB AND FRAME PARTS For Models: KUDE60FVBL0, KUDE60FVWH0, KUDE60FVSS0 (Black) (White) (Stainless) W10246594 5

Parts Diagram
Page 6
... 8268582 Insulator, Sound 23 304666 Retainer, Push 24 8573239 Shield, Sound Tub 25 9742648 Bracket, Thermostat 26 661566 Thermostat 6 W10246594 TUB AND FRAME PARTS For Models: KUDE60FVBL0, KUDE60FVWH0, KUDE60FVSS0 (Black) (White) (Stainless) Illus.
... 8268582 Insulator, Sound 23 304666 Retainer, Push 24 8573239 Shield, Sound Tub 25 9742648 Bracket, Thermostat 26 661566 Thermostat 6 W10246594 TUB AND FRAME PARTS For Models: KUDE60FVBL0, KUDE60FVWH0, KUDE60FVSS0 (Black) (White) (Stainless) Illus.


