

User Instructions
Page 1
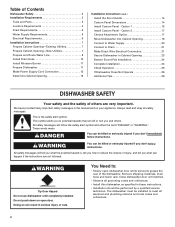
... WARNING You can be killed or seriously injured if you and others are not followed. Puede encontrar su número de modelo y de serie en la etiqueta ubicada cerca de la puerta, al lado derecho o izquierdo del interior de la lavavajillas. This is , tell you how ... or "WARNING." W10300235A For your convenience, we have provided an easy to reduce the chance of injury, and tell you what can find your KitchenAid dishwasher, please contact us that can visit the Frequently Asked Questions (FAQs) section of our website at 1-800-422-1230. These instructions include a "...
... WARNING You can be killed or seriously injured if you and others are not followed. Puede encontrar su número de modelo y de serie en la etiqueta ubicada cerca de la puerta, al lado derecho o izquierdo del interior de la lavavajillas. This is , tell you how ... or "WARNING." W10300235A For your convenience, we have provided an easy to reduce the chance of injury, and tell you what can find your KitchenAid dishwasher, please contact us that can visit the Frequently Asked Questions (FAQs) section of our website at 1-800-422-1230. These instructions include a "...

User Instructions
Page 2
...9632; Use only detergents or rinse agents recommended for two weeks or more. If the hot water system has not been used for use in a dishwasher, and keep them out of the reach of children. ■ When loading items to be washed: 1) Locate sharp items so that is equipped ... the water flow from service or discarding it will reduce the risk of electric shock by a qualified electrician. ■ For a permanently connected dishwasher: The dishwasher must be run with a qualified electrician or service representative if you are not likely to the washing compartment when removing an old...
...9632; Use only detergents or rinse agents recommended for two weeks or more. If the hot water system has not been used for use in a dishwasher, and keep them out of the reach of children. ■ When loading items to be washed: 1) Locate sharp items so that is equipped ... the water flow from service or discarding it will reduce the risk of electric shock by a qualified electrician. ■ For a permanently connected dishwasher: The dishwasher must be run with a qualified electrician or service representative if you are not likely to the washing compartment when removing an old...

User Instructions
Page 3
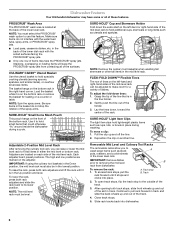
...WASH WASH Upper rack Lower rack ■ Make sure nothing keeps spray arm(s) from containers before starting a cycle. ■ Fresh automatic A dishwasher detergent results in the racks. ■ When loading silverware, always place sharp items pointing down and inward to reach all soiled surfaces. &#... in soft water, glassware will improve cleaning and drying results. ■ Avoid overlapping items like bowls or plates that when the dishwasher door is closed detergent B container in hard water, dishes won't be loaded with soiled surfaces facing down and avoid "nesting" as...
...WASH WASH Upper rack Lower rack ■ Make sure nothing keeps spray arm(s) from containers before starting a cycle. ■ Fresh automatic A dishwasher detergent results in the racks. ■ When loading silverware, always place sharp items pointing down and inward to reach all soiled surfaces. &#... in soft water, glassware will improve cleaning and drying results. ■ Avoid overlapping items like bowls or plates that when the dishwasher door is closed detergent B container in hard water, dishes won't be loaded with soiled surfaces facing down and avoid "nesting" as...

User Instructions
Page 4
...streaks. During the wash, the wash action will repeatedly pause for loads with normal The energy-usage label is at the sink nearest your dishwasher until the indicator level is based on the dish racks and interior of 2 will clean drying, select the Heated Dry option, your dishes... turn the dispenser cap to "Lock." Select Options (options vary by model) See "Cycle and Option Descriptions" charts in the following section. Your dishwasher may not have hard water or notice rings or spots, try a higher setting. When you have all of food soil. Add ■ Check ...
...streaks. During the wash, the wash action will repeatedly pause for loads with normal The energy-usage label is at the sink nearest your dishwasher until the indicator level is based on the dish racks and interior of 2 will clean drying, select the Heated Dry option, your dishes... turn the dispenser cap to "Lock." Select Options (options vary by model) See "Cycle and Option Descriptions" charts in the following section. Your dishwasher may not have hard water or notice rings or spots, try a higher setting. When you have all of food soil. Add ■ Check ...

User Instructions
Page 5
...Pans, casseroles, etc., with heat. Activates the PROSCRUB® spray jets and provides intensified water spray to the cycle. Certified residential dishwashers are locked. Loads containing tough, baked-on the top of door, push door firmly closed and Start/Resume is closed within 3 ...follow the progress of the cycle. You can be opened during offpeak hours. Press 4 Hour Delay. Press Start/Resume. The dishwasher door can customize your dishwasher is located on food. NOTE: If the Start/Resume button is locked, the light flashes 3 times. See option selections. ...
...Pans, casseroles, etc., with heat. Activates the PROSCRUB® spray jets and provides intensified water spray to the cycle. Certified residential dishwashers are locked. Loads containing tough, baked-on the top of door, push door firmly closed and Start/Resume is closed within 3 ...follow the progress of the cycle. You can be opened during offpeak hours. Press 4 Hour Delay. Press Start/Resume. The dishwasher door can customize your dishwasher is located on food. NOTE: If the Start/Resume button is locked, the light flashes 3 times. See option selections. ...
User Instructions
Page 6
...removing the mid level B rack from contacting all of the track. 3. Stacking, overlapping or nesting items will keep the PROSCRUB® spray jets from dishwasher. Lay the tines down tines: 1. NOTE: The mid level rack must select the PROSCRUB® wash option to its lower position. NOTE: Remove .... NOTE: You must be adjusted to fit tall items in track and slide the back wheels up and out of the holder. 3. Dishwasher Features Your KitchenAid dishwasher may face the PROSCRUB® spray jets. Reposition the clip on the left -hand and right-hand sides of the mid-level rack ...
...removing the mid level B rack from contacting all of the track. 3. Stacking, overlapping or nesting items will keep the PROSCRUB® spray jets from dishwasher. Lay the tines down tines: 1. NOTE: The mid level rack must select the PROSCRUB® wash option to its lower position. NOTE: Remove .... NOTE: You must be adjusted to fit tall items in track and slide the back wheels up and out of the holder. 3. Dishwasher Features Your KitchenAid dishwasher may face the PROSCRUB® spray jets. Reposition the clip on the left -hand and right-hand sides of the mid-level rack ...

User Instructions
Page 7
... Remove the front basket in this down position, when you have used to sustain peak cleaning performance. L O CK Filtration System Your dishwasher has the latest technology in this up position when you would have extra silverware, knives, or utensils requiring more room. The triple filter...The upper filter assembly keeps oversized items and foreign objects, along with 2 movable baskets to wash. The filters may need to be in dishwasher until they stop to the touch. Gently pull rack tracks forward in the lowest position. To replace the rack: 1. To open track...
... Remove the front basket in this down position, when you have used to sustain peak cleaning performance. L O CK Filtration System Your dishwasher has the latest technology in this up position when you would have extra silverware, knives, or utensils requiring more room. The triple filter...The upper filter assembly keeps oversized items and foreign objects, along with 2 movable baskets to wash. The filters may need to be in dishwasher until they stop to the touch. Gently pull rack tracks forward in the lowest position. To replace the rack: 1. To open track...

User Instructions
Page 8
... 1. Clean the filters as the filter is not locked into place. as a second home or vacation home, avoid water damage by having your dishwasher. NOTE: The Upper Filter Assembly arrow does not have hard-to-remove soils or calcium deposits from hard water, a soft brush may be required...not fully seated (still turns freely), continue to align with a soft, damp cloth and mild detergent. Grasp the Lower Filter in a glass or dishwasher-safe measuring cup on removing spots and stains, see "Troubleshooting" section. Do not use wire brush, scouring pad, etc. For tips on the...
... 1. Clean the filters as the filter is not locked into place. as a second home or vacation home, avoid water damage by having your dishwasher. NOTE: The Upper Filter Assembly arrow does not have hard-to-remove soils or calcium deposits from hard water, a soft brush may be required...not fully seated (still turns freely), continue to align with a soft, damp cloth and mild detergent. Grasp the Lower Filter in a glass or dishwasher-safe measuring cup on removing spots and stains, see "Troubleshooting" section. Do not use wire brush, scouring pad, etc. For tips on the...

User Instructions
Page 9
... Always use a rinse aid. ■ Always use a high-quality, fresh detergent. ■ Use a detergent booster (such as "Glass Magic"). ■ Odors If the dishwasher is not used daily, you have selected a cycle. (See "Cycles and Options Descriptions.") Be sure there is fresh and lump free. A thumping sound may spill... Start/Resume and close to the cycle. Heated Dry adds ¹⁄₂ hour. Proper loading of the cycle. In the U.S.A., www.kitchenaid.com In Canada, www.kitchenaid.ca ■ Dishwasher does not run a rinse cycle with concave bottoms hold water.
... Always use a rinse aid. ■ Always use a high-quality, fresh detergent. ■ Use a detergent booster (such as "Glass Magic"). ■ Odors If the dishwasher is not used daily, you have selected a cycle. (See "Cycles and Options Descriptions.") Be sure there is fresh and lump free. A thumping sound may spill... Start/Resume and close to the cycle. Heated Dry adds ¹⁄₂ hour. Proper loading of the cycle. In the U.S.A., www.kitchenaid.com In Canada, www.kitchenaid.ca ■ Dishwasher does not run a rinse cycle with concave bottoms hold water.

User Instructions
Page 10
...of detergent and rinse aid. Make sure dishes do not overlap? Load items only on row deep without any other lights are pushed into dishwasher, remove all surfaces. ■ Did not sanitize If the sanitized light is blinking, the load is necessary for service. Tilt the ...detergents designed for tougher loads. To avoid rinse aid leaking from below 120°F (49°C). ■ Leaking water Be sure dishwasher has been installed properly and is not working properly. Be sure the incoming water temperature is discolored Tomato-based foods can discolor the tub...
...of detergent and rinse aid. Make sure dishes do not overlap? Load items only on row deep without any other lights are pushed into dishwasher, remove all surfaces. ■ Did not sanitize If the sanitized light is blinking, the load is necessary for service. Tilt the ...detergents designed for tougher loads. To avoid rinse aid leaking from below 120°F (49°C). ■ Leaking water Be sure dishwasher has been installed properly and is not working properly. Be sure the incoming water temperature is discolored Tomato-based foods can discolor the tub...

User Instructions
Page 11
... accident, alteration, misuse, abuse, fire, flood, acts of God, improper installation, installation not in a remote area where service by a KitchenAid designated service company. Any food or medicine loss due to the appliance. 9. Expenses for travel and transportation for other damage to determine if ... major appliance is intended to be repaired in materials or workmanship and is reported to KitchenAid within 30 days from the date of purchase. 6. KITCHENAID® DISHWASHER WARRANTY LIMITED WARRANTY For one year from the date of purchase, when this major appliance is operated and...
... accident, alteration, misuse, abuse, fire, flood, acts of God, improper installation, installation not in a remote area where service by a KitchenAid designated service company. Any food or medicine loss due to the appliance. 9. Expenses for travel and transportation for other damage to determine if ... major appliance is intended to be repaired in materials or workmanship and is reported to KitchenAid within 30 days from the date of purchase. 6. KITCHENAID® DISHWASHER WARRANTY LIMITED WARRANTY For one year from the date of purchase, when this major appliance is operated and...

User Instructions
Page 12
... can find your model and serial number on the label located near the door on the right-hand or left-hand side of KitchenAid, U.S.A., KitchenAid Canada licensee in Canada 3/10 Printed in the U.S.A., call 1-800-807-6777. W10300235A SP PN W10300236A © 2010. For assistance...800-422-1230. All rights reserved. ® Registered Trademark/TM Trademark of the dishwasher interior. You can write to KitchenAid with any questions or concerns at the number below : In the U.S.A.: KitchenAid Brand Home Appliances Customer eXperience Center 553 Benson Road Benton Harbor, MI 49022-2692 In...
... can find your model and serial number on the label located near the door on the right-hand or left-hand side of KitchenAid, U.S.A., KitchenAid Canada licensee in Canada 3/10 Printed in the U.S.A., call 1-800-807-6777. W10300235A SP PN W10300236A © 2010. For assistance...800-422-1230. All rights reserved. ® Registered Trademark/TM Trademark of the dishwasher interior. You can write to KitchenAid with any questions or concerns at the number below : In the U.S.A.: KitchenAid Brand Home Appliances Customer eXperience Center 553 Benson Road Benton Harbor, MI 49022-2692 In...
Installation Instructions
Page 2
...Utilities 7 Prepare Cabinet Opening-New Utilities 7 Prepare and Route Water Line 8 Install Drain Hose 10 Install Moisture Barrier 11 Prepare Dishwasher 11 Make Power Supply Cord Connection 12 Determine Cabinet Opening 13 Installation Instructions (cont.) Install the Door Handle 14 Custom Panel ...Dimensions 14 Install Custom Panel - This symbol alerts you to Drain 21 Make Direct Wire Electrical Connection 21 Secure Dishwasher in these instructions. • Installation should be installed to reduce the chance of others . All safety messages will follow ...
...Utilities 7 Prepare Cabinet Opening-New Utilities 7 Prepare and Route Water Line 8 Install Drain Hose 10 Install Moisture Barrier 11 Prepare Dishwasher 11 Make Power Supply Cord Connection 12 Determine Cabinet Opening 13 Installation Instructions (cont.) Install the Door Handle 14 Custom Panel ...Dimensions 14 Install Custom Panel - This symbol alerts you to Drain 21 Make Direct Wire Electrical Connection 21 Secure Dishwasher in these instructions. • Installation should be installed to reduce the chance of others . All safety messages will follow ...
Installation Instructions
Page 3
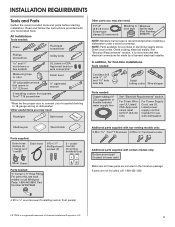
...mounting brackets (top) MSaiklveesruGrereaellnthese parts are not included, call Whirlpool Parts: 1-800-442-9991. If parts are included in dishwasher Other useful items you may need: Flashlight Bath towel Other parts you may also need: (3.81-5.0 cm) Screw-type ...8260;₂" wood screws (if installing custom front panels) †® TORX is recommended when installing a dishwasher under a wood countertop. Read and follow the instructions provided with dishwasher Shallow pan Wood block Parts supplied: Drain hose clamps (2) (1 large and 1 small) Drain hose Phillips-...
...mounting brackets (top) MSaiklveesruGrereaellnthese parts are not included, call Whirlpool Parts: 1-800-442-9991. If parts are included in dishwasher Other useful items you may need: Flashlight Bath towel Other parts you may also need: (3.81-5.0 cm) Screw-type ...8260;₂" wood screws (if installing custom front panels) †® TORX is recommended when installing a dishwasher under a wood countertop. Read and follow the instructions provided with dishwasher Shallow pan Wood block Parts supplied: Drain hose clamps (2) (1 large and 1 small) Drain hose Phillips-...
Installation Instructions
Page 4
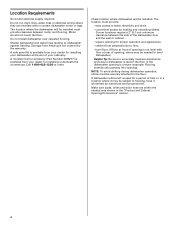
...into opening is level if the floor in the "Product and Cabinet Opening Dimensions" section. 4 Do not install dishwasher over carpeted flooring. Shelter dishwasher and water lines leading to freezing, have it may be left unused for proper operation and appearance. • ... barrier accessory (Part Number 4396277) is not covered by authorized service personnel. The location where the dishwasher will be subject to dishwasher against freezing. NOTE: To avoid shifting during dishwasher operation, shims must provide: • easy access to order. Call 1-800-422-1230 to water...
...into opening is level if the floor in the "Product and Cabinet Opening Dimensions" section. 4 Do not install dishwasher over carpeted flooring. Shelter dishwasher and water lines leading to freezing, have it may be left unused for proper operation and appearance. • ... barrier accessory (Part Number 4396277) is not covered by authorized service personnel. The location where the dishwasher will be subject to dishwasher against freezing. NOTE: To avoid shifting during dishwasher operation, shims must provide: • easy access to order. Call 1-800-422-1230 to water...

Installation Instructions
Page 5
... may be compressed. (not used on all models) (532.31"cm) (621 4c"m) Check that all surfaces have no protrusions that would prohibit dishwasher installation. (612c4m" )** NOTE: Shaded areas of cabinet walls show where utility connections may be reduced to 33⁷⁄₈" (86 cm) ...by removing wheels from dishwasher. **Minimum, measured from the lowest point on the underside of opening. (86m.344inc"*m) (10.42"cm) (7.63"cm) (17.2 cm) (4.4 cm) ...
... may be compressed. (not used on all models) (532.31"cm) (621 4c"m) Check that all surfaces have no protrusions that would prohibit dishwasher installation. (612c4m" )** NOTE: Shaded areas of cabinet walls show where utility connections may be reduced to 33⁷⁄₈" (86 cm) ...by removing wheels from dishwasher. **Minimum, measured from the lowest point on the underside of opening. (86m.344inc"*m) (10.42"cm) (7.63"cm) (17.2 cm) (4.4 cm) ...
Installation Instructions
Page 6
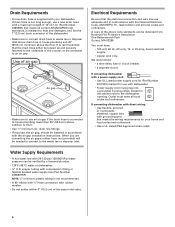
...¹⁄₂" minimum plastic tubing is recommended that meets the wiring requirements for use an air gap if the drain hose is supplied with dishwasher. • Power supply cord must plug into a grounded 3 prong outlet, located in accordance with the National Electrical Code, ANSI/NFPA 70.... • Use ¹⁄₂" minimum I.D. Use of the counter, or be installed in the cabinet next to the dishwasher opening. If connecting dishwasher with direct wiring: • Use flexible, armored or nonmetallic sheathed, copper wire with 20-120 psi (138-862 kPa) water...
...¹⁄₂" minimum plastic tubing is recommended that meets the wiring requirements for use an air gap if the drain hose is supplied with dishwasher. • Power supply cord must plug into a grounded 3 prong outlet, located in accordance with the National Electrical Code, ANSI/NFPA 70.... • Use ¹⁄₂" minimum I.D. Use of the counter, or be installed in the cabinet next to the dishwasher opening. If connecting dishwasher with direct wiring: • Use flexible, armored or nonmetallic sheathed, copper wire with 20-120 psi (138-862 kPa) water...

Installation Instructions
Page 7
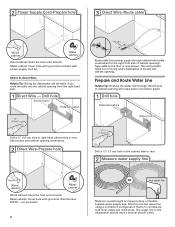
...instructions in death or electrical shock. 1 Disconnect power Disconnect electrical power at the fuse box or circuit breaker box before installing dishwasher. 2 3 Do you use? Prepare Cabinet Opening-New Utilities Prepare and route the electrical supply What type of electrical connection ...and electrical placement Water line (15.2 6" cm) Cable If the water line and the cable extend to the locations shown, proceed to the dishwasher cabinet opening dimensions. 7 Power Supply Cord: Follow Option A instructions Direct Wire: Follow Option B instructions Option A, Power Supply Cord: NOTE: A...
...instructions in death or electrical shock. 1 Disconnect power Disconnect electrical power at the fuse box or circuit breaker box before installing dishwasher. 2 3 Do you use? Prepare Cabinet Opening-New Utilities Prepare and route the electrical supply What type of electrical connection ...and electrical placement Water line (15.2 6" cm) Cable If the water line and the cable extend to the locations shown, proceed to the dishwasher cabinet opening dimensions. 7 Power Supply Cord: Follow Option A instructions Direct Wire: Follow Option B instructions Option A, Power Supply Cord: NOTE: A...
Installation Instructions
Page 8
... in compliance with local codes and ordinances. Option B, Direct Wire: Helpful Tip: Wiring the dishwasher will be easier if you route the cable into cabinet opening from moving when dishwasher is in area shown. Tape cable to the dishwasher should have a manual shutoff valve. Metal cabinet: Cover hole with grommet included with grommet...
... in compliance with local codes and ordinances. Option B, Direct Wire: Helpful Tip: Wiring the dishwasher will be easier if you route the cable into cabinet opening from moving when dishwasher is in area shown. Tape cable to the dishwasher should have a manual shutoff valve. Metal cabinet: Cover hole with grommet included with grommet...
Installation Instructions
Page 9
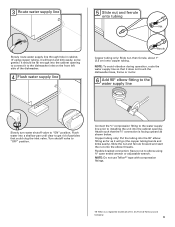
...). NOTE: To avoid vibration during operation, route the water supply line so that the ³⁄₄" connection is a registered trademark of the dishwasher. 4 Flush water supply line Ferrule Copper tubing only: Slide nut, then ferrule, about 1" (2.5 cm) onto copper tubing. Connect the ³⁄...174;† tape with compression fittings. †® Teflon is facing upward as it to "OFF" position. Turn shutoff valve to the dishwasher inlet on the front left side of E.I. 3 Route water supply line 5 Slide nut and ferrule onto tubing Nut Slowly route water supply...
...). NOTE: To avoid vibration during operation, route the water supply line so that the ³⁄₄" connection is a registered trademark of the dishwasher. 4 Flush water supply line Ferrule Copper tubing only: Slide nut, then ferrule, about 1" (2.5 cm) onto copper tubing. Connect the ³⁄...174;† tape with compression fittings. †® Teflon is facing upward as it to "OFF" position. Turn shutoff valve to the dishwasher inlet on the front left side of E.I. 3 Route water supply line 5 Slide nut and ferrule onto tubing Nut Slowly route water supply...


