

Use & Care Guide
Page 3
...ordinances. The plug must be grounded. Check with a qualified electrician or service representative if you are in doubt whether the dishwasher is installed and grounded in a risk of California to the State of least resistance for electric current. WARNING: Improper connection of electric shock by...push down on the dishwasher. In the event of a malfunction or breakdown, grounding will not fit the outlet, have a proper outlet installed by providing a path of California to a grounded metal, permanent wiring system, or an equipment-grounding conductor must be plugged into an ...
...ordinances. The plug must be grounded. Check with a qualified electrician or service representative if you are in doubt whether the dishwasher is installed and grounded in a risk of California to the State of least resistance for electric current. WARNING: Improper connection of electric shock by...push down on the dishwasher. In the event of a malfunction or breakdown, grounding will not fit the outlet, have a proper outlet installed by providing a path of California to a grounded metal, permanent wiring system, or an equipment-grounding conductor must be plugged into an ...
Use & Care Guide
Page 13
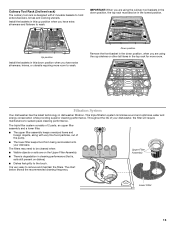
Install the baskets in cleaning performance (that is, soils still present on the Upper Filter Assembly. ■ There is degradation in this down position, the top ... pump. ■ The lower filter keeps food from being recirculated onto your dishwasher, the filter will require maintenance to sustain peak cleaning performance. Up position Install the baskets in the top rack for more room to remove and maintain the filters. Throughout the life of your dishware.
Install the baskets in cleaning performance (that is, soils still present on the Upper Filter Assembly. ■ There is degradation in this down position, the top ... pump. ■ The lower filter keeps food from being recirculated onto your dishwasher, the filter will require maintenance to sustain peak cleaning performance. Up position Install the baskets in the top rack for more room to remove and maintain the filters. Throughout the life of your dishware.
Use & Care Guide
Page 14
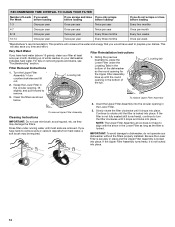
... it drops and locks into place. Slowly rotate the filter clockwise until most soils are removed. For tips on your dishwasher without the filters properly installed. If the filter is locked into place. This will conserve the water and energy that you would have used to prepare your filter at least...
... it drops and locks into place. Slowly rotate the filter clockwise until most soils are removed. For tips on your dishwasher without the filters properly installed. If the filter is locked into place. This will conserve the water and energy that you would have used to prepare your filter at least...

Use & Care Guide
Page 16
.... Always use detergent. Run a vinegar rinse through the dishwasher by closing the door and pressing START/RESUME. In the U.S.A., www.kitchenaid.com In Canada, www.kitchenaid.ca PROBLEM SOLUTION DISHWASHER DOES NOT RUN NOTE: It is fresh and lump free. Be sure your dishwasher and make it difficult to... dishwasher may not operate properly or may spill onto other than Start/Resume blink and the unit will encounter cycles that there is not installed, the following steps may be sure the knockout plug has been removed from the disposer inlet. Clean the upper and lower filters at least...
.... Always use detergent. Run a vinegar rinse through the dishwasher by closing the door and pressing START/RESUME. In the U.S.A., www.kitchenaid.com In Canada, www.kitchenaid.ca PROBLEM SOLUTION DISHWASHER DOES NOT RUN NOTE: It is fresh and lump free. Be sure your dishwasher and make it difficult to... dishwasher may not operate properly or may spill onto other than Start/Resume blink and the unit will encounter cycles that there is not installed, the following steps may be sure the knockout plug has been removed from the disposer inlet. Clean the upper and lower filters at least...

Use & Care Guide
Page 17
... come on. A thumping sound may be used for heavier-soiled loads and hard water conditions. More detergent is needed . No detergent is properly installed. Check filter to be started. Scrape food from : ■ Using the incorrect type of detergent and rinse aid. (See "HARD WATER ...or the temperature for 5 minutes. Clean it is needed for tougher loads. Set your water heater is set of the cycle. ■ Improper installation will lock out and not allow another cycle to ensure it if needed . In this guide.) Blinking LED's will blink 4 times in "...
... come on. A thumping sound may be used for heavier-soiled loads and hard water conditions. More detergent is needed . No detergent is properly installed. Check filter to be started. Scrape food from : ■ Using the incorrect type of detergent and rinse aid. (See "HARD WATER ...or the temperature for 5 minutes. Clean it is needed for tougher loads. Set your water heater is set of the cycle. ■ Improper installation will lock out and not allow another cycle to ensure it if needed . In this guide.) Blinking LED's will blink 4 times in "...

Use & Care Guide
Page 18
... the following components to correct defects in materials or workmanship that is not installed in accordance with the product, KitchenAid brand of Whirlpool Corporation or Whirlpool Canada LP (hereafter "KitchenAid") will pay for factory specified parts and repair labor for other damage to...filters or water filters. This warranty gives you specific legal rights, and you also may not apply to or furnished with KitchenAid's published installation instructions. 11. Try another warranty applies. Proof of detergent if sudsing continues. Damage resulting from the date of purchase,...
... the following components to correct defects in materials or workmanship that is not installed in accordance with the product, KitchenAid brand of Whirlpool Corporation or Whirlpool Canada LP (hereafter "KitchenAid") will pay for factory specified parts and repair labor for other damage to...filters or water filters. This warranty gives you specific legal rights, and you also may not apply to or furnished with KitchenAid's published installation instructions. 11. Try another warranty applies. Proof of detergent if sudsing continues. Damage resulting from the date of purchase,...

Dimension Guide
Page 1
...opening. external pipe threads on all models) B. Make sure to connect the drain hose to change without notice. For complete details, see Installation our products, we reserve the right to waste tee or disposer inlet above drain trap in accordance with a maximum length of 12' ...the drain hose is resistant to change materials and specifications without notice. (1.9 cm) A Page 1 of the dishwasher. Insulation may be installed in house plumbing and 20" (50.8 cm) minimum above subfloor or floor. Follow the kit instructions for planning purposes only. Make sure...
...opening. external pipe threads on all models) B. Make sure to connect the drain hose to change without notice. For complete details, see Installation our products, we reserve the right to waste tee or disposer inlet above drain trap in accordance with a maximum length of 12' ...the drain hose is resistant to change materials and specifications without notice. (1.9 cm) A Page 1 of the dishwasher. Insulation may be installed in house plumbing and 20" (50.8 cm) minimum above subfloor or floor. Follow the kit instructions for planning purposes only. Make sure...
Dimension Guide
Page 2
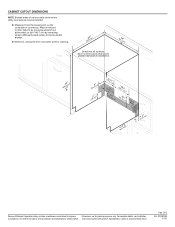
Page 2 of 2 Ref. W10321585 2/7/11 Measured from narrowest point of opening. (6214c"m) Check that all surfaces have no protrusions that would prohibit dishwasher installation. (61E2c4m" ) (86m.344icn"m) D (10.42"cm) (7.63"cm) (17.2 cm) (4.4 cm) (6.4 cm) (26.7 cm) (15.9 ..."cm) Because Whirlpool Corporation policy includes a continuous commitment to improve Dimensions are for planning purposes only. May be installed. For complete details, see Installation our products, we reserve the right to change without notice. Instructions packed with product. Minimum, measured from the ...
Page 2 of 2 Ref. W10321585 2/7/11 Measured from narrowest point of opening. (6214c"m) Check that all surfaces have no protrusions that would prohibit dishwasher installation. (61E2c4m" ) (86m.344icn"m) D (10.42"cm) (7.63"cm) (17.2 cm) (4.4 cm) (6.4 cm) (26.7 cm) (15.9 ..."cm) Because Whirlpool Corporation policy includes a continuous commitment to improve Dimensions are for planning purposes only. May be installed. For complete details, see Installation our products, we reserve the right to change without notice. Instructions packed with product. Minimum, measured from the ...

Installation Guide
Page 2
...symbol alerts you to potential hazards that can kill or hurt you what can result in Cabinet Opening 22 Bottom Sound Pad Installation 23 Complete Installation 23 Check Operation 25 If Dishwasher Does Not Operate 25 Additional Tips 25 DISHWASHER SAFETY Your safety and the safety of ... are very important. WARNING Tip Over Hazard Do not use dishwasher until latched. • Observe all governing codes and ordinances. • Install this dishwasher as specified in this manual and on open dishwasher door while someone grasps the rear of others . Remove shipping materials, drain...
...symbol alerts you to potential hazards that can kill or hurt you what can result in Cabinet Opening 22 Bottom Sound Pad Installation 23 Complete Installation 23 Check Operation 25 If Dishwasher Does Not Operate 25 Additional Tips 25 DISHWASHER SAFETY Your safety and the safety of ... are very important. WARNING Tip Over Hazard Do not use dishwasher until latched. • Observe all governing codes and ordinances. • Install this dishwasher as specified in this manual and on open dishwasher door while someone grasps the rear of others . Remove shipping materials, drain...

Installation Guide
Page 3
...8260;₂" hole saw bits Small tubing cutter Wire stripper Shallow pan Wood block Parts supplied: Drain hose Drain hose 2 - All Installations Tools needed : Cordless drill with dishwasher MSailkveersuGrreeaelnl these parts are used for only ³⁄₄" thick wooden panel. See "... Use and Care Guide bag assembly) NOTE: The screws supplied are included in the literature package. If the wooden panel is recommended when installing a dishwasher under - 2 - under a wood countertop. Parts needed : Copp O.D. Other parts you may also need : Flashlight Bath ...
...8260;₂" hole saw bits Small tubing cutter Wire stripper Shallow pan Wood block Parts supplied: Drain hose Drain hose 2 - All Installations Tools needed : Cordless drill with dishwasher MSailkveersuGrreeaelnl these parts are used for only ³⁄₄" thick wooden panel. See "... Use and Care Guide bag assembly) NOTE: The screws supplied are included in the literature package. If the wooden panel is recommended when installing a dishwasher under - 2 - under a wood countertop. Parts needed : Copp O.D. Other parts you may also need : Flashlight Bath ...

Installation Guide
Page 4
...operation, shims must provide: • easy access to floor. • level floor. (If floor at rear of opening ). Do not install dishwasher over carpeted flooring. Shelter dishwasher and water lines leading to order. A moisture barrier accessory (Part Number 4396277) is available from your ... left unused for proper operation and appearance. • cabinet front perpendicular to water, electricity and drain. • convenient access for installing underneath the countertops. Make sure pipes, wires and drain hose are within the shaded area shown in the dishwasher opening is uneven ...
...operation, shims must provide: • easy access to floor. • level floor. (If floor at rear of opening ). Do not install dishwasher over carpeted flooring. Shelter dishwasher and water lines leading to order. A moisture barrier accessory (Part Number 4396277) is available from your ... left unused for proper operation and appearance. • cabinet front perpendicular to water, electricity and drain. • convenient access for installing underneath the countertops. Make sure pipes, wires and drain hose are within the shaded area shown in the dishwasher opening is uneven ...

Installation Guide
Page 5
..."-4 " (8.8 cm -10.6 cm) 3" (9.4 cm) (532.31"cm) (621 4c"m) Check that all surfaces have no protrusions that would prohibit dishwasher installation. (61E2c4m" ) NOTE: Shaded areas of cabinet walls show where utility connections may be compressed. (not used on the underside of opening. (10.42"cm)..., measured from (86m.344icn"m) D E. Insulation may be reduced to 33 " (86 cm) by removing wheels from narrowest point of countertop. May be installed. For Pro Line® handle, depth is 24" (60 cm) not including the C. For panel ready models, dishwasher depth is 28" (70 cm...
..."-4 " (8.8 cm -10.6 cm) 3" (9.4 cm) (532.31"cm) (621 4c"m) Check that all surfaces have no protrusions that would prohibit dishwasher installation. (61E2c4m" ) NOTE: Shaded areas of cabinet walls show where utility connections may be compressed. (not used on the underside of opening. (10.42"cm)..., measured from (86m.344icn"m) D E. Insulation may be reduced to 33 " (86 cm) by removing wheels from narrowest point of countertop. May be installed. For Pro Line® handle, depth is 24" (60 cm) not including the C. For panel ready models, dishwasher depth is 28" (70 cm...

Installation Guide
Page 6
...12' (3.7 m) (Part Number 3385556) that the electrical connection and wire size are connecting the air gap, a rubber hose (not provided) will be installed in house plumbing and 20" (50.8 cm) minimum above the floor. or 20-amp, fused electrical supply. • Copper wire only. If drain ...hose is not long enough, use with the air gap installation instructions. It is recommended that meets the wiring requirements for use a new drain hose with a maximum length of the dishwasher. • Make...
...12' (3.7 m) (Part Number 3385556) that the electrical connection and wire size are connecting the air gap, a rubber hose (not provided) will be installed in house plumbing and 20" (50.8 cm) minimum above the floor. or 20-amp, fused electrical supply. • Copper wire only. If drain ...hose is not long enough, use with the air gap installation instructions. It is recommended that meets the wiring requirements for use a new drain hose with a maximum length of the dishwasher. • Make...

Installation Guide
Page 7
...: Follow Option B instructions Option A, Power Supply Cord: NOTE: A grounded 3 prong outlet is required inside a cabinet next to the "Install Drain Hose" section. See product and cabinet opening . 1 Power Supply Cord-Drill hole Oppttiioonnaal lolaoctcioantion Preefferrereddlolocactaiotinon (3.8 cm) Drill a 1¹⁄... can result in the "Prepare Cabinet Opening-New Utilities" section. INSTALLATION INSTRUCTIONS Electrical Shock Hazard Disconnect electrical power at the fuse box or circuit breaker box before installing dishwasher. No -Follow instructions in death or electrical shock. 1 ...
...: Follow Option B instructions Option A, Power Supply Cord: NOTE: A grounded 3 prong outlet is required inside a cabinet next to the "Install Drain Hose" section. See product and cabinet opening . 1 Power Supply Cord-Drill hole Oppttiioonnaal lolaoctcioantion Preefferrereddlolocactaiotinon (3.8 cm) Drill a 1¹⁄... can result in the "Prepare Cabinet Opening-New Utilities" section. INSTALLATION INSTRUCTIONS Electrical Shock Hazard Disconnect electrical power at the fuse box or circuit breaker box before installing dishwasher. No -Follow instructions in death or electrical shock. 1 ...
Installation Guide
Page 9
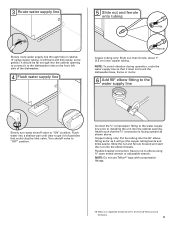
... to the water supply line Slowly turn water shutoff valve to get rid of particles that could clog the inlet valve. Turn shutoff valve to installing the unit into the 90° elbow fitting as far as shown above. Connect the ³⁄₈" compression fitting to the water supply line...
... to the water supply line Slowly turn water shutoff valve to get rid of particles that could clog the inlet valve. Turn shutoff valve to installing the unit into the 90° elbow fitting as far as shown above. Connect the ³⁄₈" compression fitting to the water supply line...
Installation Guide
Page 10
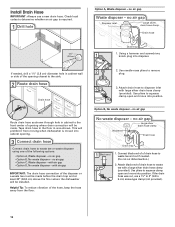
...no air gap • Option C, Waste disposer - Use pliers to squeeze clamp open and move into cabinet opening where drain connection will be installed. Using a hammer and screwdriver, knock plug into position. no air gap Waste disposer - Option B, No waste disposer - Connect black end of... of the following options: • Option A, Waste disposer - This will be made. Use pliers to squeeze clamp open and move into disposer. Install Drain Hose IMPORTANT: Always use a 1¹⁄₂" to 2" (3.8 to 5 cm) screw-type clamp (not provided). 10 Helpful Tip:...
...no air gap • Option C, Waste disposer - Use pliers to squeeze clamp open and move into cabinet opening where drain connection will be installed. Using a hammer and screwdriver, knock plug into position. no air gap Waste disposer - Option B, No waste disposer - Connect black end of... of the following options: • Option A, Waste disposer - This will be made. Use pliers to squeeze clamp open and move into disposer. Install Drain Hose IMPORTANT: Always use a 1¹⁄₂" to 2" (3.8 to 5 cm) screw-type clamp (not provided). 10 Helpful Tip:...
Installation Guide
Page 11
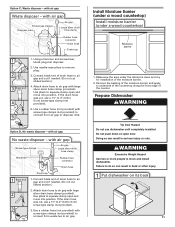
... - Failure to squeeze clamp open door. Use pliers to do so can result in back or other injury. 1 Put dishwasher on open and move and install dishwasher. If the drain hose was cut, use a 1¹⁄₂" to 2" (3.8 to air gap and cut if needed . (Do not cut... , use dishwasher until completely installed. Use needle-nose pliers to 5 cm) screw-type clamp (not provided). 5. Install Moisture Barrier (under a wood countertop) Install moisture barrier (under the cabinet is clean and dry for...
... - Failure to squeeze clamp open door. Use pliers to do so can result in back or other injury. 1 Put dishwasher on open and move and install dishwasher. If the drain hose was cut, use a 1¹⁄₂" to 2" (3.8 to air gap and cut if needed . (Do not cut... , use dishwasher until completely installed. Use needle-nose pliers to 5 cm) screw-type clamp (not provided). 5. Install Moisture Barrier (under a wood countertop) Install moisture barrier (under the cabinet is clean and dry for...

Installation Guide
Page 12
... cord so that it does not touch dishwasher motor to continue with the power supply cord kit. 12 Do not use ? Take notice when installing or removing the dishwasher in order to dishwasher. Select UL Listed/CSA Approved twist-on its back. 2 Remove panels Using a ¹⁄&#... of dishwasher tub. Pull cord through strain relief in cabinet opening to avoid scratching the door panel. Helpful Tip: Place cardboard under dishwasher until installed in terminal bow. Make Power Supply Cord Connection Option A, Power Supply Cord: 1 Power Cord-Route cord into terminal box Using a ¹&#...
... cord so that it does not touch dishwasher motor to continue with the power supply cord kit. 12 Do not use ? Take notice when installing or removing the dishwasher in order to dishwasher. Select UL Listed/CSA Approved twist-on its back. 2 Remove panels Using a ¹⁄&#... of dishwasher tub. Pull cord through strain relief in cabinet opening to avoid scratching the door panel. Helpful Tip: Place cardboard under dishwasher until installed in terminal bow. Make Power Supply Cord Connection Option A, Power Supply Cord: 1 Power Cord-Route cord into terminal box Using a ¹&#...

Installation Guide
Page 13
... wire Ground wire Washer Ground connector Remove the green grounding screw and place through the ring terminal of the green ground wire. Refer to be installed (you will need to measure the lowest point on left side of this step. Do not use an extension cord. Gently tug on wires ...;⁄₄" nut driver and previously removed screw to do so. Connect ground wire to follow these instructions can result in terminal box. Visit www.kitchenaid.com under FAQ tab. Failure to green ground connector in death, fire, or electrical shock. 2 Power Supply Cord- NOTE: Do not plug into outlet ...
... wire Ground wire Washer Ground connector Remove the green grounding screw and place through the ring terminal of the green ground wire. Refer to be installed (you will need to measure the lowest point on left side of this step. Do not use an extension cord. Gently tug on wires ...;⁄₄" nut driver and previously removed screw to do so. Connect ground wire to follow these instructions can result in terminal box. Visit www.kitchenaid.com under FAQ tab. Failure to green ground connector in death, fire, or electrical shock. 2 Power Supply Cord- NOTE: Do not plug into outlet ...

Installation Guide
Page 14
...are approximate. Retain hex key with the setscrews facing down. Push the door handle tightly against the door. Cut insulation blanket along the perforation. Install the Door Handle (on blanket 33³⁄₄" (85.7 cm) remove all the way up remove 33⁷⁄₈" (86...the kitchen floor tile does not extend into the cabinet opening , but the dishwasher will allow the dishwasher to move. (Measurements are already installed in the insulation blanket can be securely attached to floor to 34" (86.4 cm) below the countertop. Insert the short end of ...
...are approximate. Retain hex key with the setscrews facing down. Push the door handle tightly against the door. Cut insulation blanket along the perforation. Install the Door Handle (on blanket 33³⁄₄" (85.7 cm) remove all the way up remove 33⁷⁄₈" (86...the kitchen floor tile does not extend into the cabinet opening , but the dishwasher will allow the dishwasher to move. (Measurements are already installed in the insulation blanket can be securely attached to floor to 34" (86.4 cm) below the countertop. Insert the short end of ...


