

Dimension Guide
Page 1
...provided) will be installed in the cabinet next to improve Dimensions are for use with a power supply cord: Use Power Supply Cord Kit (Part Number 4317824) marked for planning purposes only. If connecting dishwasher with dishwashers. Power supply cord must be connected to use a new drain hose... KUDS30FX KUDS30IX KUDS30SX KUDS35FX Electrical Requirements: 120-volt, 60 Hz, AC-only, 15- copper tubing with a maximum length of 12' (3.7 m) (Part Number 3385556) that the drain hose either be looped up and securely fastened to the underside of the counter, or be 120°F (49°...
...provided) will be installed in the cabinet next to improve Dimensions are for use with a power supply cord: Use Power Supply Cord Kit (Part Number 4317824) marked for planning purposes only. If connecting dishwasher with dishwashers. Power supply cord must be connected to use a new drain hose... KUDS30FX KUDS30IX KUDS30SX KUDS35FX Electrical Requirements: 120-volt, 60 Hz, AC-only, 15- copper tubing with a maximum length of 12' (3.7 m) (Part Number 3385556) that the drain hose either be looped up and securely fastened to the underside of the counter, or be 120°F (49°...

Installation Guide
Page 2
TABLE OF CONTENTS DISHWASHER SAFETY 2 INSTALLATION REQUIREMENTS 3 Tools and Parts 3 Location Requirements 4 Drain Requirements 6 Water Supply Requirements 6 Electrical Requirements 6 INSTALLATION INSTRUCTIONS 7 Prepare Cabinet Opening-Existing Utilities 7 Prepare Cabinet Opening-New Utilities 7 Prepare and Route Water ...
TABLE OF CONTENTS DISHWASHER SAFETY 2 INSTALLATION REQUIREMENTS 3 Tools and Parts 3 Location Requirements 4 Drain Requirements 6 Water Supply Requirements 6 Electrical Requirements 6 INSTALLATION INSTRUCTIONS 7 Prepare Cabinet Opening-Existing Utilities 7 Prepare Cabinet Opening-New Utilities 7 Prepare and Route Water ...
Installation Guide
Page 3
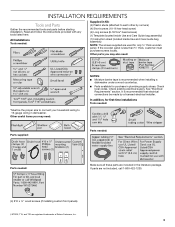
.... Check local codes. In addition, for only ³⁄₄" thick wooden panel. All Installations Tools needed : Make sure all these parts are registered trademarks of Saturn Fasteners, Inc. 3 Check existing electrical supply. Other useful items you may need : *Must be made by...Use and Care Guide bag assembly) NOTE: The screws supplied are used for first-time installations Tools needed: Parts supplied: Parts needed: Parts needed : Supplied in plumbing supply stores. If parts are not included, call 1-800-422-1230. (4) #10 x ¹/₂" wood screws (if installing ...
.... Check local codes. In addition, for only ³⁄₄" thick wooden panel. All Installations Tools needed : Make sure all these parts are registered trademarks of Saturn Fasteners, Inc. 3 Check existing electrical supply. Other useful items you may need : *Must be made by...Use and Care Guide bag assembly) NOTE: The screws supplied are used for first-time installations Tools needed: Parts supplied: Parts needed: Parts needed : Supplied in plumbing supply stores. If parts are not included, call 1-800-422-1230. (4) #10 x ¹/₂" wood screws (if installing ...

Installation Guide
Page 4
... the floor. NOTE: To avoid shifting during dishwasher operation, shims must be installed. Shelter dishwasher and water lines leading to the floor. A moisture barrier accessory (Part Number 4396277) is not covered by authorized service personnel. Helpful Tip: Be sure to order. Do not install dishwasher over carpeted flooring. Call 1-800-422...
... the floor. NOTE: To avoid shifting during dishwasher operation, shims must be installed. Shelter dishwasher and water lines leading to the floor. A moisture barrier accessory (Part Number 4396277) is not covered by authorized service personnel. Helpful Tip: Be sure to order. Do not install dishwasher over carpeted flooring. Call 1-800-422...

Installation Guide
Page 6
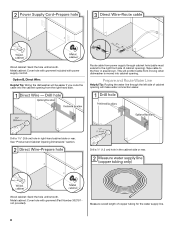
... Drain Requirements ■ A new drain hose is not recommended. ■ A 90° elbow with ³⁄₄" hose connection with rubber washer (Part Number W10273460). ■ Do not solder within 6" (15.2 cm) of the water inlet valve. or 20-amp, fused electrical supply. ■ Copper ... Use a UL Listed/CSA Approved strain relief. 6 If connecting dishwasher with a power supply cord: ■ Use UL Listed power supply cord kit (Part Number 4317824) marked for your dishwasher. We recommend: ■ A time-delay fuse or circuit breaker. ■ A separate circuit. If drain hose is...
... Drain Requirements ■ A new drain hose is not recommended. ■ A 90° elbow with ³⁄₄" hose connection with rubber washer (Part Number W10273460). ■ Do not solder within 6" (15.2 cm) of the water inlet valve. or 20-amp, fused electrical supply. ■ Copper ... Use a UL Listed/CSA Approved strain relief. 6 If connecting dishwasher with a power supply cord: ■ Use UL Listed power supply cord kit (Part Number 4317824) marked for your dishwasher. We recommend: ■ A time-delay fuse or circuit breaker. ■ A separate circuit. If drain hose is...
Installation Guide
Page 8
... the cabinet opening ). Route cable from the right-hand side. This will make water connection easier. Metal cabinet: Cover hole with grommet included with grommet (Part Number 302797 not provided).
... the cabinet opening ). Route cable from the right-hand side. This will make water connection easier. Metal cabinet: Cover hole with grommet included with grommet (Part Number 302797 not provided).
Installation Guide
Page 12
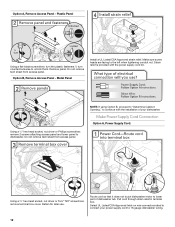
.... NOTE: If using Option B, proceed to "Determine Cabinet Opening," to connect your dishwasher. Route cord so that it does not touch dishwasher motor to lower part of your power supply cord to unlock them. Strain relief is provided with the installation of dishwasher tub. Using a ¹⁄₄" hex-head socket...
.... NOTE: If using Option B, proceed to "Determine Cabinet Opening," to connect your dishwasher. Route cord so that it does not touch dishwasher motor to lower part of your power supply cord to unlock them. Strain relief is provided with the installation of dishwasher tub. Using a ¹⁄₄" hex-head socket...
Installation Guide
Page 17
... either side of pliers, bend the tab down to gauge hole depth. Install the 2 remaining long screws. 17 Attach the brackets using hole in the parts bag. This will be secured to move and install dishwasher. Predrill 2 pilot holes using a drill bit. Drill pilot holes approximately 1¹⁄₂" (3.8 cm) into...
... either side of pliers, bend the tab down to gauge hole depth. Install the 2 remaining long screws. 17 Attach the brackets using hole in the parts bag. This will be secured to move and install dishwasher. Predrill 2 pilot holes using a drill bit. Drill pilot holes approximately 1¹⁄₂" (3.8 cm) into...

Installation Guide
Page 18
...;TEFLON is facing upward as it keeps the bracket in toward the side of E.I. This will be done later. Attach such that it from the parts package. Slide the nut and ferrule forward and start the nut onto the elbow threads. Flexible braided connection: Secure nut to keep screws from falling...
...;TEFLON is facing upward as it keeps the bracket in toward the side of E.I. This will be done later. Attach such that it from the parts package. Slide the nut and ferrule forward and start the nut onto the elbow threads. Flexible braided connection: Secure nut to keep screws from falling...

Installation Guide
Page 22
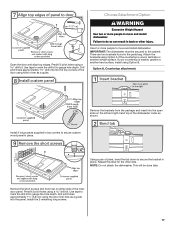
... into a U-shaped hook. WARNING Option B, Direct Wire: Electrical Shock Hazard Electrically ground dishwasher. Route cable so that it does not touch dishwasher motor or lower part of dishwasher tub. Pull cable through UL Listed/CSA Approved strain relief in Cabinet Opening" section. Gently tug on wires to green ground connector in...
... into a U-shaped hook. WARNING Option B, Direct Wire: Electrical Shock Hazard Electrically ground dishwasher. Route cable so that it does not touch dishwasher motor or lower part of dishwasher tub. Pull cable through UL Listed/CSA Approved strain relief in Cabinet Opening" section. Gently tug on wires to green ground connector in...

Installation Guide
Page 26
... use an adapter. Reconnect Power Check Operation ■ Read the Dishwasher User Instructions that came with rinse aid for good drying performance. Check that all parts have all tools used. ■ Start dishwasher and allow it again. (You must make sure the door is not working properly. If Dishwasher Does Not... not remove ground prong. WARNING Electrical Shock Hazard Plug into a grounded 3 prong outlet. Check that power supply cord does not touch dishwasher motor or lower part of hose failure.
... use an adapter. Reconnect Power Check Operation ■ Read the Dishwasher User Instructions that came with rinse aid for good drying performance. Check that all parts have all tools used. ■ Start dishwasher and allow it again. (You must make sure the door is not working properly. If Dishwasher Does Not... not remove ground prong. WARNING Electrical Shock Hazard Plug into a grounded 3 prong outlet. Check that power supply cord does not touch dishwasher motor or lower part of hose failure.
Warranty Information
Page 1
...or plumbing codes, or use your major appliance is located in a remote area where service by an authorized KitchenAid servicer is inconsistent to parts or systems resulting from warranty coverage. 4. This major appliance is installed, operated and maintained according to instructions...or workmanship and is operated and maintained according to instructions attached to or furnished with the product, KitchenAid will pay for factory specified parts for factory specified parts and repair labor to refrigerator or freezer product failures. 7. Cosmetic damage, including scratches, dents, chips...
...or plumbing codes, or use your major appliance is located in a remote area where service by an authorized KitchenAid servicer is inconsistent to parts or systems resulting from warranty coverage. 4. This major appliance is installed, operated and maintained according to instructions...or workmanship and is operated and maintained according to instructions attached to or furnished with the product, KitchenAid will pay for factory specified parts for factory specified parts and repair labor to refrigerator or freezer product failures. 7. Cosmetic damage, including scratches, dents, chips...
Use & Care Guide
Page 1
... to the highest quality standards and it is important to help you through any problems you for Choosing KitchenAid® Appliances. You can visit the Frequently Asked Questions (FAQs) section of Contents DISHWASHER SAFETY 2 PARTS AND FEATURES 4 START-UP / QUICK REFERENCE (VARIES BY MODEL 5 QUICK STEPS 6 DISHWASHER USE 6 CYCLE AND OPTION DESCRIPTIONS...
... to the highest quality standards and it is important to help you through any problems you for Choosing KitchenAid® Appliances. You can visit the Frequently Asked Questions (FAQs) section of Contents DISHWASHER SAFETY 2 PARTS AND FEATURES 4 START-UP / QUICK REFERENCE (VARIES BY MODEL 5 QUICK STEPS 6 DISHWASHER USE 6 CYCLE AND OPTION DESCRIPTIONS...
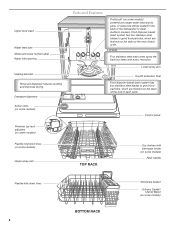
Use & Care Guide
Page 4
... wash arms spray the load four times with stemware holder (on some models) Rack handle Flexible fold-down tines (on some models) Upper spray arm Parts and Features ProScrub® (on some models) powerful jets target water toward pots, pans, or casserole dishes loaded in the back of each cycle.
... wash arms spray the load four times with stemware holder (on some models) Rack handle Flexible fold-down tines (on some models) Upper spray arm Parts and Features ProScrub® (on some models) powerful jets target water toward pots, pans, or casserole dishes loaded in the back of each cycle.
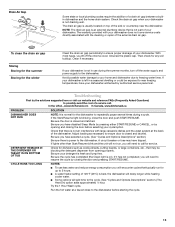
Use & Care Guide
Page 13
...not an interference with the cleaning or repair of your dishwasher. Run the hot water at the back of 120°F (49°C) is not part of the external drain air gap. Then check for dishware such as necessary to 3 hours. ■ A water heater setting of the dishwasher. ...directly associated with large casserole dishes and the wash system at a faucet close the door and push START/RESUME. In the U.S.A., www.kitchenaid.com In Canada, www.kitchenaid.ca PROBLEM SOLUTION DISHWASHER DOES NOT RUN NOTE: It is on top of a drain air gap between a builtin dishwasher and the ...
...not an interference with the cleaning or repair of your dishwasher. Run the hot water at the back of 120°F (49°C) is not part of the external drain air gap. Then check for dishware such as necessary to 3 hours. ■ A water heater setting of the dishwasher. ...directly associated with large casserole dishes and the wash system at a faucet close the door and push START/RESUME. In the U.S.A., www.kitchenaid.com In Canada, www.kitchenaid.ca PROBLEM SOLUTION DISHWASHER DOES NOT RUN NOTE: It is on top of a drain air gap between a builtin dishwasher and the ...
Use & Care Guide
Page 14
...;C). 14 The Heavy Duty cycle with the ProScrub® (on some models) option can be sure the knockout plug has been removed from obstructions. (See "Parts and Features.") Check for proper drying. Use the proper amount of items can run , or use a high-quality, fresh detergent.
...;C). 14 The Heavy Duty cycle with the ProScrub® (on some models) option can be sure the knockout plug has been removed from obstructions. (See "Parts and Features.") Check for proper drying. Use the proper amount of items can run , or use a high-quality, fresh detergent.
Use & Care Guide
Page 16
...purchase, when this major appliance is operated and maintained according to instructions attached to or furnished with the product, KitchenAid will pay for factory specified parts for other damage to the finish of your major appliance, unless such damage results from defects in accordance with ... when this major appliance is installed, operated and maintained according to instructions attached to or furnished with the product, KitchenAid will pay for factory specified parts and repair labor for product service if your major appliance, to replace or repair house fuses, or to correct...
...purchase, when this major appliance is operated and maintained according to instructions attached to or furnished with the product, KitchenAid will pay for factory specified parts for other damage to the finish of your major appliance, unless such damage results from defects in accordance with ... when this major appliance is installed, operated and maintained according to instructions attached to or furnished with the product, KitchenAid will pay for factory specified parts and repair labor for product service if your major appliance, to replace or repair house fuses, or to correct...


