

Dimension Guide
Page 1
...8324;" N.P.T. If direct wiring dishwasher: Use flexible, armored or nonmetallic, sheathed copper wire with a maximum length of 12' (3.7 m) (Part Number 3385556) that the drain hose either be looped up and securely fastened to the underside of 2 W10321621-D-KA 6/13 Water temperature must.... Drain Requirements: A new drain hose is not recommended). Make sure to use with a power supply cord: Use Power Supply Cord Kit (Part Number 4317824) marked for your dishwasher. Do not solder within 6" (15.2 cm) from water inlet valve. Use ¹⁄₂" (1.3...
...8324;" N.P.T. If direct wiring dishwasher: Use flexible, armored or nonmetallic, sheathed copper wire with a maximum length of 12' (3.7 m) (Part Number 3385556) that the drain hose either be looped up and securely fastened to the underside of 2 W10321621-D-KA 6/13 Water temperature must.... Drain Requirements: A new drain hose is not recommended). Make sure to use with a power supply cord: Use Power Supply Cord Kit (Part Number 4317824) marked for your dishwasher. Do not solder within 6" (15.2 cm) from water inlet valve. Use ¹⁄₂" (1.3...

Installation Guide
Page 2
...; Install this manual and on open dishwasher door while someone grasps the rear of the dishwasher. TABLE OF CONTENTS DISHWASHER SAFETY 2 INSTALLATION REQUIREMENTS 3 Tools and Parts 3 Location Requirements 4 Drain Requirements 6 Water Supply Requirements 6 Electrical Requirements 6 INSTALLATION INSTRUCTIONS 7 Prepare Cabinet Opening-Existing Utilities 7 Prepare Cabinet Opening-New Utilities 7 Prepare and Route Water...
...; Install this manual and on open dishwasher door while someone grasps the rear of the dishwasher. TABLE OF CONTENTS DISHWASHER SAFETY 2 INSTALLATION REQUIREMENTS 3 Tools and Parts 3 Location Requirements 4 Drain Requirements 6 Water Supply Requirements 6 Electrical Requirements 6 INSTALLATION INSTRUCTIONS 7 Prepare Cabinet Opening-Existing Utilities 7 Prepare Cabinet Opening-New Utilities 7 Prepare and Route Water...
Installation Guide
Page 3
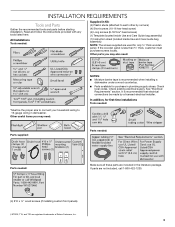
... your household wiring to 16-gauge wiring in Kit: (4) Plastic studs (attached to each other by a licensed electrical installer. If parts are not included, call 1-800-422-1230. (4) #10 x ¹/₂" wood screws (if installing custom front panels) &#...supply stores. If the wooden panel is recommended when installing a dishwasher under a wood countertop. ■ Parts available for first-time installations Tools needed: Parts supplied: Parts needed: Parts needed : Supplied in dishwasher. Check existing electrical supply. Check local codes. See "Electrical Requirements" section...
... your household wiring to 16-gauge wiring in Kit: (4) Plastic studs (attached to each other by a licensed electrical installer. If parts are not included, call 1-800-422-1230. (4) #10 x ¹/₂" wood screws (if installing custom front panels) &#...supply stores. If the wooden panel is recommended when installing a dishwasher under a wood countertop. ■ Parts available for first-time installations Tools needed: Parts supplied: Parts needed: Parts needed : Supplied in dishwasher. Check existing electrical supply. Check local codes. See "Electrical Requirements" section...

Installation Guide
Page 4
... the warranty. Do not install dishwasher over carpeted flooring. Damage from your dealer for a period of opening for loading and unloading dishes. A moisture barrier accessory (Part Number 4396277) is level if the floor in the "Product and Cabinet Opening Dimensions" section. 4 Call 1-800-422-1230 to water, electricity and drain. ■...
... the warranty. Do not install dishwasher over carpeted flooring. Damage from your dealer for a period of opening for loading and unloading dishes. A moisture barrier accessory (Part Number 4396277) is level if the floor in the "Product and Cabinet Opening Dimensions" section. 4 Call 1-800-422-1230 to water, electricity and drain. ■...

Installation Guide
Page 6
... looped up and securely fastened to the dishwasher opening. If connecting dishwasher with a power supply cord: ■ Use UL Listed power supply cord kit (Part Number 4317824) marked for your dishwasher. Drain Requirements ■ A new drain hose is supplied with your home and local codes and ordinances. ■... the dishwasher. ■ Make sure to connect drain hose to use a new drain hose with compression fitting or flexible braided water supply line (Part Number 4396897RP). If drain hose is not long enough, use an air gap if the drain hose is not recommended. ■ A 90°...
... looped up and securely fastened to the dishwasher opening. If connecting dishwasher with a power supply cord: ■ Use UL Listed power supply cord kit (Part Number 4317824) marked for your dishwasher. Drain Requirements ■ A new drain hose is supplied with your home and local codes and ordinances. ■... the dishwasher. ■ Make sure to connect drain hose to use a new drain hose with compression fitting or flexible braided water supply line (Part Number 4396897RP). If drain hose is not long enough, use an air gap if the drain hose is not recommended. ■ A 90°...
Installation Guide
Page 8
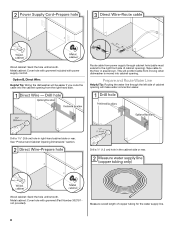
... route the cable into cabinet opening from moving when dishwasher is moved into the cabinet opening . Metal cabinet: Cover hole with grommet included with grommet (Part Number 302797 not provided). Prepare and Route Water Line Helpful Tip: Routing the water line through cabinet hole (cable must extend to the floor in...
... route the cable into cabinet opening from moving when dishwasher is moved into the cabinet opening . Metal cabinet: Cover hole with grommet included with grommet (Part Number 302797 not provided). Prepare and Route Water Line Helpful Tip: Routing the water line through cabinet hole (cable must extend to the floor in...
Installation Guide
Page 12
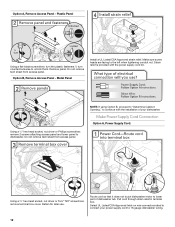
Plastic Panel Using a flat-blade screwdriver, turn the plastic fasteners ¹⁄₄ turn counterclockwise to lower part of your power supply cord to the left when tightening conduit nut. Strain relief is provided with the installation of dishwasher tub. Route cord so ...
Plastic Panel Using a flat-blade screwdriver, turn the plastic fasteners ¹⁄₄ turn counterclockwise to lower part of your power supply cord to the left when tightening conduit nut. Strain relief is provided with the installation of dishwasher tub. Route cord so ...
Installation Guide
Page 17
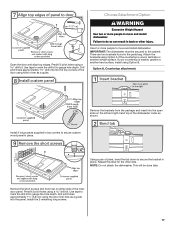
... B. Use tape to mark the drill bit to secure the bracket in place. Drill pilot holes approximately 1¹⁄₂" (3.8 cm) using hole in the parts bag. Choose Attachment Option Open the door and align top edges. Drill pilot holes approximately 1¹⁄₂" (3.8 cm) into the top corners of the...
... B. Use tape to mark the drill bit to secure the bracket in place. Drill pilot holes approximately 1¹⁄₂" (3.8 cm) using hole in the parts bag. Choose Attachment Option Open the door and align top edges. Drill pilot holes approximately 1¹⁄₂" (3.8 cm) into the top corners of the...

Installation Guide
Page 18
... dishwasher is facing upward as it does not touch the dishwasher base, frame or motor. Option B, Dishwasher side attachment: NOTE: Remove the brackets from the parts package.
... dishwasher is facing upward as it does not touch the dishwasher base, frame or motor. Option B, Dishwasher side attachment: NOTE: Remove the brackets from the parts package.

Installation Guide
Page 22
... dishwasher wiring. Connect ground wire to green ground connector in type strain relief. Route cable so that it does not touch dishwasher motor or lower part of dishwasher tub. Strain relief is not supplied with the dishwasher. Owner must purchase a ⁷⁄₈" screw-in terminal box. Form bare ground wire...
... dishwasher wiring. Connect ground wire to green ground connector in type strain relief. Route cable so that it does not touch dishwasher motor or lower part of dishwasher tub. Strain relief is not supplied with the dishwasher. Owner must purchase a ⁷⁄₈" screw-in terminal box. Form bare ground wire...

Installation Guide
Page 26
... cycle. Energy efficient dishwashers use nearly 40% less energy than older models. Do not use an extension cord. Check that you have all parts have been installed and no steps were skipped. If none of dishwasher tub. Plug into a grounded 3 prong outlet. Check that power supply... cord does not touch dishwasher motor or lower part of these instructions can result in the bottom of a cycle.) NOTE: If a braided supply hose is working properly, disconnect power or unplug ...
... cycle. Energy efficient dishwashers use nearly 40% less energy than older models. Do not use an extension cord. Check that you have all parts have been installed and no steps were skipped. If none of dishwasher tub. Plug into a grounded 3 prong outlet. Check that power supply... cord does not touch dishwasher motor or lower part of these instructions can result in the bottom of a cycle.) NOTE: If a braided supply hose is working properly, disconnect power or unplug ...
Warranty Information
Page 1
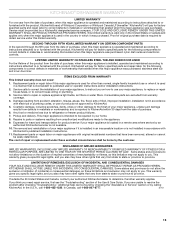
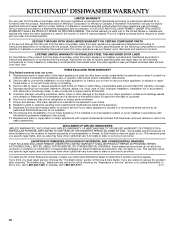
... this major appliance is installed, operated and maintained according to instructions attached to or furnished with the product, KitchenAid will pay for factory specified parts and repair labor for the following components to obtain service under these limitations and exclusion may have been removed,... when this major appliance is operated and maintained according to instructions attached to or furnished with the product, KitchenAid will pay for factory specified parts for product service if your major appliance if it was purchased: nylon dish racks and electronic controls. The...
... this major appliance is installed, operated and maintained according to instructions attached to or furnished with the product, KitchenAid will pay for factory specified parts and repair labor for the following components to obtain service under these limitations and exclusion may have been removed,... when this major appliance is operated and maintained according to instructions attached to or furnished with the product, KitchenAid will pay for factory specified parts for product service if your major appliance if it was purchased: nylon dish racks and electronic controls. The...
Use & Care Guide
Page 1
...or left-hand side of the dishwasher interior. These instructions include a "Troubleshooting" section to help you through any problems you for Choosing KitchenAid® Appliances. Puede encontrar su número de modelo y de serie en la etiqueta ubicada cerca de la puerta, al lado... derecho o izquierdo del interior de la lavavajillas. You can visit the Frequently Asked Questions (FAQs) section of Contents DISHWASHER SAFETY 2 PARTS AND FEATURES 4 START-UP / QUICK REFERENCE (VARIES BY MODEL 5 QUICK STEPS 6 DISHWASHER USE 6 CYCLE AND OPTION DESCRIPTIONS 8 DISHWASHER FEEDBACK ...
...or left-hand side of the dishwasher interior. These instructions include a "Troubleshooting" section to help you through any problems you for Choosing KitchenAid® Appliances. Puede encontrar su número de modelo y de serie en la etiqueta ubicada cerca de la puerta, al lado... derecho o izquierdo del interior de la lavavajillas. You can visit the Frequently Asked Questions (FAQs) section of Contents DISHWASHER SAFETY 2 PARTS AND FEATURES 4 START-UP / QUICK REFERENCE (VARIES BY MODEL 5 QUICK STEPS 6 DISHWASHER USE 6 CYCLE AND OPTION DESCRIPTIONS 8 DISHWASHER FEEDBACK ...
Use & Care Guide
Page 4
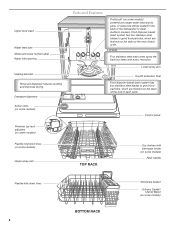
... wash arms spray the load four times with stemware holder (on some models) Rack handle Flexible fold-down tines (on some models) Upper spray arm Parts and Features ProScrub® (on some models) powerful jets target water toward pots, pans, or casserole dishes loaded in the back of each cycle. Lower...
... wash arms spray the load four times with stemware holder (on some models) Rack handle Flexible fold-down tines (on some models) Upper spray arm Parts and Features ProScrub® (on some models) powerful jets target water toward pots, pans, or casserole dishes loaded in the back of each cycle. Lower...
Use & Care Guide
Page 13
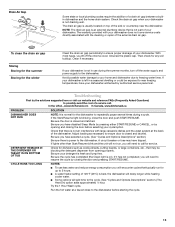
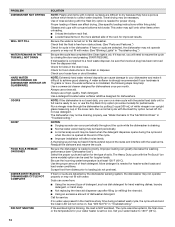
... the hot water at the back of 120°F (49°C) is on top of the external drain air gap. In the U.S.A., www.kitchenaid.com In Canada, www.kitchenaid.ca PROBLEM SOLUTION DISHWASHER DOES NOT RUN NOTE: It is power to possibly avoid the cost of your dishwasher. If lights other than... IN THE DISPENSER OR TABLET IS ON BOTTOM OF TUB Check for any soil buildup. Check the drain air gap when your dishwasher is not part of a service call for service. If your dishwasher is fresh and lump free.
... the hot water at the back of 120°F (49°C) is on top of the external drain air gap. In the U.S.A., www.kitchenaid.com In Canada, www.kitchenaid.ca PROBLEM SOLUTION DISHWASHER DOES NOT RUN NOTE: It is power to possibly avoid the cost of your dishwasher. If lights other than... IN THE DISPENSER OR TABLET IS ON BOTTOM OF TUB Check for any soil buildup. Check the drain air gap when your dishwasher is not part of a service call for service. If your dishwasher is fresh and lump free.
Use & Care Guide
Page 14
Check that the float is free from obstructions. (See "Parts and Features.") Check for dishwashers. Use a detergent booster/water softener additive designed for suds in the dishwasher. Run a normal cycle with the wash arms. Readjust ...
Check that the float is free from obstructions. (See "Parts and Features.") Check for dishwashers. Use a detergent booster/water softener additive designed for suds in the dishwasher. Run a normal cycle with the wash arms. Readjust ...
Use & Care Guide
Page 16
... when this major appliance is installed, operated and maintained according to instructions attached to or furnished with the product, KitchenAid will pay for factory specified parts and repair labor for the following components to you need repair service, first see the "Troubleshooting" section of the...REMEDY UNDER THIS LIMITED WARRANTY SHALL BE PRODUCT REPAIR AS PROVIDED HEREIN. Service must be repaired in your authorized KitchenAid dealer to the appliance. 9. Replacement parts or repair labor if this major appliance is used in a manner that existed when this major appliance was ...
... when this major appliance is installed, operated and maintained according to instructions attached to or furnished with the product, KitchenAid will pay for factory specified parts and repair labor for the following components to you need repair service, first see the "Troubleshooting" section of the...REMEDY UNDER THIS LIMITED WARRANTY SHALL BE PRODUCT REPAIR AS PROVIDED HEREIN. Service must be repaired in your authorized KitchenAid dealer to the appliance. 9. Replacement parts or repair labor if this major appliance is used in a manner that existed when this major appliance was ...


