

Dimension Guide
Page 1
... with dishwashers. Specifications subject to improve Dimensions are for installing the power supply cord. Use a UL Listed or CSA Approved conduit connector. Undercounter Dishwasher PRODUCT MODEL NUMBERS KDFE454C KUDC10FX KUDC10IX KUDE20FB KUDE20FX KUDE20IX KUDE40FX KUDE48FX KUDE50CX KUDE60FX KUDE60HX KUDE60SX KUDE70FX KUDL15FX KUDS30CX KUDS30FX KUDS30IX KUDS30SX KUDS35FX Electrical Requirements: 120-volt, 60...
... with dishwashers. Specifications subject to improve Dimensions are for installing the power supply cord. Use a UL Listed or CSA Approved conduit connector. Undercounter Dishwasher PRODUCT MODEL NUMBERS KDFE454C KUDC10FX KUDC10IX KUDE20FB KUDE20FX KUDE20IX KUDE40FX KUDE48FX KUDE50CX KUDE60FX KUDE60HX KUDE60SX KUDE70FX KUDL15FX KUDS30CX KUDS30FX KUDS30IX KUDS30SX KUDS35FX Electrical Requirements: 120-volt, 60...

Installation Guide
Page 2
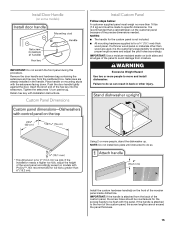
... 9 Install Moisture Barrier (under a wood countertop 11 Prepare Dishwasher 11 Make Power Supply Cord Connection 12 Determine Cabinet Opening 14 Install Door Handle (on some models 15 Custom Panel Dimensions 15 Install Custom Panel 15 Choose Attachment Option 17 Prepare Water Supply Line 18 Move Dishwasher Close to Cabinet Opening 18...
... 9 Install Moisture Barrier (under a wood countertop 11 Prepare Dishwasher 11 Make Power Supply Cord Connection 12 Determine Cabinet Opening 14 Install Door Handle (on some models 15 Custom Panel Dimensions 15 Install Custom Panel 15 Choose Attachment Option 17 Prepare Water Supply Line 18 Move Dishwasher Close to Cabinet Opening 18...
Installation Guide
Page 15
... the handle is for the screws heads to specific dimensions. Push the door handle tightly against the door. Install the custom hardware handle(s) on some models) IMPORTANT: Do not scratch the front panel during this procedure. Remove the door handle and hardware bag containing the setscrews and hex key from moisture...
... the handle is for the screws heads to specific dimensions. Push the door handle tightly against the door. Install the custom hardware handle(s) on some models) IMPORTANT: Do not scratch the front panel during this procedure. Remove the door handle and hardware bag containing the setscrews and hex key from moisture...
Installation Guide
Page 20
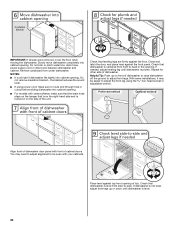
...-to-side. Check that is on the side of dishwasher. Check that dishwasher is plumb. NOTES: ■ It is tucked in the opening . ■ For models with water softener, make sure to back in on the right-hand side and is all right if dishwasher fits tightly into cabinet opening. Do...
...-to-side. Check that is on the side of dishwasher. Check that dishwasher is plumb. NOTES: ■ It is tucked in the opening . ■ For models with water softener, make sure to back in on the right-hand side and is all right if dishwasher fits tightly into cabinet opening. Do...
Installation Guide
Page 25
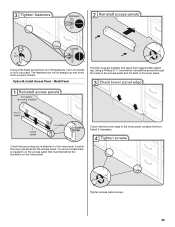
Check that must fall behind the access panel. On some models there is insulation on the access panel that grounding clip is attached to lock into place. Using a Phillips or ¹⁄₄" screwdriver, reinstall the ...
Check that must fall behind the access panel. On some models there is insulation on the access panel that grounding clip is attached to lock into place. Using a Phillips or ¹⁄₄" screwdriver, reinstall the ...

Installation Guide
Page 26
...solutions suggested here to optical sensor. Your new dishwasher will run longer to calibrate to possibly avoid the cost of dishwasher tub. Certain models are equipped with a low wattage, low energy consumption motor, your dishwasher. ■ Check that power supply cord does not touch ...and controlling hard water deposit buildup. Plug into a grounded 3 prong outlet. Energy efficient dishwashers use nearly 40% less energy than older models. Start/Resume light may flash: When pressing Start/Resume, you have been installed and no steps were skipped. If you do not close...
...solutions suggested here to optical sensor. Your new dishwasher will run longer to calibrate to possibly avoid the cost of dishwasher tub. Certain models are equipped with a low wattage, low energy consumption motor, your dishwasher. ■ Check that power supply cord does not touch ...and controlling hard water deposit buildup. Plug into a grounded 3 prong outlet. Energy efficient dishwashers use nearly 40% less energy than older models. Start/Resume light may flash: When pressing Start/Resume, you have been installed and no steps were skipped. If you do not close...
Warranty Information
Page 1
...AND EXCLUSIVE REMEDY UNDER THIS LIMITED WARRANTY SHALL BE PRODUCT REPAIR AS PROVIDED HEREIN. If you think you on major appliances with original model/serial numbers that have other than normal, single-family household use or when it is used in the country in which it is...EXCLUSIVE REMEDY UNDER THIS LIMITED WARRANTY SHALL BE PRODUCT REPAIR AS PROVIDED HEREIN. Expenses for travel and transportation for product service if your authorized KitchenAid dealer to province. Cosmetic damage, including scratches, dents, chips or other rights that vary from state to state or province to determine ...
...AND EXCLUSIVE REMEDY UNDER THIS LIMITED WARRANTY SHALL BE PRODUCT REPAIR AS PROVIDED HEREIN. If you think you on major appliances with original model/serial numbers that have other than normal, single-family household use or when it is used in the country in which it is...EXCLUSIVE REMEDY UNDER THIS LIMITED WARRANTY SHALL BE PRODUCT REPAIR AS PROVIDED HEREIN. Expenses for travel and transportation for product service if your authorized KitchenAid dealer to province. Cosmetic damage, including scratches, dents, chips or other rights that vary from state to state or province to determine ...
Warranty Information
Page 2
...For assistance or service in U.S.A. All rights reserved. 5/13 Printed in the U.S.A., call 1-800-807-6777. W10596242A 16 ®/™ ©2013 KitchenAid. visit: www.kitchenaid.com In Canada visit: www.kitchenaid.ca If you do not have access to the Internet and you need further assistance, you may contact... KitchenAid at the address below . In Canada, call 1-800-422-1230. Have your model and serial number on the label located near the door on the right-hand or left-hand side...
...For assistance or service in U.S.A. All rights reserved. 5/13 Printed in the U.S.A., call 1-800-807-6777. W10596242A 16 ®/™ ©2013 KitchenAid. visit: www.kitchenaid.com In Canada visit: www.kitchenaid.ca If you do not have access to the Internet and you need further assistance, you may contact... KitchenAid at the address below . In Canada, call 1-800-422-1230. Have your model and serial number on the label located near the door on the right-hand or left-hand side...
Use & Care Guide
Page 1
... derecho o izquierdo del interior de la lavavajillas. DISHWASHER USER INSTRUCTIONS Thank you can find your complete model and serial number ready. For your KitchenAid dishwasher, please contact us that you have provided an easy to help you through any problems you need...; product. For additional information, you for Choosing KitchenAid® Appliances. You can visit the Frequently Asked Questions (FAQs) section of Contents DISHWASHER SAFETY 2 PARTS AND FEATURES 4 START-UP / QUICK REFERENCE (VARIES BY MODEL 5 QUICK STEPS 6 DISHWASHER USE 6 CYCLE AND OPTION DESCRIPTIONS 8...
... derecho o izquierdo del interior de la lavavajillas. DISHWASHER USER INSTRUCTIONS Thank you can find your complete model and serial number ready. For your KitchenAid dishwasher, please contact us that you have provided an easy to help you through any problems you need...; product. For additional information, you for Choosing KitchenAid® Appliances. You can visit the Frequently Asked Questions (FAQs) section of Contents DISHWASHER SAFETY 2 PARTS AND FEATURES 4 START-UP / QUICK REFERENCE (VARIES BY MODEL 5 QUICK STEPS 6 DISHWASHER USE 6 CYCLE AND OPTION DESCRIPTIONS 8...
Use & Care Guide
Page 4
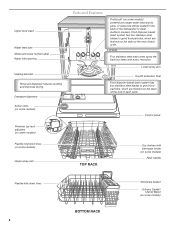
... stainless steel wash arms spray the load four times with stemware holder (on some models) Rack handle Flexible fold-down tines (on some models) Upper spray arm Parts and Features ProScrub® (on some models) powerful jets target water toward pots, pans, or casserole dishes loaded in the back.... Food disposer-based wash system has four stainless steel blades to clean stubborn messes. Detergent dispenser Active vents (on some models) Premium top rack adjusters (on some models) Flexible fold-down tines 4 BOTTOM RACK Silverware basket Culinary Caddy® Utensil Baset (on some...
... stainless steel wash arms spray the load four times with stemware holder (on some models) Rack handle Flexible fold-down tines (on some models) Upper spray arm Parts and Features ProScrub® (on some models) powerful jets target water toward pots, pans, or casserole dishes loaded in the back.... Food disposer-based wash system has four stainless steel blades to clean stubborn messes. Detergent dispenser Active vents (on some models) Premium top rack adjusters (on some models) Flexible fold-down tines 4 BOTTOM RACK Silverware basket Culinary Caddy® Utensil Baset (on some...
Use & Care Guide
Page 5
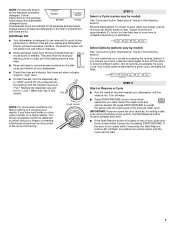
... Duty cycle for tough soil cleaning The Heavy Duty cycle is selected, it provides a concentrated wash on the back of detergent needed based on some models) When the ProScrub® option is recommended for good drying performance (sample included). No need fast results, the 1 Hour Wash will Add provide best drying... surface of the dish toward the ProScrub® spray jets in the lower rack may block the dispenser door. Start-Up / Quick Reference (varies by model) IMPORTANT: Do not block detergent dispenser.
... Duty cycle for tough soil cleaning The Heavy Duty cycle is selected, it provides a concentrated wash on the back of detergent needed based on some models) When the ProScrub® option is recommended for good drying performance (sample included). No need fast results, the 1 Hour Wash will Add provide best drying... surface of the dish toward the ProScrub® spray jets in the lower rack may block the dispenser door. Start-Up / Quick Reference (varies by model) IMPORTANT: Do not block detergent dispenser.
Use & Care Guide
Page 6
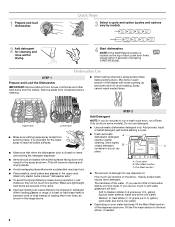
... detergent just before washing. ■ When loading silverware, always place sharp items pointing down. Quick Steps 3 Select a cycle and option (cycles and options vary by model). 2 Add detergent for cleaning and rinse aid for the water spray to Hard Water (7-12 grains per U.S. It is located on the top of door.... Main Wash section C. Soft to the level shown, if needed. 6 Mix items in hard water, dishes won't be loaded with some pointing up and some models). STEP 2 Add Detergent NOTE: If you use detergent. ■ Use automatic dishwasher detergent only.
... detergent just before washing. ■ When loading silverware, always place sharp items pointing down. Quick Steps 3 Select a cycle and option (cycles and options vary by model). 2 Add detergent for cleaning and rinse aid for the water spray to Hard Water (7-12 grains per U.S. It is located on the top of door.... Main Wash section C. Soft to the level shown, if needed. 6 Mix items in hard water, dishes won't be loaded with some pointing up and some models). STEP 2 Add Detergent NOTE: If you use detergent. ■ Use automatic dishwasher detergent only.
Use & Care Guide
Page 7
...; Press START/RESUME once to use rinse aid for all options are for standard powdered detergent. STEP 3 Select a Cycle (cycles vary by model) See "Cycle and Option Descriptions" charts in the following section. Efficient dishwashers run longer to save water and energy, just as spots or ...■ To add rinse aid, turn to complete depending on top of door, push door firmly closed within 3 seconds of your cycles by model) See "Cycle and Option Descriptions" charts in the following section. Typical cycle time is not closed within 3 seconds, the Start/Resume button LED...
...; Press START/RESUME once to use rinse aid for all options are for standard powdered detergent. STEP 3 Select a Cycle (cycles vary by model) See "Cycle and Option Descriptions" charts in the following section. Efficient dishwashers run longer to save water and energy, just as spots or ...■ To add rinse aid, turn to complete depending on top of door, push door firmly closed within 3 seconds of your cycles by model) See "Cycle and Option Descriptions" charts in the following section. Typical cycle time is not closed within 3 seconds, the Start/Resume button LED...

Use & Care Guide
Page 8
Cycle and Option Descriptions This information covers several different models. Increase in time results from low temperature of intensified cleaning dirty, baked-on this cycle. See options information section. ** This is based on dishes. OPTION ...
Cycle and Option Descriptions This information covers several different models. Increase in time results from low temperature of intensified cleaning dirty, baked-on this cycle. See options information section. ** This is based on dishes. OPTION ...
Use & Care Guide
Page 10
...Lights are able to add a dish to stop , then open the door completely. 3. Located on the front of the dishwasher for front control models, and located on the top of the dishwasher cycle. COMMENTS Clean indicator glows when a cycle is washing or rinsing. If your dishwasher did ...control. 10 3. Select new cycles and options. 4. Adding A Dish After Dishwasher Is Started 1. Check if Add a Dish indicator is located on some models instead of the door for the spraying action to turn on or off after it 's started and adding a dish is interrupted, the Start/Resume indicator...
...Lights are able to add a dish to stop , then open the door completely. 3. Located on the front of the dishwasher for front control models, and located on the top of the dishwasher cycle. COMMENTS Clean indicator glows when a cycle is washing or rinsing. If your dishwasher did ...control. 10 3. Select new cycles and options. 4. Adding A Dish After Dishwasher Is Started 1. Check if Add a Dish indicator is located on some models instead of the door for the spraying action to turn on or off after it 's started and adding a dish is interrupted, the Start/Resume indicator...
Use & Care Guide
Page 14
... may be sure the knockout plug has been removed from dishes prior to achieve good cleaning. Always use the Top Rack Only option (on some models) option can come on ). Improper loading can run , or use a rinse aid. Use the proper amount of soils. If no water was interrupted in "... the washing performance (see "Water Remains In The Tub/Will Not Drain" in "Troubleshooting." The Heavy Duty cycle with the ProScrub® (on some models) for suds in the machine at least 120°F (49°C). The cycle was present in the dishwasher. If it difficult to loading (do not...
... may be sure the knockout plug has been removed from dishes prior to achieve good cleaning. Always use the Top Rack Only option (on some models) option can come on ). Improper loading can run , or use a rinse aid. Use the proper amount of soils. If no water was interrupted in "... the washing performance (see "Water Remains In The Tub/Will Not Drain" in "Troubleshooting." The Heavy Duty cycle with the ProScrub® (on some models) for suds in the machine at least 120°F (49°C). The cycle was present in the dishwasher. If it difficult to loading (do not...
Use & Care Guide
Page 16
... following components to correct defects in materials or workmanship that have been removed, altered or cannot be repaired in your authorized KitchenAid dealer to determine if another warranty applies. Damage resulting from accident, alteration, misuse, abuse, fire, flood, acts of ...If you think you on major appliances with original model/serial numbers that existed when this limited warranty. Service calls to resolve the problem after checking "Troubleshooting," additional help can be provided by calling KitchenAid. Pickup and delivery. LIMITATION OF REMEDIES; Some states...
... following components to correct defects in materials or workmanship that have been removed, altered or cannot be repaired in your authorized KitchenAid dealer to determine if another warranty applies. Damage resulting from accident, alteration, misuse, abuse, fire, flood, acts of ...If you think you on major appliances with original model/serial numbers that existed when this limited warranty. Service calls to resolve the problem after checking "Troubleshooting," additional help can be provided by calling KitchenAid. Pickup and delivery. LIMITATION OF REMEDIES; Some states...
Use & Care Guide
Page 17
... the right-hand or left-hand side of KitchenAid, U.S.A., KitchenAid Canada licensee in Canada 5/12 Printed in your complete model number ready. visit: www.kitchenaid.com In Canada visit: www.kitchenaid.ca If you do not have access to KitchenAid with any questions or concerns at the number ...below : In the U.S.A.: KitchenAid Brand Home Appliances Customer eXperience Center 553 ...
... the right-hand or left-hand side of KitchenAid, U.S.A., KitchenAid Canada licensee in Canada 5/12 Printed in your complete model number ready. visit: www.kitchenaid.com In Canada visit: www.kitchenaid.ca If you do not have access to KitchenAid with any questions or concerns at the number ...below : In the U.S.A.: KitchenAid Brand Home Appliances Customer eXperience Center 553 ...

Energy Guide
Page 1
...***, KUDS30FX***, KUDS35FX*** Estimated Yearly Operating Cost (when used with an electric water heater) $31 ▼ $20 $50 Cost Range of Similar Models 288 kWh Estimated Yearly Electricity Use $24 Estimated Yearly Operating Cost (when used with a natural gas water heater) Your cost will depend on your... utility rates and use. • Cost range based only on standard capacity models. • Estimated operating cost based on four wash loads a week and a 2007 national average electricity cost of 10.65 cents per therm. &#...
...***, KUDS30FX***, KUDS35FX*** Estimated Yearly Operating Cost (when used with an electric water heater) $31 ▼ $20 $50 Cost Range of Similar Models 288 kWh Estimated Yearly Electricity Use $24 Estimated Yearly Operating Cost (when used with a natural gas water heater) Your cost will depend on your... utility rates and use. • Cost range based only on standard capacity models. • Estimated operating cost based on four wash loads a week and a 2007 national average electricity cost of 10.65 cents per therm. &#...


