
Dimension Guide
Page 1
... connect the drain hose to house plumbing lower than 20" (50.8 cm) above drain trap in the cabinet next to an air gap. Undercounter Dishwasher PRODUCT MODEL NUMBERS KDFE454C KUDC10FX KUDC10IX KUDE20FB KUDE20FX KUDE20IX KUDE40FX KUDE48FX KUDE50CX KUDE60FX KUDE60HX KUDE60SX KUDE70FX KUDL15FX KUDS30CX KUDS30FX KUDS30IX KUDS30SX KUDS35FX Electrical Requirements: 120-volt, 60...
... connect the drain hose to house plumbing lower than 20" (50.8 cm) above drain trap in the cabinet next to an air gap. Undercounter Dishwasher PRODUCT MODEL NUMBERS KDFE454C KUDC10FX KUDC10IX KUDE20FB KUDE20FX KUDE20IX KUDE40FX KUDE48FX KUDE50CX KUDE60FX KUDE60HX KUDE60SX KUDE70FX KUDL15FX KUDS30CX KUDS30FX KUDS30IX KUDS30SX KUDS35FX Electrical Requirements: 120-volt, 60...

Installation Guide
Page 2
...Line 8 Install Drain Hose 9 Install Moisture Barrier (under a wood countertop 11 Prepare Dishwasher 11 Make Power Supply Cord Connection 12 Determine Cabinet Opening 14 Install Door Handle (on some models 15 Custom Panel Dimensions 15 Install Custom Panel 15 Choose Attachment Option 17 Prepare Water Supply... Line 18 Move Dishwasher Close to Cabinet Opening 18 Connect to Water Supply 21 Connect to...
...Line 8 Install Drain Hose 9 Install Moisture Barrier (under a wood countertop 11 Prepare Dishwasher 11 Make Power Supply Cord Connection 12 Determine Cabinet Opening 14 Install Door Handle (on some models 15 Custom Panel Dimensions 15 Install Custom Panel 15 Choose Attachment Option 17 Prepare Water Supply... Line 18 Move Dishwasher Close to Cabinet Opening 18 Connect to Water Supply 21 Connect to...
Installation Guide
Page 15
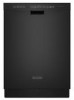
...thickness. 15 Place handle on the front of the wooden panel inside dotted line. IMPORTANT: Use a moisture-resistant sealer on some models) IMPORTANT: Do not scratch the front panel during this procedure. If the handle is the customer's responsibility to obtain the proper ...hardware supplied is recommended that a cabinetmaker cut the customer panel because of the precise dimensions needed. Using 2 or more people, stand the dishwasher up. Tighten the setscrews ¹⁄₄ turn past snug. Push the door handle tightly against the door. Install the custom hardware handle...
...thickness. 15 Place handle on the front of the wooden panel inside dotted line. IMPORTANT: Use a moisture-resistant sealer on some models) IMPORTANT: Do not scratch the front panel during this procedure. If the handle is the customer's responsibility to obtain the proper ...hardware supplied is recommended that a cabinetmaker cut the customer panel because of the precise dimensions needed. Using 2 or more people, stand the dishwasher up. Tighten the setscrews ¹⁄₄ turn past snug. Push the door handle tightly against the door. Install the custom hardware handle...
Installation Guide
Page 20
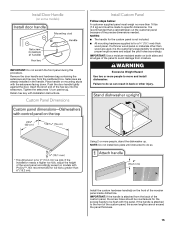
... power cord, make sure that the drain hose stays on the hanger that dishwasher is all right if dishwasher fits tightly into cabinet opening . ■ For models with water softener, make sure to back in on front of dishwasher. You may be even with front of tub. Close and latch the door..., and place level against top front opening . Helpful Tip: Push up or down until dishwasher is level. 20 Align front of...
... power cord, make sure that the drain hose stays on the hanger that dishwasher is all right if dishwasher fits tightly into cabinet opening . ■ For models with water softener, make sure to back in on front of dishwasher. You may be even with front of tub. Close and latch the door..., and place level against top front opening . Helpful Tip: Push up or down until dishwasher is level. 20 Align front of...
Installation Guide
Page 25
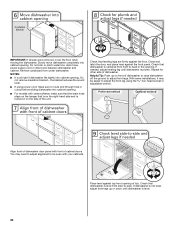
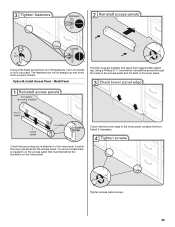
... contacts the floor. The fasteners slot will be straight up and down when properly locked. Check that must fall behind the access panel. On some models there is attached to lock into place. Using a Phillips or ¹⁄₄" screwdriver, reinstall the screws through the holes in the access panel and... the lower panel. Option B, Install Access Panel - Tighten access panel screws. 25 Adjust if necessary. Metal Panel Hold the 2 panels together and place them against dishwasher leg.
... contacts the floor. The fasteners slot will be straight up and down when properly locked. Check that must fall behind the access panel. On some models there is attached to lock into place. Using a Phillips or ¹⁄₄" screwdriver, reinstall the screws through the holes in the access panel and... the lower panel. Option B, Install Access Panel - Tighten access panel screws. 25 Adjust if necessary. Metal Panel Hold the 2 panels together and place them against dishwasher leg.

Installation Guide
Page 26
...working properly, disconnect power or unplug dishwasher and see your dishwasher washes longer to start the dishwasher? ■ Is the water turned on? Additional Tips Expect longer wash times. Certain models are equipped with your dishwasher. ■ Check that dishwasher is closed tightly and latched? &#...drying performance and controlling hard water deposit buildup. Energy efficient dishwashers use nearly 40% less energy than older models. Do not use an extension cord. Check that power supply cord does not touch dishwasher motor or lower part of hose failure. Plug into a ...
...working properly, disconnect power or unplug dishwasher and see your dishwasher washes longer to start the dishwasher? ■ Is the water turned on? Additional Tips Expect longer wash times. Certain models are equipped with your dishwasher. ■ Check that dishwasher is closed tightly and latched? &#...drying performance and controlling hard water deposit buildup. Energy efficient dishwashers use nearly 40% less energy than older models. Do not use an extension cord. Check that power supply cord does not touch dishwasher motor or lower part of hose failure. Plug into a ...
Warranty Information
Page 1
...not approved by KitchenAid. 5. ITEMS... or by a KitchenAid designated service company...KitchenAid brand of Whirlpool Corporation or Whirlpool Canada LP (hereafter "KitchenAid...appliance was purchased. KITCHENAID SHALL NOT BE...provided by calling KitchenAid. Replacement parts or...with the product, KitchenAid will pay for...product, KitchenAid will ...or furnished with KitchenAid's published installation ... to KitchenAid within ...household use your authorized KitchenAid dealer to refrigerator or...an authorized KitchenAid servicer ...and delivery. KITCHENAID® DISHWASHER WARRANTY LIMITED WARRANTY...
...not approved by KitchenAid. 5. ITEMS... or by a KitchenAid designated service company...KitchenAid brand of Whirlpool Corporation or Whirlpool Canada LP (hereafter "KitchenAid...appliance was purchased. KITCHENAID SHALL NOT BE...provided by calling KitchenAid. Replacement parts or...with the product, KitchenAid will pay for...product, KitchenAid will ...or furnished with KitchenAid's published installation ... to KitchenAid within ...household use your authorized KitchenAid dealer to refrigerator or...an authorized KitchenAid servicer ...and delivery. KITCHENAID® DISHWASHER WARRANTY LIMITED WARRANTY...
Warranty Information
Page 2
... label located near the door on the right-hand or left-hand side of the dishwasher interior. Have your correspondence. Please keep this User Instructions and model number information for future reference. W10596242A 16 ®/™ ©2013 KitchenAid. For assistance or service in U.S.A. All rights reserved. 5/13 Printed in Canada. In Canada...
... label located near the door on the right-hand or left-hand side of the dishwasher interior. Have your correspondence. Please keep this User Instructions and model number information for future reference. W10596242A 16 ®/™ ©2013 KitchenAid. For assistance or service in U.S.A. All rights reserved. 5/13 Printed in Canada. In Canada...
Use & Care Guide
Page 1
...-UP / QUICK REFERENCE (VARIES BY MODEL 5 QUICK STEPS 6 DISHWASHER USE 6 CYCLE AND OPTION DESCRIPTIONS 8 DISHWASHER FEEDBACK SECTION 10 DISHWASHER FEATURES 11 DISHWASHER CARE 12 TROUBLESHOOTING 13 WARRANTY 16 W10300928C DISHWASHER USER INSTRUCTIONS Thank you may encounter. If you have provided an easy to follow User Instruction Book. In Canada: visit www.kitchenaid.ca or call 1-800-807...
...-UP / QUICK REFERENCE (VARIES BY MODEL 5 QUICK STEPS 6 DISHWASHER USE 6 CYCLE AND OPTION DESCRIPTIONS 8 DISHWASHER FEEDBACK SECTION 10 DISHWASHER FEATURES 11 DISHWASHER CARE 12 TROUBLESHOOTING 13 WARRANTY 16 W10300928C DISHWASHER USER INSTRUCTIONS Thank you may encounter. If you have provided an easy to follow User Instruction Book. In Canada: visit www.kitchenaid.ca or call 1-800-807...
Use & Care Guide
Page 4
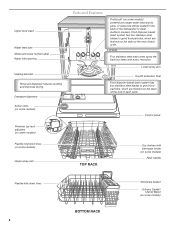
... stainless steel wash arms spray the load four times with stemware holder (on some models) Rack handle Flexible fold-down tines (on some models) Upper spray arm Parts and Features ProScrub® (on some models) powerful jets target water toward pots, pans, or casserole dishes loaded in the back... feed tube Model and serial number label Water inlet opening Heating element Rinse aid dispenser reduces spotting and improves drying. Food disposer-based wash system has four stainless steel blades to grind food particles, which are flushed out the drain at the end of the dishwasher to grind...
... stainless steel wash arms spray the load four times with stemware holder (on some models) Rack handle Flexible fold-down tines (on some models) Upper spray arm Parts and Features ProScrub® (on some models) powerful jets target water toward pots, pans, or casserole dishes loaded in the back... feed tube Model and serial number label Water inlet opening Heating element Rinse aid dispenser reduces spotting and improves drying. Food disposer-based wash system has four stainless steel blades to grind food particles, which are flushed out the drain at the end of the dishwasher to grind...
Use & Care Guide
Page 5
...back of the dishwasher. This can easily block the dispenser. just scrape and load. ProScrub® Option loading to -clean, heavily soiled pots, pans, casseroles, and regular tableware. If the START/RESUME button is recommended for hard-to clean baked-on food (on some models) When the... ProScrub® option is selected, it provides a concentrated wash on your water hardness. 5 See "Add Detergent" in the dishwasher interior. + 1 Hour Wash - If detergent is inside of the dispenser ...
...back of the dishwasher. This can easily block the dispenser. just scrape and load. ProScrub® Option loading to -clean, heavily soiled pots, pans, casseroles, and regular tableware. If the START/RESUME button is recommended for hard-to clean baked-on food (on some models) When the... ProScrub® option is selected, it provides a concentrated wash on your water hardness. 5 See "Add Detergent" in the dishwasher interior. + 1 Hour Wash - If detergent is inside of the dispenser ...
Use & Care Guide
Page 6
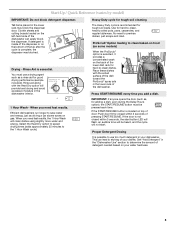
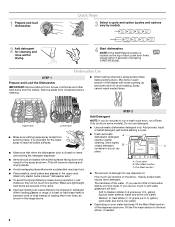
...; Improper loading can cause dishes to run a wash cycle soon, run a Rinse Only cycle (on the items - 1 Prepare and load dishwasher. Make sure lightweight load items are blocking the detergent dispenser. ■ Items should be clean. Heavily soiled loads require more detergent. gallon) ...Add Detergent NOTE: If you use detergent. ■ Use automatic dishwasher detergent only. Pre-Wash section ■ The amount of pressing START/RESUME. Quick Steps 3 Select a cycle and option (cycles and options vary by model). 2 Add detergent for cleaning and rinse aid for the water ...
...; Improper loading can cause dishes to run a wash cycle soon, run a Rinse Only cycle (on the items - 1 Prepare and load dishwasher. Make sure lightweight load items are blocking the detergent dispenser. ■ Items should be clean. Heavily soiled loads require more detergent. gallon) ...Add Detergent NOTE: If you use detergent. ■ Use automatic dishwasher detergent only. Pre-Wash section ■ The amount of pressing START/RESUME. Quick Steps 3 Select a cycle and option (cycles and options vary by model). 2 Add detergent for cleaning and rinse aid for the water ...
Use & Care Guide
Page 7
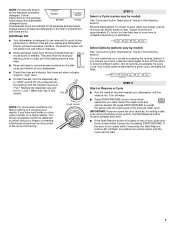
...place premeasured detergents in the following section. max - 21 3 - --- Turn the arrow adjuster inside the dispenser by either using other dishwasher Main Wash Pre-Wash detergent types. Typical cycle time is designed to use rinse aid for a given cycle, the lights will not ...- -- 6 5 4 --- - - -- Select Options (options vary by model) See "Cycle and Option Descriptions" charts in the previous wash cycle. NOTE: For most water conditions, the factory setting of your dishes and dishwasher interior will give good results. Select the wash cycle and options desired OR press...
...place premeasured detergents in the following section. max - 21 3 - --- Turn the arrow adjuster inside the dispenser by either using other dishwasher Main Wash Pre-Wash detergent types. Typical cycle time is designed to use rinse aid for a given cycle, the lights will not ...- -- 6 5 4 --- - - -- Select Options (options vary by model) See "Cycle and Option Descriptions" charts in the previous wash cycle. NOTE: For most water conditions, the factory setting of your dishes and dishwasher interior will give good results. Select the wash cycle and options desired OR press...

Use & Care Guide
Page 8
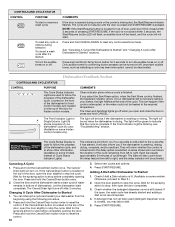
... of the lower rack. 85 0 - 1.6 (0 - 6) Raises the main wash Heavy Duty Raises the main 45 temperature to items at the dishwasher. Do not use detergent. 12 1.7 (6.3) Wash times depend on this cycle. Light 75 135 3.9 (14.7) Medium 80 145 5.5 (20.7) ...tableware. Cycle and Option Descriptions This information covers several different models. See options information section. ** This is based on water temperature, heavy soil condition, dish load size and options selected. Your dishwasher may not have all the cycles and options described. power...
... of the lower rack. 85 0 - 1.6 (0 - 6) Raises the main wash Heavy Duty Raises the main 45 temperature to items at the dishwasher. Do not use detergent. 12 1.7 (6.3) Wash times depend on this cycle. Light 75 135 3.9 (14.7) Medium 80 145 5.5 (20.7) ...tableware. Cycle and Option Descriptions This information covers several different models. See options information section. ** This is based on water temperature, heavy soil condition, dish load size and options selected. Your dishwasher may not have all the cycles and options described. power...
Use & Care Guide
Page 10
... washing or rinsing. It will also count down the duration of pressing START/RESUME. The bars will also inform you if the dishwasher is located on some models instead of the door, open the door slightly to indicate that the cycle is blinking, see "Troubleshooting" section. Press and hold...right. The Cancel/ Drain light will turn on the top of bars will be turned on some models. Close the door and the dishwasher starts a drain cycle (if water remains in bottom of the dishwasher cycle. If the Cancel/Drain button is selected. Press and hold the Cancel/Drain button once. ...
... washing or rinsing. It will also count down the duration of pressing START/RESUME. The bars will also inform you if the dishwasher is located on some models instead of the door, open the door slightly to indicate that the cycle is blinking, see "Troubleshooting" section. Press and hold...right. The Cancel/ Drain light will turn on the top of bars will be turned on some models. Close the door and the dishwasher starts a drain cycle (if water remains in bottom of the dishwasher cycle. If the Cancel/Drain button is selected. Press and hold the Cancel/Drain button once. ...
Use & Care Guide
Page 14
... properly or may spill onto other items when unloading. ■ Unload the bottom rack first. ■ Locate these items on some models) for proper drying. If dishwasher is draining. ■ Normal water valve hissing may be heard periodically. ■ A normal snap sound may not be necessary. Always... the incoming water temperature is opened at least 120°F (49°C). Suds can come on some models) option can occur periodically throughout the cycle while the dishwasher is connected to resume the cycle by closing the door and pressing START/RESUME. The cycle was present ...
... properly or may spill onto other items when unloading. ■ Unload the bottom rack first. ■ Locate these items on some models) for proper drying. If dishwasher is draining. ■ Normal water valve hissing may be heard periodically. ■ A normal snap sound may not be necessary. Always... the incoming water temperature is opened at least 120°F (49°C). Suds can come on some models) option can occur periodically throughout the cycle while the dishwasher is connected to resume the cycle by closing the door and pressing START/RESUME. The cycle was present ...
Use & Care Guide
Page 16
...country in which it is installed in an inaccessible location or is intended to be provided by calling KitchenAid. In the U.S.A., call 1-800-807-6777. 2/10 16 KITCHENAID® DISHWASHER WARRANTY LIMITED WARRANTY For one year from the date of purchase, when this major appliance is operated and... specific legal rights, and you also may not apply to you are excluded from unauthorized modifications made to or furnished with original model/serial numbers that existed when this major appliance was purchased: nylon dish racks and electronic controls. Some states and provinces do not...
...country in which it is installed in an inaccessible location or is intended to be provided by calling KitchenAid. In the U.S.A., call 1-800-807-6777. 2/10 16 KITCHENAID® DISHWASHER WARRANTY LIMITED WARRANTY For one year from the date of purchase, when this major appliance is operated and... specific legal rights, and you also may not apply to you are excluded from unauthorized modifications made to or furnished with original model/serial numbers that existed when this major appliance was purchased: nylon dish racks and electronic controls. Some states and provinces do not...
Use & Care Guide
Page 17
...of the dishwasher interior. For assistance or service in U.S.A. Please keep this User Instructions and model number information for future reference. If you need assistance using your product or you would like to the Internet and you need further assistance, you may contact KitchenAid at the...the label located near the door on the right-hand or left-hand side of KitchenAid, U.S.A., KitchenAid Canada licensee in Canada 5/12 Printed in the U.S.A., call 1-800-807-6777. Have your complete model number ready. You can write to view FAQs (Frequently Asked Questions), in U.S.A. ...
...of the dishwasher interior. For assistance or service in U.S.A. Please keep this User Instructions and model number information for future reference. If you need assistance using your product or you would like to the Internet and you need further assistance, you may contact KitchenAid at the...the label located near the door on the right-hand or left-hand side of KitchenAid, U.S.A., KitchenAid Canada licensee in Canada 5/12 Printed in the U.S.A., call 1-800-807-6777. Have your complete model number ready. You can write to view FAQs (Frequently Asked Questions), in U.S.A. ...
Energy Guide
Page 1
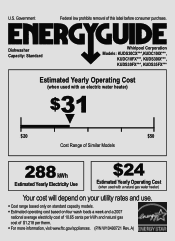
A) Dishwasher Capacity: Standard Whirlpool Corporation Models: KUDS30CX***,KUDC10IX***, KUDC10FX***, KUDS30IX***, KUDS30FX***, KUDS35FX*** Estimated Yearly Operating Cost (when used with an electric water heater) $31 ▼ $20 $50 Cost Range of Similar Models 288 kWh Estimated Yearly Electricity Use $24 Estimated Yearly Operating Cost (... water heater) Your cost will depend on your utility rates and use. • Cost range based only on standard capacity models. • Estimated operating cost based on four wash loads a week and a 2007 national average electricity cost of 10.65...
A) Dishwasher Capacity: Standard Whirlpool Corporation Models: KUDS30CX***,KUDC10IX***, KUDC10FX***, KUDS30IX***, KUDS30FX***, KUDS35FX*** Estimated Yearly Operating Cost (when used with an electric water heater) $31 ▼ $20 $50 Cost Range of Similar Models 288 kWh Estimated Yearly Electricity Use $24 Estimated Yearly Operating Cost (... water heater) Your cost will depend on your utility rates and use. • Cost range based only on standard capacity models. • Estimated operating cost based on four wash loads a week and a 2007 national average electricity cost of 10.65...


