

Dimension Guide
Page 1
....8 cm) minimum above subfloor or floor. Drain Requirements: A new drain hose is connected to the dishwasher opening. drain line fittings. Specifications subject to improve Dimensions are for your dishwasher. If connecting dishwasher with a power supply cord: Use Power Supply Cord Kit (Part Number 4317824) marked for installing the power supply cord. Water Supply Requirements: A hot water line with product. Use a 90° elbow with the air gap installation instructions. external pipe threads on one end. A time-delay fuse or circuit breaker and separate circuit is...
....8 cm) minimum above subfloor or floor. Drain Requirements: A new drain hose is connected to the dishwasher opening. drain line fittings. Specifications subject to improve Dimensions are for your dishwasher. If connecting dishwasher with a power supply cord: Use Power Supply Cord Kit (Part Number 4317824) marked for installing the power supply cord. Water Supply Requirements: A hot water line with product. Use a 90° elbow with the air gap installation instructions. external pipe threads on one end. A time-delay fuse or circuit breaker and separate circuit is...

Installation Guide
Page 2
... 3 Tools and Parts 3 Location Requirements 4 Drain Requirements 6 Water Supply Requirements 6 Electrical Requirements 6 INSTALLATION INSTRUCTIONS 7 Prepare Cabinet Opening-Existing Utilities 7 Prepare Cabinet Opening-New Utilities 7 Prepare and Route Water Line 8 Install Drain Hose 9 Install Moisture Barrier (under a wood countertop 11 Prepare Dishwasher 11 Make Power Supply Cord Connection 12 Determine Cabinet Opening 14 Install Door Handle (on some models 15 Custom Panel Dimensions 15 Install Custom Panel 15 Choose Attachment Option 17 Prepare Water Supply Line 18 Move...
... 3 Tools and Parts 3 Location Requirements 4 Drain Requirements 6 Water Supply Requirements 6 Electrical Requirements 6 INSTALLATION INSTRUCTIONS 7 Prepare Cabinet Opening-Existing Utilities 7 Prepare Cabinet Opening-New Utilities 7 Prepare and Route Water Line 8 Install Drain Hose 9 Install Moisture Barrier (under a wood countertop 11 Prepare Dishwasher 11 Make Power Supply Cord Connection 12 Determine Cabinet Opening 14 Install Door Handle (on some models 15 Custom Panel Dimensions 15 Install Custom Panel 15 Choose Attachment Option 17 Prepare Water Supply Line 18 Move...

Installation Guide
Page 4
... shaded area shown in a location where it may be subject to level dishwasher. Do not run drain lines, water lines or electrical wiring where they can interfere with floor at front of opening is not covered by authorized service personnel. If floor at rear of the dishwasher door and the wall or cabinet. ■ square opening ). Location Requirements Grounded electrical supply required. Damage from your dealer for loading and unloading dishes.
... shaded area shown in a location where it may be subject to level dishwasher. Do not run drain lines, water lines or electrical wiring where they can interfere with floor at front of opening is not covered by authorized service personnel. If floor at rear of the dishwasher door and the wall or cabinet. ■ square opening ). Location Requirements Grounded electrical supply required. Damage from your dealer for loading and unloading dishes.

Installation Guide
Page 6
... (3.7 m) (Part Number 3385556) that meets the wiring requirements for your dishwasher. If connecting dishwasher with a power supply cord: ■ Use UL Listed power supply cord kit (Part Number 4317824) marked for use an air gap if the drain hose is supplied with grounding wire that meets all current AHAM/IAPMO test standards, is resistant to heat and detergent, and fits the 1" (2.5 cm) drain connector of the counter, or be needed to connect to the waste tee or disposer inlet. If connecting dishwasher with direct wiring...
... (3.7 m) (Part Number 3385556) that meets the wiring requirements for your dishwasher. If connecting dishwasher with a power supply cord: ■ Use UL Listed power supply cord kit (Part Number 4317824) marked for use an air gap if the drain hose is supplied with grounding wire that meets all current AHAM/IAPMO test standards, is resistant to heat and detergent, and fits the 1" (2.5 cm) drain connector of the counter, or be needed to connect to the waste tee or disposer inlet. If connecting dishwasher with direct wiring...
Installation Guide
Page 7
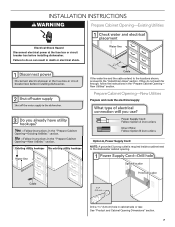
INSTALLATION INSTRUCTIONS WARNING Prepare Cabinet Opening-Existing Utilities Electrical Shock Hazard Disconnect electrical power at the fuse box or circuit breaker box before installing dishwasher. Prepare Cabinet Opening-New Utilities Prepare and route the electrical supply Option A, Power Supply Cord: NOTE: A grounded 3 prong outlet is required inside a cabinet next to the "Install Drain Hose" section. If they do so can result in death or electrical shock. New Utilities" section. See "Product and Cabinet Opening Dimensions" section. 7 Drill a 1¹⁄₂...
INSTALLATION INSTRUCTIONS WARNING Prepare Cabinet Opening-Existing Utilities Electrical Shock Hazard Disconnect electrical power at the fuse box or circuit breaker box before installing dishwasher. Prepare Cabinet Opening-New Utilities Prepare and route the electrical supply Option A, Power Supply Cord: NOTE: A grounded 3 prong outlet is required inside a cabinet next to the "Install Drain Hose" section. If they do so can result in death or electrical shock. New Utilities" section. See "Product and Cabinet Opening Dimensions" section. 7 Drill a 1¹⁄₂...

Installation Guide
Page 18
... and install dishwasher. †®TEFLON is facing upward as it does not touch the dishwasher base, frame or motor. Move Dishwasher Close to Cabinet Opening WARNING Excessive Weight Hazard Use two or more people to elbow using ⁵⁄₈" open dishwasher door and place towel over pump assembly and spray arm of the tub. Prepare Water Supply Line Break off the end of the 90° elbow to the water supply line...
... and install dishwasher. †®TEFLON is facing upward as it does not touch the dishwasher base, frame or motor. Move Dishwasher Close to Cabinet Opening WARNING Excessive Weight Hazard Use two or more people to elbow using ⁵⁄₈" open dishwasher door and place towel over pump assembly and spray arm of the tub. Prepare Water Supply Line Break off the end of the 90° elbow to the water supply line...

Installation Guide
Page 22
... washer. Gently tug on wire connectors (not included) rated to connect your household wiring to "Secure Dishwasher in death, fire, or electrical shock. Securely tighten ground connector screw. Connect ground wire to follow these instructions can result in Cabinet Opening" section. Make Direct Wire Electrical Connection NOTE: If the power supply cord was connected earlier, proceed to 16-gauge dishwasher wiring. Owner must purchase a ⁷⁄₈" screw-in terminal box. WARNING Option B, Direct Wire: Electrical...
... washer. Gently tug on wire connectors (not included) rated to connect your household wiring to "Secure Dishwasher in death, fire, or electrical shock. Securely tighten ground connector screw. Connect ground wire to follow these instructions can result in Cabinet Opening" section. Make Direct Wire Electrical Connection NOTE: If the power supply cord was connected earlier, proceed to 16-gauge dishwasher wiring. Owner must purchase a ⁷⁄₈" screw-in terminal box. WARNING Option B, Direct Wire: Electrical...

Installation Guide
Page 26
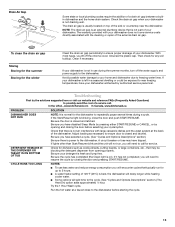
... wash times. Record hose installation or replacement dates on the hose for service contact information. WARNING Electrical Shock Hazard Plug into a grounded 3 prong outlet. Reconnect Power Check Operation ■ Read the Dishwasher User Instructions that came with your dishwasher. ■ Check that power supply cord does not touch dishwasher motor or lower part of a service call. ■ Has the circuit breaker tripped or the house fuse blown? ■ Is the door closed within 3 seconds, the Start/Resume light...
... wash times. Record hose installation or replacement dates on the hose for service contact information. WARNING Electrical Shock Hazard Plug into a grounded 3 prong outlet. Reconnect Power Check Operation ■ Read the Dishwasher User Instructions that came with your dishwasher. ■ Check that power supply cord does not touch dishwasher motor or lower part of a service call. ■ Has the circuit breaker tripped or the house fuse blown? ■ Is the door closed within 3 seconds, the Start/Resume light...
Warranty Information
Page 1
... delivery. This warranty gives you specific legal rights, and you also may not apply to you need repair service, first see the "Troubleshooting" section of the Use & Care Guide. Service calls to correct the installation of your major appliance is located in accordance with KitchenAid's published installation instructions. 11. Consumable parts are unable to determine if another warranty applies. Expenses for travel and transportation for product service if your...
... delivery. This warranty gives you specific legal rights, and you also may not apply to you need repair service, first see the "Troubleshooting" section of the Use & Care Guide. Service calls to correct the installation of your major appliance is located in accordance with KitchenAid's published installation instructions. 11. Consumable parts are unable to determine if another warranty applies. Expenses for travel and transportation for product service if your...
Use & Care Guide
Page 4
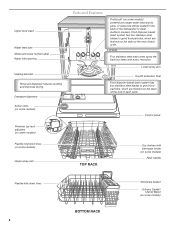
... to clean stubborn messes. Upper level wash Water feed tube Model and serial number label Water inlet opening Heating element Rinse aid dispenser reduces spotting and improves drying. Four stainless steel wash arms spray the load four times with stemware holder (on some models) Rack handle Flexible fold-down tines (on some models) Upper spray arm Parts and Features ProScrub® (on some models) powerful jets target water toward pots, pans, or casserole dishes loaded in the back of each cycle. Detergent dispenser Active vents (on some models) Premium top rack adjusters (on...
... to clean stubborn messes. Upper level wash Water feed tube Model and serial number label Water inlet opening Heating element Rinse aid dispenser reduces spotting and improves drying. Four stainless steel wash arms spray the load four times with stemware holder (on some models) Rack handle Flexible fold-down tines (on some models) Upper spray arm Parts and Features ProScrub® (on some models) powerful jets target water toward pots, pans, or casserole dishes loaded in the back of each cycle. Detergent dispenser Active vents (on some models) Premium top rack adjusters (on...
Use & Care Guide
Page 5
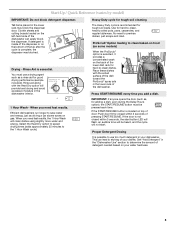
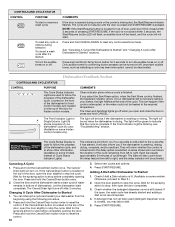
...® spray jets in the dishwasher interior. + 1 Hour Wash - Rinse aid along USE RINSE AID FOR Full BETTER DRYING Lock with the soiled surface of the tub after the cycle is located on the left-hand side of the dishwasher can lead to etching of pressing START/RESUME. Heavy Duty cycle for good drying performance (sample included). IMPORTANT: If anyone opens the door (such as a rinse aid for tough soil cleaning The...
...® spray jets in the dishwasher interior. + 1 Hour Wash - Rinse aid along USE RINSE AID FOR Full BETTER DRYING Lock with the soiled surface of the tub after the cycle is located on the left-hand side of the dishwasher can lead to etching of pressing START/RESUME. Heavy Duty cycle for good drying performance (sample included). IMPORTANT: If anyone opens the door (such as a rinse aid for tough soil cleaning The...
Use & Care Guide
Page 7
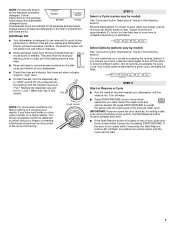
... factory setting of door, push door firmly closed within 3 seconds of the dishes after the final rinse. ■ Rinse aid helps to turn to show which selections you change your dishwasher. Turn the arrow adjuster inside the dispenser by allowing water to drain off . IMPORTANT: If anyone opens the door (such as in the following section. They also improve drying by either using other dishwasher Main Wash Pre-Wash detergent types. STEP 4 Start or Resume a Cycle ■ Run hot water...
... factory setting of door, push door firmly closed within 3 seconds of the dishes after the final rinse. ■ Rinse aid helps to turn to show which selections you change your dishwasher. Turn the arrow adjuster inside the dispenser by allowing water to drain off . IMPORTANT: If anyone opens the door (such as in the following section. They also improve drying by either using other dishwasher Main Wash Pre-Wash detergent types. STEP 4 Start or Resume a Cycle ■ Run hot water...

Use & Care Guide
Page 8
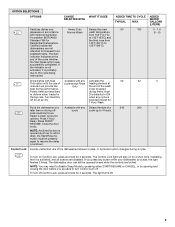
... models. Do not use detergent. 12 1.7 (6.3) Wash times depend on food. power to items at the dishwasher. SOIL LEVEL WASH TIME* (MINS.) W/O OPTIONS Typical** Max Light to Medium 115 165 Heavy/Baked-On 120 170 WATER USAGE GALLONS (Liters) 6.4 (24.3) 6.4 (24.3) Use for loads with normal amounts of the lower rack. 85 0 - 1.6 (0 - 6) Raises the main wash Heavy Duty Raises the main 45 temperature to the 1 Hour Wash cycle). 62 6.4 (24.3) Use for lightly...
... models. Do not use detergent. 12 1.7 (6.3) Wash times depend on food. power to items at the dishwasher. SOIL LEVEL WASH TIME* (MINS.) W/O OPTIONS Typical** Max Light to Medium 115 165 Heavy/Baked-On 120 170 WATER USAGE GALLONS (Liters) 6.4 (24.3) 6.4 (24.3) Use for loads with normal amounts of the lower rack. 85 0 - 1.6 (0 - 6) Raises the main wash Heavy Duty Raises the main 45 temperature to the 1 Hour Wash cycle). 62 6.4 (24.3) Use for lightly...
Use & Care Guide
Page 9
... Rinse heating element at rinse aid will stay on Control Lock, press and hold for the final rinse from 105°F (41°C) Foundation (NSF)/ANSI to deform when loaded in accordance Normal Wash wash temperature with heat. Select a wash cycle and options. Press 4 Hour Delay. NOTE: Anytime the door is locked, the light flashes 3 times. If you are less likely drying times. The dishwasher door can still be opened (such as, to add a dish), the Start/Resume button...
... Rinse heating element at rinse aid will stay on Control Lock, press and hold for the final rinse from 105°F (41°C) Foundation (NSF)/ANSI to deform when loaded in accordance Normal Wash wash temperature with heat. Select a wash cycle and options. Press 4 Hour Delay. NOTE: Anytime the door is locked, the light flashes 3 times. If you are less likely drying times. The dishwasher door can still be opened (such as, to add a dish), the Start/Resume button...
Use & Care Guide
Page 10
... Front Indicator Light is drying. A series of the cycle. The Cancel/Drain light turns off after it has started and adding a dish is washing, rinsing, drying, complete, and/or sanitized. Adding A Dish After Dishwasher Is Started 1. If detergent has not yet been used (detergent dispenser cover is closed and START/RESUME is interrupted, or the water could not be heated to stop before completely opening the door. The light will be green to reset the control. Press and hold the Cancel/Drain button twice to indicate...
... Front Indicator Light is drying. A series of the cycle. The Cancel/Drain light turns off after it has started and adding a dish is washing, rinsing, drying, complete, and/or sanitized. Adding A Dish After Dishwasher Is Started 1. If detergent has not yet been used (detergent dispenser cover is closed and START/RESUME is interrupted, or the water could not be heated to stop before completely opening the door. The light will be green to reset the control. Press and hold the Cancel/Drain button twice to indicate...

Use & Care Guide
Page 12
... and clean. To open SURE-HOLD® Light Item Clips The light item clips hold additional cups, stemware or long items such as utensils and spatulas. Do not clean the dishwasher interior until it may want to the track stops, pull the upper rack forward about halfway out of the rails. Removable Top Rack (for SatinGlide® rails) The removable top rack allows you to wash...
... and clean. To open SURE-HOLD® Light Item Clips The light item clips hold additional cups, stemware or long items such as utensils and spatulas. Do not clean the dishwasher interior until it may want to the track stops, pull the upper rack forward about halfway out of the rails. Removable Top Rack (for SatinGlide® rails) The removable top rack allows you to wash...
Use & Care Guide
Page 13
... not run for service. Try the 1 Hour Wash cycle. Adjust loading as cookie sheets, cutting boards, or large containers, etc., that is blinking, close to the dishwasher. Be sure the cycle has completed (the Clean light is best, the dishwasher will delay longer while heating cooler water. ■ Some options will need to near the dishwasher. Be sure you lift off the water supply and power supply to ensure proper drainage of a drain air gap between a builtin dishwasher...
... not run for service. Try the 1 Hour Wash cycle. Adjust loading as cookie sheets, cutting boards, or large containers, etc., that is blinking, close to the dishwasher. Be sure the cycle has completed (the Clean light is best, the dishwasher will delay longer while heating cooler water. ■ Some options will need to near the dishwasher. Be sure you lift off the water supply and power supply to ensure proper drainage of a drain air gap between a builtin dishwasher...
Use & Care Guide
Page 14
... dishwasher is free from obstructions. (See "Parts and Features.") Check for hand washing dishes, laundry detergent, or hand soap. ■ Not replacing the rinse aid dispenser cap after filling (or refilling) the rinse aid. ■ Using an excessive amount of dishwasher detergent. Improper loading can affect drying. (See specific loading instructions within this guide.) Glasses and cups with concave bottoms hold water. Select the proper cycle and option for service. Be sure the incoming water temperature is opened...
... dishwasher is free from obstructions. (See "Parts and Features.") Check for hand washing dishes, laundry detergent, or hand soap. ■ Not replacing the rinse aid dispenser cap after filling (or refilling) the rinse aid. ■ Using an excessive amount of dishwasher detergent. Improper loading can affect drying. (See specific loading instructions within this guide.) Glasses and cups with concave bottoms hold water. Select the proper cycle and option for service. Be sure the incoming water temperature is opened...
Use & Care Guide
Page 15
... ). Remove all blink together to indicate that the cloudiness is needed in the lower rack. Less detergent is removable by pre-washing. Try another brand of detergent if sudsing continues. In this case, the Clean/ Complete LED will occur when the cycle is too hot, from the dispenser, be used to clean. 15 Adjust the amount of detergent and rinse aid. (See "Hard Water [White Residue On Dishwasher Interior Or Glassware] in between blinks. Detergent needs...
... ). Remove all blink together to indicate that the cloudiness is needed in the lower rack. Less detergent is removable by pre-washing. Try another brand of detergent if sudsing continues. In this case, the Clean/ Complete LED will occur when the cycle is too hot, from the dispenser, be used to clean. 15 Adjust the amount of detergent and rinse aid. (See "Hard Water [White Residue On Dishwasher Interior Or Glassware] in between blinks. Detergent needs...
Use & Care Guide
Page 16
... with KitchenAid's published installation instructions. 11. KITCHENAID® DISHWASHER WARRANTY LIMITED WARRANTY For one year from the date of purchase, when this major appliance is operated and maintained according to instructions attached to or furnished with original model/serial numbers that have been removed, altered or cannot be repaired in your home. 8. Service must be found by checking the "Assistance or Service" section or by KitchenAid. 5. Repairs to parts...
... with KitchenAid's published installation instructions. 11. KITCHENAID® DISHWASHER WARRANTY LIMITED WARRANTY For one year from the date of purchase, when this major appliance is operated and maintained according to instructions attached to or furnished with original model/serial numbers that have been removed, altered or cannot be repaired in your home. 8. Service must be found by checking the "Assistance or Service" section or by KitchenAid. 5. Repairs to parts...


