Owners Manual
Page 3
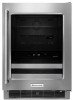
... prevent accidents. Always read and obey all parts and panels before operating. ■ Remove door or drawer(s) from beverage center. ■ Use two or more people to know about disposal of refrigerants: Dispose of refrigerator in accordance with established procedures. 3 WARNING You can result in this manual and on your beverage center, follow instructions. We have provided many important safety messages...
... prevent accidents. Always read and obey all parts and panels before operating. ■ Remove door or drawer(s) from beverage center. ■ Use two or more people to know about disposal of refrigerants: Dispose of refrigerator in accordance with established procedures. 3 WARNING You can result in this manual and on your beverage center, follow instructions. We have provided many important safety messages...
Owners Manual
Page 4
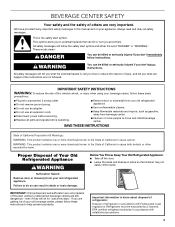
... of installation, cleaning, or removing a light bulb, unplug beverage center or disconnect power. 4 or 20-amp fused, grounded electrical supply is recommended that a separate circuit serving only your beverage center into a grounded 3 prong outlet. Failure to follow these instructions can result in a location where the temperature will fall below 55°F (13°C). Do not install in death, explosion, or fire. Do not use...
... of installation, cleaning, or removing a light bulb, unplug beverage center or disconnect power. 4 or 20-amp fused, grounded electrical supply is recommended that a separate circuit serving only your beverage center into a grounded 3 prong outlet. Failure to follow these instructions can result in a location where the temperature will fall below 55°F (13°C). Do not install in death, explosion, or fire. Do not use...
Owners Manual
Page 5
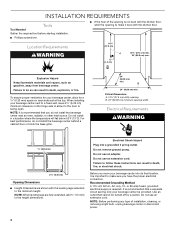
.... Refrigerants must be sure to cover the floor with warm water and dry. ■ Do not use sharp instruments, rubbing alcohol, flammable fluids, or abrasive cleaners to remove tape or glue. Do not use an extension cord. If not, tilt the beverage center slightly more people to move it easier to adjust the leveling legs. 4. Clean Before Using After you like. INSTALLATION INSTRUCTIONS...
.... Refrigerants must be sure to cover the floor with warm water and dry. ■ Do not use sharp instruments, rubbing alcohol, flammable fluids, or abrasive cleaners to remove tape or glue. Do not use an extension cord. If not, tilt the beverage center slightly more people to move it easier to adjust the leveling legs. 4. Clean Before Using After you like. INSTALLATION INSTRUCTIONS...

Owners Manual
Page 6
... or stops running into the drain pan when the beverage center is located on the beverage center. NOTE: The set point temperatures, press "+" (plus) or "-" (minus) until the desired temperature setting is designed to run longer than your beverage center. ■ You may hear water running . Using Presets For your convenience, your beverages are as cold as the flooring and surrounding structures, can make the...
... or stops running into the drain pan when the beverage center is located on the beverage center. NOTE: The set point temperatures, press "+" (plus) or "-" (minus) until the desired temperature setting is designed to run longer than your beverage center. ■ You may hear water running . Using Presets For your convenience, your beverages are as cold as the flooring and surrounding structures, can make the...
Owners Manual
Page 7
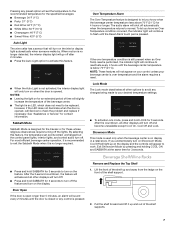
... Light option to work. Door Open If the door is open longer than 5 minutes, an alarm will sound every 2 minutes until the door is closed or any changes being made to your beverage center is over temperature condition is still present when an Over Temp reset is performed, the indicator light will not appear on the interior display light automatically when someone walks by pressing and holding COOL...
... Light option to work. Door Open If the door is open longer than 5 minutes, an alarm will sound every 2 minutes until the door is closed or any changes being made to your beverage center is over temperature condition is still present when an Over Temp reset is performed, the indicator light will not appear on the interior display light automatically when someone walks by pressing and holding COOL...
Owners Manual
Page 8
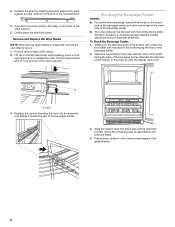
... forward and lift it stops. 2. Place the next bottle on the left -hand side of the bottom rack, place the first bottle with the neck of the bottle facing the back of the rack supports. Replace the shelf by inserting the rack into the supports and sliding it toward ...shelf against the rear support in the back of the bottles, in opposite directions. Stock the remaining rack as described In the previous steps. 4. Stocking the Beverage Center NOTES: ■ For optimum wine storage, place white wines on the upper rack of the beverage center and place red wines on the glass shelves...
... forward and lift it stops. 2. Place the next bottle on the left -hand side of the bottom rack, place the first bottle with the neck of the bottle facing the back of the rack supports. Replace the shelf by inserting the rack into the supports and sliding it toward ...shelf against the rear support in the back of the bottles, in opposite directions. Stock the remaining rack as described In the previous steps. 4. Stocking the Beverage Center NOTES: ■ For optimum wine storage, place white wines on the upper rack of the beverage center and place red wines on the glass shelves...
Owners Manual
Page 9
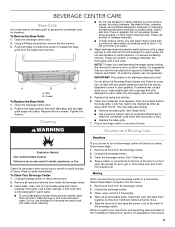
.... Remove all removable parts, wrap them well, and tape them off before you get in warm water. Unplug the beverage center. 3. Clean, wipe, and dry it is for cleaning. Using a Phillips screwdriver, remove the two screws. 3. Push both tabs align and the base grille snaps into contact with a soft cloth. These can result in warm water. Replace the racks and shelves. 6. Tape the doors shut and...
.... Remove all removable parts, wrap them well, and tape them off before you get in warm water. Unplug the beverage center. 3. Clean, wipe, and dry it is for cleaning. Using a Phillips screwdriver, remove the two screws. 3. Push both tabs align and the base grille snaps into contact with a soft cloth. These can result in warm water. Replace the racks and shelves. 6. Tape the doors shut and...
Owners Manual
Page 10
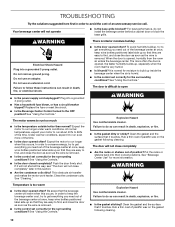
... the control set correctly for the surrounding conditions? Rub a thin coat of position? The door will not operate ■ Is the base grille blocked? Replace the fuse or reset the circuit. ■ Is the Beverage Center Control turned to run longer under warm conditions. Push the door firmly shut. Clean the condenser coils. Clean the gasket and the surface that it touches. WARNING Electrical Shock Hazard Plug...
... the control set correctly for the surrounding conditions? Rub a thin coat of position? The door will not operate ■ Is the base grille blocked? Replace the fuse or reset the circuit. ■ Is the Beverage Center Control turned to run longer under warm conditions. Push the door firmly shut. Clean the condenser coils. Clean the gasket and the surface that it touches. WARNING Electrical Shock Hazard Plug...
Owners Manual
Page 11
... replacement parts, we recommend that you still need to fulfill the product warranty and provide after -warranty service anywhere in your appliance. In the U.S.A., visit our webpage www.kitchenaid.com/accessories or call us and ask for assistance or service, please check "Troubleshooting." If you only use factory specified replacement parts. To locate factory specified replacement parts in Canada. ASSISTANCE OR SERVICE Before calling for the Part Number...
... replacement parts, we recommend that you still need to fulfill the product warranty and provide after -warranty service anywhere in your appliance. In the U.S.A., visit our webpage www.kitchenaid.com/accessories or call us and ask for assistance or service, please check "Troubleshooting." If you only use factory specified replacement parts. To locate factory specified replacement parts in Canada. ASSISTANCE OR SERVICE Before calling for the Part Number...
Owners Manual
Page 12
... warranted for service or repair of the refrigerator and that comes with servicing, removal or replacement of household electrical or plumbing (i.e. Proof of original purchase date is installed, operated and maintained according to the instructions attached to or furnished with the product, KitchenAid brand will pay for warranty service to determine whether another warranty applies. Consumable parts (i.e. light bulbs, batteries, air or water filters, preservation solutions, etc.). 5. Repairs to parts or systems...
... warranted for service or repair of the refrigerator and that comes with servicing, removal or replacement of household electrical or plumbing (i.e. Proof of original purchase date is installed, operated and maintained according to the instructions attached to or furnished with the product, KitchenAid brand will pay for warranty service to determine whether another warranty applies. Consumable parts (i.e. light bulbs, batteries, air or water filters, preservation solutions, etc.). 5. Repairs to parts or systems...

Dimension Guide
Page 1
.... NOTE: It is not level with the kitchen floor. For complete details, see Installation Instructions packed with the leveling legs extended to change without notice. A. 14³⁄₄" (37.5 cm) utility opening B. 24" (60.96 cm) minimum opening to the height dimensions. ■■ If the floor of installation, cleaning, or removing a light bulb, unplug beverage center or disconnect power. 14³⁄₄" (37...
.... NOTE: It is not level with the kitchen floor. For complete details, see Installation Instructions packed with the leveling legs extended to change without notice. A. 14³⁄₄" (37.5 cm) utility opening B. 24" (60.96 cm) minimum opening to the height dimensions. ■■ If the floor of installation, cleaning, or removing a light bulb, unplug beverage center or disconnect power. 14³⁄₄" (37...


