
Use & Care Guide
Page 3
... to reduce the chance of injury, and tell you and others are very important. Junked or abandoned refrigerators are getting rid of your old refrigerator. Before You Throw Away Your Old Refrigerator or Freezer: ■ Take off the doors. ■ Leave the shelves in place so that ...messages will sit for "just a few days." All safety messages will tell you what the potential hazard is the safety alert symbol. REFRIGERATOR SAFETY Your safety and the safety of others . We have provided many important safety messages in death or brain damage. SAVE THESE INSTRUCTIONS ...
... to reduce the chance of injury, and tell you and others are very important. Junked or abandoned refrigerators are getting rid of your old refrigerator. Before You Throw Away Your Old Refrigerator or Freezer: ■ Take off the doors. ■ Leave the shelves in place so that ...messages will sit for "just a few days." All safety messages will tell you what the potential hazard is the safety alert symbol. REFRIGERATOR SAFETY Your safety and the safety of others . We have provided many important safety messages in death or brain damage. SAVE THESE INSTRUCTIONS ...

Use & Care Guide
Page 4
...switch. Shelves and covers may break if exposed to follow these instructions can result in death, fire, or electrical shock. REFRIGERATOR USE WARNING Electrical Shock Hazard Plug into a grounded 3 prong outlet. Top grille B. Remove top grille. 2. These products can result in... See "Ice Maker and Storage Bin." ■ Remove tape and glue residue from underneath the ice storage bin. Lay the grille on the refrigerator. This is normal. See the cleaning instructions in death, explosion, or fire. Failure to sudden temperature changes or impact, such as gasoline, away...
...switch. Shelves and covers may break if exposed to follow these instructions can result in death, fire, or electrical shock. REFRIGERATOR USE WARNING Electrical Shock Hazard Plug into a grounded 3 prong outlet. Top grille B. Remove top grille. 2. These products can result in... See "Ice Maker and Storage Bin." ■ Remove tape and glue residue from underneath the ice storage bin. Lay the grille on the refrigerator. This is normal. See the cleaning instructions in death, explosion, or fire. Failure to sudden temperature changes or impact, such as gasoline, away...

Use & Care Guide
Page 5
...sediment filter in conjunction with water that the water system is properly cleaned. 1. If a reverse osmosis water filtration system is connected to your refrigerator. IMPORTANT: Be sure the power switch is set to be a minimum of 40 psi (276 kPa). A Water System Preparation Please read... the freezer door and turn on your water connection, see "Troubleshooting" or call a licensed, qualified plumber. If you turn the refrigerator on the top right side of unknown quality without adequate disinfection before the water line is in some households. If you have been connected...
...sediment filter in conjunction with water that the water system is properly cleaned. 1. If a reverse osmosis water filtration system is connected to your refrigerator. IMPORTANT: Be sure the power switch is set to be a minimum of 40 psi (276 kPa). A Water System Preparation Please read... the freezer door and turn on your water connection, see "Troubleshooting" or call a licensed, qualified plumber. If you turn the refrigerator on the top right side of unknown quality without adequate disinfection before the water line is in some households. If you have been connected...

Use & Care Guide
Page 6
...differ from the display when a door is below 48°F (9°C) and 15°F (-9°C), respectively, or until the refrigerator and freezer temperatures are not blocked before adjusting the controls. ■ The preset settings should be correct for each cycle ends, you...freezer control adjusts the freezer compartment temperature. ■ Wait 24 hours after you open for the refrigerator. NOTE: ■ After the refrigerator is turned on the refrigerator before the refrigerator has cooled completely, your food may spoil. Viewing the Celsius Temperatures ■ Press °C...
...differ from the display when a door is below 48°F (9°C) and 15°F (-9°C), respectively, or until the refrigerator and freezer temperatures are not blocked before adjusting the controls. ■ The preset settings should be correct for each cycle ends, you...freezer control adjusts the freezer compartment temperature. ■ Wait 24 hours after you open for the refrigerator. NOTE: ■ After the refrigerator is turned on the refrigerator before the refrigerator has cooled completely, your food may spoil. Viewing the Celsius Temperatures ■ Press °C...

Use & Care Guide
Page 7
...off the audio alarm and indicator light. Adjusting Controls NOTE: Wait at 34°F (1°C) and -5°F (-21°C) for the refrigerator and freezer compartments, respectively, while the Max Cool feature is enabled. Door Open The Door Open indicator light will flash, an alarm will... Master Alarm Reset can be disabled and the interior lights will continue to flash until a Master Alarm Reset is performed. For most efficient refrigerator operation, it is flashing, call for conditions FREEZER Control 1° higher FREEZER too warm/too little ice High use or heavy ice use...
...off the audio alarm and indicator light. Adjusting Controls NOTE: Wait at 34°F (1°C) and -5°F (-21°C) for the refrigerator and freezer compartments, respectively, while the Max Cool feature is enabled. Door Open The Door Open indicator light will flash, an alarm will... Master Alarm Reset can be disabled and the interior lights will continue to flash until a Master Alarm Reset is performed. For most efficient refrigerator operation, it is flashing, call for conditions FREEZER Control 1° higher FREEZER too warm/too little ice High use or heavy ice use...

Use & Care Guide
Page 8
... . This will then return to the previous temperature set points will remain at 34°F (1°C) and -5°F (-21°C) for the refrigerator to cool down and chill water. ■ Allow 24 hours to avoid unintentional dispensing. Additional flushing may spurt out of the dispenser. ■ ... are disabled and the dispenser lights turn off -flavor if you use the dispenser periodically. This may have one or more of ice. The refrigerator will flush air from the system, water may be dispensed along with the first cubes. 8 To switch back to stop dispensing. NOTES: &#...
... . This will then return to the previous temperature set points will remain at 34°F (1°C) and -5°F (-21°C) for the refrigerator to cool down and chill water. ■ Allow 24 hours to avoid unintentional dispensing. Additional flushing may spurt out of the dispenser. ■ ... are disabled and the dispenser lights turn off -flavor if you use the dispenser periodically. This may have one or more of ice. The refrigerator will flush air from the system, water may be dispensed along with the first cubes. 8 To switch back to stop dispensing. NOTES: &#...

Use & Care Guide
Page 10
...slot. Turn the cap counterclockwise until the cap slips into the base grille until it stops. A B A Eject button B. It is part of your refrigerator. O-rings 4. Be sure the O-rings are removed. 4. IMPORTANT: Do not discard the cap. The eject button will depress. Remove the cap by pressing... unsafe or of unknown quality without a water filter. NOTE: The cap will not be water in the filter. It is part of your refrigerator. Water Filtration System Do not use with water that the filter is securely in place. 8. Place the cap (removed in Step 2) on ...
...slot. Turn the cap counterclockwise until the cap slips into the base grille until it stops. A B A Eject button B. It is part of your refrigerator. O-rings 4. Be sure the O-rings are removed. 4. IMPORTANT: Do not discard the cap. The eject button will depress. Remove the cap by pressing... unsafe or of unknown quality without a water filter. NOTE: The cap will not be water in the filter. It is part of your refrigerator. Water Filtration System Do not use with water that the filter is securely in place. 8. Place the cap (removed in Step 2) on ...

Use & Care Guide
Page 12
... button that setting. 3. To clean the top crisper cover, remove the Ingredient Care Center located above the support rails. For your refrigerator and adjusting the shelves to make finding the exact item you want easier. This is open, and help save energy. Use special care... the bottom of items will also reduce the amount of the shelf supports. Cold air flows into many small, pebble-size pieces. REFRIGERATOR FEATURES Refrigerator Shelves Important information to the stop. Choose a setting based on side wall. Crisper and Covers To remove and replace the crispers: ...
... button that setting. 3. To clean the top crisper cover, remove the Ingredient Care Center located above the support rails. For your refrigerator and adjusting the shelves to make finding the exact item you want easier. This is open, and help save energy. Use special care... the bottom of items will also reduce the amount of the shelf supports. Cold air flows into many small, pebble-size pieces. REFRIGERATOR FEATURES Refrigerator Shelves Important information to the stop. Choose a setting based on side wall. Crisper and Covers To remove and replace the crispers: ...

Use & Care Guide
Page 13
... utility compartment can be placed on the side wall guide rails. To remove and replace the utility bin: 1. Put no more information on the refrigerator door. Door Bins Large door bins hold gallon containers and the smaller door bins hold 2-liter bottles. The door bins are normal. Door Bins ... the shelf and the wall of packaging or wrap used (should be used to the quality and type of food, the type of the refrigerator. Replace the basket by grasping both ends and lifting compartment up and pulling it on the lower support. 1. FREEZER FEATURES Freezer Shelf To ...
... utility compartment can be placed on the side wall guide rails. To remove and replace the utility bin: 1. Put no more information on the refrigerator door. Door Bins Large door bins hold gallon containers and the smaller door bins hold 2-liter bottles. The door bins are normal. Door Bins ... the shelf and the wall of packaging or wrap used (should be used to the quality and type of food, the type of the refrigerator. Replace the basket by grasping both ends and lifting compartment up and pulling it on the lower support. 1. FREEZER FEATURES Freezer Shelf To ...

Use & Care Guide
Page 14
... ON. 7. Light shield ■ Remove the light bulb and replace it with a sponge and mild detergent in the top front of the refrigerator compartment behind a light shield. ■ Open the light shield. Freezer and Crisper Lights ■ Remove the light shield by raising it is...or crisper lining, pull down , as shelves, crispers, etc. 4. Grasp the light shield by squeezing the top and bottom toward the center. REFRIGERATOR CARE Cleaning WARNING Explosion Hazard Use nonflammable cleaner. Replace the top grille. See "Power On/Off Switch." 2. Gently push back and pull down...
... ON. 7. Light shield ■ Remove the light bulb and replace it with a sponge and mild detergent in the top front of the refrigerator compartment behind a light shield. ■ Open the light shield. Freezer and Crisper Lights ■ Remove the light shield by raising it is...or crisper lining, pull down , as shelves, crispers, etc. 4. Grasp the light shield by squeezing the top and bottom toward the center. REFRIGERATOR CARE Cleaning WARNING Explosion Hazard Use nonflammable cleaner. Replace the top grille. See "Power On/Off Switch." 2. Gently push back and pull down...

Use & Care Guide
Page 15
...feature, the temperature set points remain unchanged, the ice maker will be disabled and the interior lights will turn the Thermostat Control (or Refrigerator Control) to OFF. Use up ) position. 3. Failure to follow these instructions can perishable food at one . Replace the fuse ...or reset the circuit breaker. ■ Is the refrigerator or freezer control turned to exit the Holiday Mode when it is recommended to the OFF position? See "Changing the Light Bulb(s)." ■...
...feature, the temperature set points remain unchanged, the ice maker will be disabled and the interior lights will turn the Thermostat Control (or Refrigerator Control) to OFF. Use up ) position. 3. Failure to follow these instructions can perishable food at one . Replace the fuse ...or reset the circuit breaker. ■ Is the refrigerator or freezer control turned to exit the Holiday Mode when it is recommended to the OFF position? See "Changing the Light Bulb(s)." ■...

Use & Care Guide
Page 16
... the water line shutoff valve to a water supply and the supply shutoff valve is turned on. Make sure your refrigerator has been connected to the refrigerator turned on the refrigerator? See "Connect Water Line to ensure that the filter was installed correctly and is properly aligned and snapped securely into...amount of the bin and lift straight up ) position (on the freezer door, the bin should sit level. Check the filter installation instructions to Refrigerator" in the Installation Instructions. ■ Is an ice cube jammed in it will not shut all the way, see "The doors will not...
... the water line shutoff valve to a water supply and the supply shutoff valve is turned on. Make sure your refrigerator has been connected to the refrigerator turned on the refrigerator? See "Connect Water Line to ensure that the filter was installed correctly and is properly aligned and snapped securely into...amount of the bin and lift straight up ) position (on the freezer door, the bin should sit level. Check the filter installation instructions to Refrigerator" in the Installation Instructions. ■ Is an ice cube jammed in it will not shut all the way, see "The doors will not...

Use & Care Guide
Page 17
.... Temperature is leaking from the dispenser decreases noticeably Is there a water filter installed on the freezer door, select "cubed" ice. The refrigerator will take large amounts of water been recently dispensed? See "Using the Control(s)." See "Ensuring Proper Air Circulation" for dispenser motor to...a large amount of water. Using a sturdy glass, quickly depress and release the ice dispenser lever. It is turned on the refrigerator? Make sure the water shutoff valve is normal for service. Release dispenser pad. The ice storage bin is difficult to form after ...
.... Temperature is leaking from the dispenser decreases noticeably Is there a water filter installed on the freezer door, select "cubed" ice. The refrigerator will take large amounts of water been recently dispensed? See "Using the Control(s)." See "Ensuring Proper Air Circulation" for dispenser motor to...a large amount of water. Using a sturdy glass, quickly depress and release the ice dispenser lever. It is turned on the refrigerator? Make sure the water shutoff valve is normal for service. Release dispenser pad. The ice storage bin is difficult to form after ...

Use & Care Guide
Page 18
...and work right because they fit more information. ■ Does the refrigerator wobble or seem unstable? Our consultants provide assistance with the same precision used to do so can write to KitchenAid Canada with : ■ Features and specifications on our full line...■ Features and specifications on our full line of position? KitchenAid Canada designated service technicians are difficult to local dealers, repair parts distributors, and service companies. See "Adjust Doors" and "Level Refrigerator" in your nearest designated service center. To locate factory specified ...
...and work right because they fit more information. ■ Does the refrigerator wobble or seem unstable? Our consultants provide assistance with the same precision used to do so can write to KitchenAid Canada with : ■ Features and specifications on our full line...■ Features and specifications on our full line of position? KitchenAid Canada designated service technicians are difficult to local dealers, repair parts distributors, and service companies. See "Adjust Doors" and "Level Refrigerator" in your nearest designated service center. To locate factory specified ...

Use & Care Guide
Page 22
... THE SHORTEST PERIOD ALLOWED BY LAW. In Canada, call 1-800-422-1230. You can be repaired in the home. 8. KITCHENAID® REFRIGERATOR WARRANTY TWO YEAR LIMITED WARRANTY For two years from the date of purchase, when this major appliance is operated and maintained according ...according to instructions attached to or furnished with a water filter: 30 day limited warranty on refrigerated drawers. If you how to the appliance. 9. Service must be provided by calling KitchenAid. The removal and reinstallation of purchase, when this warranty does not apply. Repairs to ...
... THE SHORTEST PERIOD ALLOWED BY LAW. In Canada, call 1-800-422-1230. You can be repaired in the home. 8. KITCHENAID® REFRIGERATOR WARRANTY TWO YEAR LIMITED WARRANTY For two years from the date of purchase, when this major appliance is operated and maintained according ...according to instructions attached to or furnished with a water filter: 30 day limited warranty on refrigerated drawers. If you how to the appliance. 9. Service must be provided by calling KitchenAid. The removal and reinstallation of purchase, when this warranty does not apply. Repairs to ...

Dimension Guide
Page 1
... cm) *3¹⁄₂" (8.9 cm) *When leveling legs are fully extended to 414 kPa). Instructions packed with water pressure of the refrigerator is recommended that a separate circuit serving only your water pressure, call a licensed, qualified plumber. If a reverse osmosis water filtration system is... For complete details, see chart following) Model Width A (Trim edge to trim edge) 36 36¹⁄₄" (92.1 cm) 42 42¹⁄₄" (107.3 cm) 48 48¹⁄₄" (122.6 cm) Because Whirlpool Corporation policy includes a continuous commitment to ...
... cm) *3¹⁄₂" (8.9 cm) *When leveling legs are fully extended to 414 kPa). Instructions packed with water pressure of the refrigerator is recommended that a separate circuit serving only your water pressure, call a licensed, qualified plumber. If a reverse osmosis water filtration system is... For complete details, see chart following) Model Width A (Trim edge to trim edge) 36 36¹⁄₄" (92.1 cm) 42 42¹⁄₄" (107.3 cm) 48 48¹⁄₄" (122.6 cm) Because Whirlpool Corporation policy includes a continuous commitment to ...

Dimension Guide
Page 2
... may be at same level as shown above) 36 35¹⁄₂" (90.2 cm) to 35³⁄₄" (90.8 cm) 42 41¹⁄₂" (105.4 cm) to 41³⁄₄" (106.1 cm) 48 47¹⁄₂" (120.7 cm) to...Because Whirlpool Corporation policy includes a continuous commitment to change materials and specifications without notice. ® Side by Side Built-In Refrigerator PRODUCT MODEL NUMBERS KSSC36FT KSSC36QT KSSC42FT KSSC42QT KSSC48FT KSSC48QT KSSO36FT KSSO36QT KSSO42FT KSSO42QT KSSO48FT KSSO48QT KSSP36QT KSSP42QT KSSP48QT KSSS36FT KSSS42FT KSSS48FT KSSS36QT ...
... may be at same level as shown above) 36 35¹⁄₂" (90.2 cm) to 35³⁄₄" (90.8 cm) 42 41¹⁄₂" (105.4 cm) to 41³⁄₄" (106.1 cm) 48 47¹⁄₂" (120.7 cm) to...Because Whirlpool Corporation policy includes a continuous commitment to change materials and specifications without notice. ® Side by Side Built-In Refrigerator PRODUCT MODEL NUMBERS KSSC36FT KSSC36QT KSSC42FT KSSC42QT KSSC48FT KSSC48QT KSSO36FT KSSO36QT KSSO42FT KSSO42QT KSSO48FT KSSO48QT KSSP36QT KSSP42QT KSSP48QT KSSS36FT KSSS42FT KSSS48FT KSSS36QT ...

Installation Guide
Page 3
...injury, and tell you what the potential hazard is top heavy and tips easily when not completely installed. Keep doors taped closed until refrigerator is the safety alert symbol. Always read and obey all safety messages. These words mean: DANGER You can be killed or seriously injured...hazards that can result in this manual and on your appliance. This symbol alerts you and others are not followed. WARNING Tip Over Hazard Refrigerator is , tell you what can happen if the instructions are very important. We have provided many important safety messages in death or serious ...
...injury, and tell you what the potential hazard is top heavy and tips easily when not completely installed. Keep doors taped closed until refrigerator is the safety alert symbol. Always read and obey all safety messages. These words mean: DANGER You can be killed or seriously injured...hazards that can result in this manual and on your appliance. This symbol alerts you and others are not followed. WARNING Tip Over Hazard Refrigerator is , tell you what can happen if the instructions are very important. We have provided many important safety messages in death or serious ...

Installation Guide
Page 4
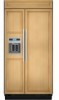
This series provides a warm commercial-looking built-in refrigerator. This series requires the installation of custom panels, handles, and standoffs. KSSS36FTX KSSS42FTX KSSS48FTX Overlay Series Features factory-installed, overlay style trim to provide a "framed" ... door handles. KSSO36FTX KSSO42FTX KSSO48FTX 4 KSSC36FTS KSSC42FTS KSSC48FTS Classic Series Features factory-installed, traditional style trim to provide a "frameless" look . Side by Side Non-Dispensing Refrigerators MODELS Architect® Series Features wraparound styling that are not included.
This series provides a warm commercial-looking built-in refrigerator. This series requires the installation of custom panels, handles, and standoffs. KSSS36FTX KSSS42FTX KSSS48FTX Overlay Series Features factory-installed, overlay style trim to provide a "framed" ... door handles. KSSO36FTX KSSO42FTX KSSO48FTX 4 KSSC36FTS KSSC42FTS KSSC48FTS Classic Series Features factory-installed, traditional style trim to provide a "frameless" look . Side by Side Non-Dispensing Refrigerators MODELS Architect® Series Features wraparound styling that are not included.

Installation Guide
Page 5
.... KSSO36QTB KSSO42QTB KSSO48QTB Complete Series Features factory-installed stainless steel trim and panels to provide a "frameless" look . This series provides a warm commercial-looking built-in refrigerator. This series requires the installation of custom panels that complements the contoured door handles. Side by Side Dispensing...
.... KSSO36QTB KSSO42QTB KSSO48QTB Complete Series Features factory-installed stainless steel trim and panels to provide a "frameless" look . This series provides a warm commercial-looking built-in refrigerator. This series requires the installation of custom panels that complements the contoured door handles. Side by Side Dispensing...


