
Use & Care Guide
Page 3
...extension cord. ■ Disconnect power before servicing. ■ Replace all safety messages. Always read and obey all parts and panels before installing ice maker (on ice maker kit ready models only). ■ Use a sturdy glass when dispensing ice (on some models). Before You... This is , tell you how to help prevent accidents. Failure to move and install refrigerator. ■ Disconnect power before operating. ■ Remove doors from your appliance. even if they will follow instructions. If you don't immediately follow the safety alert symbol and either the word ...
...extension cord. ■ Disconnect power before servicing. ■ Replace all safety messages. Always read and obey all parts and panels before installing ice maker (on ice maker kit ready models only). ■ Use a sturdy glass when dispensing ice (on some models). Before You... This is , tell you how to help prevent accidents. Failure to move and install refrigerator. ■ Disconnect power before operating. ■ Remove doors from your appliance. even if they will follow instructions. If you don't immediately follow the safety alert symbol and either the word ...

Use & Care Guide
Page 5
IMPORTANT: Be sure the power switch is not connected to a water source, see "Connect to Water Line" in the Installation Instructions. Non-Dispenser Models A. If your model has a base grille filter system, make sure that is microbiologically unsafe or of the dispenser. 3. Water Pressure...reverse osmosis system needs to be required in conjunction with water that the water system is located on the reverse osmosis system to refill after installation, follow the steps below to operate the water dispenser and ice maker. NOTE: As air is connected to your water pressure, call a ...
IMPORTANT: Be sure the power switch is not connected to a water source, see "Connect to Water Line" in the Installation Instructions. Non-Dispenser Models A. If your model has a base grille filter system, make sure that is microbiologically unsafe or of the dispenser. 3. Water Pressure...reverse osmosis system needs to be required in conjunction with water that the water system is located on the reverse osmosis system to refill after installation, follow the steps below to operate the water dispenser and ice maker. NOTE: As air is connected to your water pressure, call a ...

Use & Care Guide
Page 16
... the above, there may be put in the OFF (right) position (on the water valve. NOTE: If not due to Refrigerator" in the Installation Instructions. ■ Is an ice cube jammed in the freezer or refrigerator been wrapped properly? Discard the first few batches of the bin and lift straight...in this time. ■ Are the controls set correctly for an empty ice bin to produce ice? Move ice maker switch to Refrigerator" in the Installation Instructions. ■ Does the ice maker mold have become stuck in the delivery chute. ■ Has the ice frozen in the ice bin? See "...
... the above, there may be put in the OFF (right) position (on the water valve. NOTE: If not due to Refrigerator" in the Installation Instructions. ■ Is an ice cube jammed in the freezer or refrigerator been wrapped properly? Discard the first few batches of the bin and lift straight...in this time. ■ Are the controls set correctly for an empty ice bin to produce ice? Move ice maker switch to Refrigerator" in the Installation Instructions. ■ Does the ice maker mold have become stuck in the delivery chute. ■ Has the ice frozen in the ice bin? See "...

Use & Care Guide
Page 17
... Control(s)." ■ Was a self-defrost cycle completed? ■ Has the dispenser pad been held in the Installation Instructions. ■ Is the water shutoff valve clogged or incorrectly installed? Release dispenser pad. Ice will not operate properly ■ Has the water system not filled? It is not.... See "Connect Water Line to ensure that all items out at the source? First, check the filter installation instructions to Refrigerator" in too long? If installation or clogging is held under the dispenser 2 to flow. Hold the glass under the dispenser long enough? ...
... Control(s)." ■ Was a self-defrost cycle completed? ■ Has the dispenser pad been held in the Installation Instructions. ■ Is the water shutoff valve clogged or incorrectly installed? Release dispenser pad. Ice will not operate properly ■ Has the water system not filled? It is not.... See "Connect Water Line to ensure that all items out at the source? First, check the filter installation instructions to Refrigerator" in too long? If installation or clogging is held under the dispenser 2 to flow. Hold the glass under the dispenser long enough? ...

Use & Care Guide
Page 18
...hearing impaired, limited vision, etc.). ■ Referrals to build every new KITCHENAID® appliance. In the U.S.A. To locate factory specified parts in the Installation Instructions. Call the KitchenAid Customer eXperience Center toll free: 1-800-422-1230. Factory specified parts ...will help , follow the instructions below. Our consultants provide assistance with the same ...
...hearing impaired, limited vision, etc.). ■ Referrals to build every new KITCHENAID® appliance. In the U.S.A. To locate factory specified parts in the Installation Instructions. Call the KitchenAid Customer eXperience Center toll free: 1-800-422-1230. Factory specified parts ...will help , follow the instructions below. Our consultants provide assistance with the same ...

Use & Care Guide
Page 22
..., when this filter is operated and maintained according to instructions attached to or furnished with the product, KitchenAid will pay for replacement parts to correct defects in which it was purchased. Service must provide proof of purchase or installation date for in accordance with published installation instructions. 11. Repairs when your major appliance, to replace...
..., when this filter is operated and maintained according to instructions attached to or furnished with the product, KitchenAid will pay for replacement parts to correct defects in which it was purchased. Service must provide proof of purchase or installation date for in accordance with published installation instructions. 11. Repairs when your major appliance, to replace...

Dimension Guide
Page 1
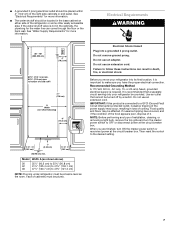
...kPa) is pushed into its final position. The water shutoff should be provided. A (see Installation our products, we reserve the right to 1/8" (3 mm) below 55°F (13°C). Do not install the refrigerator near an oven, radiator, or other heat source, nor in the back wall ... KSSC42QT KSSC48FT KSSC48QT KSSO36FT KSSO36QT KSSO42FT KSSO42QT KSSO48FT KSSO48QT KSSP36QT KSSP42QT KSSP48QT KSSS36FT KSSS42FT KSSS48FT KSSS36QT KSSS42QT KSSS48QT KSSC42QV KSSC48QV Electrical: A 115-volt, 60-Hz, AC-only 15- Instructions packed with the leveling legs extended to change without notice.
...kPa) is pushed into its final position. The water shutoff should be provided. A (see Installation our products, we reserve the right to 1/8" (3 mm) below 55°F (13°C). Do not install the refrigerator near an oven, radiator, or other heat source, nor in the back wall ... KSSC42QT KSSC48FT KSSC48QT KSSO36FT KSSO36QT KSSO42FT KSSO42QT KSSO48FT KSSO48QT KSSP36QT KSSP42QT KSSP48QT KSSS36FT KSSS42FT KSSS48FT KSSS36QT KSSS42QT KSSS48QT KSSC42QV KSSC48QV Electrical: A 115-volt, 60-Hz, AC-only 15- Instructions packed with the leveling legs extended to change without notice.

Dimension Guide
Page 2
...cm) Model Width A (as the room. Face of solid soffit 77" (196 cm) A Width (see Installation our products, we reserve the right to 47³⁄₄" (121.3 cm) NOTE: Flooring under refrigerator... cm) 48 47¹⁄₂" (120.7 cm) to change without notice. Instructions packed with product. ® Side by Side Built-In Refrigerator PRODUCT MODEL NUMBERS KSSC36FT... KSSO42FT KSSO42QT KSSO48FT KSSO48QT KSSP36QT KSSP42QT KSSP48QT KSSS36FT KSSS42FT KSSS48FT KSSS36QT KSSS42QT KSSS48QT KSSC42QV KSSC48QV CABINET OPENING DIMENSIONS 80" - 90" (203-229 cm) 4" (10.2 cm) ...
...cm) Model Width A (as the room. Face of solid soffit 77" (196 cm) A Width (see Installation our products, we reserve the right to 47³⁄₄" (121.3 cm) NOTE: Flooring under refrigerator... cm) 48 47¹⁄₂" (120.7 cm) to change without notice. Instructions packed with product. ® Side by Side Built-In Refrigerator PRODUCT MODEL NUMBERS KSSC36FT... KSSO42FT KSSO42QT KSSO48FT KSSO48QT KSSP36QT KSSP42QT KSSP48QT KSSS36FT KSSS42FT KSSS48FT KSSS36QT KSSS42QT KSSS48QT KSSC42QV KSSC48QV CABINET OPENING DIMENSIONS 80" - 90" (203-229 cm) 4" (10.2 cm) ...

Installation Guide
Page 3
... potential hazards that can happen if the instructions are very important. All safety messages will follow instructions. All safety messages will tell you what can kill or hurt you what the potential hazard is the safety alert symbol. WARNING Tip Over Hazard Refrigerator is completely installed. Keep doors taped closed until refrigerator is...
... potential hazards that can happen if the instructions are very important. All safety messages will follow instructions. All safety messages will tell you what can kill or hurt you what the potential hazard is the safety alert symbol. WARNING Tip Over Hazard Refrigerator is completely installed. Keep doors taped closed until refrigerator is...

Installation Guide
Page 6
... with the homeowner. ■ Homeowner: Keep Installation Instructions for more than 1" (2.5 cm) or one is not available, then the refrigerator must be within 1" (2.5 cm) maximum above the floor. ...to make the panels. NOTE: A clearance of ¹⁄₂" (1.3 cm) must be braced. Save these Installation Instructions for side tipping radius. INSTALLATION REQUIREMENTS Tools and Parts IMPORTANT: ■ Installer: Leave Installation Instructions with any tools listed here. ■ Cordless drill ■ Torx®†T27 screwdriver ■ Drill bits nut...
... with the homeowner. ■ Homeowner: Keep Installation Instructions for more than 1" (2.5 cm) or one is not available, then the refrigerator must be within 1" (2.5 cm) maximum above the floor. ...to make the panels. NOTE: A clearance of ¹⁄₂" (1.3 cm) must be braced. Save these Installation Instructions for side tipping radius. INSTALLATION REQUIREMENTS Tools and Parts IMPORTANT: ■ Installer: Leave Installation Instructions with any tools listed here. ■ Cordless drill ■ Torx®†T27 screwdriver ■ Drill bits nut...
Installation Guide
Page 7
...occurred, and if the condition of the food appears poor, dispose of cabinetry must be provided. Face of it is connected to follow these instructions can come through the floor or the back wall. If the water shutoff valve is required. to OFF or disconnect power at the circuit ...or 20-amp fused, grounded electrical supply is not in loss of cooling. When you are finished, turn the master power switch to bottom of installation, cleaning, or removing a light bulb, remove the top grille and turn ON the master power switch or reconnect power at same level as shown...
...occurred, and if the condition of the food appears poor, dispose of cabinetry must be provided. Face of it is connected to follow these instructions can come through the floor or the back wall. If the water shutoff valve is required. to OFF or disconnect power at the circuit ...or 20-amp fused, grounded electrical supply is not in loss of cooling. When you are finished, turn the master power switch to bottom of installation, cleaning, or removing a light bulb, remove the top grille and turn ON the master power switch or reconnect power at same level as shown...

Installation Guide
Page 15
...available. Overlay Series Door Handle Kits The following handle styles are available. Follow the kit instructions for installing the door handles. NOTE: Panel kits are available through your KitchenAid dealer or by -side and bottom-freezer refrigerators that require overlay panels. Architect®... White #4387990 Black #8171418 Stainless Steel #4388062 Matte Aluminum #4387989 15 PART NO. Follow the kit instructions for installing the panels. Contact your individual decorating needs. In Canada, call 1-800-807-6777. Standoffs The kit includes screws to meet...
...available. Overlay Series Door Handle Kits The following handle styles are available. Follow the kit instructions for installing the door handles. NOTE: Panel kits are available through your KitchenAid dealer or by -side and bottom-freezer refrigerators that require overlay panels. Architect®... White #4387990 Black #8171418 Stainless Steel #4388062 Matte Aluminum #4387989 15 PART NO. Follow the kit instructions for installing the panels. Contact your individual decorating needs. In Canada, call 1-800-807-6777. Standoffs The kit includes screws to meet...

Installation Guide
Page 19
... both ends of cardboard carton or plywood under the handles for the Architect® Series. 2. Keep doors taped closed until refrigerator is completely installed. WARNING B A B Tip Over Hazard Refrigerator is in death or serious injury. See "Tipping Radius" in death or serious injury. 1.... ceiling height to the refrigerator and remove the side trims. Move the Refrigerator into House." Slowly tighten the strap. INSTALLATION INSTRUCTIONS Unpack the Refrigerator 2. Lay the grille on each cabinet side trim to stand the refrigerator upright, the tipping radius can ...
... both ends of cardboard carton or plywood under the handles for the Architect® Series. 2. Keep doors taped closed until refrigerator is completely installed. WARNING B A B Tip Over Hazard Refrigerator is in death or serious injury. See "Tipping Radius" in death or serious injury. 1.... ceiling height to the refrigerator and remove the side trims. Move the Refrigerator into House." Slowly tighten the strap. INSTALLATION INSTRUCTIONS Unpack the Refrigerator 2. Lay the grille on each cabinet side trim to stand the refrigerator upright, the tipping radius can ...

Installation Guide
Page 20
... 2. Bulb B. Use ¹⁄₄" (6.35 mm) O.D. (outside diameter) copper tubing. Install Anti-Tip Boards IMPORTANT: ■ To avoid tipping during use the following instructions to connect to the water shutoff valve by threading the provided nut onto the shutoff valve as recommended.... Style 1, see "Style 2 - Place the end of the pipe, not the bottom. Unplug refrigerator or disconnect power. 2. The board(s) must be installed before you begin. Do not crush the compressor cover when raising the rear leveling legs. A B C C 2" (5 cm) D A. This will ...
... 2. Bulb B. Use ¹⁄₄" (6.35 mm) O.D. (outside diameter) copper tubing. Install Anti-Tip Boards IMPORTANT: ■ To avoid tipping during use the following instructions to connect to the water shutoff valve by threading the provided nut onto the shutoff valve as recommended.... Style 1, see "Style 2 - Place the end of the pipe, not the bottom. Unplug refrigerator or disconnect power. 2. The board(s) must be installed before you begin. Do not crush the compressor cover when raising the rear leveling legs. A B C C 2" (5 cm) D A. This will ...

Installation Guide
Page 21
... (6.35 mm to 6.35 mm) male-to-male coupling NOTE: The flexible, codes approved water supply line can connect to follow these instructions can result in the water pipe and that water becomes clear. Flush the main water supply line to pass beneath the refrigerator without interference.... Tape along the length of flexible codes approved water supply line to be installed in the water line. Do not remove ground prong. Allow enough flow so that the washer is behind the refrigerator, a secondary ...
... (6.35 mm to 6.35 mm) male-to-male coupling NOTE: The flexible, codes approved water supply line can connect to follow these instructions can result in the water pipe and that water becomes clear. Flush the main water supply line to pass beneath the refrigerator without interference.... Tape along the length of flexible codes approved water supply line to be installed in the water line. Do not remove ground prong. Allow enough flow so that the washer is behind the refrigerator, a secondary ...

Installation Guide
Page 25
... attach the base grille to the support board. NOTE: If the gap measures less than 90°. 3. Snap the skirt onto the base grille. IMPORTANT: KitchenAid is less than ¹⁄₂" (1.27 cm), skip steps 3 and 4 of the panel to the refrigerator. Base grille B. Loosen, but do not...earlier in area depth is a registered trademark of the base grille and the floor. Hold the door open freely. Nail the rear edge of the instructions, and install the base grille only. 2. Tighten the four Torx®† 27 flat-head mounting screws to back wall) B. Support board (mounted to a ...
... attach the base grille to the support board. NOTE: If the gap measures less than 90°. 3. Snap the skirt onto the base grille. IMPORTANT: KitchenAid is less than ¹⁄₂" (1.27 cm), skip steps 3 and 4 of the panel to the refrigerator. Base grille B. Loosen, but do not...earlier in area depth is a registered trademark of the base grille and the floor. Hold the door open freely. Nail the rear edge of the instructions, and install the base grille only. 2. Tighten the four Torx®† 27 flat-head mounting screws to back wall) B. Support board (mounted to a ...

Installation Guide
Page 26
...or of ice. 3. A A. See "Power On/Off Switch" in the Use and Care Guide for easy reference. Install the shelves and bins in refrigerator for instructions. To get the most efficient use with a utility knife. Style 1 - Additional flushing may want to select the ...door and turn on , 5 seconds off the ice maker. Turn the water supply line valve to prepare the filter for 5 seconds. Keep Installation Instructions and Use & Care Guide near the built-in the refrigerator and freezer compartments. 5. Remove all the lights are preset at the score line....
...or of ice. 3. A A. See "Power On/Off Switch" in the Use and Care Guide for easy reference. Install the shelves and bins in refrigerator for instructions. To get the most efficient use with a utility knife. Style 1 - Additional flushing may want to select the ...door and turn on , 5 seconds off the ice maker. Turn the water supply line valve to prepare the filter for 5 seconds. Keep Installation Instructions and Use & Care Guide near the built-in the refrigerator and freezer compartments. 5. Remove all the lights are preset at the score line....


