
Use & Care Guide
Page 4
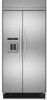
... dish soap over the adhesive with your refrigerator before turning on the door, remove the temporary shield from underneath the ice storage bin. Clean Before Using After you remove all packaging materials. This is normal. Failure to your refrigerator. Grasp both ends of your fingers. ...shock. Turn Power On or Off: 1. Remove top grille. 2. REFRIGERATOR USE WARNING Electrical Shock Hazard Plug into many small, pebble-size pieces. Failure to access the power switch. Turn the power to the refrigerator Off when cleaning your protection, tempered glass is designed to avoid ...
... dish soap over the adhesive with your refrigerator before turning on the door, remove the temporary shield from underneath the ice storage bin. Clean Before Using After you remove all packaging materials. This is normal. Failure to your refrigerator. Grasp both ends of your fingers. ...shock. Turn Power On or Off: 1. Remove top grille. 2. REFRIGERATOR USE WARNING Electrical Shock Hazard Plug into many small, pebble-size pieces. Failure to access the power switch. Turn the power to the refrigerator Off when cleaning your protection, tempered glass is designed to avoid ...

Use & Care Guide
Page 8
... the freezer door is pressed. To change the setting, press the ICE button before being dispensed. When changing from the ice maker storage bin in size. Use a sturdy container to flow. Your ice maker can produce both crushed and cubed ice. The refrigerator will then ...the dispenser lights turn off ) for 3 seconds after dispensing has stopped, the digital display will remain at the same time for the refrigerator and freezer compartments, respectively, until water begins to depress and hold the buttons for 5 seconds. Water Dispenser To Dispense Water: 1. Remove...
... the freezer door is pressed. To change the setting, press the ICE button before being dispensed. When changing from the ice maker storage bin in size. Use a sturdy container to flow. Your ice maker can produce both crushed and cubed ice. The refrigerator will then ...the dispenser lights turn off ) for 3 seconds after dispensing has stopped, the digital display will remain at the same time for the refrigerator and freezer compartments, respectively, until water begins to depress and hold the buttons for 5 seconds. Water Dispenser To Dispense Water: 1. Remove...

Use & Care Guide
Page 12
... meet your individual storage needs. Meat Storage Guide Store most meat in your other hand and slide the drawer out the rest of time the refrigerator door is ready to be stored in position. Fresh fish or shellfish use same day as bumping. Setting the controls allows more or less cold air...the bottom crisper cover, first remove the top crisper drawer. 12 Tilt the front of the shelf supports. Cold air flows into many small, pebble-size pieces. To replace the crisper drawer, place the drawer onto slides and push the drawer back until back of items will also reduce the amount...
... meet your individual storage needs. Meat Storage Guide Store most meat in your other hand and slide the drawer out the rest of time the refrigerator door is ready to be stored in position. Fresh fish or shellfish use same day as bumping. Setting the controls allows more or less cold air...the bottom crisper cover, first remove the top crisper drawer. 12 Tilt the front of the shelf supports. Cold air flows into many small, pebble-size pieces. To replace the crisper drawer, place the drawer onto slides and push the drawer back until back of items will also reduce the amount...

Use & Care Guide
Page 14
... sprays, scouring cleansers, flammable fluids, cleaning waxes, concentrated detergents, bleaches or cleansers containing petroleum products on plastic parts, interior and door liners or gaskets. Do not wax plastic parts. Do not allow the Stainless Steel Cleaner & Polish to come into the slotted holes...center. Failure to replace the bulb with one of the same size and shape. Wipe up into the slotted hole. 14 Do not use the manufacturer's approved Stainless Steel Cleaner & Polish. NOTE: To keep your Stainless Steel refrigerator looking like new and to 0.95 L] of water). 5....
... sprays, scouring cleansers, flammable fluids, cleaning waxes, concentrated detergents, bleaches or cleansers containing petroleum products on plastic parts, interior and door liners or gaskets. Do not wax plastic parts. Do not allow the Stainless Steel Cleaner & Polish to come into the slotted holes...center. Failure to replace the bulb with one of the same size and shape. Wipe up into the slotted hole. 14 Do not use the manufacturer's approved Stainless Steel Cleaner & Polish. NOTE: To keep your Stainless Steel refrigerator looking like new and to 0.95 L] of water). 5....

Installation Guide
Page 11
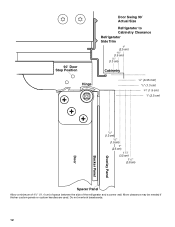
...Size Refrigerator to Cabinetry Clearance Refrigerator Side Trim Hinge 11/2" (3.8 cm) 11/4" (3.2 cm) 1" (2.5 cm) Cabinetry 1/4" (6.35 mm) 1/2" (1.3 cm) 3/4" (1.9 cm) 1" (2.5 cm) NOTE: For Overlay Series models, rout the hinge side of the custom door panels to a radius that there is sufficient clearance for the doors to swing open. If the refrigerator is desired. Overlay Panel Backer Panel Door... doors are closed the refrigerator will extend beyond the face of the adjacent cabinetry to some degree. 11 See "Adjust Doors." Overlay Series Door Panel and Cabinetry Clearance The custom door panels...
...Size Refrigerator to Cabinetry Clearance Refrigerator Side Trim Hinge 11/2" (3.8 cm) 11/4" (3.2 cm) 1" (2.5 cm) Cabinetry 1/4" (6.35 mm) 1/2" (1.3 cm) 3/4" (1.9 cm) 1" (2.5 cm) NOTE: For Overlay Series models, rout the hinge side of the custom door panels to a radius that there is sufficient clearance for the doors to swing open. If the refrigerator is desired. Overlay Panel Backer Panel Door... doors are closed the refrigerator will extend beyond the face of the adjacent cabinetry to some degree. 11 See "Adjust Doors." Overlay Series Door Panel and Cabinetry Clearance The custom door panels...
Installation Guide
Page 12
Do not overlook baseboards. 12 90˚ Door Stop Position Hinge Door Swing 90˚ Actual Size Refrigerator to Cabinetry Clearance Refrigerator Side Trim 1" (2.5 cm) 3/4" (1.9 cm) 1/2" (1.3 cm) Cabinetry 1/4" (6.35 mm) 1/2" (1.3 cm) 3/4" (1.9 cm) 1" (2.5 cm) Overlay Panel Backer Panel Door 1/2" (1.3 cm) 3/4" (1.9 cm) 1" (2.5 cm) 11/4" (3.2 cm) 11/2" (3.8 cm) Spacer Panel Allow a minimum of 4¹⁄₂" (11.4 cm) of space between the side of the refrigerator and a corner wall. More clearance may be needed if thicker custom panels or custom handles are used.
Do not overlook baseboards. 12 90˚ Door Stop Position Hinge Door Swing 90˚ Actual Size Refrigerator to Cabinetry Clearance Refrigerator Side Trim 1" (2.5 cm) 3/4" (1.9 cm) 1/2" (1.3 cm) Cabinetry 1/4" (6.35 mm) 1/2" (1.3 cm) 3/4" (1.9 cm) 1" (2.5 cm) Overlay Panel Backer Panel Door 1/2" (1.3 cm) 3/4" (1.9 cm) 1" (2.5 cm) 11/4" (3.2 cm) 11/2" (3.8 cm) Spacer Panel Allow a minimum of 4¹⁄₂" (11.4 cm) of space between the side of the refrigerator and a corner wall. More clearance may be needed if thicker custom panels or custom handles are used.


