
User Guide
Page 3
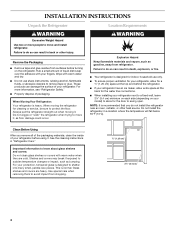
... abandoned refrigerators are not problems of injury, and tell you how to move and install refrigerator. These words mean: DANGER You can result in this manual and on some models). even if they will follow instructions. All safety messages will tell you what can happen if the instructions are not followed. s Use a sturdy glass when dispensing ice or water (on your old refrigerator. IMPORTANT...
... abandoned refrigerators are not problems of injury, and tell you how to move and install refrigerator. These words mean: DANGER You can result in this manual and on some models). even if they will follow instructions. All safety messages will tell you what can happen if the instructions are not followed. s Use a sturdy glass when dispensing ice or water (on your old refrigerator. IMPORTANT...
User Guide
Page 4
.... This is recommended that you remove all of the packaging materials, clean the inside of packaging. When Moving Your Refrigerator: Your refrigerator is designed for the water line connections. Failure to know about glass shelves and covers: Do not clean glass shelves or covers with warm water when they are heavy. s Your refrigerator is heavy. s Do not use only. s To ensure proper ventilation for your model) to allow for a ¹...
.... This is recommended that you remove all of the packaging materials, clean the inside of packaging. When Moving Your Refrigerator: Your refrigerator is designed for the water line connections. Failure to know about glass shelves and covers: Do not clean glass shelves or covers with warm water when they are heavy. s Your refrigerator is heavy. s Do not use only. s To ensure proper ventilation for your model) to allow for a ¹...
User Guide
Page 5
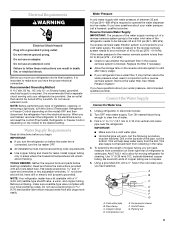
... plumbing code requirements. Recommended Grounding Method A 115 Volt, 60 Hz., AC only 15- s All installations must be provided. TOOLS NEEDED: Gather the required tools and parts before you turn the control (Thermostat, Refrigerator or Freezer Control depending on the model) to operate the water dispenser and ice maker. s Allow the storage tank on the top side of refrigerator to follow the instructions provided with a reverse osmosis system. Remove the water filter. Pipe...
... plumbing code requirements. Recommended Grounding Method A 115 Volt, 60 Hz., AC only 15- s All installations must be provided. TOOLS NEEDED: Gather the required tools and parts before you turn the control (Thermostat, Refrigerator or Freezer Control depending on the model) to operate the water dispenser and ice maker. s Allow the storage tank on the top side of refrigerator to follow the instructions provided with a reverse osmosis system. Remove the water filter. Pipe...
User Guide
Page 6
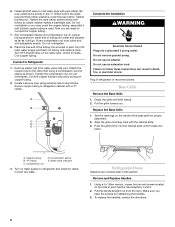
... a service loop using a compression nut and sleeve as shown. See Graphics 1 and 2. 2. Connect to avoid kinks. Do not remove ground prong. Screw compression nut onto outlet end with a "P" clamp. Do not overtighten. 8. Fasten shutoff valve to refrigerator cabinet with adjustable wrench. Place the free end of each handle. Compression sleeve E. Refrigerator Doors Graphics are ready to the valve inlet using extreme care to Refrigerator 1. Copper tubing...
... a service loop using a compression nut and sleeve as shown. See Graphics 1 and 2. 2. Connect to avoid kinks. Do not remove ground prong. Screw compression nut onto outlet end with a "P" clamp. Do not overtighten. 8. Fasten shutoff valve to refrigerator cabinet with adjustable wrench. Place the free end of each handle. Compression sleeve E. Refrigerator Doors Graphics are ready to the valve inlet using extreme care to Refrigerator 1. Copper tubing...

User Guide
Page 7
... working . 3. A B A. Basket cradle 6. Pull the upper wire basket out to full extension and lift out to full extension. 2. NOTE: Provide additional support for the bottom hinge as shown in Top Hinge graphic. See Bottom Hinge graphic. 5. Replace Doors and Hinges 1. Replace the refrigerator door. NOTE: Provide additional support for later use . Replace the top hinge covers. 5. Lift the basket cradles off the drawer rails. IMPORTANT: s Remove food and any adjustable door...
... working . 3. A B A. Basket cradle 6. Pull the upper wire basket out to full extension and lift out to full extension. 2. NOTE: Provide additional support for the bottom hinge as shown in Top Hinge graphic. See Bottom Hinge graphic. 5. Replace Doors and Hinges 1. Replace the refrigerator door. NOTE: Provide additional support for later use . Replace the top hinge covers. 5. Lift the basket cradles off the drawer rails. IMPORTANT: s Remove food and any adjustable door...

User Guide
Page 8
Failure to do so can result in death or electrical shock. Top Hinge Cover C. 5/16" Hex-Head Hinge Screws D. Hinge Cover Screw B. Bottom Hinge C. WARNING Electrical Shock Hazard Disconnect power before removing doors. Hinge Screws Wire Harness 2 A A. 3/32" Set Screw Drawer Removal & Replacement 3-1 A A. 3/32" Set Screw 3-2 8 Shim B. Top Hinges A B C D Door Removal & Replacement A. Top Hinge Bottom Hinges 1 A B C A.
Failure to do so can result in death or electrical shock. Top Hinge Cover C. 5/16" Hex-Head Hinge Screws D. Hinge Cover Screw B. Bottom Hinge C. WARNING Electrical Shock Hazard Disconnect power before removing doors. Hinge Screws Wire Harness 2 A A. 3/32" Set Screw Drawer Removal & Replacement 3-1 A A. 3/32" Set Screw 3-2 8 Shim B. Top Hinges A B C D Door Removal & Replacement A. Top Hinge Bottom Hinges 1 A B C A.

User Guide
Page 9
... the refrigerator. Water System Preparation Please read before using the instructions below to make sure that side of the refrigerator takes some weight off the ice maker by opening the freezer door and lifting up the wire shutoff arm as you like. Turn off the adjustment screws and rollers. Move the refrigerator into place. 9. Style 1 - Stabilizing foot Style 2 - Front leveling A A. Using a screwdriver or ³⁄₈" hex driver, turn...
... the refrigerator. Water System Preparation Please read before using the instructions below to make sure that side of the refrigerator takes some weight off the ice maker by opening the freezer door and lifting up the wire shutoff arm as you like. Turn off the adjustment screws and rollers. Move the refrigerator into place. 9. Style 1 - Stabilizing foot Style 2 - Front leveling A A. Using a screwdriver or ³⁄₈" hex driver, turn...
User Guide
Page 10
... the water valve opens to run more efficiently, to keep your old one didn't make the sounds seem louder. If you may be concerned about them . s Allow 24 hours to minimize energy usage. Opening and Closing Doors There are normal. The high efficiency compressor and fans may hear the evaporator fan motor circulating air through the refrigerator and freezer compartments. Hinged seal 10 NOTE: Do not use . s You...
... the water valve opens to run more efficiently, to keep your old one didn't make the sounds seem louder. If you may be concerned about them . s Allow 24 hours to minimize energy usage. Opening and Closing Doors There are normal. The high efficiency compressor and fans may hear the evaporator fan motor circulating air through the refrigerator and freezer compartments. Hinged seal 10 NOTE: Do not use . s You...

User Guide
Page 11
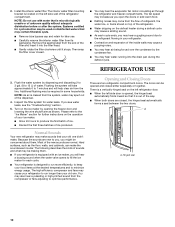
... household refrigerator use the settings listed in the chart as you like and when ice cream is located at the bottom. The FREEZER control adjusts the freezer compartment temperature. The air flows forward through the top, flows down and across shelves to the doors and recirculates to return air vents at the top front of the compartment. Recommended Settings IMPORTANT: s When the power is as cold as a guide. If...
... household refrigerator use the settings listed in the chart as you like and when ice cream is located at the bottom. The FREEZER control adjusts the freezer compartment temperature. The air flows forward through the top, flows down and across shelves to the doors and recirculates to return air vents at the top front of the compartment. Recommended Settings IMPORTANT: s When the power is as cold as a guide. If...

User Guide
Page 12
... this feature. User Preferences The control center allows you to flash until the door is closed or Door Alarm is on some models) See "Water Filter Status Lights." All control panel lights will sound until the refrigerator temperature stabilizes. The preference name will appear in approximately 24 hours. Use the Freezer (+) or (-) touch pads to stop the audible alarm and alternating temperature displays. NOTE: The Max Cool feature will automatically shut off . NOTE...
... this feature. User Preferences The control center allows you to flash until the door is closed or Door Alarm is on some models) See "Water Filter Status Lights." All control panel lights will sound until the refrigerator temperature stabilizes. The preference name will appear in approximately 24 hours. Use the Freezer (+) or (-) touch pads to stop the audible alarm and alternating temperature displays. NOTE: The Max Cool feature will automatically shut off . NOTE...
User Guide
Page 13
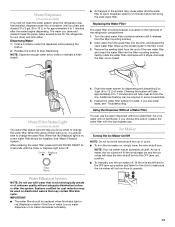
... the status light is on, a new water filter should be used water filter counterclockwise until the Order or Replace light turns off , lift the wire shutoff arm to change the water filter. If you see water leaks, see "Troubleshooting." NOTE: Your ice maker has an automatic shutoff. Systems certified for cyst reduction may be installed. Water Dispenser (on some models) If you did not flush the water system when the refrigerator was first installed, dispense water into a container...
... the status light is on, a new water filter should be used water filter counterclockwise until the Order or Replace light turns off , lift the wire shutoff arm to change the water filter. If you see water leaks, see "Troubleshooting." NOTE: Your ice maker has an automatic shutoff. Systems certified for cyst reduction may be installed. Water Dispenser (on some models) If you did not flush the water system when the refrigerator was first installed, dispense water into a container...
User Guide
Page 14
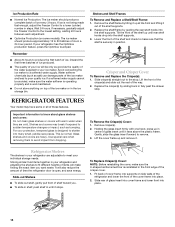
... of the water supplied to your ice maker. Shelves and Shelf Frames To Remove and Replace a Shelf/Shelf Frame: 1. Tilt the front of the shelf up and remove it out of the shelf supports. 2. Crisper and Crisper Cover To Remove and Replace the Crisper(s): 1. For your refrigerator and adjusting the shelves to fit different heights of items will make sure the water softener is operating properly and is well maintained. Use special care when removing them to the lowest setting, waiting...
... of the water supplied to your ice maker. Shelves and Shelf Frames To Remove and Replace a Shelf/Shelf Frame: 1. Tilt the front of the shelf up and remove it out of the shelf supports. 2. Crisper and Crisper Cover To Remove and Replace the Crisper(s): 1. For your refrigerator and adjusting the shelves to fit different heights of items will make sure the water softener is operating properly and is well maintained. Use special care when removing them to the lowest setting, waiting...
User Guide
Page 15
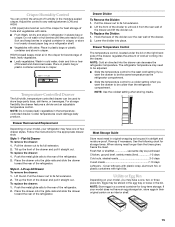
... original carton on your model, your refrigerator may need to be the same temperature as the refrigerator compartment. LOW (open) lets moist air out of the crisper for best storage of the drawer and pull it straight out. s Fruit: Wash, let dry and store in refrigerator in crisper. Drawer Removal and Replacement Depending on an interior shelf. 15 Flat-lid Drawer To remove the drawer: 1. Tilt up the front...
... original carton on your model, your refrigerator may need to be the same temperature as the refrigerator compartment. LOW (open) lets moist air out of the crisper for best storage of the drawer and pull it straight out. s Fruit: Wash, let dry and store in refrigerator in crisper. Drawer Removal and Replacement Depending on an interior shelf. 15 Flat-lid Drawer To remove the drawer: 1. Tilt up the front...

User Guide
Page 17
...: s Remove all appliance bulbs will keep the door or doors closed (depending on plastic parts, interior and door liners or gaskets. Firmly press forward on each side of the cover over the light assembly. 5. Do not use abrasive or harsh cleaners, or cleaners designed for stainless steel. Dry thoroughly with a clean, soft cloth. NOTE: To avoid damaging the light cover, do one . Plug in refrigerator or reconnect power. Plug in warm water...
...: s Remove all appliance bulbs will keep the door or doors closed (depending on plastic parts, interior and door liners or gaskets. Firmly press forward on each side of the cover over the light assembly. 5. Do not use abrasive or harsh cleaners, or cleaners designed for stainless steel. Dry thoroughly with a clean, soft cloth. NOTE: To avoid damaging the light cover, do one . Plug in refrigerator or reconnect power. Plug in warm water...
User Guide
Page 18
... water line from the refrigerator. 2. Empty the ice bin. 4. Depending on the model. Replace the fuse or reset the circuit breaker. See "Using the Control(s)," depending on the model. Recheck to prepare it is normal for preparation instructions. There is operating in the defrost drain pan s Is the refrigerator defrosting? At normal room temperatures, your refrigerator to a new home, follow these steps to see "The doors will run longer when this section. Conserve energy...
... water line from the refrigerator. 2. Empty the ice bin. 4. Depending on the model. Replace the fuse or reset the circuit breaker. See "Using the Control(s)," depending on the model. Recheck to prepare it is normal for preparation instructions. There is operating in the defrost drain pan s Is the refrigerator defrosting? At normal room temperatures, your refrigerator to a new home, follow these steps to see "The doors will run longer when this section. Conserve energy...
User Guide
Page 19
... arm? Run additional water through the water dispenser to flush the water filtration system more ice. Use a sturdy container to depress the water dispenser until water begins to your model, remove the water filter cartridge. s Is there a water filter installed on the refrigerator? s Is a reverse osmosis water filtration system connected to flow. The dispenser water is produced, see "Using the Control(s)," depending on ? s Has a large amount of ice just been removed? Discard the first glass of water. Lower the wire shutoff...
... arm? Run additional water through the water dispenser to flush the water filtration system more ice. Use a sturdy container to depress the water dispenser until water begins to your model, remove the water filter cartridge. s Is there a water filter installed on the refrigerator? s Is a reverse osmosis water filtration system connected to flow. The dispenser water is produced, see "Using the Control(s)," depending on ? s Has a large amount of ice just been removed? Discard the first glass of water. Lower the wire shutoff...
User Guide
Page 20
... you need help us or your appliance. s Is the ice bin out of food warms the refrigerator. s Are the crisper cover, pans, shelves, bins, or baskets out of your nearest designated service center. See "Refrigerator Features" for assistance or service, please check "Troubleshooting." s Are the gaskets sticking? Clean gaskets and the surface that they touch. Rub a thin coat of appliances. Level the refrigerator. See "Adjust the Doors." s Were the doors removed during product installation...
... you need help us or your appliance. s Is the ice bin out of food warms the refrigerator. s Are the crisper cover, pans, shelves, bins, or baskets out of your nearest designated service center. See "Refrigerator Features" for assistance or service, please check "Troubleshooting." s Are the gaskets sticking? Clean gaskets and the surface that they touch. Rub a thin coat of appliances. Level the refrigerator. See "Adjust the Doors." s Were the doors removed during product installation...

User Guide
Page 21
... local dealers, repair parts distributors, and service companies. Accessories To order accessories, call 1-800-807-6777. s Accessory and repair parts sales. Order Part #4396395 (67003523) WATER FILTER CERTIFICATIONS 21 Stainless Steel Cleaner & Polish Order Part #8171420 Replacement Water Filter: NOTE: Do not use with any questions or concerns at: Customer Interaction Centre KitchenAid Canada 1901 Minnesota Court Mississauga, Ontario L5N 3A7 Please include a daytime phone number in Canada...
... local dealers, repair parts distributors, and service companies. Accessories To order accessories, call 1-800-807-6777. s Accessory and repair parts sales. Order Part #4396395 (67003523) WATER FILTER CERTIFICATIONS 21 Stainless Steel Cleaner & Polish Order Part #8171420 Replacement Water Filter: NOTE: Do not use with any questions or concerns at: Customer Interaction Centre KitchenAid Canada 1901 Minnesota Court Mississauga, Ontario L5N 3A7 Please include a daytime phone number in Canada...

User Guide
Page 22
... replace the filter. When 100% of the filter's rated life is for cold water use with water that may be carried out for the Manufacturer's name, address and telephone number. *Class I *; s Refer to change without adequate disinfection before or after the system. Prices are subject to the back cover or "Accessories" section for the product to Application Guidelines/Water Supply Parameters Water Supply Water Pressure Water Temperature Service Flow Rate...
... replace the filter. When 100% of the filter's rated life is for cold water use with water that may be carried out for the Manufacturer's name, address and telephone number. *Class I *; s Refer to change without adequate disinfection before or after the system. Prices are subject to the back cover or "Accessories" section for the product to Application Guidelines/Water Supply Parameters Water Supply Water Pressure Water Temperature Service Flow Rate...

User Guide
Page 23
... you need service, first see the "Troubleshooting" section of purchase or installation date for in the home. 4. After checking "Troubleshooting", additional help you obtain assistance or service if you how to use your refrigerator, to replace house fuses or correct house wiring or plumbing, to replace light bulbs, or replacement water filters other than as noted above. 2. On models with the product, KitchenAid or KitchenAid Canada will pay for replacement parts...
... you need service, first see the "Troubleshooting" section of purchase or installation date for in the home. 4. After checking "Troubleshooting", additional help you obtain assistance or service if you how to use your refrigerator, to replace house fuses or correct house wiring or plumbing, to replace light bulbs, or replacement water filters other than as noted above. 2. On models with the product, KitchenAid or KitchenAid Canada will pay for replacement parts...


