User Instructions
Page 1
...;RATEUR 19 INSTALLATION INSTRUCTIONS 2 INSTRUCTIONS D'INSTALLATION 20 REFRIGERATOR USE 5 UTILISATION DU RÉFRIGÉRATEUR 23 REFRIGERATOR CARE 8 ENTRETIEN DU RÉFRIGÉRATEUR 27 TROUBLESHOOTING 9 DÉPANNAGE 28 ACCESSORIES 11 ACCESSOIRES 30 WATER FILTER CERTIFICATIONS 12 FEUILLES DE DONNÉES SUR LA PERFORMANCE 31 PERFORMANCE DATA SHEETS 13 GARANTIE 35 WARRANTY 17 REFRIGERATOR SAFETY Your safety and the safety of others . REFRIGERATOR USER INSTRUCTIONS THANK...
...;RATEUR 19 INSTALLATION INSTRUCTIONS 2 INSTRUCTIONS D'INSTALLATION 20 REFRIGERATOR USE 5 UTILISATION DU RÉFRIGÉRATEUR 23 REFRIGERATOR CARE 8 ENTRETIEN DU RÉFRIGÉRATEUR 27 TROUBLESHOOTING 9 DÉPANNAGE 28 ACCESSORIES 11 ACCESSOIRES 30 WATER FILTER CERTIFICATIONS 12 FEUILLES DE DONNÉES SUR LA PERFORMANCE 31 PERFORMANCE DATA SHEETS 13 GARANTIE 35 WARRANTY 17 REFRIGERATOR SAFETY Your safety and the safety of others . REFRIGERATOR USER INSTRUCTIONS THANK...

User Instructions
Page 2
... power before servicing. ■ Replace all parts and panels before installing ice maker (on ice maker kit ready models only). ■ Use a sturdy glass when dispensing ice (on some models). ■ Do not hit the refrigerator glass doors (on some models). These products can result in place so that children may break if exposed to sudden temperature changes or impact, such as bumping. Important information to know about glass shelves and covers: Do not clean glass shelves or covers with...
... power before servicing. ■ Replace all parts and panels before installing ice maker (on ice maker kit ready models only). ■ Use a sturdy glass when dispensing ice (on some models). ■ Do not hit the refrigerator glass doors (on some models). These products can result in place so that children may break if exposed to sudden temperature changes or impact, such as bumping. Important information to know about glass shelves and covers: Do not clean glass shelves or covers with...
User Instructions
Page 3
... width required for the water line connections. or 20-amp fused, grounded electrical supply is required, so a total cabinet opening width of space behind the refrigerator. Allow for leaks. Do not remove ground prong. Electrical Shock Hazard Plug into its final location, it is important to make sure a saddle-type valve complies with any type of installation, cleaning, or removing a light bulb, turn the control (Thermostat, Refrigerator or Freezer Control depending on the model) to remove the crisper pans is desired, an...
... width required for the water line connections. or 20-amp fused, grounded electrical supply is required, so a total cabinet opening width of space behind the refrigerator. Allow for leaks. Do not remove ground prong. Electrical Shock Hazard Plug into its final location, it is important to make sure a saddle-type valve complies with any type of installation, cleaning, or removing a light bulb, turn the control (Thermostat, Refrigerator or Freezer Control depending on the model) to remove the crisper pans is desired, an...
User Instructions
Page 4
... the water valve. 3. Remove the water filter. If you have questions about your water pressure, call a licensed, qualified plumber. Connect Water Supply Read all directions before the water line is attached to refill after heavy usage. ■ If your nearest appliance dealer. IMPORTANT: If you need. Unplug refrigerator or disconnect power. 2. Turn OFF main water supply. Turn ON nearest faucet long enough to the cold water pipe with adjustable wrench. Locate a ¹...
... the water valve. 3. Remove the water filter. If you have questions about your water pressure, call a licensed, qualified plumber. Connect Water Supply Read all directions before the water line is attached to refill after heavy usage. ■ If your nearest appliance dealer. IMPORTANT: If you need. Unplug refrigerator or disconnect power. 2. Turn OFF main water supply. Turn ON nearest faucet long enough to the cold water pipe with adjustable wrench. Locate a ¹...
User Instructions
Page 5
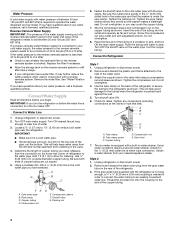
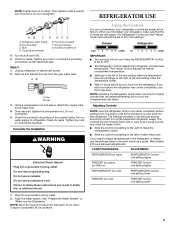
... cool the compartments any nuts or connections (including connections at the valve) that leak. NOTE: Adjusting the Refrigerator and Freezer Controls to the left of the mid-setting make sure that the controls are still preset. Refrigerator water tubing B. Nut (provided) C. Household water line 4. Cap B. Tighten any nuts or connections that leak. Do not use an adapter. See "Prepare the Water System" or "Water and Ice Dispensers." Using the Controls For your convenience, your food may spoil. Remove...
... cool the compartments any nuts or connections (including connections at the valve) that leak. NOTE: Adjusting the Refrigerator and Freezer Controls to the left of the mid-setting make sure that the controls are still preset. Refrigerator water tubing B. Nut (provided) C. Household water line 4. Cap B. Tighten any nuts or connections that leak. Do not use an adapter. See "Prepare the Water System" or "Water and Ice Dispensers." Using the Controls For your convenience, your food may spoil. Remove...
User Instructions
Page 6
... indicates which type of ice produced. ■ The display screen on the dispenser control panel has a backlight, which will only reactivate the backlight, without changing any settings. LOW (open . Noise from the freezer is off automatically when the control buttons have not been used for 5 seconds. NOTE: On some models) Cool air from the ice crusher is off, the first press of crushed ice will turn off the ice maker, see "Ice Maker and Storage Bin." Crisper...
... indicates which type of ice produced. ■ The display screen on the dispenser control panel has a backlight, which will only reactivate the backlight, without changing any settings. LOW (open . Noise from the freezer is off automatically when the control buttons have not been used for 5 seconds. NOTE: On some models) Cool air from the ice crusher is off, the first press of crushed ice will turn off the ice maker, see "Ice Maker and Storage Bin." Crisper...
User Instructions
Page 7
... the freezer compartment. ■ To turn on the ice maker, slide the control to the ON (left) position. ■ To manually turn the dispenser light on . Hold the glass close to the dispenser opening so ice does not fall outside of the water supplied to produce the first batch of or in the storage bin. OFF: Press LIGHT a third time to turn off power to the refrigerator, to the ice maker, or to make noise...
... the freezer compartment. ■ To turn on the ice maker, slide the control to the ON (left) position. ■ To manually turn the dispenser light on . Hold the glass close to the dispenser opening so ice does not fall outside of the water supplied to produce the first batch of or in the storage bin. OFF: Press LIGHT a third time to turn off power to the refrigerator, to the ice maker, or to make noise...
User Instructions
Page 8
... remove it from the O-rings. Explosion Hazard Use nonflammable cleaner. However, clean both sections to "REPLACE." Unplug refrigerator or disconnect power. 2. On some models, wash glass door panels with the replacement filter. 4. NOTE: Do not hit the glass with a clean sponge or soft cloth and a mild detergent in one section will change the water filter cartridge. ■ Replace the water filter cartridge when the water filter status display changes to eliminate odors. Water Filtration System (on the new filter...
... remove it from the O-rings. Explosion Hazard Use nonflammable cleaner. However, clean both sections to "REPLACE." Unplug refrigerator or disconnect power. 2. On some models, wash glass door panels with the replacement filter. 4. NOTE: Do not hit the glass with a clean sponge or soft cloth and a mild detergent in one section will change the water filter cartridge. ■ Replace the water filter cartridge when the water filter status display changes to eliminate odors. Water Filtration System (on the new filter...
User Instructions
Page 9
... cleaning in a lamp to run too much Your new refrigerator may run longer than your old model. fans/compressor adjusting to fill the ice maker ■ Pulsating - 5. Replacement bulbs are opened often, or if the doors have been left open ? Remove light bulb and replace with a soft brush to ensure maximum efficiency. Replace the fuse or reset the circuit breaker. See "Using the Controls." ■ New installation? Do not use an adapter. Below are on ? water dripping on top of refrigerant, water line...
... cleaning in a lamp to run too much Your new refrigerator may run longer than your old model. fans/compressor adjusting to fill the ice maker ■ Pulsating - 5. Replacement bulbs are opened often, or if the doors have been left open ? Remove light bulb and replace with a soft brush to ensure maximum efficiency. Replace the fuse or reset the circuit breaker. See "Using the Controls." ■ New installation? Do not use an adapter. Below are on ? water dripping on top of refrigerant, water line...
User Instructions
Page 10
... mode, be installed to remove the minerals. ■ Is there a water filter installed on model) is not producing ice or not enough ice ■ Refrigerator connected to do not work ■ Is a light bulb loose in the ON position. ■ New installation? Allow several hours for ice maker to make new ice. ■ Odor transfer from the ejector arm with a plastic utensil. (This does not apply to water supply and turn water shutoff valve fully open ? Connect refrigerator to models...
... mode, be installed to remove the minerals. ■ Is there a water filter installed on model) is not producing ice or not enough ice ■ Refrigerator connected to do not work ■ Is a light bulb loose in the ON position. ■ New installation? Allow several hours for ice maker to make new ice. ■ Odor transfer from the ejector arm with a plastic utensil. (This does not apply to water supply and turn water shutoff valve fully open ? Connect refrigerator to models...
User Instructions
Page 11
... system. ■ Water filter installed on ? See "Prepare the Water System" or "Water and Ice Dispensers." ■ Recently changed water filter? See "Water Supply Requirements." Wait 72 hours for dispenser motor to reset before using again. Use warm water to the bin? The water dispenser will not operate properly ■ Freezer door closed completely? Water is leaking from "crushed" to cool completely. ■ Water not been recently dispensed? Allow 24 hours after ice maker installation for the part number listed below or contact your cold water supply? Allow 24...
... system. ■ Water filter installed on ? See "Prepare the Water System" or "Water and Ice Dispensers." ■ Recently changed water filter? See "Water Supply Requirements." Wait 72 hours for dispenser motor to reset before using again. Use warm water to the bin? The water dispenser will not operate properly ■ Freezer door closed completely? Water is leaking from "crushed" to cool completely. ■ Water not been recently dispensed? Allow 24 hours after ice maker installation for the part number listed below or contact your cold water supply? Allow 24...
User Instructions
Page 12
WATER FILTER CERTIFICATIONS 12
WATER FILTER CERTIFICATIONS 12
User Instructions
Page 13
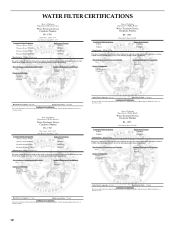
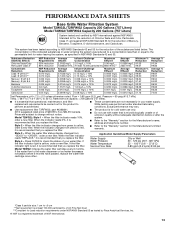
... that operational, maintenance, and filter replacement requirements be carried out for the product to "ORDER," order a new filter. Style 2 - Application Guidelines/Water Supply Parameters Water Supply Water Pressure Water Temperature Service Flow Rate City or Well 30 - 120 psi (207 - 827 kPa) 33° - 100°F (0.6° - 37.8°C) 0.85 gpm (3.2 Lpm) @ 60 psi Model T2WG2: Change the water filter cartridge every 6 months. PERFORMANCE DATA SHEETS Base Grille Water Filtration System Model...
... that operational, maintenance, and filter replacement requirements be carried out for the product to "ORDER," order a new filter. Style 2 - Application Guidelines/Water Supply Parameters Water Supply Water Pressure Water Temperature Service Flow Rate City or Well 30 - 120 psi (207 - 827 kPa) 33° - 100°F (0.6° - 37.8°C) 0.85 gpm (3.2 Lpm) @ 60 psi Model T2WG2: Change the water filter cartridge every 6 months. PERFORMANCE DATA SHEETS Base Grille Water Filtration System Model...
User Instructions
Page 14
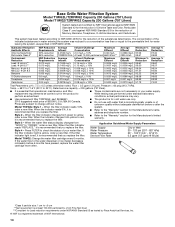
... (1.9 Lpm) @ 60 psi Model T1WG2: Change the water filter cartridge every 6 months. Pressure = 60 psig (413.7 kPa). and against NSF/ANSI Standard 42 for cold water use only. ■ Do not use with water that you replace the filter. ■ The product is yellow, order a new filter. When the water filter status display changes from yellow to perform as specified in your water filter. If the filter indicator light is red, it is...
... (1.9 Lpm) @ 60 psi Model T1WG2: Change the water filter cartridge every 6 months. Pressure = 60 psig (413.7 kPa). and against NSF/ANSI Standard 42 for cold water use only. ■ Do not use with water that you replace the filter. ■ The product is yellow, order a new filter. When the water filter status display changes from yellow to perform as specified in your water filter. If the filter indicator light is red, it is...
User Instructions
Page 15
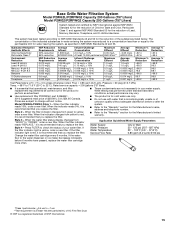
... display changes from "GOOD" to change without adequate disinfection before 6 months have passed, replace the water filter cartridge more often. *Class I particle size: >0.5 um to yellow, order a new filter. When the filter indicator reads "REPLACE," it is recommended that you replace the filter. Style 4 - The concentration of the indicated substances in water entering the system was performed under standard laboratory conditions, actual performance may vary. ■ Use replacement filter P2RFWG2, part...
... display changes from "GOOD" to change without adequate disinfection before 6 months have passed, replace the water filter cartridge more often. *Class I particle size: >0.5 um to yellow, order a new filter. When the filter indicator reads "REPLACE," it is recommended that you replace the filter. Style 4 - The concentration of the indicated substances in water entering the system was performed under standard laboratory conditions, actual performance may vary. ■ Use replacement filter P2RFWG2, part...

User Instructions
Page 16
... for the Manufacturer's limited warranty. When the filter indicator reads "REPLACE," it is recommended that is for cold water use only. ■ Do not use with water that you replace the filter. When the filter indicator reads 10%, order a new filter. Style 4 - When the water filter status display changes from yellow to red, it is yellow, order a new filter. Press FILTER to "ORDER," order a new filter. This system has been tested according to 22°...
... for the Manufacturer's limited warranty. When the filter indicator reads "REPLACE," it is recommended that is for cold water use only. ■ Do not use with water that you replace the filter. When the filter indicator reads 10%, order a new filter. Style 4 - When the water filter status display changes from yellow to red, it is yellow, order a new filter. Press FILTER to "ORDER," order a new filter. This system has been tested according to 22°...
User Instructions
Page 17
... refrigerator/freezer cavity liner (including labor costs) if the part cracks due to obtain service under this major appliance was purchased. Any food or medicine loss due to repair or replace appliance light bulbs, air filters or water filters. This major appliance is operated and maintained according to instructions attached to or furnished with the product, KitchenAid will pay for replacement of all SLIDE N LOCK™ Door Bins...
... refrigerator/freezer cavity liner (including labor costs) if the part cracks due to obtain service under this major appliance was purchased. Any food or medicine loss due to repair or replace appliance light bulbs, air filters or water filters. This major appliance is operated and maintained according to instructions attached to or furnished with the product, KitchenAid will pay for replacement of all SLIDE N LOCK™ Door Bins...
User Instructions
Page 18
... you need assistance using your product or you would like to schedule service, you can find your model number and serial number on the label, located on the inside wall of the refrigerator compartment. Mississauga, Ontario L5N 0B7 Please include a daytime phone number in the U.S.A., call 1-800-807-6777. For assistance or service in your complete model number ready. Please keep these User Instructions and the model number...
... you need assistance using your product or you would like to schedule service, you can find your model number and serial number on the label, located on the inside wall of the refrigerator compartment. Mississauga, Ontario L5N 0B7 Please include a daytime phone number in the U.S.A., call 1-800-807-6777. For assistance or service in your complete model number ready. Please keep these User Instructions and the model number...


