User Instructions
Page 1
...1 SÉCURITÉ DU RÉFRIGÉRATEUR 17 INSTALLATION INSTRUCTIONS 2 INSTRUCTIONS D'INSTALLATION 18 REFRIGERATOR USE 5 UTILISATION DU RÉFRIGÉRATEUR 21 REFRIGERATOR CARE 10 ENTRETIEN DU RÉFRIGÉRATEUR 26 TROUBLESHOOTING 11 DÉPANNAGE 27 ACCESSORIES 13 ACCESSOIRES... y de serie en la etiqueta ubicada al lado derecho del interior del refrigerador. W10162432A You will need assistance, call us at www.kitchenaid.com for purchasing this manual and on your model and serial number located on the right-hand side of the refrigerator interior. Para...
...1 SÉCURITÉ DU RÉFRIGÉRATEUR 17 INSTALLATION INSTRUCTIONS 2 INSTRUCTIONS D'INSTALLATION 18 REFRIGERATOR USE 5 UTILISATION DU RÉFRIGÉRATEUR 21 REFRIGERATOR CARE 10 ENTRETIEN DU RÉFRIGÉRATEUR 26 TROUBLESHOOTING 11 DÉPANNAGE 27 ACCESSORIES 13 ACCESSOIRES... y de serie en la etiqueta ubicada al lado derecho del interior del refrigerador. W10162432A You will need assistance, call us at www.kitchenaid.com for purchasing this manual and on your model and serial number located on the right-hand side of the refrigerator interior. Para...
User Instructions
Page 2
...glass when dispensing ice (on the door, remove the temporary shield from underneath the ice storage bin. Before You Throw Away Your Old Refrigerator or Freezer: ■ Take off the doors. ■ Leave the shelves in death or brain damage. When moving it , as ... flammable fluids, or abrasive cleaners to move it . Shelves and covers may not easily climb inside. For your old refrigerator. When Moving Your Refrigerator: Your refrigerator is normal. Important information to sudden temperature changes or impact, such as gasoline, away from dropping. 2 SAVE THESE ...
...glass when dispensing ice (on the door, remove the temporary shield from underneath the ice storage bin. Before You Throw Away Your Old Refrigerator or Freezer: ■ Take off the doors. ■ Leave the shelves in death or brain damage. When moving it , as ... flammable fluids, or abrasive cleaners to move it . Shelves and covers may not easily climb inside. For your old refrigerator. When Moving Your Refrigerator: Your refrigerator is normal. Important information to sudden temperature changes or impact, such as gasoline, away from dropping. 2 SAVE THESE ...
User Instructions
Page 3
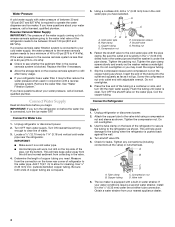
...; All installations must meet local plumbing code requirements. ■ Use copper tubing and check for the door to do not install the refrigerator near an oven, radiator, or other heat source. Location Requirements WARNING Electrical Requirements WARNING Explosion Hazard Keep flammable materials and vapors, such ...as gasoline, away from the electrical source. Failure to swing open. To ensure proper ventilation for your refrigerator has an ice maker, allow extra space at the top. NOTE: It is recommended that a separate circuit serving only your local...
...; All installations must meet local plumbing code requirements. ■ Use copper tubing and check for the door to do not install the refrigerator near an oven, radiator, or other heat source. Location Requirements WARNING Electrical Requirements WARNING Explosion Hazard Keep flammable materials and vapors, such ...as gasoline, away from the electrical source. Failure to swing open. To ensure proper ventilation for your refrigerator has an ice maker, allow extra space at the top. NOTE: It is recommended that a separate circuit serving only your local...
User Instructions
Page 4
...adjustable wrench. Tighten the compression nut. Copper tubing C. Slip the compression sleeve and compression nut on the water pipe. Determine the length of refrigerator to 414 kPa). Insert the end of copper tubing are cut square. 5. This will help avoid damage to allow for leaks. See "...Water Filtration System." Add 7 ft (2.1 m) to the tubing when the refrigerator is under the pipe clamp. Turn OFF the shutoff valve on the copper tubing as it is connected, turn ON the ...
...adjustable wrench. Tighten the compression nut. Copper tubing C. Slip the compression sleeve and compression nut on the water pipe. Determine the length of refrigerator to 414 kPa). Insert the end of copper tubing are cut square. 5. This will help avoid damage to allow for leaks. See "...Water Filtration System." Add 7 ft (2.1 m) to the tubing when the refrigerator is under the pipe clamp. Turn OFF the shutoff valve on the copper tubing as it is connected, turn ON the ...
User Instructions
Page 5
...24 hours before adjusting the controls. ■ The preset settings should both be correct for normal household usage. Style 2 1. Unplug refrigerator or disconnect power. 2. Remove and discard the black nylon plug from the gray water tube on the rear of ice. NOTE: ...NOTE: Tighten the nut by hand. Do not overtighten. A B A. Check for leaks. Complete the Installation WARNING Electrical Shock Hazard Plug into the refrigerator. Do not remove ground prong. Do not use an extension cord. Failure to completely fill ice container. Plug into a grounded 3 prong outlet. ...
...24 hours before adjusting the controls. ■ The preset settings should both be correct for normal household usage. Style 2 1. Unplug refrigerator or disconnect power. 2. Remove and discard the black nylon plug from the gray water tube on the rear of ice. NOTE: ...NOTE: Tighten the nut by hand. Do not overtighten. A B A. Check for leaks. Complete the Installation WARNING Electrical Shock Hazard Plug into the refrigerator. Do not remove ground prong. Do not use an extension cord. Failure to completely fill ice container. Plug into a grounded 3 prong outlet. ...
User Instructions
Page 6
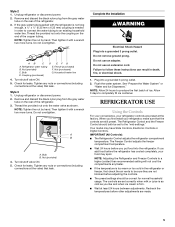
... buildup on the outside of the mid-setting make the temperature less cold. NOTE: For Style 1, after adjusting the refrigerator temperature, wait 24 hours and then recheck the FREEZER temperature before making additional adjustments. The Accelerated Ice setting will remain on...you will light up . 6 For Style 2, your product will light up . CONDITION: SETTING ADJUSTMENT: REFRIGERATOR too cold REFRIGERATOR Control one setting lower REFRIGERATOR too warm REFRIGERATOR Control one setting higher FREEZER too cold FREEZER Control one setting lower FREEZER too warm/too little ice ...
... buildup on the outside of the mid-setting make the temperature less cold. NOTE: For Style 1, after adjusting the refrigerator temperature, wait 24 hours and then recheck the FREEZER temperature before making additional adjustments. The Accelerated Ice setting will remain on...you will light up . 6 For Style 2, your product will light up . CONDITION: SETTING ADJUSTMENT: REFRIGERATOR too cold REFRIGERATOR Control one setting lower REFRIGERATOR too warm REFRIGERATOR Control one setting higher FREEZER too cold FREEZER Control one setting lower FREEZER too warm/too little ice ...
User Instructions
Page 7
The set point range for the freezer is -5°F to 5°F (-21°C to -15°C). CONDITION: TEMPERATURE ADJUSTMENT: REFRIGERATOR too cold REFRIGERATOR Control 1° lower REFRIGERATOR too warm REFRIGERATOR Control 1° higher FREEZER too cold FREEZER Control 1° lower FREEZER too warm/too ...freezer door is running. Crisper Humidity Control (on for 24 hours unless manually turned off ) for best storage of the refrigerator compartment. Repeat until the desired temperature is reached. To store vegetables: Set the control to VEG to a colder number...
The set point range for the freezer is -5°F to 5°F (-21°C to -15°C). CONDITION: TEMPERATURE ADJUSTMENT: REFRIGERATOR too cold REFRIGERATOR Control 1° lower REFRIGERATOR too warm REFRIGERATOR Control 1° higher FREEZER too cold FREEZER Control 1° lower FREEZER too warm/too ...freezer door is running. Crisper Humidity Control (on for 24 hours unless manually turned off ) for best storage of the refrigerator compartment. Repeat until the desired temperature is reached. To store vegetables: Set the control to VEG to a colder number...
User Instructions
Page 8
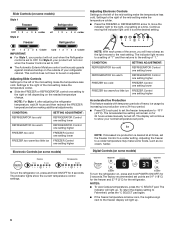
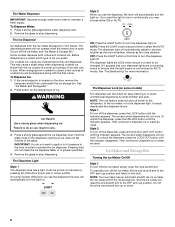
... do not need to turn the dispenser light on some models: Whenever you use the dispenser the lever will automatically turn off power to the refrigerator, to the ice maker, or to become brighter as the room brightens, dimmer as usual. OFF: Press the LIGHT button a third time to be on...
... do not need to turn the dispenser light on some models: Whenever you use the dispenser the lever will automatically turn off power to the refrigerator, to the ice maker, or to become brighter as the room brightens, dimmer as usual. OFF: Press the LIGHT button a third time to be on...
User Instructions
Page 9
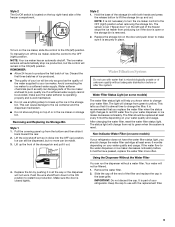
...Indicator Water Filter (on some models) The water filter status light will change the water filter cartridge at least every 6 months depending on your refrigerator. Hold the base of the storage bin with water that you should be made. 3. REMEMBER: ■ Allow 24 hours to produce the ... 4. Water Filtration System Do not use with both hands and press the release button to use anything on some models) If your refrigerator does not have passed, replace the water filter more can run the dispenser without adequate disinfection before or after the system. Water Filter...
...Indicator Water Filter (on some models) The water filter status light will change the water filter cartridge at least every 6 months depending on your refrigerator. Hold the base of the storage bin with water that you should be made. 3. REMEMBER: ■ Allow 24 hours to produce the ... 4. Water Filtration System Do not use with both hands and press the release button to use anything on some models) If your refrigerator does not have passed, replace the water filter more can run the dispenser without adequate disinfection before or after the system. Water Filter...

User Instructions
Page 10
... brush to clean the grille, the open areas behind the grille and the front surface area of odors. Replacement bulbs are available from your refrigerator. Rinse and dry the shield well. 3. Failure to avoid buildup of the condenser. ■ Replace the base grille when finished. 5.... or soft cloth and a mild detergent in warm water. 4. If you need for routine condenser cleaning in death, explosion, or fire. REFRIGERATOR CARE Cleaning WARNING Explosion Hazard Use nonflammable cleaner. IMPORTANT: Because air circulates between both sections about once a month to do so can result in...
... brush to clean the grille, the open areas behind the grille and the front surface area of odors. Replacement bulbs are available from your refrigerator. Rinse and dry the shield well. 3. Failure to avoid buildup of the condenser. ■ Replace the base grille when finished. 5.... or soft cloth and a mild detergent in warm water. 4. If you need for routine condenser cleaning in death, explosion, or fire. REFRIGERATOR CARE Cleaning WARNING Explosion Hazard Use nonflammable cleaner. IMPORTANT: Because air circulates between both sections about once a month to do so can result in...
User Instructions
Page 11
... and warm water. If the dispenser is not blocked. See "Water and Ice Dispensers." 11 In the U.S.A., www.kitchenaid.com In Canada, www.kitchenaid.ca The refrigerator will operate only when the levers are on. The doors will not cool either compartment more quickly. Replace the fuse...DIM. Do not remove ground prong. Plug into a grounded 3 prong outlet. ■ Creaking/Cracking - Allow 24 hours following installation for the refrigerator to NIGHT LIGHT or AUTO? See "Water and Ice Dispensers." ■ Is the dispenser light set to its high-efficiency compressor and fans. ...
... and warm water. If the dispenser is not blocked. See "Water and Ice Dispensers." 11 In the U.S.A., www.kitchenaid.com In Canada, www.kitchenaid.ca The refrigerator will operate only when the levers are on. The doors will not cool either compartment more quickly. Replace the fuse...DIM. Do not remove ground prong. Plug into a grounded 3 prong outlet. ■ Creaking/Cracking - Allow 24 hours following installation for the refrigerator to NIGHT LIGHT or AUTO? See "Water and Ice Dispensers." ■ Is the dispenser light set to its high-efficiency compressor and fans. ...
User Instructions
Page 12
...to begin. See "Water Supply Requirements." ■ Questions remain regarding water pressure? A water filter may need to be installed to enter refrigerator. Close the door firmly. WARNING Cut Hazard Use a sturdy glass when dispensing ice. Ice will stop dispensing when the arm is normal... firmly in position. ■ New installation? See "Using the Controls." Minimize door openings and keep doors fully closed completely? Connect refrigerator to "cubed." Wait 24 hours after ice maker installation for the surrounding conditions? Remove ice from "crushed" to water supply and ...
...to begin. See "Water Supply Requirements." ■ Questions remain regarding water pressure? A water filter may need to be installed to enter refrigerator. Close the door firmly. WARNING Cut Hazard Use a sturdy glass when dispensing ice. Ice will stop dispensing when the arm is normal... firmly in position. ■ New installation? See "Using the Controls." Minimize door openings and keep doors fully closed completely? Connect refrigerator to "cubed." Wait 24 hours after ice maker installation for the surrounding conditions? Remove ice from "crushed" to water supply and ...

User Instructions
Page 13
... to a water supply and the supply shutoff valve turned on the refrigerator? The filter may not be clogged or incorrectly installed. ■ Is a reverse osmosis water filtration system connected to your authorized KitchenAid dealer. Water is leaking from the dispenser NOTE: One or two ... 1-800-807-6777. Allow 24 hours for the water supply to cool completely. ■ Recently dispensed large amount of water. ■ Refrigerator connected to a cold water pipe. Allow 24 hours after releasing the dispenser lever. ■ New installation? See "Water Supply Requirements" in...
... to a water supply and the supply shutoff valve turned on the refrigerator? The filter may not be clogged or incorrectly installed. ■ Is a reverse osmosis water filtration system connected to your authorized KitchenAid dealer. Water is leaking from the dispenser NOTE: One or two ... 1-800-807-6777. Allow 24 hours for the water supply to cool completely. ■ Recently dispensed large amount of water. ■ Refrigerator connected to a cold water pipe. Allow 24 hours after releasing the dispenser lever. ■ New installation? See "Water Supply Requirements" in...
User Instructions
Page 16
... factory specified parts to instruct you can find your major appliance, to correct defects in materials or workmanship in the sealed refrigeration system. ITEMS KITCHENAID WILL NOT PAY FOR 1. Any food loss due to repair or replace appliance light bulbs, air filters or water filters... service in the home. 8. The removal and reinstallation of products not approved by a KitchenAid designated service company. If you need assistance using your complete model number ready. KITCHENAID® REFRIGERATOR WARRANTY ONE YEAR LIMITED WARRANTY For one year from the date of purchase, when this ...
... factory specified parts to instruct you can find your major appliance, to correct defects in materials or workmanship in the sealed refrigeration system. ITEMS KITCHENAID WILL NOT PAY FOR 1. Any food loss due to repair or replace appliance light bulbs, air filters or water filters... service in the home. 8. The removal and reinstallation of products not approved by a KitchenAid designated service company. If you need assistance using your complete model number ready. KITCHENAID® REFRIGERATOR WARRANTY ONE YEAR LIMITED WARRANTY For one year from the date of purchase, when this ...
Parts Diagram
Page 3
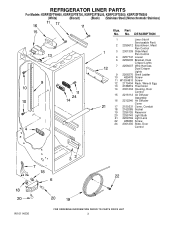
... Assembly 16 2212240 Air Diffuser Cover 17 2150331 Cover, Conduit 18 2162085 Socket 19 2256126 Reservoir 20 2255743 Light Bulb 21 2209769 Light Lens 22 488280 Screw 24 2301235 Slide, Door Control W10114536 3 REFRIGERATOR LINER PARTS For Models: KSRP22FTWH00, KSRP22FTBT00, KSRP22FTBL00, KSRP22FTSS00, KSRP22FTMS00 (White) (Biscuit) (Black) (Stainless Steel) (Monochromatic Stainless) Illus. No...
... Assembly 16 2212240 Air Diffuser Cover 17 2150331 Cover, Conduit 18 2162085 Socket 19 2256126 Reservoir 20 2255743 Light Bulb 21 2209769 Light Lens 22 488280 Screw 24 2301235 Slide, Door Control W10114536 3 REFRIGERATOR LINER PARTS For Models: KSRP22FTWH00, KSRP22FTBT00, KSRP22FTBL00, KSRP22FTSS00, KSRP22FTMS00 (White) (Biscuit) (Black) (Stainless Steel) (Monochromatic Stainless) Illus. No...
Parts Diagram
Page 7
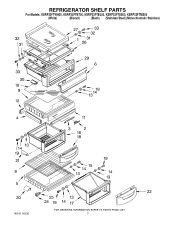
REFRIGERATOR SHELF PARTS For Models: KSRP22FTWH00, KSRP22FTBT00, KSRP22FTBL00, KSRP22FTSS00, KSRP22FTMS00 (White) (Biscuit) (Black) (Stainless Steel) (Monochromatic Stainless) W10114536 7
REFRIGERATOR SHELF PARTS For Models: KSRP22FTWH00, KSRP22FTBT00, KSRP22FTBL00, KSRP22FTSS00, KSRP22FTMS00 (White) (Biscuit) (Black) (Stainless Steel) (Monochromatic Stainless) W10114536 7
Parts Diagram
Page 8
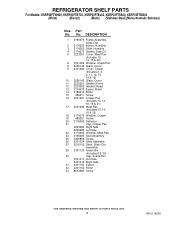
... 2223362 Gasket (Rear) 13 2174478 Eyelet, Roller 14 2188212 Roller 15 489211 Screw 16 2301481 Crisper Pan (Includes 13, 14 18, 19 & 21) 17 2301482 Meat Pan (Includes 13, 14, 19 & 22) 18 2174076 Window, Crisper 19 489261 Screw 20 2176095 Deflector... 30) 30 Cap, Snack Pan 2301017 Left Side 2301016 Right Side 31 2301153 Eyelet 32 2301152 Roller 33 8533983 Screw 8 W10114536 No. Part No. REFRIGERATOR SHELF PARTS For Models: KSRP22FTWH00, KSRP22FTBT00, KSRP22FTBL00, KSRP22FTSS00, KSRP22FTMS00 (White) (Biscuit) (Black) (Stainless Steel) (Monochromatic Stainless) Illus.
... 2223362 Gasket (Rear) 13 2174478 Eyelet, Roller 14 2188212 Roller 15 489211 Screw 16 2301481 Crisper Pan (Includes 13, 14 18, 19 & 21) 17 2301482 Meat Pan (Includes 13, 14, 19 & 22) 18 2174076 Window, Crisper 19 489261 Screw 20 2176095 Deflector... 30) 30 Cap, Snack Pan 2301017 Left Side 2301016 Right Side 31 2301153 Eyelet 32 2301152 Roller 33 8533983 Screw 8 W10114536 No. Part No. REFRIGERATOR SHELF PARTS For Models: KSRP22FTWH00, KSRP22FTBT00, KSRP22FTBL00, KSRP22FTSS00, KSRP22FTMS00 (White) (Biscuit) (Black) (Stainless Steel) (Monochromatic Stainless) Illus.
Parts Diagram
Page 12
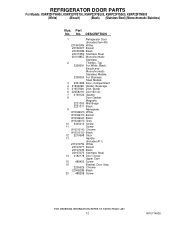
... For Models: KSRP22FTWH00, KSRP22FTBT00, KSRP22FTBL00, KSRP22FTSS00, KSRP22FTMS00 (White) (Biscuit) (Black) (Stainless Steel) (Monochromatic Stainless) Illus. DESCRIPTION 1 Refrigerator Door (Includes Item #8) 2318439W White 2318439T Biscuit 2318439B Black 2301188S Stainless Steel 2301188SZ Monochromatic Stainless 2 Thimble, Top 2308091 For White, Black, Biscuit and Monochromatic Stainless ...
... For Models: KSRP22FTWH00, KSRP22FTBT00, KSRP22FTBL00, KSRP22FTSS00, KSRP22FTMS00 (White) (Biscuit) (Black) (Stainless Steel) (Monochromatic Stainless) Illus. DESCRIPTION 1 Refrigerator Door (Includes Item #8) 2318439W White 2318439T Biscuit 2318439B Black 2301188S Stainless Steel 2301188SZ Monochromatic Stainless 2 Thimble, Top 2308091 For White, Black, Biscuit and Monochromatic Stainless ...
Parts Diagram
Page 18
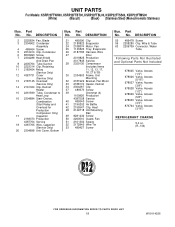
Part No. DESCRIPTION 21 489396 Clip 22 2188822 Evaporator 24 2188874 Motor, Fan 25 1105523 Tray, Evaporator 26 2187783 Harness, Wire 27 Drier 2319825 Production ... 978025 Valve, Access (1/4") 978026 Valve, Access (5/16") 978027 Valve, Access (3/8") 978028 Valve, Access (1/2") 978029 Valve, Access (5/8") 978030 Valve, Access (3/4") 876764 Valve, Access (3/16") REFRIGERANT CHARGE 5.0 oz. (R−134) 18 W10114536 UNIT PARTS For Models: KSRP22FTWH00, KSRP22FTBT00, KSRP22FTBL00, KSRP22FTSS00, KSRP22FTMS00 (White) (Biscuit) (Black) (Stainless Steel) (Monochromatic Stainless) Illus....
Part No. DESCRIPTION 21 489396 Clip 22 2188822 Evaporator 24 2188874 Motor, Fan 25 1105523 Tray, Evaporator 26 2187783 Harness, Wire 27 Drier 2319825 Production ... 978025 Valve, Access (1/4") 978026 Valve, Access (5/16") 978027 Valve, Access (3/8") 978028 Valve, Access (1/2") 978029 Valve, Access (5/8") 978030 Valve, Access (3/4") 876764 Valve, Access (3/16") REFRIGERANT CHARGE 5.0 oz. (R−134) 18 W10114536 UNIT PARTS For Models: KSRP22FTWH00, KSRP22FTBT00, KSRP22FTBL00, KSRP22FTSS00, KSRP22FTMS00 (White) (Biscuit) (Black) (Stainless Steel) (Monochromatic Stainless) Illus....


