User Instructions
Page 1
...201;RATEUR 16 INSTALLATION INSTRUCTIONS 2 INSTRUCTIONS D'INSTALLATION 17 REFRIGERATOR USE 5 UTILISATION DU RÉFRIGÉRATEUR 20 REFRIGERATOR CARE 8 ENTRETIEN DU RÉFRIGÉRATEUR 24 TROUBLESHOOTING 9 DÉPANNAGE 25 ACCESSORIES 11 ACCESSOIRES 28 WATER FILTER CERTIFICATIONS 11 FEUILLES...instructions are very important. All safety messages will follow instructions. W10162446A REFRIGERATOR USER INSTRUCTIONS THANK YOU for additional information. In Canada, visit our website at www.kitchenaid.ca or call us at 1-800-422-1230. Para obtener ...
...201;RATEUR 16 INSTALLATION INSTRUCTIONS 2 INSTRUCTIONS D'INSTALLATION 17 REFRIGERATOR USE 5 UTILISATION DU RÉFRIGÉRATEUR 20 REFRIGERATOR CARE 8 ENTRETIEN DU RÉFRIGÉRATEUR 24 TROUBLESHOOTING 9 DÉPANNAGE 25 ACCESSORIES 11 ACCESSOIRES 28 WATER FILTER CERTIFICATIONS 11 FEUILLES...instructions are very important. All safety messages will follow instructions. W10162446A REFRIGERATOR USER INSTRUCTIONS THANK YOU for additional information. In Canada, visit our website at www.kitchenaid.ca or call us at 1-800-422-1230. Para obtener ...

User Instructions
Page 2
...tempered glass is designed to do so can result in back or other injury. When Moving Your Refrigerator: Your refrigerator is normal. Important information to do so can damage the surface of your old refrigerator. ■ Keep flammable materials and vapors, such as floor damage could occur. ■ ... ■ Take off the doors. ■ Leave the shelves in place so that children may break if exposed to move and install refrigerator. Do not use an extension cord. ■ Disconnect power before servicing. ■ Replace all parts and panels before installing ice maker (...
...tempered glass is designed to do so can result in back or other injury. When Moving Your Refrigerator: Your refrigerator is normal. Important information to do so can damage the surface of your old refrigerator. ■ Keep flammable materials and vapors, such as floor damage could occur. ■ ... ■ Take off the doors. ■ Leave the shelves in place so that children may break if exposed to move and install refrigerator. Do not use an extension cord. ■ Disconnect power before servicing. ■ Replace all parts and panels before installing ice maker (...
User Instructions
Page 3
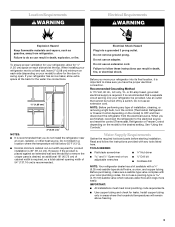
...to a fixed wall, leave 2" (5.08 cm) minimum on each side (depending on your refrigerator, allow for ¹⁄₂" (1.25 cm) space on each side and at the back for the water line connections. 1/2" (1.25 cm) 2" (5.08 cm) NOTES: ■ It is recommended. Do not use a piercing...product installation is required, so a total cabinet opening width of installation, cleaning, or removing a light bulb, turn the control (Thermostat, Refrigerator or Freezer Control depending on the model) to swing open. NOTE: Before performing any tools listed here. Do not use an extension ...
...to a fixed wall, leave 2" (5.08 cm) minimum on each side (depending on your refrigerator, allow for ¹⁄₂" (1.25 cm) space on each side and at the back for the water line connections. 1/2" (1.25 cm) 2" (5.08 cm) NOTES: ■ It is recommended. Do not use a piercing...product installation is required, so a total cabinet opening width of installation, cleaning, or removing a light bulb, turn the control (Thermostat, Refrigerator or Freezer Control depending on the model) to swing open. NOTE: Before performing any tools listed here. Do not use an extension ...

User Instructions
Page 4
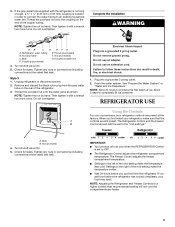
... clamp. Compression nut D E. Packing nut 4 Water Pressure A cold water supply with water pressure of between 30 and 120 psi (207 and 827 kPa). Unplug refrigerator or disconnect power. 2. Measure from collecting in water strainer. Use ¹⁄₄" (6.35 mm) O.D. (outside diameter) copper tubing. A G B C ... a ¹⁄₂" (12.70 mm) to Water Line 1. This will work, but drill on before you need. Add 7 ft (2.1 m) to Refrigerator Style 1 1. Using a cordless drill, drill a ¹⁄₄" (6.35 mm) hole in a container or sink, and turn the ...
... clamp. Compression nut D E. Packing nut 4 Water Pressure A cold water supply with water pressure of between 30 and 120 psi (207 and 827 kPa). Unplug refrigerator or disconnect power. 2. Measure from collecting in water strainer. Use ¹⁄₄" (6.35 mm) O.D. (outside diameter) copper tubing. A G B C ... a ¹⁄₂" (12.70 mm) to Water Line 1. This will work, but drill on before you need. Add 7 ft (2.1 m) to Refrigerator Style 1 1. Using a cordless drill, drill a ¹⁄₄" (6.35 mm) hole in a container or sink, and turn the ...
User Instructions
Page 5
... instructions can result in order to connect the water tubing to a higher (colder) than recommended setting will not cool when the REFRIGERATOR Control is needed in death, fire, or electrical shock. 1. Bulb G. Tighten any nuts or connections (including connections at the valve... 3 1. Do not use an extension cord. Bulb B. Check for leaks. Complete the Installation WARNING AB C D EFG A. Nut (provided) E. The Refrigerator Control and the Freezer Control should both be set to completely fill ice container. Check for leaks. Remove and discard the black nylon plug from...
... instructions can result in order to connect the water tubing to a higher (colder) than recommended setting will not cool when the REFRIGERATOR Control is needed in death, fire, or electrical shock. 1. Bulb G. Tighten any nuts or connections (including connections at the valve... 3 1. Do not use an extension cord. Bulb B. Check for leaks. Complete the Installation WARNING AB C D EFG A. Nut (provided) E. The Refrigerator Control and the Freezer Control should both be set to completely fill ice container. Check for leaks. Remove and discard the black nylon plug from...
User Instructions
Page 6
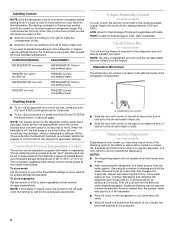
...: Set the control to one setting to the left (less cold). Once water begins to avoid unintentional dispensing. Adjusting Controls NOTE: Give the refrigerator time to flow. Chilled Door Bin Control The chilled door bin control is located on , 5 seconds off , the first press of a...the following options: the ability to select either crushed or cubed ice, a special light that turns on when you put food into the refrigerator. NOTES: ■ The dispensing system will only re-activate the backlight, without changing any setting between adjustments. Repeat until water begins ...
...: Set the control to one setting to the left (less cold). Once water begins to avoid unintentional dispensing. Adjusting Controls NOTE: Give the refrigerator time to flow. Chilled Door Bin Control The chilled door bin control is located on , 5 seconds off , the first press of a...the following options: the ability to select either crushed or cubed ice, a special light that turns on when you put food into the refrigerator. NOTES: ■ The dispensing system will only re-activate the backlight, without changing any setting between adjustments. Repeat until water begins ...
User Instructions
Page 7
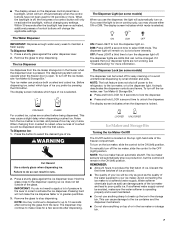
... ice will remain on the ice maker, slide the control to the dispenser light. OFF: Press LIGHT a third time to turn off power to the refrigerator, to the ice maker, or to the ON (left ) position. If you use anything on top of ice may choose either ON or DIM. The...
... ice will remain on the ice maker, slide the control to the dispenser light. OFF: Press LIGHT a third time to turn off power to the refrigerator, to the ice maker, or to the ON (left ) position. If you use anything on top of ice may choose either ON or DIM. The...
User Instructions
Page 8
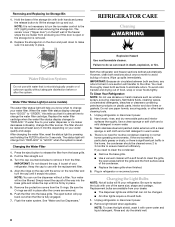
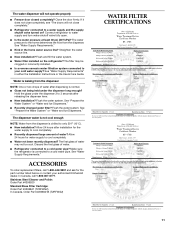
...the arrow on some models) The water filter status light will fit your water dispenser or ice maker decreases noticeably, change your refrigerator. Your water will change from "REPLACE" to change the water filter cartridge. After changing the water filter, reset the status light... by pressing and holding the FILTER button for routine condenser cleaning in place. 5. Unplug refrigerator or disconnect power. 2. Remove light shield when applicable. NOTE: To clean the light shield, wash it is reset. NOTE: It is ...
...the arrow on some models) The water filter status light will fit your water dispenser or ice maker decreases noticeably, change your refrigerator. Your water will change from "REPLACE" to change the water filter cartridge. After changing the water filter, reset the status light... by pressing and holding the FILTER button for routine condenser cleaning in place. 5. Unplug refrigerator or disconnect power. 2. Remove light shield when applicable. NOTE: To clean the light shield, wash it is reset. NOTE: It is ...
User Instructions
Page 9
... bulb loose in a lamp to its high-efficiency compressor and fans. In the U.S.A., www.kitchenaid.com In Canada, www.kitchenaid.ca The refrigerator will not close completely Do not use an extension cord. The doors will not operate Refrigerator Operation ■ Pulsating - Clean gaskets with one due to see if the outlet is working...
... bulb loose in a lamp to its high-efficiency compressor and fans. In the U.S.A., www.kitchenaid.com In Canada, www.kitchenaid.ca The refrigerator will not close completely Do not use an extension cord. The doors will not operate Refrigerator Operation ■ Pulsating - Clean gaskets with one due to see if the outlet is working...

User Instructions
Page 10
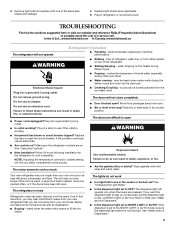
...Cut Hazard Use a sturdy glass when dispensing ice. Wait 3 minutes for dispenser motor to normal temperature. ■ Controls set correctly for refrigerator to return to reset before using again. 10 Minimize door openings and keep doors fully closed. Check temperature in the ice bin? Allows ...is normal. ■ Humid room? Ice and Water The ice maker is not producing ice or not enough ice ■ Refrigerator connected to enter refrigerator. Connect refrigerator to do so can decrease water pressure. Make sure wire shutoff arm or switch (depending on ? The ice cubes are hollow...
...Cut Hazard Use a sturdy glass when dispensing ice. Wait 3 minutes for dispenser motor to normal temperature. ■ Controls set correctly for refrigerator to return to reset before using again. 10 Minimize door openings and keep doors fully closed. Check temperature in the ice bin? Allows ...is normal. ■ Humid room? Ice and Water The ice maker is not producing ice or not enough ice ■ Refrigerator connected to enter refrigerator. Connect refrigerator to do so can decrease water pressure. Make sure wire shutoff arm or switch (depending on ? The ice cubes are hollow...
User Instructions
Page 11
...Part #4396920 Standard Base Filter Cartridge: Order Part #4396841 (T2RFWG2) In Canada, Order Part #4396841B (T2RFWG2) WATER FILTER CERTIFICATIONS 11 Connect refrigerator to a cold water pipe. Flush and fill the water system. ■ Water filter installed on ? The water pressure to only 50&#... "Water and Ice Dispensers." ■ Recently changed water filter? The water dispenser will not close completely." ■ Refrigerator connected to your authorized KitchenAid dealer. Flush the water system. See "Water Supply Requirements." Hold the glass under the dispenser long enough?
...Part #4396920 Standard Base Filter Cartridge: Order Part #4396841 (T2RFWG2) In Canada, Order Part #4396841B (T2RFWG2) WATER FILTER CERTIFICATIONS 11 Connect refrigerator to a cold water pipe. Flush and fill the water system. ■ Water filter installed on ? The water pressure to only 50&#... "Water and Ice Dispensers." ■ Recently changed water filter? The water dispenser will not close completely." ■ Refrigerator connected to your authorized KitchenAid dealer. Flush the water system. See "Water Supply Requirements." Hold the glass under the dispenser long enough?
User Instructions
Page 14
... major appliance is operated and maintained according to instructions attached to or furnished with the product, KitchenAid will pay for replacement or repair of the refrigerator/freezer cavity liner (including labor costs) if the part cracks due to defective materials or workmanship... how to use of products not approved by a KitchenAid designated service company. KITCHENAID SHALL NOT BE LIABLE FOR INCIDENTAL OR CONSEQUENTIAL DAMAGES. Any food loss due to refrigerator or freezer product failures. 6. KITCHENAID® REFRIGERATOR WARRANTY ONE YEAR LIMITED WARRANTY For one year from ...
... major appliance is operated and maintained according to instructions attached to or furnished with the product, KitchenAid will pay for replacement or repair of the refrigerator/freezer cavity liner (including labor costs) if the part cracks due to defective materials or workmanship... how to use of products not approved by a KitchenAid designated service company. KITCHENAID SHALL NOT BE LIABLE FOR INCIDENTAL OR CONSEQUENTIAL DAMAGES. Any food loss due to refrigerator or freezer product failures. 6. KITCHENAID® REFRIGERATOR WARRANTY ONE YEAR LIMITED WARRANTY For one year from ...
User Instructions
Page 15
...model number information for future reference. 15 Have your model number and serial number on the label, located on the inside wall of the refrigerator compartment. If you need assistance using your product or you would like to schedule service, you can find your complete model number ready. ...For additional product information, in the U.S.A., visit www.kitchenaid.com In Canada, visit www.kitchenaid.ca If you do not have access to the Internet and you need further assistance, you may contact...
...model number information for future reference. 15 Have your model number and serial number on the label, located on the inside wall of the refrigerator compartment. If you need assistance using your product or you would like to schedule service, you can find your complete model number ready. ...For additional product information, in the U.S.A., visit www.kitchenaid.com In Canada, visit www.kitchenaid.ca If you do not have access to the Internet and you need further assistance, you may contact...


