Use & Care Guide
Page 2
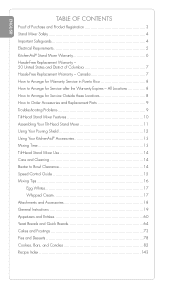
...Replacement Parts 9 Troubleshooting Problems 9 Tilt-Head Stand Mixer Features 10 Assembling Your Tilt-Head Stand Mixer 11 Using Your Pouring Shield 12 Using Your KitchenAid® Accessories 13 Mixing Time 13 Tilt-Head Stand Mixer Use 14 Care and Cleaning 14 Beater ...to Arrange for Service after the Warranty Expires - All Locations 8 How to Bowl Clearance 14 Speed Control Guide 15 Mixing Tips 16 Egg Whites 17 Whipped...
...Replacement Parts 9 Troubleshooting Problems 9 Tilt-Head Stand Mixer Features 10 Assembling Your Tilt-Head Stand Mixer 11 Using Your Pouring Shield 12 Using Your KitchenAid® Accessories 13 Mixing Time 13 Tilt-Head Stand Mixer Use 14 Care and Cleaning 14 Beater ...to Arrange for Service after the Warranty Expires - All Locations 8 How to Bowl Clearance 14 Speed Control Guide 15 Mixing Tips 16 Egg Whites 17 Whipped...
Use & Care Guide
Page 7
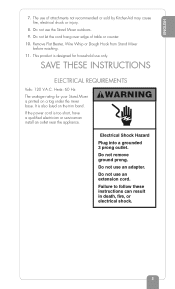
...Whip or Dough Hook from Stand Mixer before washing. 11. The use of table or counter. 10. If the power cord is also listed on a tag under the mixer base. Do not use only. Failure to follow these instructions can result in death, fire, or electrical shock. 5 This product is designed for your Stand Mixer... recommended or sold by KitchenAid may cause fire, electrical shock or injury. 8. Do not use an extension cord. SAVE THESE INSTRUCTIONS ELECTRICAL REQUIREMENTS Volts: 120 V.A.C. Do not remove ground prong. Do not use the Stand Mixer outdoors. 9. ENGLISH 7....
...Whip or Dough Hook from Stand Mixer before washing. 11. The use of table or counter. 10. If the power cord is also listed on a tag under the mixer base. Do not use only. Failure to follow these instructions can result in death, fire, or electrical shock. 5 This product is designed for your Stand Mixer... recommended or sold by KitchenAid may cause fire, electrical shock or injury. 8. Do not use an extension cord. SAVE THESE INSTRUCTIONS ELECTRICAL REQUIREMENTS Volts: 120 V.A.C. Do not remove ground prong. Do not use the Stand Mixer outdoors. 9. ENGLISH 7....
Use & Care Guide
Page 12
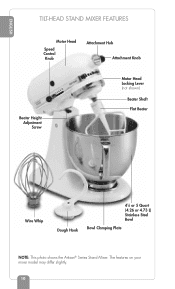
ENGLISH TILT-HEAD STAND MIXER FEATURES Motor Head Speed Control Knob Attachment Hub Attachment Knob Beater Height Adjustment Screw Motor Head Locking Lever (not shown) Beater Shaft Flat Beater Wire Whip Dough Hook 41⁄2 or 5 Quart (4.26 or 4.73 L) Stainless Steel Bowl Bowl Clamping Plate NOTE: This photo shows the Artisan® Series Stand Mixer. The features on your mixer model may differ slightly. 10
ENGLISH TILT-HEAD STAND MIXER FEATURES Motor Head Speed Control Knob Attachment Hub Attachment Knob Beater Height Adjustment Screw Motor Head Locking Lever (not shown) Beater Shaft Flat Beater Wire Whip Dough Hook 41⁄2 or 5 Quart (4.26 or 4.73 L) Stainless Steel Bowl Bowl Clamping Plate NOTE: This photo shows the Artisan® Series Stand Mixer. The features on your mixer model may differ slightly. 10
Use & Care Guide
Page 13
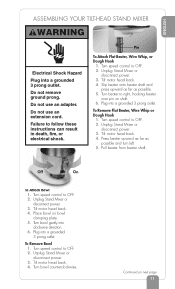
...turn left. 5. To Remove Flat Beater, Wire Whip or Dough Hook 1. Press beater upward as far as possible. 5. Place bowl on next page 11 Unplug Stand Mixer or disconnect power. 3. ENGLISH ASSEMBLING YOUR TILT-HEAD STAND MIXER WARNING Electrical Shock Hazard Plug into a grounded 3 ...prong outlet. Pin To Attach Flat Beater, Wire Whip, or Dough Hook 1. Tilt motor head back. 4. Continued ...
...turn left. 5. To Remove Flat Beater, Wire Whip or Dough Hook 1. Press beater upward as far as possible. 5. Place bowl on next page 11 Unplug Stand Mixer or disconnect power. 3. ENGLISH ASSEMBLING YOUR TILT-HEAD STAND MIXER WARNING Electrical Shock Hazard Plug into a grounded 3 ...prong outlet. Pin To Attach Flat Beater, Wire Whip, or Dough Hook 1. Tilt motor head back. 4. Continued ...
Use & Care Guide
Page 14
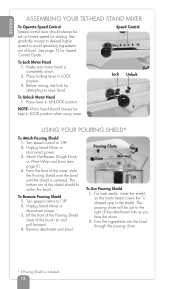
... Beater, Dough Hook, or Wire Whip and bowl (see page 11). 4. Turn speed control to raise head. For best results, rotate the shield so the motor head covers the "u" shaped gap in LOCK position. 3. ENGLISH ASSEMBLING YOUR TILT-HEAD STAND MIXER To Operate Speed Control Speed control ...4. Turn speed control to the right of bowl. Pouring Chute To Use Pouring Shield 1. Make sure motor head is centered. Unplug Stand Mixer or disconnect power. 3. Unplug Stand Mixer or disconnect power. 3. The pouring chute will be just to OFF. 2. See page 15 for starting, then gradually moved to...
... Beater, Dough Hook, or Wire Whip and bowl (see page 11). 4. Turn speed control to raise head. For best results, rotate the shield so the motor head covers the "u" shaped gap in LOCK position. 3. ENGLISH ASSEMBLING YOUR TILT-HEAD STAND MIXER To Operate Speed Control Speed control ...4. Turn speed control to the right of bowl. Pouring Chute To Use Pouring Shield 1. Make sure motor head is centered. Unplug Stand Mixer or disconnect power. 3. Unplug Stand Mixer or disconnect power. 3. The pouring chute will be just to OFF. 2. See page 15 for starting, then gradually moved to...
Use & Care Guide
Page 15
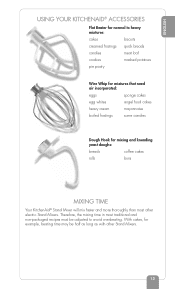
Therefore, the mixing time in most other Stand Mixers. 13 ENGLISH USING YOUR KITCHENAID® ACCESSORIES Flat Beater for normal to heavy mixtures: cakes biscuits creamed frostings quick breads candies meat loaf cookies mashed potatoes pie pastry Wire Whip for mixtures that need air incorporated: eggs sponge cakes egg whites angel food cakes heavy cream...
Therefore, the mixing time in most other Stand Mixers. 13 ENGLISH USING YOUR KITCHENAID® ACCESSORIES Flat Beater for normal to heavy mixtures: cakes biscuits creamed frostings quick breads candies meat loaf cookies mashed potatoes pie pastry Wire Whip for mixtures that need air incorporated: eggs sponge cakes egg whites angel food cakes heavy cream...
Use & Care Guide
Page 16
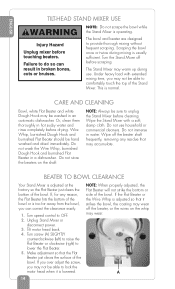
... Flat Beater. 5. Under heavy load with a soft, damp cloth. Wire Whip, burnished Dough Hook and burnished Flat Beater should be able to OFF. 2. NOTE: Always be able to unplug the Stand Mixer before touching beaters. Or, clean them thoroughly in water. Tilt motor head ... the bottom or side of the Stand Mixer. ENGLISH TILT-HEAD STAND MIXER USE WARNING Injury Hazard Unplug mixer before cleaning. Wipe the Stand Mixer with extended mixing time, you may not be hand washed and dried immediately. Do not wash the Wire Whip, burnished Dough Hook and burnished Flat...
... Flat Beater. 5. Under heavy load with a soft, damp cloth. Wire Whip, burnished Dough Hook and burnished Flat Beater should be able to OFF. 2. NOTE: Always be able to unplug the Stand Mixer before touching beaters. Or, clean them thoroughly in water. Tilt motor head ... the bottom or side of the Stand Mixer. ENGLISH TILT-HEAD STAND MIXER USE WARNING Injury Hazard Unplug mixer before cleaning. Wipe the Stand Mixer with extended mixing time, you may not be hand washed and dried immediately. Do not wash the Wire Whip, burnished Dough Hook and burnished Flat...
Use & Care Guide
Page 17
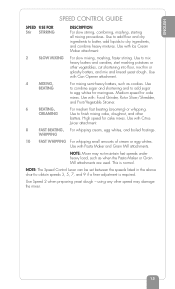
... finish mixing cake, doughnut, and other speed may not maintain fast speeds under heavy load, such as cookies. NOTE: Mixer may damage the mixer. 15 Use with Can Opener attachment. 4 MIXING, BEATING For mixing semi-heavy batters, such as when the Pasta Maker... with: Food Grinder, Rotor Slicer/Shredder, and Fruit/Vegetable Strainer. 6 BEATING, CREAMING For medium fast beating (creaming) or whipping. WHIPPING 10 FAST WHIPPING For whipping small amounts of cream or egg whites. ENGLISH SPEED CONTROL GUIDE SPEED USE FOR Stir STIRRING DESCRIPTION For slow stirring, combining,...
... finish mixing cake, doughnut, and other speed may not maintain fast speeds under heavy load, such as cookies. NOTE: Mixer may damage the mixer. 15 Use with Can Opener attachment. 4 MIXING, BEATING For mixing semi-heavy batters, such as when the Pasta Maker... with: Food Grinder, Rotor Slicer/Shredder, and Fruit/Vegetable Strainer. 6 BEATING, CREAMING For medium fast beating (creaming) or whipping. WHIPPING 10 FAST WHIPPING For whipping small amounts of cream or egg whites. ENGLISH SPEED CONTROL GUIDE SPEED USE FOR Stir STIRRING DESCRIPTION For slow stirring, combining,...
Use & Care Guide
Page 19
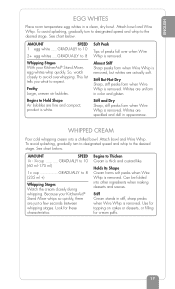
... a chilled bowl. This list tells you what to the desired stage. product is removed. Attach bowl and Wire Whip. To avoid splashing, gradually turn to designated speed and whip to 8 Whipping Stages With your KitchenAid® Stand Mixer whips so quickly, there are speckled and dull in color and glisten. Holds Its Shape Cream forms soft peaks...
... a chilled bowl. This list tells you what to the desired stage. product is removed. Attach bowl and Wire Whip. To avoid splashing, gradually turn to designated speed and whip to 8 Whipping Stages With your KitchenAid® Stand Mixer whips so quickly, there are speckled and dull in color and glisten. Holds Its Shape Cream forms soft peaks...
Use & Care Guide
Page 73
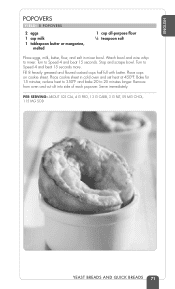
Turn to 25 minutes longer. Place cookie sheet in mixer bowl. Bake for 15 minutes; Remove from oven and cut slit into side of each popover. Serve immediately. Fill 8 heavily greased and floured custard ... 20 to Speed 4 and beat 15 seconds more. Stop and scrape bowl. Place cups on cookie sheet. Attach bowl and wire whip to Speed 4 and beat 15 seconds. Turn to mixer. ENGLISH POPOVERS YIELD: 8 POPOVERS 2 eggs 1 cup milk 1 tablespoon butter or margarine, melted 1 cup all-purpose flour 1⁄4 teaspoon salt Place...
Turn to 25 minutes longer. Place cookie sheet in mixer bowl. Bake for 15 minutes; Remove from oven and cut slit into side of each popover. Serve immediately. Fill 8 heavily greased and floured custard ... 20 to Speed 4 and beat 15 seconds more. Stop and scrape bowl. Place cups on cookie sheet. Attach bowl and wire whip to Speed 4 and beat 15 seconds. Turn to mixer. ENGLISH POPOVERS YIELD: 8 POPOVERS 2 eggs 1 cup milk 1 tablespoon butter or margarine, melted 1 cup all-purpose flour 1⁄4 teaspoon salt Place...
Use & Care Guide
Page 80
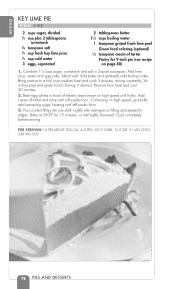
Combine 11⁄2 cups sugar, cornstarch and salt in bowl of electric stand mixer on high speed, gradually add remaining sugar, beating until frothy. Add cream of tartar and whip until lightly browned. Pour cooled filling into pie shell. blend well. Add lime juice, ... AND DESSERTS Continuing on high speed until stiff peaks form. 3. ENGLISH KEY LIME PIE YIELD: 1 PIE 2 cups sugar, divided 1⁄4 cup plus 2 tablespoons cornstarch 1⁄4 teaspoon salt 1⁄2 cup fresh key lime juice 1⁄2 cup cold water 3 eggs, separated 2 tablespoons butter 11⁄...
Combine 11⁄2 cups sugar, cornstarch and salt in bowl of electric stand mixer on high speed, gradually add remaining sugar, beating until frothy. Add cream of tartar and whip until lightly browned. Pour cooled filling into pie shell. blend well. Add lime juice, ... AND DESSERTS Continuing on high speed until stiff peaks form. 3. ENGLISH KEY LIME PIE YIELD: 1 PIE 2 cups sugar, divided 1⁄4 cup plus 2 tablespoons cornstarch 1⁄4 teaspoon salt 1⁄2 cup fresh key lime juice 1⁄2 cup cold water 3 eggs, separated 2 tablespoons butter 11⁄...
Use & Care Guide
Page 81
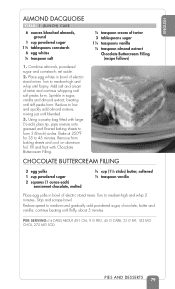
...) semisweet chocolate, melted 3⁄4 cup (11⁄2 sticks) butter, softened 1⁄2 teaspoon vanilla Place egg yolks in bowl of electric stand mixer. Bake at 250°F for 35 to medium and gradually add powdered sugar, chocolate, butter and vanilla; Combine almonds, powdered sugar and cornstarch... G PRO, 45 G CARB, 33 G FAT, 102 MG CHOL, 272 MG SOD PIES AND DESSERTS 79 Turn to medium-high and whip 2 minutes. Turn to medium-high and whip until fluffy, about 5 minutes. continue beating until foamy. set aside. 2. ENGLISH ALMOND DACQUOISE YIELD: 1 (8-INCH) CAKE 6 ...
...) semisweet chocolate, melted 3⁄4 cup (11⁄2 sticks) butter, softened 1⁄2 teaspoon vanilla Place egg yolks in bowl of electric stand mixer. Bake at 250°F for 35 to medium and gradually add powdered sugar, chocolate, butter and vanilla; Combine almonds, powdered sugar and cornstarch... G PRO, 45 G CARB, 33 G FAT, 102 MG CHOL, 272 MG SOD PIES AND DESSERTS 79 Turn to medium-high and whip 2 minutes. Turn to medium-high and whip until fluffy, about 5 minutes. continue beating until foamy. set aside. 2. ENGLISH ALMOND DACQUOISE YIELD: 1 (8-INCH) CAKE 6 ...


