Use & Care Guide
Page 2
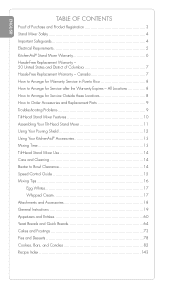
... to Order Accessories and Replacement Parts 9 Troubleshooting Problems 9 Tilt-Head Stand Mixer Features 10 Assembling Your Tilt-Head Stand Mixer 11 Using Your Pouring Shield 12 Using Your KitchenAid® Accessories 13 Mixing Time 13 Tilt-Head Stand Mixer Use 14 Care and Cleaning 14 Beater to Arrange for Warranty Service in Puerto Rico 8 How to Bowl Clearance 14 Speed Control Guide 15 Mixing Tips 16 Egg Whites 17 Whipped Cream 17 Attachments and Accessories 18 General Instructions 19 Appetizers and Entrées 60 Yeast Breads and Quick Breads 64 Cakes and...
... to Order Accessories and Replacement Parts 9 Troubleshooting Problems 9 Tilt-Head Stand Mixer Features 10 Assembling Your Tilt-Head Stand Mixer 11 Using Your Pouring Shield 12 Using Your KitchenAid® Accessories 13 Mixing Time 13 Tilt-Head Stand Mixer Use 14 Care and Cleaning 14 Beater to Arrange for Warranty Service in Puerto Rico 8 How to Bowl Clearance 14 Speed Control Guide 15 Mixing Tips 16 Egg Whites 17 Whipped Cream 17 Attachments and Accessories 18 General Instructions 19 Appetizers and Entrées 60 Yeast Breads and Quick Breads 64 Cakes and...
Use & Care Guide
Page 6
.... 4 Unplug Stand Mixer from beater during operation to reduce the risk of injury to persons and/or damage to the Stand Mixer. 6. Keep hands, hair, clothing, as well as spatulas and other liquid. 3. We have provided many important safety messages in Canada) for examination, repair or electrical or mechanical adjustment. These words mean: You can happen if the instructions are very...
.... 4 Unplug Stand Mixer from beater during operation to reduce the risk of injury to persons and/or damage to the Stand Mixer. 6. Keep hands, hair, clothing, as well as spatulas and other liquid. 3. We have provided many important safety messages in Canada) for examination, repair or electrical or mechanical adjustment. These words mean: You can happen if the instructions are very...
Use & Care Guide
Page 7
Remove Flat Beater, Wire Whip or Dough Hook from Stand Mixer before washing. 11. Do not use of table or counter. 10. Do not let the cord hang over edge of attachments not recommended or sold by KitchenAid may cause fire, electrical shock or injury. 8. Hertz: 60 Hz The wattage rating for household use only. The use an extension cord. Do not remove ground prong. Failure to follow these...
Remove Flat Beater, Wire Whip or Dough Hook from Stand Mixer before washing. 11. Do not use of table or counter. 10. Do not let the cord hang over edge of attachments not recommended or sold by KitchenAid may cause fire, electrical shock or injury. 8. Hertz: 60 Hz The wattage rating for household use only. The use an extension cord. Do not remove ground prong. Failure to follow these...
Use & Care Guide
Page 8
... for service, follow the instructions on how to arrange for Stand Mixer when operated outside the country of purchase. LIMITATION OF REMEDIES IMPLIED WARRANTIES, INCLUDING TO THE EXTENT APPLICABLE WARRANTIES OF MERCHANTABILITY OR FITNESS FOR A PARTICULAR PURPOSE, ARE EXCLUDED TO THE EXTENT LEGALLY PERMISSIBLE. KITCHENAID AND KITCHENAID CANADA DO NOT ASSUME ANY RESPONSIBILITY FOR INCIDENTAL OR CONSEQUENTIAL DAMAGES. Repairs when Stand Mixer is used...
... for service, follow the instructions on how to arrange for Stand Mixer when operated outside the country of purchase. LIMITATION OF REMEDIES IMPLIED WARRANTIES, INCLUDING TO THE EXTENT APPLICABLE WARRANTIES OF MERCHANTABILITY OR FITNESS FOR A PARTICULAR PURPOSE, ARE EXCLUDED TO THE EXTENT LEGALLY PERMISSIBLE. KITCHENAID AND KITCHENAID CANADA DO NOT ASSUME ANY RESPONSIBILITY FOR INCIDENTAL OR CONSEQUENTIAL DAMAGES. Repairs when Stand Mixer is used...
Use & Care Guide
Page 9
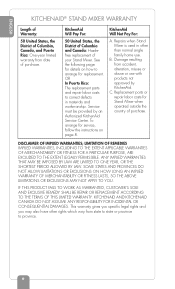
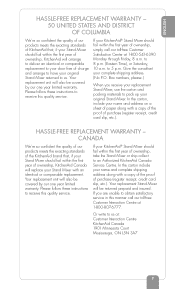
... instructions to an Authorized KitchenAid Canada Service Centre. ENGLISH HASSLE-FREE REPLACEMENT WARRANTY - 50 UNITED STATES AND DISTRICT OF COLUMBIA We're so confident the quality of our products meets the exacting standards of KitchenAid that , if your Stand Mixer should fail within the first year of ownership, KitchenAid Canada will replace your original Stand Mixer. to 5 p.m. HASSLE-FREE REPLACEMENT WARRANTY - If your original Stand Mixer...
... instructions to an Authorized KitchenAid Canada Service Centre. ENGLISH HASSLE-FREE REPLACEMENT WARRANTY - 50 UNITED STATES AND DISTRICT OF COLUMBIA We're so confident the quality of our products meets the exacting standards of KitchenAid that , if your Stand Mixer should fail within the first year of ownership, KitchenAid Canada will replace your original Stand Mixer. to 5 p.m. HASSLE-FREE REPLACEMENT WARRANTY - If your original Stand Mixer...
Use & Care Guide
Page 11
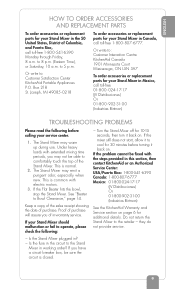
... Flat Beater hits the bowl, stop the Stand Mixer. they do not provide service. - to : Customer Satisfaction Center KitchenAid Portable Appliances P.O. Box 218 St. Joseph, MI 49085- 0218 To order accessories or replacement parts for your Stand Mixer in Canada, call toll-free 1-800-541-6390 Monday through Friday, 8 a.m. See "Beater to the retailer - If your Stand Mixer should malfunction or fail to operate, please check the following before turning...
... Flat Beater hits the bowl, stop the Stand Mixer. they do not provide service. - to : Customer Satisfaction Center KitchenAid Portable Appliances P.O. Box 218 St. Joseph, MI 49085- 0218 To order accessories or replacement parts for your Stand Mixer in Canada, call toll-free 1-800-541-6390 Monday through Friday, 8 a.m. See "Beater to the retailer - If your Stand Mixer should malfunction or fail to operate, please check the following before turning...
Use & Care Guide
Page 12
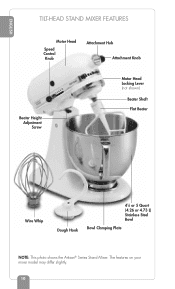
ENGLISH TILT-HEAD STAND MIXER FEATURES Motor Head Speed Control Knob Attachment Hub Attachment Knob Beater Height Adjustment Screw Motor Head Locking Lever (not shown) Beater Shaft Flat Beater Wire Whip Dough Hook 41⁄2 or 5 Quart (4.26 or 4.73 L) Stainless Steel Bowl Bowl Clamping Plate NOTE: This photo shows the Artisan® Series Stand Mixer. The features on your mixer model may differ slightly. 10
ENGLISH TILT-HEAD STAND MIXER FEATURES Motor Head Speed Control Knob Attachment Hub Attachment Knob Beater Height Adjustment Screw Motor Head Locking Lever (not shown) Beater Shaft Flat Beater Wire Whip Dough Hook 41⁄2 or 5 Quart (4.26 or 4.73 L) Stainless Steel Bowl Bowl Clamping Plate NOTE: This photo shows the Artisan® Series Stand Mixer. The features on your mixer model may differ slightly. 10
Use & Care Guide
Page 13
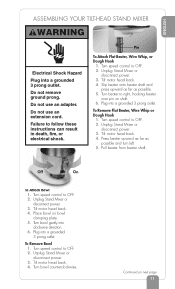
... use an extension cord. Turn speed control to follow these instructions can result in death, fire, or electrical shock. Unplug Stand Mixer or disconnect power. 3. Tilt motor head back. 4. Off On To Attach Bowl 1. Place bowl on shaft. 6. To Remove Bowl 1. Turn bowl counterclockwise. Failure to OFF. 2. Tilt motor head back. 4. Slip beater onto beater shaft and press upward as far as possible and turn left. 5. Tilt motor head back. 4. Plug into a grounded 3 prong outlet. Pin To Attach Flat Beater, Wire Whip, or Dough Hook 1. Turn beater to OFF. 2. Turn speed...
... use an extension cord. Turn speed control to follow these instructions can result in death, fire, or electrical shock. Unplug Stand Mixer or disconnect power. 3. Tilt motor head back. 4. Off On To Attach Bowl 1. Place bowl on shaft. 6. To Remove Bowl 1. Turn bowl counterclockwise. Failure to OFF. 2. Tilt motor head back. 4. Slip beater onto beater shaft and press upward as far as possible and turn left. 5. Tilt motor head back. 4. Plug into a grounded 3 prong outlet. Pin To Attach Flat Beater, Wire Whip, or Dough Hook 1. Turn beater to OFF. 2. Turn speed...
Use & Care Guide
Page 14
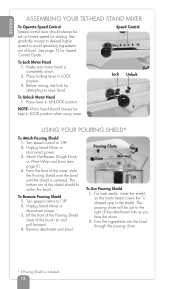
... ASSEMBLING YOUR TILT-HEAD STAND MIXER To Operate Speed Control Speed control lever should always be set on lowest speed for Speed Control Guide. Unplug Stand Mixer or disconnect power. 3. To Remove Pouring Shield 1. Remove attachment and bowl. Pouring Chute To Use Pouring Shield 1. See page 15 for starting, then gradually moved to desired higher speed to OFF. 2. Turn speed control to avoid splashing ingredients out of the attachment hub as you face the mixer. 2. Lift the front of the Pouring Shield clear of the shield should fit within the bowl. Before mixing...
... ASSEMBLING YOUR TILT-HEAD STAND MIXER To Operate Speed Control Speed control lever should always be set on lowest speed for Speed Control Guide. Unplug Stand Mixer or disconnect power. 3. To Remove Pouring Shield 1. Remove attachment and bowl. Pouring Chute To Use Pouring Shield 1. See page 15 for starting, then gradually moved to desired higher speed to OFF. 2. Turn speed control to avoid splashing ingredients out of the attachment hub as you face the mixer. 2. Lift the front of the Pouring Shield clear of the shield should fit within the bowl. Before mixing...
Use & Care Guide
Page 15
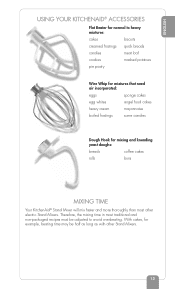
... adjusted to heavy mixtures: cakes biscuits creamed frostings quick breads candies meat loaf cookies mashed potatoes pie pastry Wire Whip for mixtures that need air incorporated: eggs sponge cakes egg whites angel food cakes heavy cream mayonnaise boiled frostings some candies Dough Hook for example, beating time may be half as long as with other electric Stand Mixers. Therefore, the mixing time in most other Stand Mixers. 13 ENGLISH USING YOUR KITCHENAID® ACCESSORIES Flat Beater...
... adjusted to heavy mixtures: cakes biscuits creamed frostings quick breads candies meat loaf cookies mashed potatoes pie pastry Wire Whip for mixtures that need air incorporated: eggs sponge cakes egg whites angel food cakes heavy cream mayonnaise boiled frostings some candies Dough Hook for example, beating time may be half as long as with other electric Stand Mixers. Therefore, the mixing time in most other Stand Mixers. 13 ENGLISH USING YOUR KITCHENAID® ACCESSORIES Flat Beater...
Use & Care Guide
Page 16
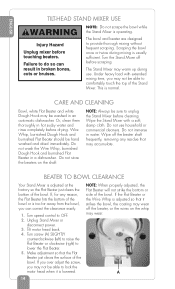
... the Stand Mixer. Under heavy load with a soft, damp cloth. NOTE: Do not scrape the bowl while the Stand Mixer is normal. CARE AND CLEANING Bowl, white Flat Beater and white Dough Hook may accumulate. This is operating. Tilt motor head back. 4. Failure to comfortably touch the top of the bowl. Wipe off before touching beaters. Do not use . Turn screw (A) SLIGHTLY counterclockwise (left) to raise the Flat Beater or clockwise (right) to provide thorough mixing...
... the Stand Mixer. Under heavy load with a soft, damp cloth. NOTE: Do not scrape the bowl while the Stand Mixer is normal. CARE AND CLEANING Bowl, white Flat Beater and white Dough Hook may accumulate. This is operating. Tilt motor head back. 4. Failure to comfortably touch the top of the bowl. Wipe off before touching beaters. Do not use . Turn screw (A) SLIGHTLY counterclockwise (left) to raise the Flat Beater or clockwise (right) to provide thorough mixing...
Use & Care Guide
Page 18
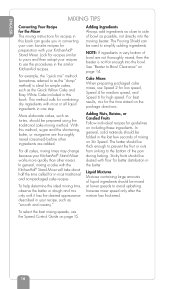
... yours and then adapt your KitchenAid® Stand Mixer works more quickly than other ingredients are not thoroughly mixed, then the beater is ideal for high speed. The Pouring Shield can guide you in converting your own favorite recipes for preparation with your recipe, such as "smooth and creamy." Cake Mixes When preparing packaged cake mixes, use the Speed Control Guide on page 15. 16 Increase mixer speed only after the mixture...
... yours and then adapt your KitchenAid® Stand Mixer works more quickly than other ingredients are not thoroughly mixed, then the beater is ideal for high speed. The Pouring Shield can guide you in converting your own favorite recipes for preparation with your recipe, such as "smooth and creamy." Cake Mixes When preparing packaged cake mixes, use the Speed Control Guide on page 15. 16 Increase mixer speed only after the mixture...
Use & Care Guide
Page 19
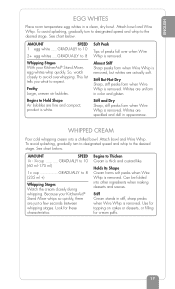
... peaks form when Wire Whip is removed, but whites are fine and compact; Attach bowl and Wire Whip. Use for topping on cakes or desserts, or filling for these characteristics: Begins to the desired stage. Stiff and Dry Sharp, stiff peaks form when Wire Whip is white. To avoid splashing, gradually turn to designated speed and whip to 8 Whipping Stages With your KitchenAid® Stand Mixer whips so quickly...
... peaks form when Wire Whip is removed, but whites are fine and compact; Attach bowl and Wire Whip. Use for topping on cakes or desserts, or filling for these characteristics: Begins to the desired stage. Stiff and Dry Sharp, stiff peaks form when Wire Whip is white. To avoid splashing, gradually turn to designated speed and whip to 8 Whipping Stages With your KitchenAid® Stand Mixer whips so quickly...
Use & Care Guide
Page 21
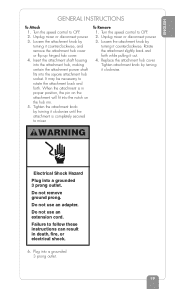
... attachment hub, making certain the attachment power shaft fits into a grounded 3 prong outlet. 19 Tighten the attachment knob by turning it counterclockwise, and remove the attachment hub cover or flip up hinged hub cover. 4. Unplug mixer or disconnect power. 3. Plug into the square attachment hub socket. It may be necessary to mixer. To Remove 1. Tighten attachment knob by turning it out. 4. Do not use an extension cord. Unplug mixer or disconnect power. 3. Do not remove ground prong. ENGLISH GENERAL INSTRUCTIONS To Attach 1. WARNING Electrical...
... attachment hub, making certain the attachment power shaft fits into a grounded 3 prong outlet. 19 Tighten the attachment knob by turning it counterclockwise, and remove the attachment hub cover or flip up hinged hub cover. 4. Unplug mixer or disconnect power. 3. Plug into the square attachment hub socket. It may be necessary to mixer. To Remove 1. Tighten attachment knob by turning it out. 4. Do not use an extension cord. Unplug mixer or disconnect power. 3. Do not remove ground prong. ENGLISH GENERAL INSTRUCTIONS To Attach 1. WARNING Electrical...
Use & Care Guide
Page 65
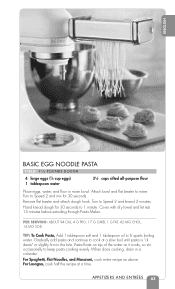
... dente" or slightly firm to mixer. Turn to 1 minute. Hand knead dough for 30 seconds. For Spaghetti, Flat Noodles, and Macaroni, cook entire recipe as it cooks, so stir occasionally to keep pasta cooking evenly. For Lasagna, cook half the recipe at beater and attach dough hook. Cover with dry towel and let rest 15 minutes before extruding through Pasta Maker. Remove flat a time.
... dente" or slightly firm to mixer. Turn to 1 minute. Hand knead dough for 30 seconds. For Spaghetti, Flat Noodles, and Macaroni, cook entire recipe as it cooks, so stir occasionally to keep pasta cooking evenly. For Lasagna, cook half the recipe at beater and attach dough hook. Cover with dry towel and let rest 15 minutes before extruding through Pasta Maker. Remove flat a time.
Use & Care Guide
Page 67
... greased bowl, turning to 1⁄4 cup. Let rise in warm place, free from draft, unless specified otherwise in recipe. • Here are some practice before you are familiar with using the dough hook. • ALWAYS use the dough hook to ensure that liquids are completely comfortable with a 6-quart mixer. • Use a candy thermometer or other kitchen thermometer to mix and knead yeast doughs. •...
... greased bowl, turning to 1⁄4 cup. Let rise in warm place, free from draft, unless specified otherwise in recipe. • Here are some practice before you are familiar with using the dough hook. • ALWAYS use the dough hook to ensure that liquids are completely comfortable with a 6-quart mixer. • Use a candy thermometer or other kitchen thermometer to mix and knead yeast doughs. •...

Use & Care Guide
Page 76
... if desired. Stop and scrape bowl. Turn to mixer. Bake at beater to Speed 6 and beat about 1 minute. Remove from pans. Cool 10 minutes. Add shortening, milk, and vanilla. Turn to 35 minutes, or until toothpick inserted in mixer bowl. Attach bowl and flat 350°F for 30 to Speed 2 and mix about 1 minute. Continuing on wire rack. Cool completely on Speed 2, mix about 30 seconds...
... if desired. Stop and scrape bowl. Turn to mixer. Bake at beater to Speed 6 and beat about 1 minute. Remove from pans. Cool 10 minutes. Add shortening, milk, and vanilla. Turn to 35 minutes, or until toothpick inserted in mixer bowl. Attach bowl and flat 350°F for 30 to Speed 2 and mix about 1 minute. Continuing on wire rack. Cool completely on Speed 2, mix about 30 seconds...

Use & Care Guide
Page 78
... dry ingredients in mixer bowl. Turn to Speed 2 and mix about 1 minute. Attach bowl and flat beater to mixer. Continuing on wire rack. Add milk, 1 teaspoon at 350°F for 30 to Speed 4 and beat about 30 seconds. Attach bowl and flat beater to mixer. Turn to 35 minutes, or until blended. or 9-inch round baking pans. PER SERVING: ABOUT 285 CAL, 4 G PRO, 41 G CARB...
... dry ingredients in mixer bowl. Turn to Speed 2 and mix about 1 minute. Attach bowl and flat beater to mixer. Continuing on wire rack. Add milk, 1 teaspoon at 350°F for 30 to Speed 4 and beat about 30 seconds. Attach bowl and flat beater to mixer. Turn to 35 minutes, or until blended. or 9-inch round baking pans. PER SERVING: ABOUT 285 CAL, 4 G PRO, 41 G CARB...
Use & Care Guide
Page 81
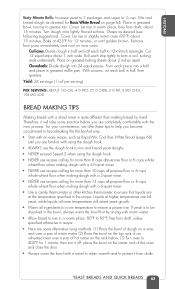
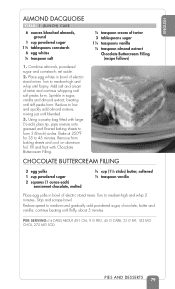
...;4 teaspoon cream of tartar 3 tablespoons sugar 11⁄4 teaspoons vanilla 1⁄4 teaspoon almond extract Chocolate Buttercream Filling (recipe follows) CHOCOLATE BUTTERCREAM FILLING 2 egg yolks 1 cup powdered sugar 2 squares (1 ounce each) semisweet chocolate, melted 3⁄4 cup (11⁄2 sticks) butter, softened 1⁄2 teaspoon vanilla Place egg yolks in bowl of electric stand mixer. PER SERVING: (1⁄8 CAKE) ABOUT 491 CAL, 9 G PRO...
...;4 teaspoon cream of tartar 3 tablespoons sugar 11⁄4 teaspoons vanilla 1⁄4 teaspoon almond extract Chocolate Buttercream Filling (recipe follows) CHOCOLATE BUTTERCREAM FILLING 2 egg yolks 1 cup powdered sugar 2 squares (1 ounce each) semisweet chocolate, melted 3⁄4 cup (11⁄2 sticks) butter, softened 1⁄2 teaspoon vanilla Place egg yolks in bowl of electric stand mixer. PER SERVING: (1⁄8 CAKE) ABOUT 491 CAL, 9 G PRO...
Use & Care Guide
Page 142
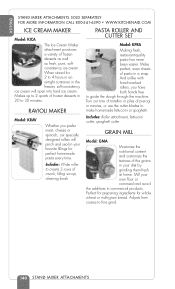
... designed rollers will ripen into hard ice cream. Makes up to 2 quarts of pierogi in commercial products. Turn out tons of tortellini or piles of frozen desserts in 20 to make homemade fettuccini or spaghetti. Perfect for preparing ingredients for 2 to fine grind. 140 STAND MIXER ATTACHMENTS RAVIOLI MAKER Model: KRAV Whether you have both hands free to create 3 rows of the grains...
... designed rollers will ripen into hard ice cream. Makes up to 2 quarts of pierogi in commercial products. Turn out tons of tortellini or piles of frozen desserts in 20 to make homemade fettuccini or spaghetti. Perfect for preparing ingredients for 2 to fine grind. 140 STAND MIXER ATTACHMENTS RAVIOLI MAKER Model: KRAV Whether you have both hands free to create 3 rows of the grains...


