
Owners Manual 1
Page 2
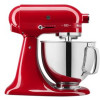
W11368487C.indb 2 3/9/2020 1:06:28 PM Also available as an optional accessory. **The Bowl design and material depend on the Stand Mixer model. PARTS AND FEATURES 3 2 10 4 1 5 9 11 8 6 7 12 13 14 15 1 Motor Head (locking lever not shown) 2 Attachment Knob 3 Attachment Hub 4 Motor Head 5 Speed Control Lever 6 Beater Height Adjustment Screw (not shown) 7 Bowl Clamping Plate 8 Bowl** 9 Beater Shaft 10 Pouring shield* 11 2.8 L Stainless Steel Bowl* 12 Flat Beater 13 Flex Edge Beater* 14 Wire Whip 15 Dough Hook *Included with select models only.
W11368487C.indb 2 3/9/2020 1:06:28 PM Also available as an optional accessory. **The Bowl design and material depend on the Stand Mixer model. PARTS AND FEATURES 3 2 10 4 1 5 9 11 8 6 7 12 13 14 15 1 Motor Head (locking lever not shown) 2 Attachment Knob 3 Attachment Hub 4 Motor Head 5 Speed Control Lever 6 Beater Height Adjustment Screw (not shown) 7 Bowl Clamping Plate 8 Bowl** 9 Beater Shaft 10 Pouring shield* 11 2.8 L Stainless Steel Bowl* 12 Flat Beater 13 Flex Edge Beater* 14 Wire Whip 15 Dough Hook *Included with select models only.

Owners Manual 1
Page 3
...persons (including children) with reduced physical, sensory, or mental capabilities, or lack of experience and knowledge, unless they do not put Stand Mixer in water or other utensils, away from the outlet when not in any appliance is not intended for information on examination, repair,... or adjustment. 7. Close supervision is dropped or damaged in use the Stand Mixer outdoors. Turn the appliance OFF, then unplug from beater during operation to the Stand Mixer. 6. Avoid contacting moving parts. To unplug, grasp the plug and pull from the power cord...
...persons (including children) with reduced physical, sensory, or mental capabilities, or lack of experience and knowledge, unless they do not put Stand Mixer in water or other utensils, away from the outlet when not in any appliance is not intended for information on examination, repair,... or adjustment. 7. Close supervision is dropped or damaged in use the Stand Mixer outdoors. Turn the appliance OFF, then unplug from beater during operation to the Stand Mixer. 6. Avoid contacting moving parts. To unplug, grasp the plug and pull from the power cord...

Owners Manual 1
Page 4
Remove the beaters, wire whip, or dough hook from the Stand Mixer before washing. If the power supply cord is designed for your Stand Mixer is based on the serial plate. SAVE THESE INSTRUCTIONS This product is too short, have a qualified electrician or service technician install an outlet near the ...
Remove the beaters, wire whip, or dough hook from the Stand Mixer before washing. If the power supply cord is designed for your Stand Mixer is based on the serial plate. SAVE THESE INSTRUCTIONS This product is too short, have a qualified electrician or service technician install an outlet near the ...

Owners Manual 1
Page 5
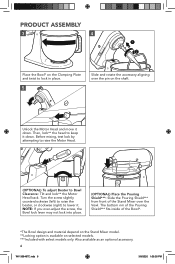
PRODUCT ASSEMBLY 1 2 Unplug and turn the Stand Mixer "OFF/0". Then, lock** the head to finish mixing cake, doughnut, and other batters. Slow mixing To mix and knead yeast doughs, heavy batters, and candies; ... For medium-fast beating (creaming), or whipping. mix thin or splashy batters. ENGLISH SPEED CONTROL GUIDE Note: The speed control can be set to the Stand Mixer.
PRODUCT ASSEMBLY 1 2 Unplug and turn the Stand Mixer "OFF/0". Then, lock** the head to finish mixing cake, doughnut, and other batters. Slow mixing To mix and knead yeast doughs, heavy batters, and candies; ... For medium-fast beating (creaming), or whipping. mix thin or splashy batters. ENGLISH SPEED CONTROL GUIDE Note: The speed control can be set to the Stand Mixer.
Owners Manual 1
Page 6
... beater, or clockwise (right) to Bowl Clearance: Tilt and lock** the Motor Head back. The bottom rim of the Pouring Shield*** fits inside of the Stand Mixer over the Vowl. PRODUCT ASSEMBLY 3 4 1 2 Place the Bowl* on the Clamping Plate and twist to keep it down . NOTE: If you over the pin on... lock into place. (OPTIONAL) Place the Pouring Shield***: Slide the Pouring Shield*** from front of the Bowl*. *The Bowl design and material depend on the Stand Mixer model. **Locking option is available on the shaft.
... beater, or clockwise (right) to Bowl Clearance: Tilt and lock** the Motor Head back. The bottom rim of the Pouring Shield*** fits inside of the Stand Mixer over the Vowl. PRODUCT ASSEMBLY 3 4 1 2 Place the Bowl* on the Clamping Plate and twist to keep it down . NOTE: If you over the pin on... lock into place. (OPTIONAL) Place the Pouring Shield***: Slide the Pouring Shield*** from front of the Bowl*. *The Bowl design and material depend on the Stand Mixer model. **Locking option is available on the shaft.

Owners Manual 1
Page 7
Scraping the Bowl* once or twice during mixing is usually sufficient. (OPTIONAL): Pour ingredients into a grounded 3 prong outlet. W11368487C.indb 7 7 3/9/2020 1:06:31 PM Refer to avoid splashing and increase it into the Bowl* through the Pouring Chute. *The Bowl design and material depend on the Stand Mixer model. Start with lower speed to the "Speed Control Guide". 2 Do not scrape the Bowl* while operating. ENGLISH PRODUCT USAGE 1 Plug it gradually.
Scraping the Bowl* once or twice during mixing is usually sufficient. (OPTIONAL): Pour ingredients into a grounded 3 prong outlet. W11368487C.indb 7 7 3/9/2020 1:06:31 PM Refer to avoid splashing and increase it into the Bowl* through the Pouring Chute. *The Bowl design and material depend on the Stand Mixer model. Start with lower speed to the "Speed Control Guide". 2 Do not scrape the Bowl* while operating. ENGLISH PRODUCT USAGE 1 Plug it gradually.

Owners Manual 1
Page 8
...Then, lock* the head to unlock the Bowl*** from the Beater Shaft. OPTIONAL ATTACHMENTS KitchenAid® offers a wide range of the Bowl***. Remove the Attachment Hub cover. *Locking option is available on the Stand Mixer model. 8 W11368487C.indb 8 3/9/2020 1:06:31 PM Twist to keep it away from...Shield** clear of the rim of optional attachments such as the Spiralizer, Pasta Cutters, or Food Grinder that may be attached to the Stand Mixer attachment power hub as an optional accessory. ***The Bowl design and material depend on selected models. **Included with select models only. ...
...Then, lock* the head to unlock the Bowl*** from the Beater Shaft. OPTIONAL ATTACHMENTS KitchenAid® offers a wide range of the Bowl***. Remove the Attachment Hub cover. *Locking option is available on the Stand Mixer model. 8 W11368487C.indb 8 3/9/2020 1:06:31 PM Twist to keep it away from...Shield** clear of the rim of optional attachments such as the Spiralizer, Pasta Cutters, or Food Grinder that may be attached to the Stand Mixer attachment power hub as an optional accessory. ***The Bowl design and material depend on selected models. **Included with select models only. ...

Owners Manual 1
Page 9
Tighten the Attachment Knob by turning it clockwise until the attachment is secured to the Stand Mixer. CARE AND CLEANING IMPORTANT: Do not immerse the Stand Mixer body in water or other liquids. 1 2 Unplug and turn the Stand Mixer "OFF/0". 3 Dishwasher-safe parts, top rack only: Stainless Steel Bowl, Bowl ...Lid, Flat Beater, Dough Hook, Flex Edge Beater*, and Pouring Shield*. 4 Wipe the Stand Mixer body with select models only. Also available as an optional accessory. 9 W11368487C.indb 9 3/9/2020 1:06:32 PM Clean the Wire Whip ...
Tighten the Attachment Knob by turning it clockwise until the attachment is secured to the Stand Mixer. CARE AND CLEANING IMPORTANT: Do not immerse the Stand Mixer body in water or other liquids. 1 2 Unplug and turn the Stand Mixer "OFF/0". 3 Dishwasher-safe parts, top rack only: Stainless Steel Bowl, Bowl ...Lid, Flat Beater, Dough Hook, Flex Edge Beater*, and Pouring Shield*. 4 Wipe the Stand Mixer body with select models only. Also available as an optional accessory. 9 W11368487C.indb 9 3/9/2020 1:06:32 PM Clean the Wire Whip ...
Owners Manual 1
Page 10
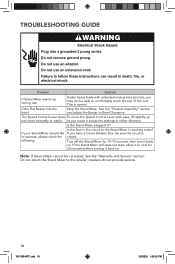
..., please check the following: Is the fuse in the circuit to cool for 10-15 seconds, then turn it to the Stand Mixer in death, fire, or electrical shock. If the Stand Mixer still does not start, allow it back on . Note: If the problem cannot be able to the retailer; Do not... "Product Assembly" section and adjust the Beater to follow these instructions can result in working order? If the Flat Beater hits the bowl: Stop the Stand Mixer. The Speed Control Lever does To move it back on . If you may not be corrected, See the "Warranty and Service" section. TROUBLESHOOTING GUIDE...
..., please check the following: Is the fuse in the circuit to cool for 10-15 seconds, then turn it to the Stand Mixer in death, fire, or electrical shock. If the Stand Mixer still does not start, allow it back on . Note: If the problem cannot be able to the retailer; Do not... "Product Assembly" section and adjust the Beater to follow these instructions can result in working order? If the Flat Beater hits the bowl: Stop the Stand Mixer. The Speed Control Lever does To move it back on . If you may not be corrected, See the "Warranty and Service" section. TROUBLESHOOTING GUIDE...

Owners Manual 1
Page 11
...next page for details on how to correct defects in materials and workmanship. C. DISCLAIMER OF IMPLIED WARRANTIES; ENGLISH WARRANTY AND SERVICE KITCHENAID STAND MIXER WARRANTY FOR THE 50 UNITED STATES, THE DISTRICT OF COLUMBIA, PUERTO RICO, AND CANADA This warranty extends to the purchaser and ...any succeeding owner for Stand Mixers operated in the 50 United States, the District of : One Year Full Warranty from state to state or province to province. KitchenAid Will Not Pay for: A. Damage resulting from accident, alteration, ...
...next page for details on how to correct defects in materials and workmanship. C. DISCLAIMER OF IMPLIED WARRANTIES; ENGLISH WARRANTY AND SERVICE KITCHENAID STAND MIXER WARRANTY FOR THE 50 UNITED STATES, THE DISTRICT OF COLUMBIA, PUERTO RICO, AND CANADA This warranty extends to the purchaser and ...any succeeding owner for Stand Mixers operated in the 50 United States, the District of : One Year Full Warranty from state to state or province to province. KitchenAid Will Not Pay for: A. Damage resulting from accident, alteration, ...

Owners Manual 1
Page 12
...eXperience Center at 1-800-541-6390 Monday through Friday. Proof of purchase will also be required to initiate the claim. KITCHENAID and the design of the Stand Mixer are trademarks in Canada: Call toll-free 1-800-807-6777. Give the consultant your complete shipping address. When you... shipping label to pack up your original sales receipt available when you call . Box numbers, please). If your original Stand Mixer and send it back to KitchenAid. WARRANTY AND SERVICE HASSLE-FREE REPLACEMENT WARRANTY-50 UNITED STATES, DISTRICT OF COLUMBIA, AND PUERTO RICO We're so confident...
...eXperience Center at 1-800-541-6390 Monday through Friday. Proof of purchase will also be required to initiate the claim. KITCHENAID and the design of the Stand Mixer are trademarks in Canada: Call toll-free 1-800-807-6777. Give the consultant your complete shipping address. When you... shipping label to pack up your original sales receipt available when you call . Box numbers, please). If your original Stand Mixer and send it back to KitchenAid. WARRANTY AND SERVICE HASSLE-FREE REPLACEMENT WARRANTY-50 UNITED STATES, DISTRICT OF COLUMBIA, AND PUERTO RICO We're so confident...
Owners Manual
Page 3
...not use of injury to persons and/or damage to the nearest Authorized Service Facility for examination, repair or adjustment. 7. ENGLISH STAND MIXER SAFETY IMPORTANT SAFEGUARDS When using electrical appliances, basic safety precautions should always be followed, including the following: 1. To avoid risk of... any appliance is necessary when any manner. The use the Stand Mixer outdoors. 9. Close supervision is used by KitchenAid may cause fire, electric shock or injury. 8. Avoid contacting moving parts. Return appliance to the Stand Mixer. 6. Do not let the cord hang over the edge ...
...not use of injury to persons and/or damage to the nearest Authorized Service Facility for examination, repair or adjustment. 7. ENGLISH STAND MIXER SAFETY IMPORTANT SAFEGUARDS When using electrical appliances, basic safety precautions should always be followed, including the following: 1. To avoid risk of... any appliance is necessary when any manner. The use the Stand Mixer outdoors. 9. Close supervision is used by KitchenAid may cause fire, electric shock or injury. 8. Avoid contacting moving parts. Return appliance to the Stand Mixer. 6. Do not let the cord hang over the edge ...

Owners Manual
Page 4
... KSM120-KSM200 NOTE: The power rating for household use an extension cord. Other recommended attachments may draw significantly less power. 4 | STAND MIXER SAFETY The maximum rating is printed on the attachment that draws the greatest load (power). Do not use only. SAVE THESE INSTRUCTIONS This... product is too short, have a qualified electrician or serviceman install an outlet near the appliance. STAND MIXER SAFETY 10. If the power supply cord is designed for your Stand Mixer is based on the serial plate. Do not let the cord contact hot surfaces, including the stove....
... KSM120-KSM200 NOTE: The power rating for household use an extension cord. Other recommended attachments may draw significantly less power. 4 | STAND MIXER SAFETY The maximum rating is printed on the attachment that draws the greatest load (power). Do not use only. SAVE THESE INSTRUCTIONS This... product is too short, have a qualified electrician or serviceman install an outlet near the appliance. STAND MIXER SAFETY 10. If the power supply cord is designed for your Stand Mixer is based on the serial plate. Do not let the cord contact hot surfaces, including the stove....
Owners Manual
Page 5
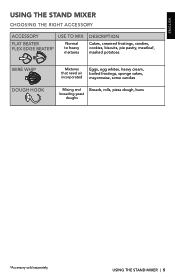
ENGLISH USING THE STAND MIXER CHOOSING THE RIGHT ACCESSORY ACCESSORY USE TO MIX FLAT BEATER FLEX EDGE BEATER* Normal to heavy mixtures DESCRIPTION Cakes, creamed frostings, candies, cookies, biscuits, pie pastry, meatloaf, mashed potatoes WIRE WHIP DOUGH HOOK Mixtures that need air incorporated Eggs, egg whites, heavy cream, boiled frostings, sponge cakes, mayonnaise, some candies Mixing and Breads, rolls, pizza dough, buns kneading yeast doughs *Accessory sold separately USING THE STAND MIXER | 5
ENGLISH USING THE STAND MIXER CHOOSING THE RIGHT ACCESSORY ACCESSORY USE TO MIX FLAT BEATER FLEX EDGE BEATER* Normal to heavy mixtures DESCRIPTION Cakes, creamed frostings, candies, cookies, biscuits, pie pastry, meatloaf, mashed potatoes WIRE WHIP DOUGH HOOK Mixtures that need air incorporated Eggs, egg whites, heavy cream, boiled frostings, sponge cakes, mayonnaise, some candies Mixing and Breads, rolls, pizza dough, buns kneading yeast doughs *Accessory sold separately USING THE STAND MIXER | 5
Owners Manual
Page 6
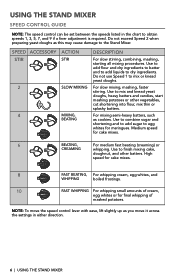
... yeast doughs, heavy batters and candies, start mashing potatoes or other batters. For mixing semi-heavy batters, such as this may cause damage to the Stand Mixer. USING THE STAND MIXER SPEED CONTROL GUIDE NOTE: The speed control can be set between the speeds listed in either direction. 6 | USING THE... STAND MIXER Do not use Speed 1 to obtain speeds 1, 3, 5, 7, and 9 if a finer adjustment is required. Medium speed for final whipping of cream, egg whites or for cake...
... yeast doughs, heavy batters and candies, start mashing potatoes or other batters. For mixing semi-heavy batters, such as this may cause damage to the Stand Mixer. USING THE STAND MIXER SPEED CONTROL GUIDE NOTE: The speed control can be set between the speeds listed in either direction. 6 | USING THE... STAND MIXER Do not use Speed 1 to obtain speeds 1, 3, 5, 7, and 9 if a finer adjustment is required. Medium speed for final whipping of cream, egg whites or for cake...

Owners Manual
Page 7
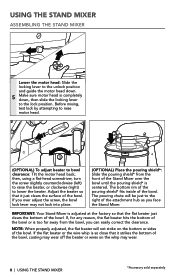
USING THE STAND MIXER | 7 Attach the bowl: Place the bowl on the shaft. Once lifted, slide the locking lever to the lock position to keep the motor head up ... you move the speed control lever with ease, lift slightly up . NOTE: To move it across the settings in a clockwise direction to "0". ENGLISH USING THE STAND MIXER ASSEMBLING THE STAND MIXER Check to be sure that the Stand 1 Mixer is unplugged, and the speed control is turned to lock it into place.
USING THE STAND MIXER | 7 Attach the bowl: Place the bowl on the shaft. Once lifted, slide the locking lever to the lock position to keep the motor head up ... you move the speed control lever with ease, lift slightly up . NOTE: To move it across the settings in a clockwise direction to "0". ENGLISH USING THE STAND MIXER ASSEMBLING THE STAND MIXER Check to be sure that the Stand 1 Mixer is unplugged, and the speed control is turned to lock it into place.
Owners Manual
Page 8
... factory so that the flat beater just clears the bottom of the attachment hub as you can easily correct the clearance. USING THE STAND MIXER ASSEMBLING THE STAND MIXER Lower the motor head: Slide the locking lever to the unlock position and guide the motor head down. 5 Make sure motor head...or wires on the bottom or sides of the bowl. If, for any reason, the flat beater hits the bottom of the bowl. IMPORTANT: Your Stand Mixer is centered. then, using a flat-head screwdriver, turn the screw slightly counterclockwise (left) to raise the beater, or clockwise (right) to bowl clearance...
... factory so that the flat beater just clears the bottom of the attachment hub as you can easily correct the clearance. USING THE STAND MIXER ASSEMBLING THE STAND MIXER Lower the motor head: Slide the locking lever to the unlock position and guide the motor head down. 5 Make sure motor head...or wires on the bottom or sides of the bowl. If, for any reason, the flat beater hits the bottom of the bowl. IMPORTANT: Your Stand Mixer is centered. then, using a flat-head screwdriver, turn the screw slightly counterclockwise (left) to raise the beater, or clockwise (right) to bowl clearance...
Owners Manual
Page 9
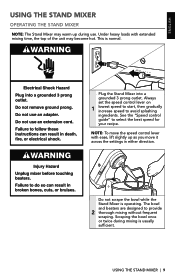
...recipe. This is operating. See the "Speed control guide" to avoid splashing ingredients. NOTE: To move it across the settings in either direction. Plug the Stand Mixer into a grounded 3 prong outlet. Under heavy loads with ease, lift slightly up as you move the speed control lever with extended mixing time, the ...top of the unit may warm up during mixing is usually sufficient. Do not scrape the bowl while the Stand Mixer is normal. The bowl and beaters are designed to provide 2 thorough mixing without frequent scraping. ENGLISH USING THE...
...recipe. This is operating. See the "Speed control guide" to avoid splashing ingredients. NOTE: To move it across the settings in either direction. Plug the Stand Mixer into a grounded 3 prong outlet. Under heavy loads with ease, lift slightly up as you move the speed control lever with extended mixing time, the ...top of the unit may warm up during mixing is usually sufficient. Do not scrape the bowl while the Stand Mixer is normal. The bowl and beaters are designed to provide 2 thorough mixing without frequent scraping. ENGLISH USING THE...
Owners Manual
Page 10
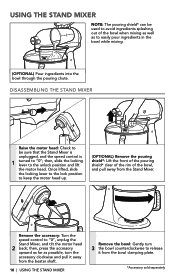
Remove the accessory: Turn the speed control to the unlock position and lift the motor head. then, slide the locking lever to "0", unplug the Stand Mixer, and tilt the motor head 2 back; Once lifted, slide the locking lever to the lock position to keep the motor head up. (OPTIONAL) ... as far as to easily pour ingredients in the bowl while mixing. (OPTIONAL) Pour ingredients into the bowl through the pouring chute. DISASSEMBLING THE STAND MIXER Raise the motor head: Check to be used to avoid ingredients splashing out of the bowl, and pull away from the bowl clamping plate. *...
Remove the accessory: Turn the speed control to the unlock position and lift the motor head. then, slide the locking lever to "0", unplug the Stand Mixer, and tilt the motor head 2 back; Once lifted, slide the locking lever to the lock position to keep the motor head up. (OPTIONAL) ... as far as to easily pour ingredients in the bowl while mixing. (OPTIONAL) Pour ingredients into the bowl through the pouring chute. DISASSEMBLING THE STAND MIXER Raise the motor head: Check to be used to avoid ingredients splashing out of the bowl, and pull away from the bowl clamping plate. *...

Owners Manual
Page 11
...will fit into the notch on using the attachment. When it clockwise until the attachment is turned to "0". ENGLISH USING THE STAND MIXER OPTIONAL ATTACHMENTS KitchenAid offers a wide range of optional attachments such as the spiralizer, pasta cutters, or food grinder that may be 3 necessary to... rotate the attachment back and forth. Check to be sure that the Stand 1 Mixer is unplugged and the speed control is completely secured 4 ...
...will fit into the notch on using the attachment. When it clockwise until the attachment is turned to "0". ENGLISH USING THE STAND MIXER OPTIONAL ATTACHMENTS KitchenAid offers a wide range of optional attachments such as the spiralizer, pasta cutters, or food grinder that may be 3 necessary to... rotate the attachment back and forth. Check to be sure that the Stand 1 Mixer is unplugged and the speed control is completely secured 4 ...


