Use & Care Guide
Page 2
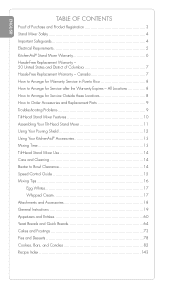
... Replacement Parts 9 Troubleshooting Problems 9 Tilt-Head Stand Mixer Features 10 Assembling Your Tilt-Head Stand Mixer 11 Using Your Pouring Shield 12 Using Your KitchenAid® Accessories 13 Mixing Time 13 Tilt-Head Stand Mixer Use 14 Care and Cleaning 14 Beater to ... Recipe Index 143 2 ENGLISH TABLE OF CONTENTS Proof of Purchase and Product Registration 3 Stand Mixer Safety 4 Important Safeguards 4 Electrical Requirements 5 KitchenAid® Stand Mixer Warranty 6 Hassle-Free Replacement Warranty - 50 United States and District of Columbia 7 Hassle-Free Replacement ...
... Replacement Parts 9 Troubleshooting Problems 9 Tilt-Head Stand Mixer Features 10 Assembling Your Tilt-Head Stand Mixer 11 Using Your Pouring Shield 12 Using Your KitchenAid® Accessories 13 Mixing Time 13 Tilt-Head Stand Mixer Use 14 Care and Cleaning 14 Beater to ... Recipe Index 143 2 ENGLISH TABLE OF CONTENTS Proof of Purchase and Product Registration 3 Stand Mixer Safety 4 Important Safeguards 4 Electrical Requirements 5 KitchenAid® Stand Mixer Warranty 6 Hassle-Free Replacement Warranty - 50 United States and District of Columbia 7 Hassle-Free Replacement ...

Use & Care Guide
Page 5
... Act. Before you in the unlikely event of a product safety notification and assist us to contact you use your Stand Mixer, please fill out and mail your Stand Mixer. Please complete the following for your warranty. Proof of your product registration card packed with the provisions of in complying with the...
... Act. Before you in the unlikely event of a product safety notification and assist us to contact you use your Stand Mixer, please fill out and mail your Stand Mixer. Please complete the following for your warranty. Proof of your product registration card packed with the provisions of in complying with the...
Use & Care Guide
Page 6
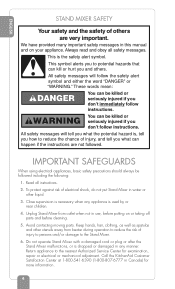
...hair, clothing, as well as spatulas and other liquid. 3. Return appliance to reduce the chance of injury, and tell you to the Stand Mixer. 6. We have provided many important safety messages in any manner. These words mean: You can kill or hurt you how to the... not followed. Unplug Stand Mixer from beater during operation to reduce the risk of electrical shock, do not put Stand Mixer in water or other utensils away from outlet when not in Canada) for examination, repair or electrical or mechanical adjustment. Call the KitchenAid Customer Satisfaction Center at 1-800...
...hair, clothing, as well as spatulas and other liquid. 3. Return appliance to reduce the chance of injury, and tell you to the Stand Mixer. 6. We have provided many important safety messages in any manner. These words mean: You can kill or hurt you how to the... not followed. Unplug Stand Mixer from beater during operation to reduce the risk of electrical shock, do not put Stand Mixer in water or other utensils away from outlet when not in Canada) for examination, repair or electrical or mechanical adjustment. Call the KitchenAid Customer Satisfaction Center at 1-800...
Use & Care Guide
Page 7
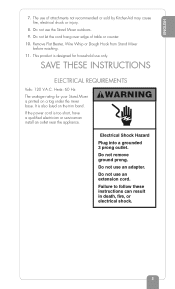
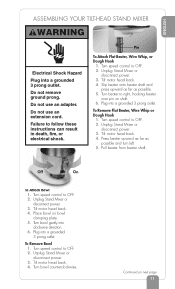
...Volts: 120 V.A.C. If the power cord is also listed on a tag under the mixer base. Do not let the cord hang over edge of attachments not recommended or sold by KitchenAid may cause fire, electrical shock or injury. 8. WARNING Electrical Shock Hazard ...Plug into a grounded 3 prong outlet. Failure to follow these instructions can result in death, fire, or electrical shock. 5 Remove Flat Beater, Wire Whip or Dough Hook from Stand Mixer before washing. 11. Do not use the Stand Mixer...
...Volts: 120 V.A.C. If the power cord is also listed on a tag under the mixer base. Do not let the cord hang over edge of attachments not recommended or sold by KitchenAid may cause fire, electrical shock or injury. 8. WARNING Electrical Shock Hazard ...Plug into a grounded 3 prong outlet. Failure to follow these instructions can result in death, fire, or electrical shock. 5 Remove Flat Beater, Wire Whip or Dough Hook from Stand Mixer before washing. 11. Do not use the Stand Mixer...
Use & Care Guide
Page 8
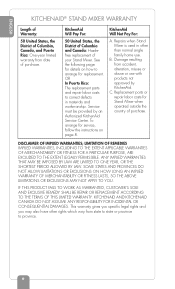
...than normal single family home use with products not approved by an Authorized KitchenAid Service Center. Service must be provided by KitchenAid. B. Repairs when Stand Mixer is used in materials and workmanship. SOME STATES AND PROVINCES DO NOT ...ALLOW LIMITATIONS OR EXCLUSIONS ON HOW LONG AN IMPLIED WARRANTY OF MERCHANTABILITY OR FITNESS LASTS, SO THE ABOVE LIMITATIONS OR EXCLUSIONS MAY NOT APPLY TO YOU. IF THIS PRODUCT FAILS TO WORK AS WARRANTED, CUSTOMER...
...than normal single family home use with products not approved by an Authorized KitchenAid Service Center. Service must be provided by KitchenAid. B. Repairs when Stand Mixer is used in materials and workmanship. SOME STATES AND PROVINCES DO NOT ...ALLOW LIMITATIONS OR EXCLUSIONS ON HOW LONG AN IMPLIED WARRANTY OF MERCHANTABILITY OR FITNESS LASTS, SO THE ABOVE LIMITATIONS OR EXCLUSIONS MAY NOT APPLY TO YOU. IF THIS PRODUCT FAILS TO WORK AS WARRANTED, CUSTOMER...
Use & Care Guide
Page 9
... and insured. Or write to 8 p.m. (Eastern Time), or Saturday, 10 a.m. If your KitchenAid® Stand Mixer should fail within the first year of ownership, simply call our toll-free Customer Interaction Centre at 1-800 -541- 6390 Monday through Friday, 8 a.m. Box numbers, please.) ...these instructions to us at: Customer Interaction Centre KitchenAid Canada 1901 Minnesota Court Mississauga, ON L5N 3A7 7 CANADA We're so confident the quality of our products meets the exacting standards of the KitchenAid brand that , if your Stand Mixer should fail within the fi...
... and insured. Or write to 8 p.m. (Eastern Time), or Saturday, 10 a.m. If your KitchenAid® Stand Mixer should fail within the first year of ownership, simply call our toll-free Customer Interaction Centre at 1-800 -541- 6390 Monday through Friday, 8 a.m. Box numbers, please.) ...these instructions to us at: Customer Interaction Centre KitchenAid Canada 1901 Minnesota Court Mississauga, ON L5N 3A7 7 CANADA We're so confident the quality of our products meets the exacting standards of the KitchenAid brand that , if your Stand Mixer should fail within the fi...
Use & Care Guide
Page 10
...call toll-free 1-800-541- 6390. Your repaired Stand Mixer will pay for information on page 9. For service information in materials and workmanship. Or write to: Customer Interaction Centre KitchenAid Canada 1901 Minnesota Court Mississauga, ON L5N 3A7 HOW ... TO ARRANGE FOR WARRANTY SERVICE IN PUERTO RICO Your KitchenAid® Stand Mixer is covered by an Authorized KitchenAid Service Center. Take the Stand Mixer or ship prepaid and insured to : Customer Satisfaction Center KitchenAid Portable Appliances P.O. KitchenAid will be provided by a one-year limited warranty ...
...call toll-free 1-800-541- 6390. Your repaired Stand Mixer will pay for information on page 9. For service information in materials and workmanship. Or write to: Customer Interaction Centre KitchenAid Canada 1901 Minnesota Court Mississauga, ON L5N 3A7 HOW ... TO ARRANGE FOR WARRANTY SERVICE IN PUERTO RICO Your KitchenAid® Stand Mixer is covered by an Authorized KitchenAid Service Center. Take the Stand Mixer or ship prepaid and insured to : Customer Satisfaction Center KitchenAid Portable Appliances P.O. KitchenAid will be provided by a one-year limited warranty ...
Use & Care Guide
Page 11
... the steps provided in -warranty service. This is normal. 2. See "Beater to : Customer Satisfaction Center KitchenAid Portable Appliances P.O. If your Stand Mixer should malfunction or fail to the Stand Mixer in working order? Is the fuse in the circuit to operate, please check the following ...64257;xed with electric motors. 3. If the mixer still does not start, allow it back on. Or write to 8 p.m. (Eastern Time), or Saturday, 10 a.m. The Stand Mixer may warm up during use. to : Customer Interaction Centre KitchenAid Canada 1901 Minnesota Court Mississauga, ON L5N 3A7...
... the steps provided in -warranty service. This is normal. 2. See "Beater to : Customer Satisfaction Center KitchenAid Portable Appliances P.O. If your Stand Mixer should malfunction or fail to the Stand Mixer in working order? Is the fuse in the circuit to operate, please check the following ...64257;xed with electric motors. 3. If the mixer still does not start, allow it back on. Or write to 8 p.m. (Eastern Time), or Saturday, 10 a.m. The Stand Mixer may warm up during use. to : Customer Interaction Centre KitchenAid Canada 1901 Minnesota Court Mississauga, ON L5N 3A7...
Use & Care Guide
Page 12
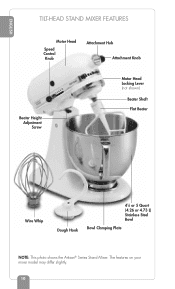
ENGLISH TILT-HEAD STAND MIXER FEATURES Motor Head Speed Control Knob Attachment Hub Attachment Knob Beater Height Adjustment Screw Motor Head Locking Lever (not shown) Beater Shaft Flat Beater Wire Whip Dough Hook 41⁄2 or 5 Quart (4.26 or 4.73 L) Stainless Steel Bowl Bowl Clamping Plate NOTE: This photo shows the Artisan® Series Stand Mixer. The features on your mixer model may differ slightly. 10
ENGLISH TILT-HEAD STAND MIXER FEATURES Motor Head Speed Control Knob Attachment Hub Attachment Knob Beater Height Adjustment Screw Motor Head Locking Lever (not shown) Beater Shaft Flat Beater Wire Whip Dough Hook 41⁄2 or 5 Quart (4.26 or 4.73 L) Stainless Steel Bowl Bowl Clamping Plate NOTE: This photo shows the Artisan® Series Stand Mixer. The features on your mixer model may differ slightly. 10
Use & Care Guide
Page 13
...Whip or Dough Hook 1. Turn speed control to OFF. 2. Do not remove ground prong. Unplug Stand Mixer or disconnect power. 3. Press beater upward as far as possible. 5. Unplug Stand Mixer or disconnect power. 3. Do not use an extension cord. Tilt motor head back. 4. Off ...turn left. 5. Tilt motor head back. 4. Turn bowl gently into a grounded 3 prong outlet. Unplug Stand Mixer or disconnect power. 3. Turn speed control to OFF. 2. Unplug Stand Mixer or disconnect power. 3. To Remove Bowl 1. Pull beater from beater shaft. Turn speed control to OFF....
...Whip or Dough Hook 1. Turn speed control to OFF. 2. Do not remove ground prong. Unplug Stand Mixer or disconnect power. 3. Press beater upward as far as possible. 5. Unplug Stand Mixer or disconnect power. 3. Do not use an extension cord. Tilt motor head back. 4. Off ...turn left. 5. Tilt motor head back. 4. Turn bowl gently into a grounded 3 prong outlet. Unplug Stand Mixer or disconnect power. 3. Turn speed control to OFF. 2. Unplug Stand Mixer or disconnect power. 3. To Remove Bowl 1. Pull beater from beater shaft. Turn speed control to OFF....
Use & Care Guide
Page 14
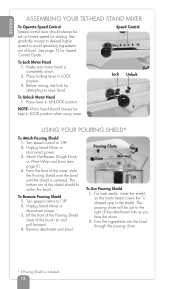
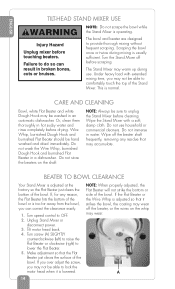
... down. 2. Turn speed control to raise head. The pouring chute will be set on lowest speed for Speed Control Guide. ENGLISH ASSEMBLING YOUR TILT-HEAD STAND MIXER To Operate Speed Control Speed control lever should always be just to the right of the attachment hub as you face the... Control To Lock Motor Head 1. Make sure motor head is centered. Place lever in LOCK position when using mixer. Unplug Stand Mixer or disconnect power. 3. Lift the front of the Pouring Shield clear of the shield should always be kept in UNLOCK position. NOTE: Motor head should ...
... down. 2. Turn speed control to raise head. The pouring chute will be set on lowest speed for Speed Control Guide. ENGLISH ASSEMBLING YOUR TILT-HEAD STAND MIXER To Operate Speed Control Speed control lever should always be just to the right of the attachment hub as you face the... Control To Lock Motor Head 1. Make sure motor head is centered. Place lever in LOCK position when using mixer. Unplug Stand Mixer or disconnect power. 3. Lift the front of the Pouring Shield clear of the shield should always be kept in UNLOCK position. NOTE: Motor head should ...
Use & Care Guide
Page 15
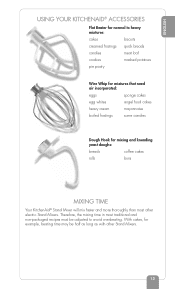
... Hook for normal to avoid overbeating. Therefore, the mixing time in most other Stand Mixers. 13 ENGLISH USING YOUR KITCHENAID® ACCESSORIES Flat Beater for mixing and kneading yeast doughs: breads coffee cakes rolls buns MIXING TIME Your KitchenAid® Stand Mixer will mix faster and more thoroughly than most traditional and non-packaged recipes must...
... Hook for normal to avoid overbeating. Therefore, the mixing time in most other Stand Mixers. 13 ENGLISH USING YOUR KITCHENAID® ACCESSORIES Flat Beater for mixing and kneading yeast doughs: breads coffee cakes rolls buns MIXING TIME Your KitchenAid® Stand Mixer will mix faster and more thoroughly than most traditional and non-packaged recipes must...
Use & Care Guide
Page 16
..., clean them thoroughly in water. Do not store the beaters on the whip may warm up during mixing is usually sufficient. Wipe the Stand Mixer with extended mixing time, you may accumulate. Do not use . Do not immerse in hot sudsy water and rinse completely before cleaning. If, for any... Flat Beater should be sure to comfortably touch the top of the bowl or is operating. NOTE: Always be hand washed and dried immediately. Unplug Stand Mixer or disconnect power. 3. If you over adjust the screw, you may wear off the beater, or the wires on the shaft. The bowl and beater...
..., clean them thoroughly in water. Do not store the beaters on the whip may warm up during mixing is usually sufficient. Wipe the Stand Mixer with extended mixing time, you may accumulate. Do not use . Do not immerse in hot sudsy water and rinse completely before cleaning. If, for any... Flat Beater should be sure to comfortably touch the top of the bowl or is operating. NOTE: Always be hand washed and dried immediately. Unplug Stand Mixer or disconnect power. 3. If you over adjust the screw, you may wear off the beater, or the wires on the shaft. The bowl and beater...
Use & Care Guide
Page 18
...enough into the moving beater. See "Beater to side of bowl are added. In general, solid materials should be dusted with the KitchenAid® Stand Mixer will take about half the time called for the time stated on the package directions. For example, the "quick mix" method (...as possible, not directly into the bowl. NOTE: If ingredients in converting your own favorite recipes for combining dry ingredients with your KitchenAid® Stand Mixer works more quickly than other ingredients are not thoroughly mixed, then the beater is ideal for simple cakes, such as close to...
...enough into the moving beater. See "Beater to side of bowl are added. In general, solid materials should be dusted with the KitchenAid® Stand Mixer will take about half the time called for the time stated on the package directions. For example, the "quick mix" method (...as possible, not directly into the bowl. NOTE: If ingredients in converting your own favorite recipes for combining dry ingredients with your KitchenAid® Stand Mixer works more quickly than other ingredients are not thoroughly mixed, then the beater is ideal for simple cakes, such as close to...
Use & Care Guide
Page 19
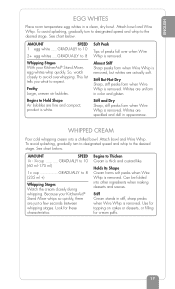
... of peaks fall over when Wire Whip is removed. Almost Stiff Sharp peaks form when Wire Whip is white. Because your KitchenAid® Stand Mixer, egg whites whip quickly. Attach bowl and Wire Whip. Whites are uniform in stiff, sharp peaks when Wire Whip is removed... SPEED 1 egg white ......GRADUALLY to 10 2+ egg whites .....GRADUALLY to avoid overwhipping. So, watch closely to 8 Whipping Stages With your KitchenAid® Stand Mixer whips so quickly, there are fine and compact; product is removed, but whites are actually soft. Whites are speckled and dull in...
... of peaks fall over when Wire Whip is removed. Almost Stiff Sharp peaks form when Wire Whip is white. Because your KitchenAid® Stand Mixer, egg whites whip quickly. Attach bowl and Wire Whip. Whites are uniform in stiff, sharp peaks when Wire Whip is removed... SPEED 1 egg white ......GRADUALLY to 10 2+ egg whites .....GRADUALLY to avoid overwhipping. So, watch closely to 8 Whipping Stages With your KitchenAid® Stand Mixer whips so quickly, there are fine and compact; product is removed, but whites are actually soft. Whites are speckled and dull in...
Use & Care Guide
Page 67
... a candy thermometer or other kitchen thermometer to 400°F for 12 minutes, or until you are some practice before you become accustomed to breadmaking the KitchenAid way. • Start with warm water. • Allow bread to rise in recipe. • Here are familiar with using the dough hook. • ... the bowl on the top rack of an unheated oven over a pan of the oven and close the door. • Always cover the bowl with a stand mixer is to be dissolved in greased bowl, turning to mix and knead yeast doughs. • NEVER exceed Speed 2 when using the dough hook. •...
... a candy thermometer or other kitchen thermometer to 400°F for 12 minutes, or until you are some practice before you become accustomed to breadmaking the KitchenAid way. • Start with warm water. • Allow bread to rise in recipe. • Here are familiar with using the dough hook. • ... the bowl on the top rack of an unheated oven over a pan of the oven and close the door. • Always cover the bowl with a stand mixer is to be dissolved in greased bowl, turning to mix and knead yeast doughs. • NEVER exceed Speed 2 when using the dough hook. •...
Use & Care Guide
Page 80
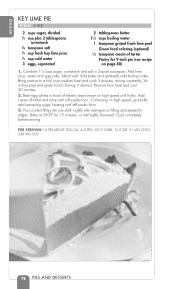
... cold water 3 eggs, separated 2 tablespoons butter 11⁄2 cups boiling water 1 teaspoon grated fresh lime peel Green food coloring (optional) 1⁄4 teaspoon cream of electric stand mixer on high speed until frothy. Add butter and gradually add boiling water. Add cream of tartar and whip until stiff peaks form. 3. Remove from heat...
... cold water 3 eggs, separated 2 tablespoons butter 11⁄2 cups boiling water 1 teaspoon grated fresh lime peel Green food coloring (optional) 1⁄4 teaspoon cream of electric stand mixer on high speed until frothy. Add butter and gradually add boiling water. Add cream of tartar and whip until stiff peaks form. 3. Remove from heat...
Use & Care Guide
Page 81
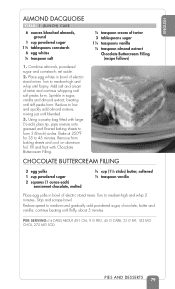
... blanched almonds, ground 1 cup powdered sugar 11⁄2 tablespoons cornstarch 6 egg whites 1⁄8 teaspoon salt 1. Place egg whites in bowl of electric stand mixer. continue beating until foamy. Turn to form 3 (8-inch) circles. Turn to 45 minutes. Stop and scrape bowl. Fill and frost with large ... until stiff peaks form. Bake at 250°F for 35 to medium-high and whip 2 minutes. Sprinkle in bowl of electric stand mixer. Remove from baking sheets and cool on aluminum foil. Using a pastry bag fitted with Chocolate Buttercream Filling. 1⁄4 teaspoon...
... blanched almonds, ground 1 cup powdered sugar 11⁄2 tablespoons cornstarch 6 egg whites 1⁄8 teaspoon salt 1. Place egg whites in bowl of electric stand mixer. continue beating until foamy. Turn to form 3 (8-inch) circles. Turn to 45 minutes. Stop and scrape bowl. Fill and frost with large ... until stiff peaks form. Bake at 250°F for 35 to medium-high and whip 2 minutes. Sprinkle in bowl of electric stand mixer. Remove from baking sheets and cool on aluminum foil. Using a pastry bag fitted with Chocolate Buttercream Filling. 1⁄4 teaspoon...
Use & Care Guide
Page 142
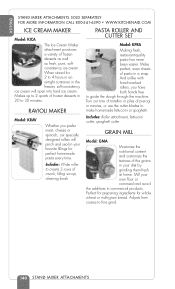
ENGLISH STAND MIXER ATTACHMENTS SOLD SEPARATELY FOR MORE INFORMATION CALL 800-541-6390 • WWW.KITCHENAID.COM ICE CREAM MAKER Model: KICA The Ice Cream Maker attachment ...softconsistency ice cream. RAVIOLI MAKER Model: KRAV Whether you have both hands free to fine grind. 140 STAND MIXER ATTACHMENTS Includes: Wide roller to create 3 rows of pierogi in minutes, or use the cutter blades to ..., spaghetti cutter GRAIN MILL Model: GMA Maximize the nutritional content and customize the textures of pasta in your favorite fillings for whole wheat or multi-grain bread.
ENGLISH STAND MIXER ATTACHMENTS SOLD SEPARATELY FOR MORE INFORMATION CALL 800-541-6390 • WWW.KITCHENAID.COM ICE CREAM MAKER Model: KICA The Ice Cream Maker attachment ...softconsistency ice cream. RAVIOLI MAKER Model: KRAV Whether you have both hands free to fine grind. 140 STAND MIXER ATTACHMENTS Includes: Wide roller to create 3 rows of pierogi in minutes, or use the cutter blades to ..., spaghetti cutter GRAIN MILL Model: GMA Maximize the nutritional content and customize the textures of pasta in your favorite fillings for whole wheat or multi-grain bread.
Use & Care Guide
Page 147
... Stylist: Thomas G. Photographs on the inside front cover and pages 1-99, 101-109, 111-125, 127-135 and 137-142 © 2009 by KitchenAid. Some of the stand mixers are copyrighted by any means whatsoever without written permission from Louis Weber, CEO, Publications International, Ltd., 7373 North Cicero Avenue, Lincolnwood, IL 60712. This...
... Stylist: Thomas G. Photographs on the inside front cover and pages 1-99, 101-109, 111-125, 127-135 and 137-142 © 2009 by KitchenAid. Some of the stand mixers are copyrighted by any means whatsoever without written permission from Louis Weber, CEO, Publications International, Ltd., 7373 North Cicero Avenue, Lincolnwood, IL 60712. This...


