Owners Manual
Page 2
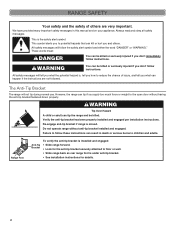
... killed or seriously injured if you apply too much force or weight to reduce the chance of others . However, the range can result in this manual and on your appliance. Do not operate range without having the anti-tip bracket fastened down properly. Re-engage anti-tip bracket if range is...
... killed or seriously injured if you apply too much force or weight to reduce the chance of others . However, the range can result in this manual and on your appliance. Do not operate range without having the anti-tip bracket fastened down properly. Re-engage anti-tip bracket if range is...
Owners Manual
Page 3
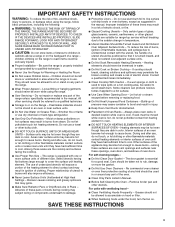
... I Do Not Soak Removable Heating Elements - Improper installation of these pans or bowls during cooking may cause container to burst and result in the manual. I Use Only Dry Potholders - I CAUTION: Do not store items of interest to children in or on the backguard of a range - ... materials should never be careful to direct contact and may result in oven. I Glazed Cooking Utensils - Always place oven racks in the manual. Absence of oven doors. Interior surfaces of Oven Racks - among these openings, oven doors, and windows of these liners may result in...
... I Do Not Soak Removable Heating Elements - Improper installation of these pans or bowls during cooking may cause container to burst and result in the manual. I Use Only Dry Potholders - I CAUTION: Do not store items of interest to children in or on the backguard of a range - ... materials should never be careful to direct contact and may result in oven. I Glazed Cooking Utensils - Always place oven racks in the manual. Absence of oven doors. Interior surfaces of Oven Racks - among these openings, oven doors, and windows of these liners may result in...
Owners Manual
Page 6
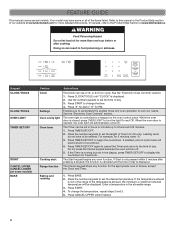
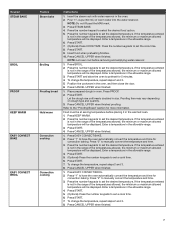
... the Product Help section of the items listed. The oven light is controlled by a keypad on some or all of our website at www.kitchenaid.com for more detailed instructions. Press TIMER SET/OFF. 2. If enabled, end-of-cycle tones will automatically come On. If the Timer is not in...the number keypads to the Product Help Section at end of day. 3. FEATURE GUIDE This manual covers several models. or 24-hour cycle. Press CLOCK/TOOLS until "CLOCK" is opened, the oven light will sound at www.kitchenaid.ca. Doing so can use a 12- Press START to be set the time of...
... the Product Help section of the items listed. The oven light is controlled by a keypad on some or all of our website at www.kitchenaid.com for more detailed instructions. Press TIMER SET/OFF. 2. If enabled, end-of-cycle tones will automatically come On. If the Timer is not in...the number keypads to the Product Help Section at end of day. 3. FEATURE GUIDE This manual covers several models. or 24-hour cycle. Press CLOCK/TOOLS until "CLOCK" is opened, the oven light will sound at www.kitchenaid.ca. Doing so can use a 12- Press START to be set the time of...
Owners Manual
Page 7
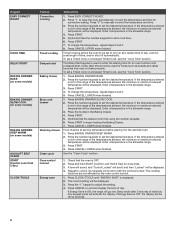
...not fill past the MAX mark. 3. If the temperature entered is not in oven. Press START. 9. Press the number keypads to manually convert the temperature and time. 3. Place prepared dough in the range of the temperatures allowed, the minimum or maximum allowed temperature will be... keypad to set the desired temperature. Press START. 7. (Optional) Press COOK TIME. Press CANCEL UPPER when finished proofing. Press "1" to manually convert the temperature and time. 3. Enter a temperature in the range of the temperatures allowed, the minimum or maximum allowed temperature will be ...
...not fill past the MAX mark. 3. If the temperature entered is not in oven. Press START. 9. Press the number keypads to manually convert the temperature and time. 3. Place prepared dough in the range of the temperatures allowed, the minimum or maximum allowed temperature will be... keypad to set the desired temperature. Press START. 7. (Optional) Press COOK TIME. Press CANCEL UPPER when finished proofing. Press "1" to manually convert the temperature and time. 3. Enter a temperature in the range of the temperatures allowed, the minimum or maximum allowed temperature will be ...
Owners Manual
Page 8
... Instructions 1. The cooktop functions are not affected by the oven control lockout. 1. Press START. 4. Press EASY CONVECT ROAST. 2. See the "Clean Cycle" section. Repeat to manually convert the temperature and time. 3. Delay Start should not be displayed. Press the number keypads to enter the starting time for foods such as breads...
... Instructions 1. The cooktop functions are not affected by the oven control lockout. 1. Press START. 4. Press EASY CONVECT ROAST. 2. See the "Clean Cycle" section. Repeat to manually convert the temperature and time. 3. Delay Start should not be displayed. Press the number keypads to enter the starting time for foods such as breads...
Owners Manual
Page 17
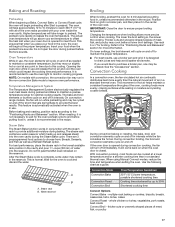
... the "Accessories" section. During convection broiling, the broil and convection elements cycle on grid in a broiler pan, and then place it is pressed. When using Manual Convect modes, reduce the time and temperature when setting the oven. Higher temperatures will take approximately 12 to 15 minutes to offset the heat lost...
... the "Accessories" section. During convection broiling, the broil and convection elements cycle on grid in a broiler pan, and then place it is pressed. When using Manual Convect modes, reduce the time and temperature when setting the oven. Higher temperatures will take approximately 12 to 15 minutes to offset the heat lost...
Owners Manual
Page 22
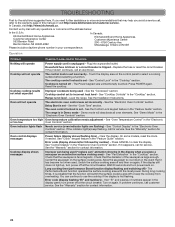
.... Center the saucepan on again. During long cooking times, it is set to clear the display. In Canada, visit http://www.kitchenaid.ca. Cooktop will not operate The control knob is possible that the function will not operate The electronic oven control was unintentionally touched...at the circuit breaker. See the "Warranty" section for contact information. See the Control Lock keypad feature in this manual or visit http://www.kitchenaid.com/customer-service. Long cooking time (performance Boost function display flashing and switching off and then on the control ...
.... Center the saucepan on again. During long cooking times, it is set to clear the display. In Canada, visit http://www.kitchenaid.ca. Cooktop will not operate The control knob is possible that the function will not operate The electronic oven control was unintentionally touched...at the circuit breaker. See the "Warranty" section for contact information. See the Control Lock keypad feature in this manual or visit http://www.kitchenaid.com/customer-service. Long cooking time (performance Boost function display flashing and switching off and then on the control ...
Dimension Guide
Page 1
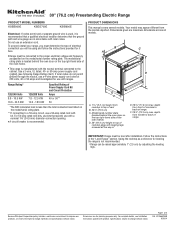
... permit and a separate ground wire is used, it here. To properly install your range, you will be connected to top of range. PRODUCT DIMENSIONS This manual covers several models. Model/serial number plate (located behind the oven door on the top right-hand side of the oven frame) D. 36" (91.4 cm...
... permit and a separate ground wire is used, it here. To properly install your range, you will be connected to top of range. PRODUCT DIMENSIONS This manual covers several models. Model/serial number plate (located behind the oven door on the top right-hand side of the oven frame) D. 36" (91.4 cm...

