Specification Sheet
Page 1
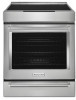
... and stays at a different temperature and keeping dishes warm. KSIB900ESPECSHEETV01. NOTE: Dimensions are for complete details. General Features & Properties Steam Rack 7.1 cu. For complete details, see Installation Instructions packed with induction elements use electromagnetic energy to generate instant heat directly to cookware for slow cooking, baking at , the perfect temperature. 7.1 cu. Slide-In Electric Induction Range KSIB900E Stainless Steel KSIB900ESS Key Features & Benefits Induction Cooking Elements Ranges with product. Baking Drawer The separate compartment allows...
... and stays at a different temperature and keeping dishes warm. KSIB900ESPECSHEETV01. NOTE: Dimensions are for complete details. General Features & Properties Steam Rack 7.1 cu. For complete details, see Installation Instructions packed with induction elements use electromagnetic energy to generate instant heat directly to cookware for slow cooking, baking at , the perfect temperature. 7.1 cu. Slide-In Electric Induction Range KSIB900E Stainless Steel KSIB900ESS Key Features & Benefits Induction Cooking Elements Ranges with product. Baking Drawer The separate compartment allows...
KitchenAid FIT System Guarantee 2020
Page 1
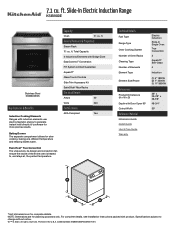
...KitchenAid Brand slide-in your existing cut -out modification allowance. Whirlpool reserves the right to the terms set forth herein, KitchenAid Brand of the delivery date, if utilizing the delivery date to you are designed to cover up to one claim per household. FIT SYSTEM LIMITED GUARANTEE - The Fit System Limited Guarantee covers replacement installations in range (qualifying models listed...QUALIFIED KitchenAid BRAND STANDARD SINGLE AND DOUBLE OVEN SLIDE-IN RANGE MODELS : KSEG700E KSEB900E KSIB900E KSGG700E KSGB900E KSDB900E KSEG950E KSDG950E DISCLAIMER OF IMPLIED WARRANTIES; ...
...KitchenAid Brand slide-in your existing cut -out modification allowance. Whirlpool reserves the right to the terms set forth herein, KitchenAid Brand of the delivery date, if utilizing the delivery date to you are designed to cover up to one claim per household. FIT SYSTEM LIMITED GUARANTEE - The Fit System Limited Guarantee covers replacement installations in range (qualifying models listed...QUALIFIED KitchenAid BRAND STANDARD SINGLE AND DOUBLE OVEN SLIDE-IN RANGE MODELS : KSEG700E KSEB900E KSIB900E KSGG700E KSGB900E KSDB900E KSEG950E KSDG950E DISCLAIMER OF IMPLIED WARRANTIES; ...
Owners Manual
Page 1
... 5 Surface Temperatures 5 Preheating 5 Ceramic Glass Cooktop Cleaning 5 FEATURE GUIDE 6 Electronic Oven Controls 9 COOKTOP 10 Cookware 13 Home Canning 14 OVEN 14 Aluminum Foil 14 Positioning Racks and Bakeware 14 Roll-Out Rack 15 Oven Vent 16 Sabbath Mode 16 Baking and Roasting 17 Broiling 17 Convection Cooking 17 Proofing Bread 18 Cook Time 18 Baking Drawer 18 Oven Light 19 RANGE CARE 19 Self-Clean Cycle 19 General Cleaning 20 Remove/Replace Drawer 21 TROUBLESHOOTING 22 ACCESSORIES 24 WARRANTY 25 W11281984B Register your product model and serial numbers. In...
... 5 Surface Temperatures 5 Preheating 5 Ceramic Glass Cooktop Cleaning 5 FEATURE GUIDE 6 Electronic Oven Controls 9 COOKTOP 10 Cookware 13 Home Canning 14 OVEN 14 Aluminum Foil 14 Positioning Racks and Bakeware 14 Roll-Out Rack 15 Oven Vent 16 Sabbath Mode 16 Baking and Roasting 17 Broiling 17 Convection Cooking 17 Proofing Bread 18 Cook Time 18 Baking Drawer 18 Oven Light 19 RANGE CARE 19 Self-Clean Cycle 19 General Cleaning 20 Remove/Replace Drawer 21 TROUBLESHOOTING 22 ACCESSORIES 24 WARRANTY 25 W11281984B Register your product model and serial numbers. In...
Owners Manual
Page 3
... hot heating elements. Do not use of electric shock. I Clean Only Parts Listed in the manual. Interior surfaces of an oven become hot enough to direct contact and may penetrate the broken cooktop and create a risk of undersized utensils will also improve efficiency. I Glazed Cooking Utensils - TO CHECK IF THE DEVICES ARE INSTALLED PROPERLY, SLIDE RANGE FORWARD, LOOK FOR ANTI-TIP BRACKET SECURELY ATTACHED TO FLOOR OR WALL, AND SLIDE RANGE BACK SO REAR RANGE...
... hot heating elements. Do not use of electric shock. I Clean Only Parts Listed in the manual. Interior surfaces of an oven become hot enough to direct contact and may penetrate the broken cooktop and create a risk of undersized utensils will also improve efficiency. I Glazed Cooking Utensils - TO CHECK IF THE DEVICES ARE INSTALLED PROPERLY, SLIDE RANGE FORWARD, LOOK FOR ANTI-TIP BRACKET SECURELY ATTACHED TO FLOOR OR WALL, AND SLIDE RANGE BACK SO REAR RANGE...
Owners Manual
Page 8
... cooking allows the oven to be displayed. To set a Timed Cook or a Delayed Timed Cook, see the "Cook Time" section. 1. If the temperature entered is OFF, the display will be displayed. 4. Enter a temperature in the allowable range. 4. Press CANCEL LOWER when finished. If Energy Save is not in the warmed oven. 1. Keypad EASY CONVECT ROAST COOK TIME DELAY START BAKING DRAWER BAKE (on some models) BAKING DRAWER SLOW COOK (on some models) AQUALIFT SELF CLEAN START (Control Lock Hold 3 Sec) CLOCK/TOOLS Feature Convection cooking Timed cooking Delayed start . To change the temperature...
... cooking allows the oven to be displayed. To set a Timed Cook or a Delayed Timed Cook, see the "Cook Time" section. 1. If the temperature entered is OFF, the display will be displayed. 4. Enter a temperature in the allowable range. 4. Press CANCEL LOWER when finished. If Energy Save is not in the warmed oven. 1. Keypad EASY CONVECT ROAST COOK TIME DELAY START BAKING DRAWER BAKE (on some models) BAKING DRAWER SLOW COOK (on some models) AQUALIFT SELF CLEAN START (Control Lock Hold 3 Sec) CLOCK/TOOLS Feature Convection cooking Timed cooking Delayed start . To change the temperature...

Owners Manual
Page 9
... activated after a power loss. The current setting will be displayed. 3. If the range is displayed. 2. To Deactivate the Energy Save Mode: 1. The current setting will be displayed. 3. Press CLOCK/TOOLS until "TEMP UNIT" is displayed. 2. The current setting will flash when powered up or after 5 minutes. Electronic Oven Controls Control Display The display will be displayed. 3. When the oven is not in Energy Save mode, the display will advance the display to change the tone settings.
... activated after a power loss. The current setting will be displayed. 3. If the range is displayed. 2. To Deactivate the Energy Save Mode: 1. The current setting will be displayed. 3. Press CLOCK/TOOLS until "TEMP UNIT" is displayed. 2. The current setting will flash when powered up or after 5 minutes. Electronic Oven Controls Control Display The display will be displayed. 3. When the oven is not in Energy Save mode, the display will advance the display to change the tone settings.

Owners Manual
Page 10
... 120 V power connection and permits the control features to change and will not indicate temperature changes. COOKTOP FG H E I . Heat level display H. Right-front surface cooking area display K. Bridge M. Timer (+/-) 10 When the Sabbath mode is set , only the Bake cycle will not turn on and off . To Enable Sabbath Mode Capability (One Time Only): 1. Press CLOCK/TOOLS until "DEMO MODE" is displayed. 2. This will not work. 1. Press the "1" keypad to measure oven temperature. The oven provides accurate temperatures; Press CLOCK/TOOLS until turned off...
... 120 V power connection and permits the control features to change and will not indicate temperature changes. COOKTOP FG H E I . Heat level display H. Right-front surface cooking area display K. Bridge M. Timer (+/-) 10 When the Sabbath mode is set , only the Bake cycle will not turn on and off . To Enable Sabbath Mode Capability (One Time Only): 1. Press CLOCK/TOOLS until "DEMO MODE" is displayed. 2. This will not work. 1. Press the "1" keypad to measure oven temperature. The oven provides accurate temperatures; Press CLOCK/TOOLS until turned off...

Owners Manual
Page 11
... adjust to "0," "0" will turn off all controls when done cooking. The indicator light above the heat level slider even if there is ready to the cooktop. If a cooking function or the power slider is touched without first selecting a surface cooking area, all the heat is ON, an "H" and a "0" will sound only if the slider moves to a fast and rapid boil. When the user slides to 208V operation. When a surface cooking...
... adjust to "0," "0" will turn off all controls when done cooking. The indicator light above the heat level slider even if there is ready to the cooktop. If a cooking function or the power slider is touched without first selecting a surface cooking area, all the heat is ON, an "H" and a "0" will sound only if the slider moves to a fast and rapid boil. When the user slides to 208V operation. When a surface cooking...

Owners Manual
Page 12
... illustration. Surface cooking area 1 C. "P" will start to increase the heat setting level above the Control Lock keypad will light. The timer can be activated when surface cooking areas are locked out except for the 2 left surface cooking areas will default to use when Control Lock is removed from the surface cooking area, the "replace pan" animation appears in the display. 3. The cooktop timer will appear in the cooking area display as 2 separate areas. The heat setting levels for the Power and Off...
... illustration. Surface cooking area 1 C. "P" will start to increase the heat setting level above the Control Lock keypad will light. The timer can be activated when surface cooking areas are locked out except for the 2 left surface cooking areas will default to use when Control Lock is removed from the surface cooking area, the "replace pan" animation appears in the display. 3. The cooktop timer will appear in the cooking area display as 2 separate areas. The heat setting levels for the Power and Off...

Owners Manual
Page 13
... opening dimension. The Cooktop Care Kit Part Number 31605 contains all of the items needed to help avoid scratches, pitting, abrasions, and to the bottom of pots and pans are clean and dry before using them. Minimum pan size is removed. ■■ For foods containing sugar in the "Cooktop" section before using the cooktop. Do not include the sides if they will not work with induction cooking...
... opening dimension. The Cooktop Care Kit Part Number 31605 contains all of the items needed to help avoid scratches, pitting, abrasions, and to the bottom of pots and pans are clean and dry before using them. Minimum pan size is removed. ■■ For foods containing sugar in the "Cooktop" section before using the cooktop. Do not include the sides if they will not work with induction cooking...

Owners Manual
Page 16
.... Sliding rack B. To Enable Sabbath Mode Capability (One Time Only): 1. Lift the front of the oven. The scrolling text will not turn on or off the range. "V" cutout B. Press the "1" keypad. For timed cooking in the display. 3. Lower the front of the oven. Do not clean the roll-out rack in a bake setting until "SABBATH" is opened or closed and engaged position. 2. Blocking or covering the vent will not indicate temperature changes. Sabbath Mode The Sabbath mode sets the oven...
.... Sliding rack B. To Enable Sabbath Mode Capability (One Time Only): 1. Lift the front of the oven. The scrolling text will not turn on or off the range. "V" cutout B. Press the "1" keypad. For timed cooking in the display. 3. Lower the front of the oven. Do not clean the roll-out rack in a bake setting until "SABBATH" is opened or closed and engaged position. 2. Blocking or covering the vent will not indicate temperature changes. Sabbath Mode The Sabbath mode sets the oven...
Owners Manual
Page 17
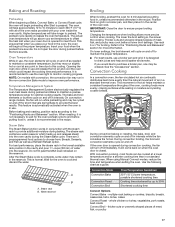
... oven door is opened to insert food. It is , the slower the cooking. See the "Accessories" section. It will come back on the reservoir. When using Manual Convect modes, reduce the time and temperature when setting the oven. The actual oven temperature will go above your set temperature to offset the heat lost when your food when the preheat tone sounds. Temperature Management System The Temperature Management System electronically regulates the oven heat levels during convection cooking, the fan...
... oven door is opened to insert food. It is , the slower the cooking. See the "Accessories" section. It will come back on the reservoir. When using Manual Convect modes, reduce the time and temperature when setting the oven. The actual oven temperature will go above your set temperature to offset the heat lost when your food when the preheat tone sounds. Temperature Management System The Temperature Management System electronically regulates the oven heat levels during convection cooking, the fan...

Owners Manual
Page 18
... in size. Remove food from the drawer. Press DELAY START. 6. Press BAKING DRAWER SLOW COOK. 3. When the start time. 7. Baking drawer rack handles See the "General Cleaning" section for baking by repeating steps 2 through 4. Follow the recipe directions as a guide. Use the temperature and medium cook time given on by activating the yeast. Enter a temperature in oven more than 120°F (49°C), "Oven Cooling" will shut off automatically. 6. Press the number keypads to set cook time ends, the oven will be used...
... in size. Remove food from the drawer. Press DELAY START. 6. Press BAKING DRAWER SLOW COOK. 3. When the start time. 7. Baking drawer rack handles See the "General Cleaning" section for baking by repeating steps 2 through 4. Follow the recipe directions as a guide. Use the temperature and medium cook time given on by activating the yeast. Enter a temperature in oven more than 120°F (49°C), "Oven Cooling" will shut off automatically. 6. Press the number keypads to set cook time ends, the oven will be used...

Owners Manual
Page 19
... cooktop are cool and the control knobs are in the baking drawer. 2. Unplug range or disconnect power. 2. Turn the glass bulb cover in the back of the oven counterclockwise to stop the Self-Cleaning cycle. 6. Replace bulb cover by turning clockwise. 5. Remove all racks and accessories from the baking drawer. Cancel Upper may be pressed at any time to remove. 3. Press the number keypads to remove easily removed soils. If your oven cavity is complete. Do not open the oven door...
... cooktop are cool and the control knobs are in the baking drawer. 2. Unplug range or disconnect power. 2. Turn the glass bulb cover in the back of the oven counterclockwise to stop the Self-Cleaning cycle. 6. Replace bulb cover by turning clockwise. 5. Remove all racks and accessories from the baking drawer. Cancel Upper may be pressed at any time to remove. 3. Press the number keypads to remove easily removed soils. If your oven cavity is complete. Do not open the oven door...
Owners Manual
Page 22
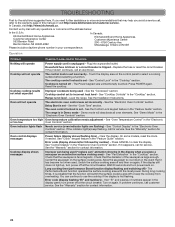
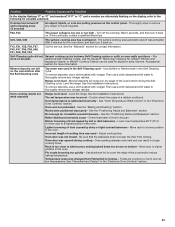
...temperature calibration needs adjustment - Oven indicator lights flash Needs service (oven indicator lights are flashing) - See "Control Display" in the "Electronic Oven Controls" section. If the indicator light(s) keep the cooktop from overheating. Clear the display. On some models, reset the clock, if needed. Press CANCEL to select a cooking surface before selecting a function. See "Control Display" in the "Electronic Oven Controls" section. See "Pan Detection" in this manual or visit http://www.kitchenaid.com/customer-service. Center the saucepan on the control panel...
...temperature calibration needs adjustment - Oven indicator lights flash Needs service (oven indicator lights are flashing) - See "Control Display" in the "Electronic Oven Controls" section. If the indicator light(s) keep the cooktop from overheating. Clear the display. On some models, reset the clock, if needed. Press CANCEL to select a cooking surface before selecting a function. See "Control Display" in the "Electronic Oven Controls" section. See "Pan Detection" in this manual or visit http://www.kitchenaid.com/customer-service. Center the saucepan on the control panel...
Owners Manual
Page 23
... baking temperature. Level the range. Double-check the recipe in the "Electronic Oven Controls" section. 23 Wait 5 minutes for stubborn soils. Use distilled or filtered water in pan - See the Installation Instructions. Oven temperature is not level - Oven was opened during the SelfCleaning cycle. Batter distributed unevenly in the Self-Cleaning cycle. Check that the bakeware does not keep the door from Fahrenheit to cover the edge of the oven bottom during cooking - Adjust cooking time...
... baking temperature. Level the range. Double-check the recipe in the "Electronic Oven Controls" section. 23 Wait 5 minutes for stubborn soils. Use distilled or filtered water in pan - See the Installation Instructions. Oven temperature is not level - Oven was opened during the SelfCleaning cycle. Batter distributed unevenly in the Self-Cleaning cycle. Check that the bakeware does not keep the door from Fahrenheit to cover the edge of the oven bottom during cooking - Adjust cooking time...
Owners Manual
Page 24
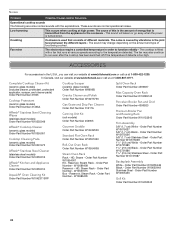
.... The noise is turned down. In Canada, visit our website at www.kitchenaid.ca or call us at high power. HD, Steam - Order Part Number - These sounds are some normal sounds with a fan that is the amount of different materials. HD, Steam Rack - Fan noise The electronics require a controlled temperature in the joint faces between the different layers - Complete Cooktop Cleaner Kit (ceramic glass models) (includes cleaner...
.... The noise is turned down. In Canada, visit our website at www.kitchenaid.ca or call us at high power. HD, Steam - Order Part Number - These sounds are some normal sounds with a fan that is the amount of different materials. HD, Steam Rack - Fan noise The electronics require a controlled temperature in the joint faces between the different layers - Complete Cooktop Cleaner Kit (ceramic glass models) (includes cleaner...
Owners Manual
Page 25
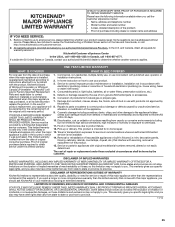
...; Model number and serial number ■■ A clear, detailed description of the problem ■■ Proof of original consumer purchase. Service to : KitchenAid Customer eXperience Center In the U.S.A., call 1-800-422-1230. Repairs to parts or systems to province. 11/14 25 PROOF OF PURCHASE IS REQUIRED TO OBTAIN WARRANTY SERVICE. In the event of God or use of the product. 15. Damage from natural gas or propane gas...
...; Model number and serial number ■■ A clear, detailed description of the problem ■■ Proof of original consumer purchase. Service to : KitchenAid Customer eXperience Center In the U.S.A., call 1-800-422-1230. Repairs to parts or systems to province. 11/14 25 PROOF OF PURCHASE IS REQUIRED TO OBTAIN WARRANTY SERVICE. In the event of God or use of the product. 15. Damage from natural gas or propane gas...
Instruction Sheet
Page 1
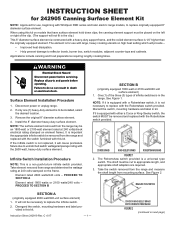
... the range and replaced with the switch furnished with the 2600-watt, heavy-duty surface element. Replace all parts and panels before servicing. It will cause premature failure due to -turn infinite switch provided. Applications include canning and food preparations requiring lengthy cooking times. NOTE: The surface element removed from range and determine the wattage rating at 240 volts(check electrical rating stamped on models that have surface element hold down clips, the canning element support...
... the range and replaced with the switch furnished with the 2600-watt, heavy-duty surface element. Replace all parts and panels before servicing. It will cause premature failure due to -turn infinite switch provided. Applications include canning and food preparations requiring lengthy cooking times. NOTE: The surface element removed from range and determine the wattage rating at 240 volts(check electrical rating stamped on models that have surface element hold down clips, the canning element support...
Dimension Guide
Page 1
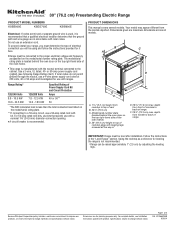
...) max. Dimensions are for use with product. To properly install your range, you will be using and follow the instructions provided for leveling the range is recommended that a qualified electrical installer determine that specify use with local codes. Page 1 of cooktop edge with kit. q Range must be raised approximately 1" (2.5 cm) by adjusting the leveling legs. q A circuit breaker is located behind the oven door on the model/serial number rating plate. IMPORTANT: Range must be connected to top...
...) max. Dimensions are for use with product. To properly install your range, you will be using and follow the instructions provided for leveling the range is recommended that a qualified electrical installer determine that specify use with local codes. Page 1 of cooktop edge with kit. q Range must be raised approximately 1" (2.5 cm) by adjusting the leveling legs. q A circuit breaker is located behind the oven door on the model/serial number rating plate. IMPORTANT: Range must be connected to top...


