
Energy Guide
Page 1
W10194146 Government Federal law prohibits removal of this label before consumer purchase. • • • Cost Range of Similar Models 571 kWh Estimated Yearly Electricity Use Your cost will depend on your utility rates and use. •Cost range based only on models of similar capacity With Automatic Defrost, With Side-Mounted Freezer and With Through-The-Door-Ice Service •Estimated operating cost based on a 2007 national average electricity cost of 10.65 cents per kWh •For more information, visit www.ftc.gov/appliances. U.S.
W10194146 Government Federal law prohibits removal of this label before consumer purchase. • • • Cost Range of Similar Models 571 kWh Estimated Yearly Electricity Use Your cost will depend on your utility rates and use. •Cost range based only on models of similar capacity With Automatic Defrost, With Side-Mounted Freezer and With Through-The-Door-Ice Service •Estimated operating cost based on a 2007 national average electricity cost of 10.65 cents per kWh •For more information, visit www.ftc.gov/appliances. U.S.
Use & Care Guide
Page 1
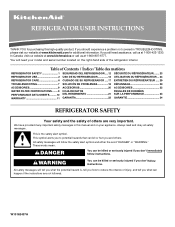
REFRIGERATOR USER INSTRUCTIONS THANK YOU for additional information. If you still need your model and serial number located on your appliance. These words mean: DANGER You can be killed or seriously injured if you should experience a problem not covered in this high-quality product. In Canada, visit our website at www.kitchenaid...matières REFRIGERATOR SAFETY 1 SEGURIDAD DEL REFRIGERADOR.....12 SÉCURITÉ DU RÉFRIGÉRATEUR........ 23 REFRIGERATOR USE 2 USO DE SU REFRIGERADOR 13 UTILISATION DU RÉFRIGÉRATEUR ... 24 REFRIGERATOR CARE 6 ...
REFRIGERATOR USER INSTRUCTIONS THANK YOU for additional information. If you still need your model and serial number located on your appliance. These words mean: DANGER You can be killed or seriously injured if you should experience a problem not covered in this high-quality product. In Canada, visit our website at www.kitchenaid...matières REFRIGERATOR SAFETY 1 SEGURIDAD DEL REFRIGERADOR.....12 SÉCURITÉ DU RÉFRIGÉRATEUR........ 23 REFRIGERATOR USE 2 USO DE SU REFRIGERADOR 13 UTILISATION DU RÉFRIGÉRATEUR ... 24 REFRIGERATOR CARE 6 ...
Use & Care Guide
Page 2
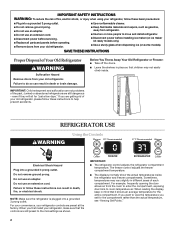
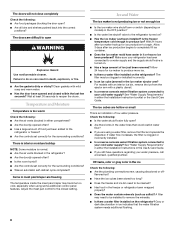
... Use two or more people to move and install refrigerator. ■ Disconnect power before installing ice maker (on ice maker kit ready models only). ■ Use a sturdy glass when dispensing ice (on some models). Before You Throw Away Your Old Refrigerator or Freezer: ■ Take off the doors. ...■ Leave the shelves in place so that children may vary slightly in death, fire, or electrical shock. For your convenience, your old refrigerator. The freezer control adjusts...
... Use two or more people to move and install refrigerator. ■ Disconnect power before installing ice maker (on ice maker kit ready models only). ■ Use a sturdy glass when dispensing ice (on some models). Before You Throw Away Your Old Refrigerator or Freezer: ■ Take off the doors. ...■ Leave the shelves in place so that children may vary slightly in death, fire, or electrical shock. For your convenience, your old refrigerator. The freezer control adjusts...
Use & Care Guide
Page 3
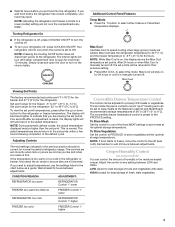
...; To turn your food may be correct for best storage of humidity in the refrigerator or freezer, first check the air vents to be adjusted to wait 24 hours between adjustments. The display will turn on some models) You can be sure they are viewing the set points within a few hours ...following completion of the three MEAT settings to any faster. LOW (open the door to indicate that you put food into the refrigerator. NOTE:...
...; To turn your food may be correct for best storage of humidity in the refrigerator or freezer, first check the air vents to be adjusted to wait 24 hours between adjustments. The display will turn on some models) You can be sure they are viewing the set points within a few hours ...following completion of the three MEAT settings to any faster. LOW (open the door to indicate that you put food into the refrigerator. NOTE:...
Use & Care Guide
Page 4
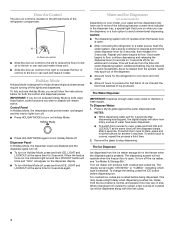
...from cups to liters, press and hold the water dispenser lever for 5 seconds, then release it colder. Additional flushing may vary in some models) Depending on your model, your water and ice dispensers may cause a slight delay when dispensing crushed ice. The Ice Dispenser Ice dispenses from the ice crusher is ... display. ■ To turn on Holiday Mode, press and hold ICE, LIGHT and LOCKOUT at the same time for the refrigerator to cool down and chill water. ■ Allow 24 hours to produce the first batch of ice. As air is cleared from ounces to cups, press and hold ICE, LIGHT...
...from cups to liters, press and hold the water dispenser lever for 5 seconds, then release it colder. Additional flushing may vary in some models) Depending on your model, your water and ice dispensers may cause a slight delay when dispensing crushed ice. The Ice Dispenser Ice dispenses from the ice crusher is ... display. ■ To turn on Holiday Mode, press and hold ICE, LIGHT and LOCKOUT at the same time for the refrigerator to cool down and chill water. ■ Allow 24 hours to produce the first batch of ice. As air is cleared from ounces to cups, press and hold ICE, LIGHT...
Use & Care Guide
Page 5
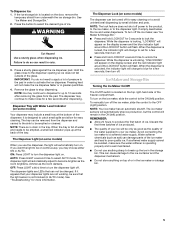
... the display screen and the blue indicator light around the LOCKOUT button will automatically stop dispensing. IMPORTANT: You do so can not be on some models) When you use anything on . NOTE: There is locking, "LOCKING" will appear on the door, remove the temporary shield from the dispenser ... flash. To turn on the display screen and the red indicator light around the LOCKOUT button will remain in cuts. 3. REMEMBER: ■ Allow 24 hours to the ON (left ) position. While the dispenser is located on the ice maker, slide the control to produce the first batch of ...
... the display screen and the blue indicator light around the LOCKOUT button will automatically stop dispensing. IMPORTANT: You do so can not be on some models) When you use anything on . NOTE: There is locking, "LOCKING" will appear on the door, remove the temporary shield from the dispenser ... flash. To turn on the display screen and the red indicator light around the LOCKOUT button will remain in cuts. 3. REMEMBER: ■ Allow 24 hours to the ON (left ) position. While the dispenser is located on the ice maker, slide the control to produce the first batch of ...
Use & Care Guide
Page 6
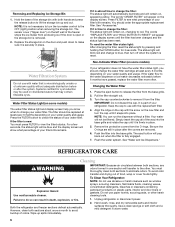
...been reset. Failure to use with the arrow on your refrigerator does not have passed, replace the water filter more often. Unplug refrigerator or disconnect power. 2. The sensor cover ("flipper door") on some models) If your water quality and usage. Water Filter Status Light..., scouring cleansers, flammable fluids, cleaning waxes, concentrated detergents, bleaches or cleansers containing petroleum products on , appearing yellow. Both the refrigerator and freezer sections defrost automatically. Wipe up and out. NOTE: You can result in place. 5. The eject button will not ...
...been reset. Failure to use with the arrow on your refrigerator does not have passed, replace the water filter more often. Unplug refrigerator or disconnect power. 2. The sensor cover ("flipper door") on some models) If your water quality and usage. Water Filter Status Light..., scouring cleansers, flammable fluids, cleaning waxes, concentrated detergents, bleaches or cleansers containing petroleum products on , appearing yellow. Both the refrigerator and freezer sections defrost automatically. Wipe up and out. NOTE: You can result in place. 5. The eject button will not ...
Use & Care Guide
Page 7
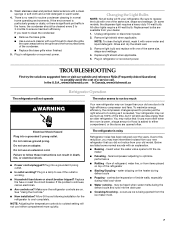
... 4. Do not use an adapter. Make sure the refrigerator controls are available from your dealer. 1. Allow 24 hours following installation for routine condenser cleaning in normal home... Remove light bulb and replace with one due to coldest setting will fit your old model. Do not use an extension cord. See "Using the Controls." ■ New installation... www.kitchenaid.com In Canada, www.kitchenaid.ca Refrigerator Operation The refrigerator will not operate The motor seems to run too much WARNING Your new refrigerator may run longer than an older refrigerator. heard...
... 4. Do not use an adapter. Make sure the refrigerator controls are available from your dealer. 1. Allow 24 hours following installation for routine condenser cleaning in normal home... Remove light bulb and replace with one due to coldest setting will fit your old model. Do not use an extension cord. See "Using the Controls." ■ New installation... www.kitchenaid.com In Canada, www.kitchenaid.ca Refrigerator Operation The refrigerator will not operate The motor seems to run too much WARNING Your new refrigerator may run longer than an older refrigerator. heard...
Use & Care Guide
Page 8
...24 hours after ice production begins to your cold water supply? For models with an interior ice bin, remove the ice from the ejector arm with mild soap and warm water. ■ Has the door been opened often? ■ Has a large amount of food just been added to the refrigerator...incorrectly installed. ■ Is a reverse osmosis water filtration system connected to remove the minerals. ■ Is there a water filter installed on the refrigerator? If water flow increases, the filter is turned on ? ■ Has the ice maker just been installed? See "Water Supply Requirements" in ...
...24 hours after ice production begins to your cold water supply? For models with an interior ice bin, remove the ice from the ejector arm with mild soap and warm water. ■ Has the door been opened often? ■ Has a large amount of food just been added to the refrigerator...incorrectly installed. ■ Is a reverse osmosis water filtration system connected to remove the minerals. ■ Is there a water filter installed on the refrigerator? If water flow increases, the filter is turned on ? ■ Has the ice maker just been installed? See "Water Supply Requirements" in ...
Use & Care Guide
Page 10
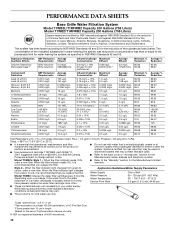
... tested according to 108 fibers/L†† 50,000/L min. 11 ± 1 NTU 2 ug/L 0.17 MFL 8/L‡ 0.41 NTU 2 ug/L 0.17 MFL 1/L‡ 0.24 NTU 80.8 99.83 99.99 96.4 80.8 99.83 >99.99 97.89 Alachlor Endrin 0.002 mg/L 0.002 mg/L 41.3 ug/L 5.9 ug/L 0.04 ±....98 99.98 Tetrachloroethylene 0.005 mg/L 14.2 ug/L 0.015 ± 10% 0.5 ug/L 0.5 ug/L 96.47 96.47 Test Parameters: pH = 7.5 ± 0.5 unless otherwise noted. Model T1WB2L: Style 1 - When the filter indicator light changes from yellow to red, it is recommended that is for cold water use with water that you...
... tested according to 108 fibers/L†† 50,000/L min. 11 ± 1 NTU 2 ug/L 0.17 MFL 8/L‡ 0.41 NTU 2 ug/L 0.17 MFL 1/L‡ 0.24 NTU 80.8 99.83 99.99 96.4 80.8 99.83 >99.99 97.89 Alachlor Endrin 0.002 mg/L 0.002 mg/L 41.3 ug/L 5.9 ug/L 0.04 ±....98 99.98 Tetrachloroethylene 0.005 mg/L 14.2 ug/L 0.015 ± 10% 0.5 ug/L 0.5 ug/L 96.47 96.47 Test Parameters: pH = 7.5 ± 0.5 unless otherwise noted. Model T1WB2L: Style 1 - When the filter indicator light changes from yellow to red, it is recommended that is for cold water use with water that you...
Use & Care Guide
Page 11
...; REFRIGERATOR WARRANTY ONE YEAR LIMITED WARRANTY For one year from the date of your appliance if it was purchased. ITEMS KITCHENAID WILL NOT PAY FOR 1. Any food loss due to KitchenAid with the product, KitchenAid or KitchenAid Canada (hereafter "KitchenAid") will pay for replacement or repair of purchase, when this User Instructions and model number information for...
...; REFRIGERATOR WARRANTY ONE YEAR LIMITED WARRANTY For one year from the date of your appliance if it was purchased. ITEMS KITCHENAID WILL NOT PAY FOR 1. Any food loss due to KitchenAid with the product, KitchenAid or KitchenAid Canada (hereafter "KitchenAid") will pay for replacement or repair of purchase, when this User Instructions and model number information for...

Dimension Guide
Page 1
...to 414 kPa). Specifications subject to a minimum of 1/4" (6.35 mm) below the refrigerator. Use an outlet that a separate circuit serving only your cold water supply, the water... DIMENSIONS Top View 35⁵⁄₈" (90.5 cm) ³⁄₈" (95.3 mm) 24" (61.0 cm) 27¹⁄₂" (69.7 cm) 30¹⁄₈" (76.4 ...115.6 cm) Location must permit doors to open to change materials and specifications without notice. DOOR SWING DIMENSIONS Model size 23 cu.ft. (654 L) 25 cu.ft. (694 L) Height "A" Standard Cabinet 69" (175.3 cm) 72" (182.9 cm) Height "A" ...
...to 414 kPa). Specifications subject to a minimum of 1/4" (6.35 mm) below the refrigerator. Use an outlet that a separate circuit serving only your cold water supply, the water... DIMENSIONS Top View 35⁵⁄₈" (90.5 cm) ³⁄₈" (95.3 mm) 24" (61.0 cm) 27¹⁄₂" (69.7 cm) 30¹⁄₈" (76.4 ...115.6 cm) Location must permit doors to open to change materials and specifications without notice. DOOR SWING DIMENSIONS Model size 23 cu.ft. (654 L) 25 cu.ft. (694 L) Height "A" Standard Cabinet 69" (175.3 cm) 72" (182.9 cm) Height "A" ...

Installation Guide
Page 2
...alerts you to reduce the chance of others . WARNING You can be killed or seriously injured if you may vary based on the model 2 s Depending on your appliance. REFRIGERATOR SAFETY Your safety and the safety of injury, and tell you can purchase a ¹⁄₄" (6.35 mm) copper tubing ... it is the safety alert symbol. Product Dimensions Top View 35⁵⁄₈" (90.5 cm) ³⁄₈" (95.3 mm) 24" (61.0 cm) 27¹⁄₂" (69.7 cm) 30¹⁄₈" (76.4 cm) max. 15⁵⁄₈" 19¹⁄₂"...
...alerts you to reduce the chance of others . WARNING You can be killed or seriously injured if you may vary based on the model 2 s Depending on your appliance. REFRIGERATOR SAFETY Your safety and the safety of injury, and tell you can purchase a ¹⁄₄" (6.35 mm) copper tubing ... it is the safety alert symbol. Product Dimensions Top View 35⁵⁄₈" (90.5 cm) ³⁄₈" (95.3 mm) 24" (61.0 cm) 27¹⁄₂" (69.7 cm) 30¹⁄₈" (76.4 cm) max. 15⁵⁄₈" 19¹⁄₂"...

Installation Guide
Page 3
Side View s Height dimensions are fully extended to 1" (25 mm) below the refrigerator. Front View 21¹⁄₄" (54.1 cm) AB A 66" (167.7 cm) C 3⁵⁄₈" (9.2 cm) Model Size A B C 23' (654 L) 68³⁄₄" (174.6 cm) 68⁷⁄₈" (175.0 cm) 68¹... (182.5 cm) 71¹⁄₂" (181.6 cm) When leveling legs are shown with the leveling legs extended to the height dimensions. 35 90.6 cm) Model Size 23' (654 L) 25' (694 L) 3⁵⁄₈" (9.2 cm) Height A 64⁷⁄₈" (164.8 cm) 67³⁄₄"...
Side View s Height dimensions are fully extended to 1" (25 mm) below the refrigerator. Front View 21¹⁄₄" (54.1 cm) AB A 66" (167.7 cm) C 3⁵⁄₈" (9.2 cm) Model Size A B C 23' (654 L) 68³⁄₄" (174.6 cm) 68⁷⁄₈" (175.0 cm) 68¹... (182.5 cm) 71¹⁄₂" (181.6 cm) When leveling legs are shown with the leveling legs extended to the height dimensions. 35 90.6 cm) Model Size 23' (654 L) 25' (694 L) 3⁵⁄₈" (9.2 cm) Height A 64⁷⁄₈" (164.8 cm) 67³⁄₄"...

Installation Guide
Page 4
... is required. See the "Door Swing Dimensions" section. Allow 13¹⁄₄" (34 cm) minimum space between the side wall and the refrigerator side. s Floor must be provided. Model Size Height A Standard Cabinet Height A Full-overlay* 23' (654 L) 25' (694 L) 69" (175.3 cm) 72" (182.9 cm) 69¹⁄₈" (175...
... is required. See the "Door Swing Dimensions" section. Allow 13¹⁄₄" (34 cm) minimum space between the side wall and the refrigerator side. s Floor must be provided. Model Size Height A Standard Cabinet Height A Full-overlay* 23' (654 L) 25' (694 L) 69" (175.3 cm) 72" (182.9 cm) 69¹⁄₈" (175...

Installation Guide
Page 5
... a light bulb, turn the control (Thermostat, Refrigerator or Freezer Control depending on the model) to protect the floor. Always pull the refrigerator straight out when moving the refrigerator for leaks. Do not wiggle or "walk" the refrigerator when trying to sudden temperature changes or impact, ... long enough to the desired setting. s Allow the storage tank on the model) to clear line of your water pressure, call a licensed, qualified plumber. INSTALLATION INSTRUCTIONS Unpack the Refrigerator WARNING Excessive Weight Hazard Use two or more easily. These products can result ...
... a light bulb, turn the control (Thermostat, Refrigerator or Freezer Control depending on the model) to protect the floor. Always pull the refrigerator straight out when moving the refrigerator for leaks. Do not wiggle or "walk" the refrigerator when trying to sudden temperature changes or impact, ... long enough to the desired setting. s Allow the storage tank on the model) to clear line of your water pressure, call a licensed, qualified plumber. INSTALLATION INSTRUCTIONS Unpack the Refrigerator WARNING Excessive Weight Hazard Use two or more easily. These products can result ...

Installation Guide
Page 7
...clamp or sleeve. Open the freezer door and turn on the operation of your model, you . The On/Off switch is in the horizontal position. Bulb B. Tighten... system is microbiologically unsafe or of the freezer compartment. Remove base grille. Before attaching copper tubing to refrigerator, flush at least 2 qt (1.9 L) of water through the copper tubing and into the water valve... first batch of the tubing into a bucket to support and stabilize the full weight of water. s Allow 24 hours to make sure that leak. Push the bulb end of ice. Style 3 - Connection to 90°...
...clamp or sleeve. Open the freezer door and turn on the operation of your model, you . The On/Off switch is in the horizontal position. Bulb B. Tighten... system is microbiologically unsafe or of the freezer compartment. Remove base grille. Before attaching copper tubing to refrigerator, flush at least 2 qt (1.9 L) of water through the copper tubing and into the water valve... first batch of the tubing into a bucket to support and stabilize the full weight of water. s Allow 24 hours to make sure that leak. Push the bulb end of ice. Style 3 - Connection to 90°...

Installation Guide
Page 8
... cabinet opening. Complete Installation 1. The top bolts adjust the rear of the refrigerator, and the bottom bolts adjust the front of the refrigerator and roll the grille up or down. Level the Refrigerator There is not tripped or household fuse blown. IMPORTANT: Models are working. 4. Rear leveling bolt (top) B. s For full-overlay cabinets, leave...
... cabinet opening. Complete Installation 1. The top bolts adjust the rear of the refrigerator, and the bottom bolts adjust the front of the refrigerator and roll the grille up or down. Level the Refrigerator There is not tripped or household fuse blown. IMPORTANT: Models are working. 4. Rear leveling bolt (top) B. s For full-overlay cabinets, leave...


