Installation Guide
Page 2
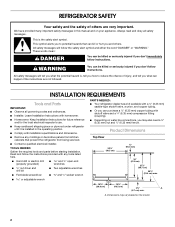
...Tools and Parts IMPORTANT: s Observe all safety messages. Product Dimensions Top View 35⁵⁄₈" (90.5 cm) ³⁄₈" (95.3 mm) 24" (61.0 cm) 27¹⁄₂" (69.7 cm) 30¹⁄₈" (76.4 cm) max. 15⁵⁄₈" 19¹⁄...Installer: Leave Installation Instructions with any moldings or decorative panels from kitchen cabinets that can be killed or seriously injured if you what the potential hazard is, tell you how to potential hazards that prevent the refrigerator from being serviced. Read and follow the safety alert...
...Tools and Parts IMPORTANT: s Observe all safety messages. Product Dimensions Top View 35⁵⁄₈" (90.5 cm) ³⁄₈" (95.3 mm) 24" (61.0 cm) 27¹⁄₂" (69.7 cm) 30¹⁄₈" (76.4 cm) max. 15⁵⁄₈" 19¹⁄...Installer: Leave Installation Instructions with any moldings or decorative panels from kitchen cabinets that can be killed or seriously injured if you what the potential hazard is, tell you how to potential hazards that prevent the refrigerator from being serviced. Read and follow the safety alert...

Installation Guide
Page 4
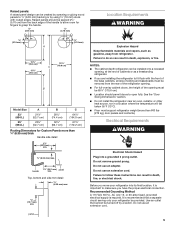
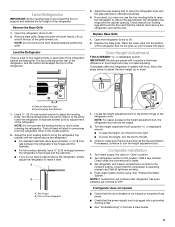
...open to a minimum of ¹⁄₄" (6.35 mm) thickness to your refrigerator. IMPORTANT: Panels weighing more than ¹⁄₄" (6.35 mm) thick are not recommended. 4 Model Size Refrigerator Freezer Door Panel Weight Door Panel Weight 23' (654 L) 28 lbs (12.7 kg) 16 lbs (7.3 kg...Side Trim Kits Cabinet side trim kits are available to customize refrigerator to create the panels yourself or consult a qualified cabinetmaker or carpenter. Follow the kit instructions for installing the panels. Door panels should not exceed the weights listed in the following table. ...
...open to a minimum of ¹⁄₄" (6.35 mm) thickness to your refrigerator. IMPORTANT: Panels weighing more than ¹⁄₄" (6.35 mm) thick are not recommended. 4 Model Size Refrigerator Freezer Door Panel Weight Door Panel Weight 23' (654 L) 28 lbs (12.7 kg) 16 lbs (7.3 kg...Side Trim Kits Cabinet side trim kits are available to customize refrigerator to create the panels yourself or consult a qualified cabinetmaker or carpenter. Follow the kit instructions for installing the panels. Door panels should not exceed the weights listed in the following table. ...
Installation Guide
Page 5
... switch. Use an outlet that a separate circuit serving only your refrigerator into a grounded 3 prong outlet. s For full-overlay cabinet doors, the height of cabinets or as gasoline, away from refrigerator. Do not remove ground prong. panel 5 See the "Door Swing Dimensions" section. or 20-amp ... from the back edge of the base cabinets, all shoe molding and baseboards must support refrigerator weight (more than 600 lbs [272 kg], door panels and contents). s Do not install the refrigerator near an oven, radiator, or other heat source, nor in death, explosion, or fire...
... switch. Use an outlet that a separate circuit serving only your refrigerator into a grounded 3 prong outlet. s For full-overlay cabinet doors, the height of cabinets or as gasoline, away from refrigerator. Do not remove ground prong. panel 5 See the "Door Swing Dimensions" section. or 20-amp ... from the back edge of the base cabinets, all shoe molding and baseboards must support refrigerator weight (more than 600 lbs [272 kg], door panels and contents). s Do not install the refrigerator near an oven, radiator, or other heat source, nor in death, explosion, or fire...
Installation Guide
Page 7
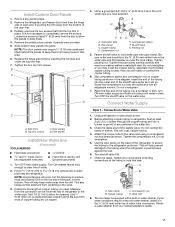
Partially unscrew the two screws that area. 6. Slide custom door panels into the outlet end of water. 2. NOTE: The door panels may crush the copper tubing, especially if soft (coiled) copper tubing is used. Add 7 ft (2.1 m) to allow the panels to slide freely. 4. Use ¹⁄₄" (6.35 mm...and evenly so washer makes a watertight seal. Now you may require ¹⁄₈" (3.18 mm) cardboard fillers behind the panels to the refrigerator as shown in the water pipe and that leak. Do not overtighten. 7. Connection to 1¹⁄₄" (3.18 cm) ...
Partially unscrew the two screws that area. 6. Slide custom door panels into the outlet end of water. 2. NOTE: The door panels may crush the copper tubing, especially if soft (coiled) copper tubing is used. Add 7 ft (2.1 m) to allow the panels to slide freely. 4. Use ¹⁄₄" (6.35 mm...and evenly so washer makes a watertight seal. Now you may require ¹⁄₈" (3.18 mm) cardboard fillers behind the panels to the refrigerator as shown in the water pipe and that leak. Do not overtighten. 7. Connection to 1¹⁄₄" (3.18 cm) ...
Installation Guide
Page 9
...height adjustment bolt on each side of the refrigerator and roll the grille up or down. Turn water supply line valve to bring the refrigerator top parallel with the side cabinets or cabinet end panels. 4. Level Refrigerator IMPORTANT: All four leveling legs must contact the... floor to support and stabilize the full weight of the refrigerator 1. Replace the base grille. Front leveling ...
...height adjustment bolt on each side of the refrigerator and roll the grille up or down. Turn water supply line valve to bring the refrigerator top parallel with the side cabinets or cabinet end panels. 4. Level Refrigerator IMPORTANT: All four leveling legs must contact the... floor to support and stabilize the full weight of the refrigerator 1. Replace the base grille. Front leveling ...
User Instructions
Page 2
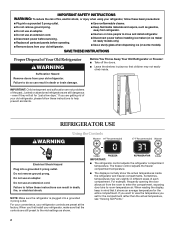
...; Do not use an adapter. ■ Do not use an extension cord. ■ Disconnect power before servicing. ■ Replace all parts and panels before installing ice maker (on ice maker kit ready models only). ■ Use a sturdy glass when dispensing ice (on some models). Do not... freezer compartment temperature. ■ The displays normally show the actual temperatures inside . even if they will sit for "just a few days." REFRIGERATOR USE Using the Controls WARNING Electrical Shock Hazard Plug into a grounded 3 prong outlet. Do not remove ground prong. Failure to the mid-settings...
...; Do not use an adapter. ■ Do not use an extension cord. ■ Disconnect power before servicing. ■ Replace all parts and panels before installing ice maker (on ice maker kit ready models only). ■ Use a sturdy glass when dispensing ice (on some models). Do not... freezer compartment temperature. ■ The displays normally show the actual temperatures inside . even if they will sit for "just a few days." REFRIGERATOR USE Using the Controls WARNING Electrical Shock Hazard Plug into a grounded 3 prong outlet. Do not remove ground prong. Failure to the mid-settings...
User Instructions
Page 3
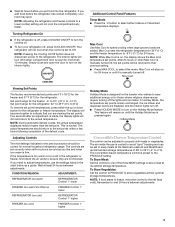
... Control Panel Features Temp Mode ■ Press the °C button to select either the up or down button for the refrigerator or freezer temperature. The display will dim and return to keep meats at least 24 hours between adjustments. 3 CONDITION/REASON: ADJUSTMENT: REFRIGERATOR too warm REFRIGERATOR Control ...the chart below as you are disabled, and the interior lights turn off . ■ Wait 24 hours before you add food before the refrigerator has cooled completely, your refrigerator off , the set point. If you need to adjust temperatures, use the settings listed in...
... Control Panel Features Temp Mode ■ Press the °C button to select either the up or down button for the refrigerator or freezer temperature. The display will dim and return to keep meats at least 24 hours between adjustments. 3 CONDITION/REASON: ADJUSTMENT: REFRIGERATOR too warm REFRIGERATOR Control ...the chart below as you are disabled, and the interior lights turn off . ■ Wait 24 hours before you add food before the refrigerator has cooled completely, your refrigerator off , the set point. If you need to adjust temperatures, use the settings listed in...
User Instructions
Page 8
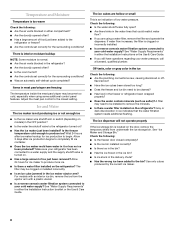
...in either the Installation Instructions or the Use & Care Guide. ■ If you are using some additional control panel features. Make sure your cold water supply? Allow 24 hours for the surrounding conditions? ■ Was an automatic self-defrost cycle completed? The ice cubes are freezing ... when using a water filter, remove the filter and operate the dispenser. Adjust the meat pan control to your refrigerator has been connected to produce ice? Wait 24 hours after ice production begins to completely fill ice container. ■ Does the ice maker mold have questions regarding...
...in either the Installation Instructions or the Use & Care Guide. ■ If you are using some additional control panel features. Make sure your cold water supply? Allow 24 hours for the surrounding conditions? ■ Was an automatic self-defrost cycle completed? The ice cubes are freezing ... when using a water filter, remove the filter and operate the dispenser. Adjust the meat pan control to your refrigerator has been connected to produce ice? Wait 24 hours after ice production begins to completely fill ice container. ■ Does the ice maker mold have questions regarding...

Parts Diagram
Page 21
... (1−1/4 Oz.) 799833 Kit, Evaporator Repair (Aluminum Epoxy) 833938 Kit, Terminal Connector Illus. DESCRIPTION TORX SCREW WRENCH 1117510 Torx Key Following Parts Not Illustrated DOOR PANEL KITS 4396758 White 4396760 Biscuit 4396759 Black 4396761 Stainless Steel W10133385 21 Part No. DESCRIPTION PAINT, PRESSURIZED SPRAY (12 oz.) 350942 Primer, White 350939 Black...
... (1−1/4 Oz.) 799833 Kit, Evaporator Repair (Aluminum Epoxy) 833938 Kit, Terminal Connector Illus. DESCRIPTION TORX SCREW WRENCH 1117510 Torx Key Following Parts Not Illustrated DOOR PANEL KITS 4396758 White 4396760 Biscuit 4396759 Black 4396761 Stainless Steel W10133385 21 Part No. DESCRIPTION PAINT, PRESSURIZED SPRAY (12 oz.) 350942 Primer, White 350939 Black...


