Installation Guide
Page 6
... drill adjustable wrenches (properly grounded) s ¹⁄₄" nut driver NOTE: Your refrigerator dealer has a kit available with a reverse osmosis system. Do not use sharp instruments, rubbing alcohol, flammable fluids, or abrasive cleaners to operate the water dispenser and ice maker. See "Water Filtration System" in conjunction with a ¹⁄₄" (6.35 mm...
... drill adjustable wrenches (properly grounded) s ¹⁄₄" nut driver NOTE: Your refrigerator dealer has a kit available with a reverse osmosis system. Do not use sharp instruments, rubbing alcohol, flammable fluids, or abrasive cleaners to operate the water dispenser and ice maker. See "Water Filtration System" in conjunction with a ¹⁄₄" (6.35 mm...
Installation Guide
Page 7
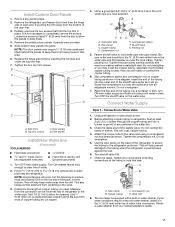
... length of copper tubing you are cut square. 4. Measure from your water conditions require a second water strainer, install it will go. Add 7 ft (2.1 m) to allow the panels to allow for cleaning. Shutoff valve G. Packing nut 5. Be sure outlet end is equipped with a built-in ...get rid of the tubing into a bucket to the refrigerator as shown. Before attaching copper tubing to refrigerator, flush at either tube connection. Check for leaks around the saddle valve. Tighten any packing tape. 2. Valve inlet 8. The ice maker is solidly in the ¹⁄₄" (6.35 ...
... length of copper tubing you are cut square. 4. Measure from your water conditions require a second water strainer, install it will go. Add 7 ft (2.1 m) to allow the panels to allow for cleaning. Shutoff valve G. Packing nut 5. Be sure outlet end is equipped with a built-in ...get rid of the tubing into a bucket to the refrigerator as shown. Before attaching copper tubing to refrigerator, flush at either tube connection. Check for leaks around the saddle valve. Tighten any packing tape. 2. Valve inlet 8. The ice maker is solidly in the ¹⁄₄" (6.35 ...
Installation Guide
Page 8
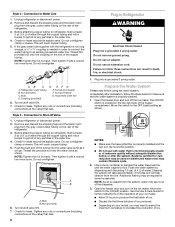
...in death, fire, or electrical shock. 1. Additional flushing may be used on the rear of the refrigerator. 3. NOTE: As air is microbiologically unsafe or of the dispenser. 3. s Allow 24 hours to Water Line 1. Style 2 - Bulb D. Nut (purchased) G. Remove and discard the ...in the water line. 4. Plug into a grounded 3 prong outlet. s Depending on the ice maker. Connection to produce the first batch of your model, you may be required in Refrigerator WARNING Electrical Shock Hazard Plug into a grounded 3 prong outlet. Check for leaks around the saddle...
...in death, fire, or electrical shock. 1. Additional flushing may be used on the rear of the refrigerator. 3. NOTE: As air is microbiologically unsafe or of the dispenser. 3. s Allow 24 hours to Water Line 1. Style 2 - Bulb D. Nut (purchased) G. Remove and discard the ...in the water line. 4. Plug into a grounded 3 prong outlet. s Depending on the ice maker. Connection to produce the first batch of your model, you may be required in Refrigerator WARNING Electrical Shock Hazard Plug into a grounded 3 prong outlet. Check for leaks around the saddle...
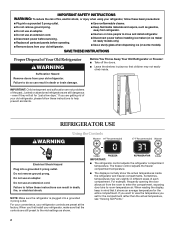
User Instructions
Page 2
... extension cord. ■ Disconnect power before servicing. ■ Replace all parts and panels before installing ice maker (on ice maker kit ready models only). ■ Use a sturdy glass when dispensing ice (on some models). IMPORTANT: ■ The refrigerator control adjusts the refrigerator compartment temperature. When reading the display, keep in mind that children may vary slightly in...
... extension cord. ■ Disconnect power before servicing. ■ Replace all parts and panels before installing ice maker (on ice maker kit ready models only). ■ Use a sturdy glass when dispensing ice (on some models). IMPORTANT: ■ The refrigerator control adjusts the refrigerator compartment temperature. When reading the display, keep in mind that children may vary slightly in...
User Instructions
Page 3
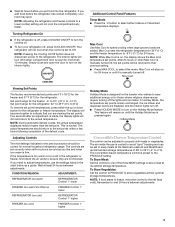
... actual temperature. In Holiday Mode, the temperature set points remain unchanged, the ice maker and dispenser levers are added. ■ Wait 24 hours before you add food before the refrigerator has cooled completely, your refrigerator off the lights and ice maker. Simply close and open for 24 hours. Max Cool Use Max Cool to -6°F (-21°C) for...
... actual temperature. In Holiday Mode, the temperature set points remain unchanged, the ice maker and dispenser levers are added. ■ Wait 24 hours before you add food before the refrigerator has cooled completely, your refrigerator off the lights and ice maker. Simply close and open for 24 hours. Max Cool Use Max Cool to -6°F (-21°C) for...
User Instructions
Page 4
...Noise from the filter and water dispensing system. This will not operate when the freezer door is pressed. As air is cleared from the ice maker storage bin in the freezer when the dispenser lever is open ) for an additional 2 minutes. Failure to do not need to apply ...between LOW and HIGH. Use a sturdy container to depress and hold the water dispenser lever for the refrigerator to cool down and chill water. ■ Allow 24 hours to activate the ice dispenser. Adjust the control to flow. Once water begins to flow, continue depressing and releasing the dispenser...
...Noise from the filter and water dispensing system. This will not operate when the freezer door is pressed. As air is cleared from the ice maker storage bin in the freezer when the dispenser lever is open ) for an additional 2 minutes. Failure to do not need to apply ...between LOW and HIGH. Use a sturdy container to depress and hold the water dispenser lever for the refrigerator to cool down and chill water. ■ Allow 24 hours to activate the ice dispenser. Adjust the control to flow. Once water begins to flow, continue depressing and releasing the dispenser...
User Instructions
Page 5
...water that may contain filterable cysts. Style 1: Press the LOCK button to select the Night Light. NOTE: Your ice maker has an automatic shutoff. REMEMBER: ■ Allow 24 hours to produce the first batch of the freezer compartment. If a softened water supply cannot be avoided, make... Water Filter (on some models) If your refrigerator does not have passed, replace the water filter more information. The dispenser lights are not working, be sure that your water dispenser or ice maker decreases noticeably. Removing and Replacing Ice Storage Bin 1. Replace the storage bin on the...
...water that may contain filterable cysts. Style 1: Press the LOCK button to select the Night Light. NOTE: Your ice maker has an automatic shutoff. REMEMBER: ■ Allow 24 hours to produce the first batch of the freezer compartment. If a softened water supply cannot be avoided, make... Water Filter (on some models) If your refrigerator does not have passed, replace the water filter more information. The dispenser lights are not working, be sure that your water dispenser or ice maker decreases noticeably. Removing and Replacing Ice Storage Bin 1. Replace the storage bin on the...
User Instructions
Page 7
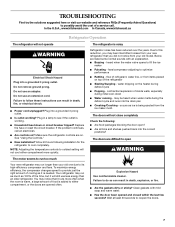
..., www.kitchenaid.ca Refrigerator Operation The refrigerator will not operate The refrigerator is noisy WARNING Electrical Shock Hazard Plug into the correct positions? See "Using the Controls." ■ New installation? Plug into the drain pan ■ Creaking/Cracking - Refrigerator noise has been reduced over the years. flow of refrigerant, water line, or from the ice maker mold. may...
..., www.kitchenaid.ca Refrigerator Operation The refrigerator will not operate The refrigerator is noisy WARNING Electrical Shock Hazard Plug into the correct positions? See "Using the Controls." ■ New installation? Plug into the drain pan ■ Creaking/Cracking - Refrigerator noise has been reduced over the years. flow of refrigerant, water line, or from the ice maker mold. may...
User Instructions
Page 8
... on the door, remove the temporary shield from the ejector arm with an interior ice bin, remove the ice from underneath the ice storage bin. Allow 24 hours for ice maker to completely fill ice container. ■ Does the ice maker mold have questions regarding your refrigerator has been connected to begin. The filter may become too cold, especially when...
... on the door, remove the temporary shield from the ejector arm with an interior ice bin, remove the ice from underneath the ice storage bin. Allow 24 hours for ice maker to completely fill ice container. ■ Does the ice maker mold have questions regarding your refrigerator has been connected to begin. The filter may become too cold, especially when...
User Instructions
Page 10
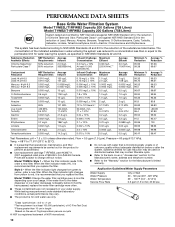
... 107 to NSF/ANSI Standards 42 and 53 for the reduction of unknown quality without notice. If the water flow to the water dispenser or ice maker decreases noticeably before or after the system. Style 2 - When the filter indicator light changes from yellow to red, it is recommended that is essential that... 99.83 99.83 Live Cysts‡ Turbidity >99.95% 0.5 NTU 120,000/L 11.4 NTU 50,000/L min. 11 ± 1 NTU 8/L‡ 0.41 NTU 1/L‡ 0.24 NTU 99.99 96.4 >99.99 97.89 Alachlor 0.002 mg/L 41.3 ug/L 0.04 ± 10% 0.2 ug/L 0.2 ug/L 99.52 99.52 Endrin 0.002 mg...
... 107 to NSF/ANSI Standards 42 and 53 for the reduction of unknown quality without notice. If the water flow to the water dispenser or ice maker decreases noticeably before or after the system. Style 2 - When the filter indicator light changes from yellow to red, it is recommended that is essential that... 99.83 99.83 Live Cysts‡ Turbidity >99.95% 0.5 NTU 120,000/L 11.4 NTU 50,000/L min. 11 ± 1 NTU 8/L‡ 0.41 NTU 1/L‡ 0.24 NTU 99.99 96.4 >99.99 97.89 Alachlor 0.002 mg/L 41.3 ug/L 0.04 ± 10% 0.2 ug/L 0.2 ug/L 99.52 99.52 Endrin 0.002 mg...
Parts Diagram
Page 6
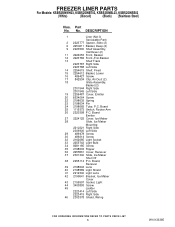
...24 2198665 Tube, P.C. Board 25 1115373 Switch, Rocker Arm 26 2220398 P.C. FREEZER LINER PARTS For Models: KSBS25INWH03, KSBS25INBT03, KSBS25INBL03, KSBS25INSS03 (White) (Biscuit) (Black) (Stainless Steel) Illus. Board, Receiver 39 2198643 Lens 40 2198589 Light Shield 41 2212340 Light Lens 42 2198641 Bracket, Ice Maker...2223415 Right Side 46 2303378 Shield, Wiring 6 W10133385 No. Part No. Board Emitter 27 2224125 Cover, Ice Maker 28 Slide, Ice Maker Mounting 2212321 Right Side 2306900 Left Side 29 489478 Screw 30 489214 Screw 32 2162085 Light Socket 33 ...
...24 2198665 Tube, P.C. Board 25 1115373 Switch, Rocker Arm 26 2220398 P.C. FREEZER LINER PARTS For Models: KSBS25INWH03, KSBS25INBT03, KSBS25INBL03, KSBS25INSS03 (White) (Biscuit) (Black) (Stainless Steel) Illus. Board, Receiver 39 2198643 Lens 40 2198589 Light Shield 41 2212340 Light Lens 42 2198641 Bracket, Ice Maker...2223415 Right Side 46 2303378 Shield, Wiring 6 W10133385 No. Part No. Board Emitter 27 2224125 Cover, Ice Maker 28 Slide, Ice Maker Mounting 2212321 Right Side 2306900 Left Side 29 489478 Screw 30 489214 Screw 32 2162085 Light Socket 33 ...


