Owners Manual
Page 2
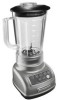
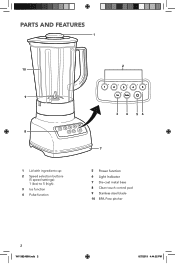
PARTS AND FEATURES 1 10 9 8 1 Lid with ingredient cup 2 Speed selection buttons (5 speed settings): 1 (low) to 5 (high). 3 Ice function 4 Pulse function 2 3 4 56 7 5 Power function 6 Light Indicator 7 Die-cast metal base 8 Clean touch control pad 9 Stainless steel blade 10 BPA Free pitcher 2 W11382496A.indb 2 8/7/2019 4:44:52 PM
PARTS AND FEATURES 1 10 9 8 1 Lid with ingredient cup 2 Speed selection buttons (5 speed settings): 1 (low) to 5 (high). 3 Ice function 4 Pulse function 2 3 4 56 7 5 Power function 6 Light Indicator 7 Die-cast metal base 8 Clean touch control pad 9 Stainless steel blade 10 BPA Free pitcher 2 W11382496A.indb 2 8/7/2019 4:44:52 PM
Owners Manual
Page 5
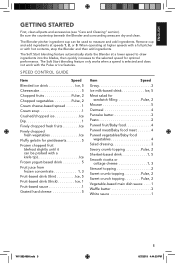
Be sure the countertop beneath the Blender and surrounding areas are dry and clean. The Blender pitcher ingredient cup can be used to the selected speed for pie/desserts 5 Frozen chopped fruit (defrost slightly until it can be probed with a knife tip... selected and does not work with hot contents, stop the Blender and then add ingredients. Remove cup and add ingredients at higher speeds with a full pitcher or with the Pulse or Ice features. SPEED CONTROL GUIDE Item Speed Blended ice drink Ice, 5 Cheesecake 5 Chopped fruits Pulse, 2 Chopped vegetables Pulse, 2 Cream ...
Be sure the countertop beneath the Blender and surrounding areas are dry and clean. The Blender pitcher ingredient cup can be used to the selected speed for pie/desserts 5 Frozen chopped fruit (defrost slightly until it can be probed with a knife tip... selected and does not work with hot contents, stop the Blender and then add ingredients. Remove cup and add ingredients at higher speeds with a full pitcher or with the Pulse or Ice features. SPEED CONTROL GUIDE Item Speed Blended ice drink Ice, 5 Cheesecake 5 Chopped fruits Pulse, 2 Chopped vegetables Pulse, 2 Cream ...
Owners Manual
Page 6
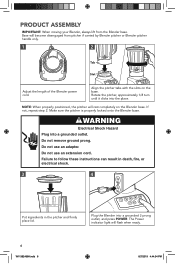
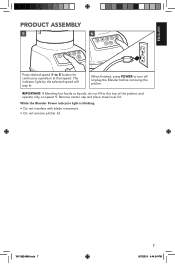
...Failure to follow these instructions can result in death, fire, or electrical shock. 3 4 Put ingredients in the pitcher and firmly place lid. NOTE: When properly positioned, the pitcher will flash when ready. 6 W11382496A.indb 6 8/7/2019 4:44:54 PM Base will become disengaged from the Blender...the Blender base. Plug the Blender into the place. PRODUCT ASSEMBLY IMPORTANT: When moving your Blender, always lift from pitcher if carried by Blender pitcher or Blender pitcher handle only. 1 2 Tab Slot Adjust the length of the Blender power cord. WARNING Electrical Shock Hazard Plug into...
...Failure to follow these instructions can result in death, fire, or electrical shock. 3 4 Put ingredients in the pitcher and firmly place lid. NOTE: When properly positioned, the pitcher will flash when ready. 6 W11382496A.indb 6 8/7/2019 4:44:54 PM Base will become disengaged from the Blender...the Blender base. Plug the Blender into the place. PRODUCT ASSEMBLY IMPORTANT: When moving your Blender, always lift from pitcher if carried by Blender pitcher or Blender pitcher handle only. 1 2 Tab Slot Adjust the length of the Blender power cord. WARNING Electrical Shock Hazard Plug into...
Owners Manual
Page 7
... the Blender Power indicator light is blinking: • Do not interfere with blade movement. • Do not remove pitcher lid. ENGLISH PRODUCT ASSEMBLY 5 6 Press desired speed (1 to turn off. The indicator light by the selected speed will stay lit. IMPORTANT: If blending hot foods ...
... the Blender Power indicator light is blinking: • Do not interfere with blade movement. • Do not remove pitcher lid. ENGLISH PRODUCT ASSEMBLY 5 6 Press desired speed (1 to turn off. The indicator light by the selected speed will stay lit. IMPORTANT: If blending hot foods ...
Owners Manual
Page 8
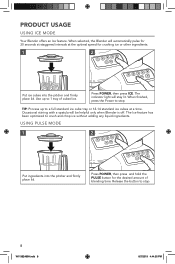
..., then press ICE. When finished, press the Power to crush and chop ice without adding any liquid ingredients. USING PULSE MODE 1 2 Put ingredients into the pitcher and firmly place lid. Release the button to a full standard ice cube tray or 12-14 standard ice cubes at the optimal speed for 30... seconds at staggered intervals at a time. When selected, the Blender will automatically pulse for crushing ice or other ingredients. 1 2 Put ice cubes into the pitcher and firmly place lid. Use up to stop .
..., then press ICE. When finished, press the Power to crush and chop ice without adding any liquid ingredients. USING PULSE MODE 1 2 Put ingredients into the pitcher and firmly place lid. Release the button to a full standard ice cube tray or 12-14 standard ice cubes at the optimal speed for 30... seconds at staggered intervals at a time. When selected, the Blender will automatically pulse for crushing ice or other ingredients. 1 2 Put ice cubes into the pitcher and firmly place lid. Use up to stop .
Owners Manual
Page 9
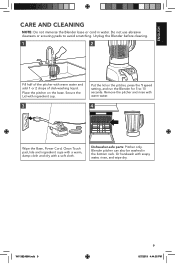
...scouring pads to 10 seconds. Secure the Lid with soapy water, rinse, and wipe dry. W11382496A.indb 9 9 8/7/2019 4:44:55 PM Remove the pitcher and rinse with warm water. 4 Wipe the Base, Power Cord, Clean Touch pad, lids and ingredient cups with a warm, damp cloth and dry... with warm water and add 1 or 2 drops of the pitcher with a soft cloth. Place the pitcher on the pitcher, press the 1 speed setting, and run the Blender for 5 to avoid scratching. Dishwasher-safe parts: Pitcher only. Blender pitcher can also be washed in water. Unplug the Blender before cleaning. 1 ...
...scouring pads to 10 seconds. Secure the Lid with soapy water, rinse, and wipe dry. W11382496A.indb 9 9 8/7/2019 4:44:55 PM Remove the pitcher and rinse with warm water. 4 Wipe the Base, Power Cord, Clean Touch pad, lids and ingredient cups with a warm, damp cloth and dry... with warm water and add 1 or 2 drops of the pitcher with a soft cloth. Place the pitcher on the pitcher, press the 1 speed setting, and run the Blender for 5 to avoid scratching. Dishwasher-safe parts: Pitcher only. Blender pitcher can also be washed in water. Unplug the Blender before cleaning. 1 ...
Owners Manual
Page 10
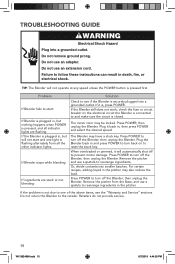
...: The Blender will not operate at any speed unless the POWER button is closed. then unplug the Blender. Plug the Blender back in the pitcher. Problem If Blender fails to start and one of the above items, see if the Blender is securely plugged into a grounded outlet. then ...unplug the Blender. Remove the pitcher from all indicator lights are stuck or not blending: Solution Check to follow these instructions can result in ; For certain recipes, adding liquid in ,...
...: The Blender will not operate at any speed unless the POWER button is closed. then unplug the Blender. Plug the Blender back in the pitcher. Problem If Blender fails to start and one of the above items, see if the Blender is securely plugged into a grounded outlet. then ...unplug the Blender. Remove the pitcher from all indicator lights are stuck or not blending: Solution Check to follow these instructions can result in ; For certain recipes, adding liquid in ,...


