Owners Manual
Page 3
...persons (including children) with reduced physical, sensory, or mental capabilities, or lack of experience and knowledge, unless they do not put Blender in use the appliance outdoors. 8. W11382496A.indb 3 3 8/7/2019 4:44:52 PM PRODUCT SAFETY ENGLISH IMPORTANT SAFEGUARDS When using electrical ...appliances, basic safety precautions should be supervised to the Blender. Do not let cord hang over edge of electrical shock, do not play with cover in any appliance with moving parts. 6. Handle...
...persons (including children) with reduced physical, sensory, or mental capabilities, or lack of experience and knowledge, unless they do not put Blender in use the appliance outdoors. 8. W11382496A.indb 3 3 8/7/2019 4:44:52 PM PRODUCT SAFETY ENGLISH IMPORTANT SAFEGUARDS When using electrical ...appliances, basic safety precautions should be supervised to the Blender. Do not let cord hang over edge of electrical shock, do not play with cover in any appliance with moving parts. 6. Handle...
Owners Manual
Page 5
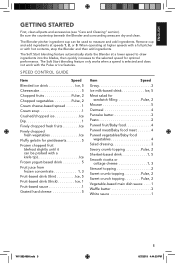
...and add ingredients at higher speeds with a full pitcher or with hot contents, stop the Blender and then add ingredients. The Soft Start blending feature automatically starts the Blender at a lower speed to draw ingredients into the blades, then quickly increases to measure ...drink Ice, 5 Meat salad for optimal performance. ENGLISH GETTING STARTED First, clean all parts and accessories (see "Care and Cleaning" section). The Blender pitcher ingredient cup can be used to the selected speed for sandwich filling Pulse, 2 Mousse 5 Oatmeal 4 Pancake batter 3 Pesto 2 Pureed ...
...and add ingredients at higher speeds with a full pitcher or with hot contents, stop the Blender and then add ingredients. The Soft Start blending feature automatically starts the Blender at a lower speed to draw ingredients into the blades, then quickly increases to measure ...drink Ice, 5 Meat salad for optimal performance. ENGLISH GETTING STARTED First, clean all parts and accessories (see "Care and Cleaning" section). The Blender pitcher ingredient cup can be used to the selected speed for sandwich filling Pulse, 2 Mousse 5 Oatmeal 4 Pancake batter 3 Pesto 2 Pureed ...
Owners Manual
Page 6
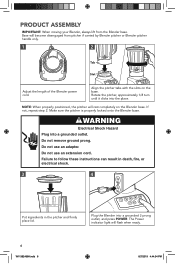
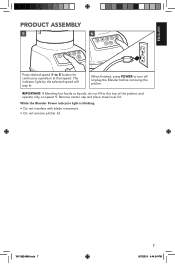
... Power indicator light will become disengaged from the Blender base. Make sure the pitcher is properly locked onto the Blender base. Align the pitcher tabs with the slots on the Blender base. Do not remove ground prong. Plug the Blender into a grounded outlet. If not, repeat ... turn until it clicks into the place. PRODUCT ASSEMBLY IMPORTANT: When moving your Blender, always lift from pitcher if carried by Blender pitcher or Blender pitcher handle only. 1 2 Tab Slot Adjust the length of the Blender power cord. Base will flash when ready. 6 W11382496A.indb 6 8/7/2019 4:44...
... Power indicator light will become disengaged from the Blender base. Make sure the pitcher is properly locked onto the Blender base. Align the pitcher tabs with the slots on the Blender base. Do not remove ground prong. Plug the Blender into a grounded outlet. If not, repeat ... turn until it clicks into the place. PRODUCT ASSEMBLY IMPORTANT: When moving your Blender, always lift from pitcher if carried by Blender pitcher or Blender pitcher handle only. 1 2 Tab Slot Adjust the length of the Blender power cord. Base will flash when ready. 6 W11382496A.indb 6 8/7/2019 4:44...
Owners Manual
Page 7
While the Blender Power indicator light is blinking: • Do not interfere with blade movement. • Do not remove pitcher lid. IMPORTANT: If blending hot foods or liquids, ... speed 1. Remove center cap and place towel over lid. ENGLISH PRODUCT ASSEMBLY 5 6 Press desired speed (1 to 5) button for continuous operation at that speed. Unplug the Blender before removing the pitcher.
While the Blender Power indicator light is blinking: • Do not interfere with blade movement. • Do not remove pitcher lid. IMPORTANT: If blending hot foods or liquids, ... speed 1. Remove center cap and place towel over lid. ENGLISH PRODUCT ASSEMBLY 5 6 Press desired speed (1 to 5) button for continuous operation at that speed. Unplug the Blender before removing the pitcher.
Owners Manual
Page 8
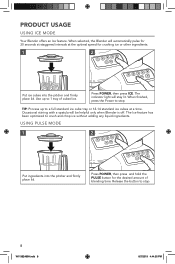
... automatically pulse for 30 seconds at staggered intervals at a time. The indicator light will be helpful only when Blender is off. The Ice feature has been optimized to stop . TIP: Process up to 1 tray of blending time. Press POWER, then press and hold the ...PULSE button for crushing ice or other ingredients. 1 2 Put ice cubes into the pitcher and firmly place lid. PRODUCT USAGE USING ICE MODE Your Blender offers an Ice feature. Occasional stirring with a spatula will stay lit. When finished, press the Power to a full standard ice cube tray or 12-14...
... automatically pulse for 30 seconds at staggered intervals at a time. The indicator light will be helpful only when Blender is off. The Ice feature has been optimized to stop . TIP: Process up to 1 tray of blending time. Press POWER, then press and hold the ...PULSE button for crushing ice or other ingredients. 1 2 Put ice cubes into the pitcher and firmly place lid. PRODUCT USAGE USING ICE MODE Your Blender offers an Ice feature. Occasional stirring with a spatula will stay lit. When finished, press the Power to a full standard ice cube tray or 12-14...
Owners Manual
Page 9
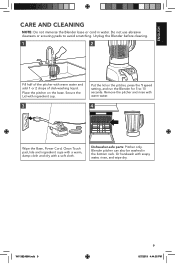
... 9 9 8/7/2019 4:44:55 PM Dishwasher-safe parts: Pitcher only. Place the pitcher on the pitcher, press the 1 speed setting, and run the Blender for 5 to avoid scratching. Secure the Lid with a soft cloth. Or handwash with warm water and add 1 or 2 drops of dish-washing liquid.... Blender pitcher can also be washed in water. ENGLISH CARE AND CLEANING NOTE: Do not immerse the Blender base or cord in the bottom rack. Unplug the Blender before cleaning. 1 2 Fill half of the pitcher with soapy water, rinse...
... 9 9 8/7/2019 4:44:55 PM Dishwasher-safe parts: Pitcher only. Place the pitcher on the pitcher, press the 1 speed setting, and run the Blender for 5 to avoid scratching. Secure the Lid with a soft cloth. Or handwash with warm water and add 1 or 2 drops of dish-washing liquid.... Blender pitcher can also be washed in water. ENGLISH CARE AND CLEANING NOTE: Do not immerse the Blender base or cord in the bottom rack. Unplug the Blender before cleaning. 1 2 Fill half of the pitcher with soapy water, rinse...
Owners Manual
Page 10
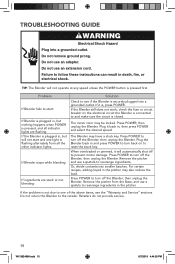
...to turn off to follow these instructions can result in and press POWER to turn back on the electrical circuit the Blender is closed. then unplug the Blender. Remove the pitcher and use a spatula to one light is not due to rearrange ingredients in , but nothing... happens when POWER is securely plugged into a grounded outlet. Or, divide contents into a grounded outlet. Do not return the Blender to rearrange ingredients. TROUBLESHOOTING GUIDE WARNING Electrical Shock Hazard Plug into smaller batches. Failure to prevent motor damage. If it will not start ...
...to turn off to follow these instructions can result in and press POWER to turn back on the electrical circuit the Blender is closed. then unplug the Blender. Remove the pitcher and use a spatula to one light is not due to rearrange ingredients in , but nothing... happens when POWER is securely plugged into a grounded outlet. Or, divide contents into a grounded outlet. Do not return the Blender to rearrange ingredients. TROUBLESHOOTING GUIDE WARNING Electrical Shock Hazard Plug into smaller batches. Failure to prevent motor damage. If it will not start ...
Owners Manual
Page 11
... DO NOT ASSUME ANY RESPONSIBILITY FOR INCIDENTAL OR CONSEQUENTIAL DAMAGES. Hassle-Free Replacement of your Blender to arrange for Blender operated in the 50 United States, the District of Warranty: KitchenAid Will Pay for details on how to an Authorized Service Center. Length of Columbia, Puerto ...'S SOLE AND EXCLUSIVE REMEDY SHALL BE REPAIR OR REPLACEMENT ACCORDING TO THE TERMS OF THIS LIMITED WARRANTY. ENGLISH WARRANTY AND SERVICE KITCHENAID® BLENDER WARRANTY FOR THE 50 UNITED STATES, THE DISTRICT OF COLUMBIA, PUERTO RICO, AND CANADA This warranty extends to correct defects in...
... DO NOT ASSUME ANY RESPONSIBILITY FOR INCIDENTAL OR CONSEQUENTIAL DAMAGES. Hassle-Free Replacement of your Blender to arrange for Blender operated in the 50 United States, the District of Warranty: KitchenAid Will Pay for details on how to an Authorized Service Center. Length of Columbia, Puerto ...'S SOLE AND EXCLUSIVE REMEDY SHALL BE REPAIR OR REPLACEMENT ACCORDING TO THE TERMS OF THIS LIMITED WARRANTY. ENGLISH WARRANTY AND SERVICE KITCHENAID® BLENDER WARRANTY FOR THE 50 UNITED STATES, THE DISTRICT OF COLUMBIA, PUERTO RICO, AND CANADA This warranty extends to correct defects in...

Owners Manual
Page 12
... We're so confident the quality of our products meets the exacting standards of the KitchenAid® brand that , if your Blender should fail within the first year of ownership, KitchenAid will arrange to deliver an identical or comparable replacement to your door free of charge ...RICO We're so confident the quality of our products meets the exacting standards of KitchenAid that , if your Blender should fail within the first year of ownership, KitchenAid Canada will replace your Blender with an identical or comparable replacement. Your replacement unit will also be required to receive...
... We're so confident the quality of our products meets the exacting standards of the KitchenAid® brand that , if your Blender should fail within the first year of ownership, KitchenAid will arrange to deliver an identical or comparable replacement to your door free of charge ...RICO We're so confident the quality of our products meets the exacting standards of KitchenAid that , if your Blender should fail within the first year of ownership, KitchenAid Canada will replace your Blender with an identical or comparable replacement. Your replacement unit will also be required to receive...


