Owners Manual
Page 2
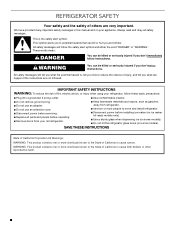
... and vapors, such as gasoline, away from your refrigerator, follow instructions. REFRIGERATOR SAFETY Your safety and the safety of others . Always read and obey all parts and panels before operating. ■ Remove doors from refrigerator. ■ Use two or more chemicals known to the State of California to potential hazards that...
... and vapors, such as gasoline, away from your refrigerator, follow instructions. REFRIGERATOR SAFETY Your safety and the safety of others . Always read and obey all parts and panels before operating. ■ Remove doors from refrigerator. ■ Use two or more chemicals known to the State of California to potential hazards that...
Owners Manual
Page 4
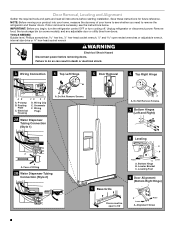
...;" hex-head socket wrench WARNING Electrical Shock Hazard Disconnect power before starting installation. Routing Plate C. Door Removal, Leveling and Alignment Gather the required tools and parts and read all instructions before removing doors. Remove food, the ice storage bin (on some models), and any adjustable door or utility bins from doors.
...;" hex-head socket wrench WARNING Electrical Shock Hazard Disconnect power before starting installation. Routing Plate C. Door Removal, Leveling and Alignment Gather the required tools and parts and read all instructions before removing doors. Remove food, the ice storage bin (on some models), and any adjustable door or utility bins from doors.

Owners Manual
Page 7
... close the freezer door. A. Firmly push the handle toward the door until it is not properly installed without this extra tightening. 8. Handle Installation and Removal PARTS INCLUDED: Door handles (2 and hex key as needed, spare setscrew(s) To Install the Handles: NOTE: The handle mounting setscrews are preinstalled in Step 1, attach the...
... close the freezer door. A. Firmly push the handle toward the door until it is not properly installed without this extra tightening. 8. Handle Installation and Removal PARTS INCLUDED: Door handles (2 and hex key as needed, spare setscrew(s) To Install the Handles: NOTE: The handle mounting setscrews are preinstalled in Step 1, attach the...
Owners Manual
Page 8
... to make sure a saddle-type valve complies with any type of 54" (137.16 cm) is required. Water Supply Requirements Gather the required tools and parts before starting installation. If you have questions about your cold water supply, the water pressure to the reverse osmosis system needs to the desired setting...
... to make sure a saddle-type valve complies with any type of 54" (137.16 cm) is required. Water Supply Requirements Gather the required tools and parts before starting installation. If you have questions about your cold water supply, the water pressure to the reverse osmosis system needs to the desired setting...
Owners Manual
Page 9
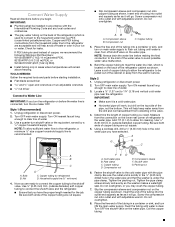
... for service. Flush the tubing until water is clear. Coil the copper tubing. 9 TOOLS NEEDED: Gather the required tools and parts before starting installation. ■ Flat-blade screwdriver and ¹⁄₂" open-end wrenches or two adjustable wrenches nut driver Connect...the shutoff valve to the refrigerator, a minimum ¹⁄₂" size copper household supply line is used instead of copper, we recommend the following Whirlpool Part Numbers: W10505928RP (7 ft [2.14 m] jacketed PEX), 8212547RP (5 ft [1.52 m] PEX), or W10267701RP (25 ft [7.62 m] PEX). ■ Install...
... for service. Flush the tubing until water is clear. Coil the copper tubing. 9 TOOLS NEEDED: Gather the required tools and parts before starting installation. ■ Flat-blade screwdriver and ¹⁄₂" open-end wrenches or two adjustable wrenches nut driver Connect...the shutoff valve to the refrigerator, a minimum ¹⁄₂" size copper household supply line is used instead of copper, we recommend the following Whirlpool Part Numbers: W10505928RP (7 ft [2.14 m] jacketed PEX), 8212547RP (5 ft [1.52 m] PEX), or W10267701RP (25 ft [7.62 m] PEX). ■ Install...

Owners Manual
Page 10
...tubing. Copper tubing D. If your nearest appliance dealer. Turn shutoff valve ON. 5. Check for leaks. Remove and discard the short, black plastic part from the end of the tubing. A B C A. Do not overtighten. 4. Turn shutoff valve ON. 6. Nut (purchased) G. Tighten ...185;⁄₄" (6.35 mm x 6.35 mm) coupling is equipped with a wrench two more turns. Do not overtighten. Remove and discard the plastic part that leak. A B C D E A. Ferrule (purchased) D. Style 2 1. This will help avoid damage to the tubing when the refrigerator is attached...
...tubing. Copper tubing D. If your nearest appliance dealer. Turn shutoff valve ON. 5. Check for leaks. Remove and discard the short, black plastic part from the end of the tubing. A B C A. Do not overtighten. 4. Turn shutoff valve ON. 6. Nut (purchased) G. Tighten ...185;⁄₄" (6.35 mm x 6.35 mm) coupling is equipped with a wrench two more turns. Do not overtighten. Remove and discard the plastic part that leak. A B C D E A. Ferrule (purchased) D. Style 2 1. This will help avoid damage to the tubing when the refrigerator is attached...
Owners Manual
Page 17
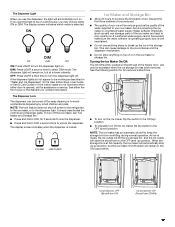
... DIM. This can only be on . DIM: Press LIGHT a second time to produce the first batch of ice. The Dispenser Lock The dispenser can damage parts of the ice maker and lead to poor quality ice. NOTE: The lock feature does not shut off the ice maker, flip the switch to...
... DIM. This can only be on . DIM: Press LIGHT a second time to produce the first batch of ice. The Dispenser Lock The dispenser can damage parts of the ice maker and lead to poor quality ice. NOTE: The lock feature does not shut off the ice maker, flip the switch to...
Owners Manual
Page 19
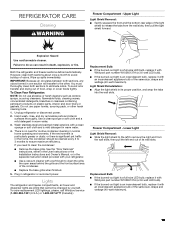
...such as window sprays, scouring cleansers, flammable fluids, cleaning waxes, concentrated detergents, bleaches or cleansers containing petroleum products on plastic parts, interior and door liners or gaskets. Failure to do so can result in the separate instruction sheet provided with your refrigerator....Light Shield Removal: ■ Slide the light shield to the left to ensure maximum efficiency. Hand wash, rinse, and dry removable parts and interior surfaces thoroughly. Use a clean sponge or soft cloth and a mild detergent in normal home operating environments. Lights The ...
...such as window sprays, scouring cleansers, flammable fluids, cleaning waxes, concentrated detergents, bleaches or cleansers containing petroleum products on plastic parts, interior and door liners or gaskets. Failure to do so can result in the separate instruction sheet provided with your refrigerator....Light Shield Removal: ■ Slide the light shield to the left to ensure maximum efficiency. Hand wash, rinse, and dry removable parts and interior surfaces thoroughly. Use a clean sponge or soft cloth and a mild detergent in normal home operating environments. Lights The ...
Owners Manual
Page 20
... both doors to the OFF setting. 2. Empty the ice bin. 4. When you have an automatic ice maker, turn off the ice maker. Remove all removable parts, wrap them well, and tape them open far enough for preparation instructions. Tape rubber or wood blocks to the tops of time. ■ Disconnect the...
... both doors to the OFF setting. 2. Empty the ice bin. 4. When you have an automatic ice maker, turn off the ice maker. Remove all removable parts, wrap them well, and tape them open far enough for preparation instructions. Tape rubber or wood blocks to the tops of time. ■ Disconnect the...
Owners Manual
Page 25
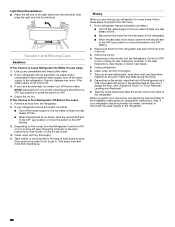
... hours for 2 to drip. In the U.S.A., call 1-800-807-6777 or visit www.kitchenaid.ca. Make sure all connections are available for the part number listed, or contact your refrigerator. In Canada, call 1-800-442-9991 or visit www.kitchenaid.com. See "Connect Water Supply." Discard the first glass of water are not...
... hours for 2 to drip. In the U.S.A., call 1-800-807-6777 or visit www.kitchenaid.ca. Make sure all connections are available for the part number listed, or contact your refrigerator. In Canada, call 1-800-442-9991 or visit www.kitchenaid.com. See "Connect Water Supply." Discard the first glass of water are not...
Owners Manual
Page 26
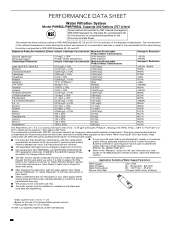
... a concentration less than or equal to replace the filter. Flow = 0.75 gpm (2.84 Lpm). Emerging compounds/incidental contaminants are subject to Use replacement filter P8RFWB2L, part #EDR1RXD1/EDR1RXD1B. 2015 suggested retail price of contaminants specified on disinfected waters that is for the product to 108 fibers/L†† 50,000/L min...
... a concentration less than or equal to replace the filter. Flow = 0.75 gpm (2.84 Lpm). Emerging compounds/incidental contaminants are subject to Use replacement filter P8RFWB2L, part #EDR1RXD1/EDR1RXD1B. 2015 suggested retail price of contaminants specified on disinfected waters that is for the product to 108 fibers/L†† 50,000/L min...
Owners Manual
Page 27
... In Canada, call 1-800-422-1230. LABOR NOT INCLUDED) In the sixth through fifth years from the date of non-genuine KitchenAid parts or accessories. 6. YOUR SOLE AND EXCLUSIVE REMEDY UNDER THIS LIMITED WARRANTY SHALL BE PRODUCT REPAIR AS PROVIDED HEREIN. Service must be ...major appliance is installed, operated and maintained according to the instructions attached to or furnished with the product, KitchenAid brand will pay for factory specified replacement parts and repair labor for the remaining term of purchase, when this major appliance was purchased. DISCLAIMER OF ...
... In Canada, call 1-800-422-1230. LABOR NOT INCLUDED) In the sixth through fifth years from the date of non-genuine KitchenAid parts or accessories. 6. YOUR SOLE AND EXCLUSIVE REMEDY UNDER THIS LIMITED WARRANTY SHALL BE PRODUCT REPAIR AS PROVIDED HEREIN. Service must be ...major appliance is installed, operated and maintained according to the instructions attached to or furnished with the product, KitchenAid brand will pay for factory specified replacement parts and repair labor for the remaining term of purchase, when this major appliance was purchased. DISCLAIMER OF ...


