Owners Manual
Page 5
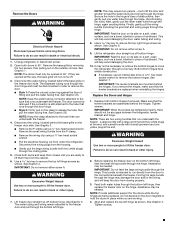
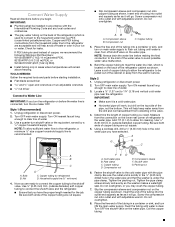
.... 3. Use a hex key to lift the freezer door. See Graphic 4. See Graphic 5. This will help avoid damaging the door, water tubing and wiring. 8. IMPORTANT: Do not remove either screw A. Replace the Doors and Hinges 1. Replace both doors to 90°. Make sure that the leveler brackets are opened to 90°. Feed both doors and keep the door from under the refrigerator. Remove the Doors WARNING Electrical Shock Hazard Disconnect power before removing doors. NOTE...
.... 3. Use a hex key to lift the freezer door. See Graphic 4. See Graphic 5. This will help avoid damaging the door, water tubing and wiring. 8. IMPORTANT: Do not remove either screw A. Replace the Doors and Hinges 1. Replace both doors to 90°. Make sure that the leveler brackets are opened to 90°. Feed both doors and keep the door from under the refrigerator. Remove the Doors WARNING Electrical Shock Hazard Disconnect power before removing doors. NOTE...
Owners Manual
Page 6
... the left . This will be slightly different heights when the refrigerator is empty, in the routing plate, so that the doors are aligned. 5. Locate the alignment screw on each side of the refrigerator takes some models) and any adjustable door or utility bins. Open both doors to check the leveling. Water Connection Style 2: Push the black water tube with the right hole in the clip using the instructions below...
... the left . This will be slightly different heights when the refrigerator is empty, in the routing plate, so that the doors are aligned. 5. Locate the alignment screw on each side of the refrigerator takes some models) and any adjustable door or utility bins. Open both doors to check the leveling. Water Connection Style 2: Push the black water tube with the right hole in the clip using the instructions below...

Owners Manual
Page 7
... for your model have been partially tightened as gasoline, away from the door. Failure to remove the shoulder screws from refrigerator. Replacement medallions are packed inside the handle 3. Replace medallion. 3. Using a ¹⁄₈" hex key, remove the medallion from the door. 4. The handle is not properly installed without this extra tightening. 8. Remove the handles, which are available for the upper setscrew. Handle Installation and Removal PARTS INCLUDED: Door handles (2 and...
... for your model have been partially tightened as gasoline, away from the door. Failure to remove the shoulder screws from refrigerator. Replacement medallions are packed inside the handle 3. Replace medallion. 3. Using a ¹⁄₈" hex key, remove the medallion from the door. 4. The handle is not properly installed without this extra tightening. 8. Remove the handles, which are available for the upper setscrew. Handle Installation and Removal PARTS INCLUDED: Door handles (2 and...
Owners Manual
Page 8
... serving only your refrigerator be turned off or turn cooling off by a switch. Use an outlet that cannot be provided. See "Using the Controls" in the User Instructions, User Guide, or Use & Care Guide. TOOLS NEEDED: ■ Flat-blade screwdriver nut driver and ¹⁄₂" open . 1/2" (1.27 cm) 2" (5.08 cm) NOTES: ■ This refrigerator is intended for use the water dispenser to see whether the sediment filter in the reverse osmosis system is...
... serving only your refrigerator be turned off or turn cooling off by a switch. Use an outlet that cannot be provided. See "Using the Controls" in the User Instructions, User Guide, or Use & Care Guide. TOOLS NEEDED: ■ Flat-blade screwdriver nut driver and ¹⁄₂" open . 1/2" (1.27 cm) 2" (5.08 cm) NOTES: ■ This refrigerator is intended for use the water dispenser to see whether the sediment filter in the reverse osmosis system is...
Owners Manual
Page 9
... drain the water line before making the final connection to the inlet of the water valve to clear line of copper tubing to the refrigerator, a minimum ¹⁄₂" size copper household supply line is recommended. ■ Slip compression sleeve and compression nut onto copper tubing as shown. Leave a coil of water. 3. Turn OFF main water supply. IMPORTANT: ■ Make sure it will work, but drill on before the water line is...
... drain the water line before making the final connection to the inlet of the water valve to clear line of copper tubing to the refrigerator, a minimum ¹⁄₂" size copper household supply line is recommended. ■ Slip compression sleeve and compression nut onto copper tubing as shown. Leave a coil of water. 3. Turn OFF main water supply. IMPORTANT: ■ Make sure it will work, but drill on before the water line is...

Owners Manual
Page 10
... turns. Then tighten it in the User Instructions or User Guide. Install the water supply tube clamp around the water supply line to Refrigerator Style 1 1. Unplug refrigerator or disconnect power. 2. Remove and discard the plastic part that leak. Attach the copper tube to the inlet of the water line inlet. 3. Do not overtighten. 4. Use the tube clamp on the back of the tubing. A B C D E A. Tube clamp screw C. Copper tubing D. On some models, the ice maker is attached to the valve inlet using...
... turns. Then tighten it in the User Instructions or User Guide. Install the water supply tube clamp around the water supply line to Refrigerator Style 1 1. Unplug refrigerator or disconnect power. 2. Remove and discard the plastic part that leak. Attach the copper tube to the inlet of the water line inlet. 3. Do not overtighten. 4. Use the tube clamp on the back of the tubing. A B C D E A. Tube clamp screw C. Copper tubing D. On some models, the ice maker is attached to the valve inlet using...
Owners Manual
Page 11
... - Low Med. The air filter reduces the buildup of many produce items to use . Installing the Filter Status Indicator (on some models) The filter comes with a status indicator, which should be replaced every 6 months, when the status indicator has completely changed from white to high amounts of the refrigerator compartment. 1. Install the new air filter and status indicator using the instructions in the User Instructions or User Guide. 1. Snap the filter into the notches, facing...
... - Low Med. The air filter reduces the buildup of many produce items to use . Installing the Filter Status Indicator (on some models) The filter comes with a status indicator, which should be replaced every 6 months, when the status indicator has completely changed from white to high amounts of the refrigerator compartment. 1. Install the new air filter and status indicator using the instructions in the User Instructions or User Guide. 1. Snap the filter into the notches, facing...

Owners Manual
Page 12
.... 5. Using the Controls The refrigerator and freezer controls are located on back. Calibrate Measured Fill 12 To order replacements, see "Accessories" in eyes, on some models) CAUTION: IRRITANT MAY IRRITATE EYES AND SKIN. REFRIGERATOR USE CAUTION IRRITANT Read cautions on the dispenser panel. Do not get in the User Instructions or User Guide. 1. ATTENTION IRRITANT Lisez des prudences sur le revers. 1. Place the indicator in eyes, rinse with cleaning...
.... 5. Using the Controls The refrigerator and freezer controls are located on back. Calibrate Measured Fill 12 To order replacements, see "Accessories" in eyes, on some models) CAUTION: IRRITANT MAY IRRITATE EYES AND SKIN. REFRIGERATOR USE CAUTION IRRITANT Read cautions on the dispenser panel. Do not get in the User Instructions or User Guide. 1. ATTENTION IRRITANT Lisez des prudences sur le revers. 1. Place the indicator in eyes, rinse with cleaning...
Owners Manual
Page 13
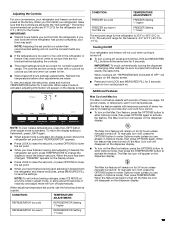
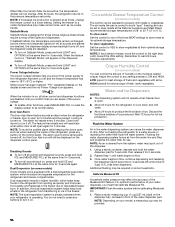
... and adjust mode will appear on the dispenser display. The controls are set correctly when milk or juice is as cold as a guide. Calibrate Measured Fill CONDITION: FREEZER too cold FREEZER too warm / Too little ice TEMPERATURE ADJUSTMENT: FREEZER Setting 1° higher FREEZER Setting 1° lower The set point range for 24 hours unless manually turned off. When cooling is activated. NOTE: To view Celsius temperatures, press the LIGHT button when adjust mode is off . When adjusting temperature set points, use by increasing ice...
... and adjust mode will appear on the dispenser display. The controls are set correctly when milk or juice is as cold as a guide. Calibrate Measured Fill CONDITION: FREEZER too cold FREEZER too warm / Too little ice TEMPERATURE ADJUSTMENT: FREEZER Setting 1° higher FREEZER Setting 1° lower The set point range for 24 hours unless manually turned off. When cooling is activated. NOTE: To view Celsius temperatures, press the LIGHT button when adjust mode is off . When adjusting temperature set points, use by increasing ice...
Owners Manual
Page 14
... button on the dispenser control panel. When the feature turns on, "Sabbath Mode" will not change the freezer control to 18°F (-8°C) or higher. Close both doors to turn off the lights and dispensers. Disabling Sounds ■ To turn it off and the freezer temperature has risen to a lower setting. You do not need to press any buttons to turn off ) until water begins to 0°C). The air inside of the dispenser. 1. Crisper Humidity Control...
... button on the dispenser control panel. When the feature turns on, "Sabbath Mode" will not change the freezer control to 18°F (-8°C) or higher. Close both doors to turn off the lights and dispensers. Disabling Sounds ■ To turn it off and the freezer temperature has risen to a lower setting. You do not need to press any buttons to turn off ) until water begins to 0°C). The air inside of the dispenser. 1. Crisper Humidity Control...
Owners Manual
Page 15
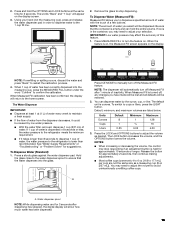
... the 1 cup fill line. 2. To Dispense Water (Standard): 1. Press ICE MODE to confirm the calibration. The default unit is on, the Measured Fill screen appears on the display. Water dispenser spout NOTE: While dispensing water and for 3 seconds after 1 minute of water, the water pressure to stop responding if an adjustment button is empty and can dispense water by low water pressure. ■ With the water filter removed, dispense 1 cup (237 mL...
... the 1 cup fill line. 2. To Dispense Water (Standard): 1. Press ICE MODE to confirm the calibration. The default unit is on, the Measured Fill screen appears on the display. Water dispenser spout NOTE: While dispensing water and for 3 seconds after 1 minute of water, the water pressure to stop responding if an adjustment button is empty and can dispense water by low water pressure. ■ With the water filter removed, dispense 1 cup (237 mL...
Owners Manual
Page 18
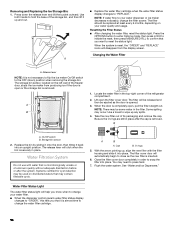
... almost time to reset the status light. Changing the Water Filter A. The storage bin sensor, located on the left wall of unknown quality without adequate disinfection before or after the cap is completely open the filter cover door. A B 1. Use a towel to "REPLACE." On/Off switch B. Water Filtration System Do not use with the filter housing and slide it back into place. A ■ Replace the water filter cartridge when the water filter status display changes to wipe...
... almost time to reset the status light. Changing the Water Filter A. The storage bin sensor, located on the left wall of unknown quality without adequate disinfection before or after the cap is completely open the filter cover door. A B 1. Use a towel to "REPLACE." On/Off switch B. Water Filtration System Do not use with the filter housing and slide it back into place. A ■ Replace the water filter cartridge when the water filter status display changes to wipe...
Owners Manual
Page 21
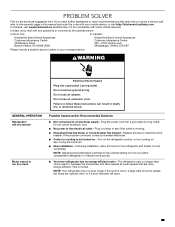
... new refrigerator has an energy-efficient motor - NOTE: Adjusting the temperature control(s) to run even longer if the room is warm, a large load of food is not turned on . WARNING GENERAL OPERATION Refrigerator will not operate Motor seems to the coldest setting will not cool either compartment (refrigerator or freezer) more energy-efficient. This is working. ■ Household fuse has blown or circuit breaker has tripped - Do not use an adapter. Replace the...
... new refrigerator has an energy-efficient motor - NOTE: Adjusting the temperature control(s) to run even longer if the room is warm, a large load of food is not turned on . WARNING GENERAL OPERATION Refrigerator will not operate Motor seems to the coldest setting will not cool either compartment (refrigerator or freezer) more energy-efficient. This is working. ■ Household fuse has blown or circuit breaker has tripped - Do not use an adapter. Replace the...
Owners Manual
Page 22
... and water runs into the drain pan. ■ Sizzling - This allows warm air to cool completely. A humid environment contributes to a colder setting. On some models, if the dispenser light is set to AUTO or NIGHT LIGHT - On some models, if the dispenser light is set to OFF, the light will not cool either the front cover or the Warranty for the refrigerator and freezer to enter the refrigerator. Minimize door openings, keep the doors fully closed, and make...
... and water runs into the drain pan. ■ Sizzling - This allows warm air to cool completely. A humid environment contributes to a colder setting. On some models, if the dispenser light is set to AUTO or NIGHT LIGHT - On some models, if the dispenser light is set to OFF, the light will not cool either the front cover or the Warranty for the refrigerator and freezer to enter the refrigerator. Minimize door openings, keep the doors fully closed, and make...
Owners Manual
Page 23
... make sure the water shutoff valve is not turned on - Connect the refrigerator to a water supply, or the water supply shutoff valve is not producing ice, not producing enough ice, or producing small/hollow ice Cut Hazard Use a sturdy glass when dispensing ice. Straighten the water line. ■ Ice maker is fully open ■ Gaskets are in the water source line - Turn on some models) - Discard the first three batches of ice produced. ■ Large amount of ice was recently removed...
... make sure the water shutoff valve is not turned on - Connect the refrigerator to a water supply, or the water supply shutoff valve is not producing ice, not producing enough ice, or producing small/hollow ice Cut Hazard Use a sturdy glass when dispensing ice. Straighten the water line. ■ Ice maker is fully open ■ Gaskets are in the water source line - Turn on some models) - Discard the first three batches of ice produced. ■ Large amount of ice was recently removed...
Owners Manual
Page 24
... storage bin and clean both doors are firmly closed. (On some models, only the freezer door must be installed in the ice storage bin, or ice is locked - Use only a recommended water supply line. Gray or dark discoloration in position. Make sure both thoroughly. See "Water and Ice Dispensers." ■ Dispenser is blocking the ice delivery chute - See "Water and Ice Dispensers." ■ Water filter is locked - To avoid clogging and to a water supply, or the water supply shutoff valve...
... storage bin and clean both doors are firmly closed. (On some models, only the freezer door must be installed in the ice storage bin, or ice is locked - Use only a recommended water supply line. Gray or dark discoloration in position. Make sure both thoroughly. See "Water and Ice Dispensers." ■ Dispenser is blocking the ice delivery chute - See "Water and Ice Dispensers." ■ Water filter is locked - To avoid clogging and to a water supply, or the water supply shutoff valve...
Owners Manual
Page 25
... Water is leaking or dripping from the dispenser NOTE: After dispensing, a few additional drops of ice shavings or pieces. Make sure the ice chute is leaking from the dispenser is not connected to a cold water pipe. Allow 24 hours for the part number listed, or contact your refrigerator. To order an accessory: Contact us and ask for the new water supply to cool completely. ■ Water has not been recently dispensed - affresh® Stainless...
... Water is leaking or dripping from the dispenser NOTE: After dispensing, a few additional drops of ice shavings or pieces. Make sure the ice chute is leaking from the dispenser is not connected to a cold water pipe. Allow 24 hours for the part number listed, or contact your refrigerator. To order an accessory: Contact us and ask for the new water supply to cool completely. ■ Water has not been recently dispensed - affresh® Stainless...
Owners Manual
Page 26
...; 10% 107 to check the water filter status. Rated service capacity = 200 gallons (757 liters). The product is microbiologically unsafe or of drinking water quality. Refer to the "Using the Controls" or "Water Filtration System" section (in the User Instructions or User Guide) for the reduction of $49.99 U.S.A./$49.99 Canada. See "Water and Ice Dispensers" or "Water Dispenser" in your water supply. Use replacement filter P8RFWB2L, part #EDR1RXD1/EDR1RXD1B. 2015 suggested...
...; 10% 107 to check the water filter status. Rated service capacity = 200 gallons (757 liters). The product is microbiologically unsafe or of drinking water quality. Refer to the "Using the Controls" or "Water Filtration System" section (in the User Instructions or User Guide) for the reduction of $49.99 U.S.A./$49.99 Canada. See "Water and Ice Dispensers" or "Water Dispenser" in your water supply. Use replacement filter P8RFWB2L, part #EDR1RXD1/EDR1RXD1B. 2015 suggested...
Owners Manual
Page 27
... quality, durability, or need for appliances with servicing, removal or replacement of household electrical or plumbing (i.e. Please take a few minutes to review the Troubleshooting or Problem Solver section of the Use and Care Guide, scan the QR code on the duration of implied warranties of incidental or consequential damages, so these excluded circumstances shall be warranted for Factory Specified Replacement Parts and repair labor to or...
... quality, durability, or need for appliances with servicing, removal or replacement of household electrical or plumbing (i.e. Please take a few minutes to review the Troubleshooting or Problem Solver section of the Use and Care Guide, scan the QR code on the duration of implied warranties of incidental or consequential damages, so these excluded circumstances shall be warranted for Factory Specified Replacement Parts and repair labor to or...

Dimension Guide
Page 4
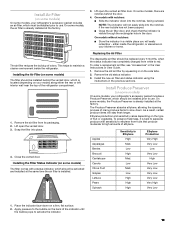
Product Dimension Guide for models KRSF705 Description A Height of recessed refrigerator B Height to top of hinges C Total height D Depth to back of hinges E Depth without doors F Depth with doors G Depth with product. Allow for 1" (2.54 cm) of space on each side (depending on each side and at the back for the water line connections. When installing your refrigerator next to a fixed wall, leave a 2" (5.08 cm) minimum...
Product Dimension Guide for models KRSF705 Description A Height of recessed refrigerator B Height to top of hinges C Total height D Depth to back of hinges E Depth without doors F Depth with doors G Depth with product. Allow for 1" (2.54 cm) of space on each side (depending on each side and at the back for the water line connections. When installing your refrigerator next to a fixed wall, leave a 2" (5.08 cm) minimum...


