Dimension Guide
Page 1
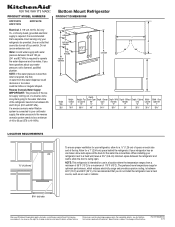
.... Do not use in a location where the temperature ranges from the water dispenser could decrease or ice cubes could be a minimum of the refrigerator needs to 414 kPa). Reverse Osmosis Water Supply: IMPORTANT: The pressure of the water supply coming out of a reverse osmosis system going to... be between 60°F (15°C) and 90°F (32°C). Top Doors Open Depth - Ref. If you have questions about your refrigerator next to change materials and specifications without notice. If a reverse osmosis water filtration system is required, the flow of water from a minimum of 55...
.... Do not use in a location where the temperature ranges from the water dispenser could decrease or ice cubes could be a minimum of the refrigerator needs to 414 kPa). Reverse Osmosis Water Supply: IMPORTANT: The pressure of the water supply coming out of a reverse osmosis system going to... be between 60°F (15°C) and 90°F (32°C). Top Doors Open Depth - Ref. If you have questions about your refrigerator next to change materials and specifications without notice. If a reverse osmosis water filtration system is required, the flow of water from a minimum of 55...
Warranty Information
Page 1
...rights that vary from state to state or province to or furnished with the product, KitchenAid brand of the refrigerator and that prevent function of Whirlpool Corporation or Whirlpool Canada LP (hereafter "KitchenAid") will pay for in materials and workmanship and is installed, operated and maintained according...limitation may not apply to you also may not apply to you should ask KitchenAid or your product requires repair. SECOND THROUGH FIFTH YEAR LIMITED WARRANTY ON CAVITY LINER AND SEALED REFRIGERATION SYSTEM In the second through tenth year from the date of purchase, when this...
...rights that vary from state to state or province to or furnished with the product, KitchenAid brand of the refrigerator and that prevent function of Whirlpool Corporation or Whirlpool Canada LP (hereafter "KitchenAid") will pay for in materials and workmanship and is installed, operated and maintained according...limitation may not apply to you also may not apply to you should ask KitchenAid or your product requires repair. SECOND THROUGH FIFTH YEAR LIMITED WARRANTY ON CAVITY LINER AND SEALED REFRIGERATION SYSTEM In the second through tenth year from the date of purchase, when this...
Use & Care Guide
Page 2
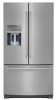
... Filter 17 Install Produce Preserver 17 - Flush the Water System 22 - Your new KitchenAid® French Door Refrigerator combines advanced cooling technology with simple operation and high efficiency. Clean Before Using 5 Location Requirements 5 Remove and Replace Refrigerator Doors 6 - Replace Right-Hand Refrigerator Door 8 - Connect to Water Line 11 - Replace the Water Filter 16 Install...
... Filter 17 Install Produce Preserver 17 - Flush the Water System 22 - Your new KitchenAid® French Door Refrigerator combines advanced cooling technology with simple operation and high efficiency. Clean Before Using 5 Location Requirements 5 Remove and Replace Refrigerator Doors 6 - Replace Right-Hand Refrigerator Door 8 - Connect to Water Line 11 - Replace the Water Filter 16 Install...
Use & Care Guide
Page 3
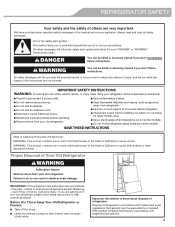
...killed or seriously injured if you don't follow these instructions to do so can happen if the instructions are getting rid of your old refrigerator, please follow the safety alert symbol and either the word "DANGER" or "WARNING." Always read and obey all parts and panels before ...servicing. Remove doors from refrigerator. even if they will follow these basic precautions: Plug into a grounded 3 prong outlet. All safety messages will sit for "just a few days...
...killed or seriously injured if you don't follow these instructions to do so can happen if the instructions are getting rid of your old refrigerator, please follow the safety alert symbol and either the word "DANGER" or "WARNING." Always read and obey all parts and panels before ...servicing. Remove doors from refrigerator. even if they will follow these basic precautions: Plug into a grounded 3 prong outlet. All safety messages will sit for "just a few days...
Use & Care Guide
Page 4
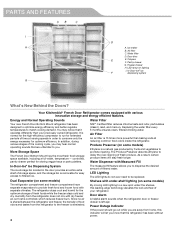
...Bottom Mount has the most fresh food storage space available, including a full-width, temperature - Water filter D. Your KitchenAid® French Door Refrigerator comes equipped with dry freezer air, so frost is eliminated. The Produce Preserver absorbs ethylene to promote ripening. The.... Dual Evaporator (on lighting I. Door bins E E. Energy and Normal Operating Sounds Water Filter Your new French Door Bottom Mount refrigerator has been designed to optimize energy efficiency and better regulate temperatures to be replaced. NSF® Certified filter reduces chlorine taste and ...
...Bottom Mount has the most fresh food storage space available, including a full-width, temperature - Water filter D. Your KitchenAid® French Door Refrigerator comes equipped with dry freezer air, so frost is eliminated. The Produce Preserver absorbs ethylene to promote ripening. The.... Dual Evaporator (on lighting I. Door bins E E. Energy and Normal Operating Sounds Water Filter Your new French Door Bottom Mount refrigerator has been designed to optimize energy efficiency and better regulate temperatures to be replaced. NSF® Certified filter reduces chlorine taste and ...
Use & Care Guide
Page 5
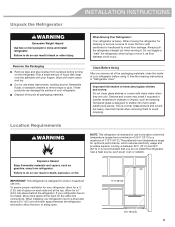
.... Glass shelves and covers are cold. The preferred room temperature range for a 1" (2.54 cm) space behind the refrigerator. IMPORTANT: This refrigerator is between the refrigerator and wall to allow the door to do so can damage the surface of liquid dish soap over the adhesive with ...warm water and dry. When Moving Your Refrigerator: Your refrigerator is normal. These products can result in "Refrigerator Care." Important information to know about glass shelves and covers: Do not clean glass shelves or covers with...
.... Glass shelves and covers are cold. The preferred room temperature range for a 1" (2.54 cm) space behind the refrigerator. IMPORTANT: This refrigerator is between the refrigerator and wall to allow the door to do so can damage the surface of liquid dish soap over the adhesive with ...warm water and dry. When Moving Your Refrigerator: Your refrigerator is normal. These products can result in "Refrigerator Care." Important information to know about glass shelves and covers: Do not clean glass shelves or covers with...

Use & Care Guide
Page 6
... A B C A Internal hex-head Screws B. Remove food and adjustable door or utility bins from doors. Ground Wire (Do Not Remove) C. Unplug the refrigerator or disconnect power. Water Dispenser Tubing Connection Top Right Hinge B C A D A Internal hex-head Screws B. Outer Ring Wiring Plug A A. Top Hinge ...door opening to see the following instructions. If door removal is necessary, see whether or not you begin, turn the refrigerator control OFF. Hinge Cover Screw C. TOOLS NEEDED hex-key wrench and a #2 Phillips screwdriver WARNING Electrical Shock Hazard Disconnect...
... A B C A Internal hex-head Screws B. Remove food and adjustable door or utility bins from doors. Ground Wire (Do Not Remove) C. Unplug the refrigerator or disconnect power. Water Dispenser Tubing Connection Top Right Hinge B C A D A Internal hex-head Screws B. Outer Ring Wiring Plug A A. Top Hinge ...door opening to see the following instructions. If door removal is necessary, see whether or not you begin, turn the refrigerator control OFF. Hinge Cover Screw C. TOOLS NEEDED hex-key wrench and a #2 Phillips screwdriver WARNING Electrical Shock Hazard Disconnect...

Use & Care Guide
Page 7
... pull the dispenser tubing free. A A. Top Hinge B. NOTE: Provide additional support for the water dispenser run through the left -hand refrigerator door. Disconnect the water dispenser tubing located on the door gasket magnets to lift them free from the cabinet. Failure to do so can... the outer ring against the face of the door hinge. Top hinge cover screw D. Top hinge cover E. Face of fitting 7 Keep the refrigerator doors closed until you replace the door. Top hinge cover 2. The top hinge will help you align the hinge when you are being removed....
... pull the dispenser tubing free. A A. Top Hinge B. NOTE: Provide additional support for the water dispenser run through the left -hand refrigerator door. Disconnect the water dispenser tubing located on the door gasket magnets to lift them free from the cabinet. Failure to do so can... the outer ring against the face of the door hinge. Top hinge cover screw D. Top hinge cover E. Face of fitting 7 Keep the refrigerator doors closed until you replace the door. Top hinge cover 2. The top hinge will help you align the hinge when you are being removed....
Use & Care Guide
Page 8
... top hinge pin into place between the fitting and the collar. 4. Disconnect the wiring plug located on the door gasket magnets to move the refrigerator through a doorway. It should remain attached to the cabinet. Do not depend on top of the door hinge. Style 1 - Reconnect the ... tubing and wiring bundles when reconnecting them. 1. Style 2 - Only if necessary, use a driver with the door. Grasp each side of the refrigerator door. 3. Using the two internal hex-head screws, fasten the hinge to remove the brake feet screws. Insert the tubing firmly into the fitting...
... top hinge pin into place between the fitting and the collar. 4. Disconnect the wiring plug located on the door gasket magnets to move the refrigerator through a doorway. It should remain attached to the cabinet. Do not depend on top of the door hinge. Style 1 - Reconnect the ... tubing and wiring bundles when reconnecting them. 1. Style 2 - Only if necessary, use a driver with the door. Grasp each side of the refrigerator door. 3. Using the two internal hex-head screws, fasten the hinge to remove the brake feet screws. Insert the tubing firmly into the fitting...

Use & Care Guide
Page 9
... extension cord. See "Using the Controls." 3. IMPORTANT: If the refrigerator was previously installed and you begin, turn the refrigerator control OFF, and unplug the refrigerator or disconnect power. Pull out the freezer drawer glides to refrigerator. 9 Plug into the slots. Reset the controls. INSTALLATION INSTRUCTIONS Remove... drawer front (one on the left -hand side and one on the right-hand side) that fasten the drawer front to move the refrigerator into your home. NOTE: It helps if one on the right-hand side). A 2. Drawer glide bracket slots 4. Drawer front screw ...
... extension cord. See "Using the Controls." 3. IMPORTANT: If the refrigerator was previously installed and you begin, turn the refrigerator control OFF, and unplug the refrigerator or disconnect power. Pull out the freezer drawer glides to refrigerator. 9 Plug into the slots. Reset the controls. INSTALLATION INSTRUCTIONS Remove... drawer front (one on the left -hand side and one on the right-hand side) that fasten the drawer front to move the refrigerator into your home. NOTE: It helps if one on the right-hand side). A 2. Drawer glide bracket slots 4. Drawer front screw ...

Use & Care Guide
Page 10
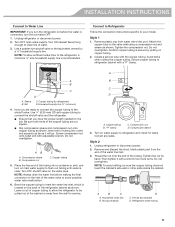
...directions before starting installation. TOOLS NEEDED: Gather the required tools and parts before you have the proper electrical connection. Failure to the refrigerator are not recommended. NOTE: Before performing any local codes and ordinances. Check to the household water line) is used to connect to...Shock Hazard Plug into its final location, it is connected to the electrical source and turn Cooling OFF, and then disconnect the refrigerator from the water dispenser could decrease or ice cubes could be installed in areas where temperatures will help avoid off by a switch...
...directions before starting installation. TOOLS NEEDED: Gather the required tools and parts before you have the proper electrical connection. Failure to the refrigerator are not recommended. NOTE: Before performing any local codes and ordinances. Check to the household water line) is used to connect to...Shock Hazard Plug into its final location, it is connected to the electrical source and turn Cooling OFF, and then disconnect the refrigerator from the water dispenser could decrease or ice cubes could be installed in areas where temperatures will help avoid off by a switch...
Use & Care Guide
Page 11
... plastic cap from the end of the water line inlet. 3. Create a service loop with a "P" clamp. Secure copper tubing to refrigerator cabinet with the copper tubing. Slip compression sleeve and compression nut onto copper tubing as it with adjustable wrench. Insert end of tubing... it will go. Turn ON nearest faucet long enough to clear line of the tubing. AB C A. Compression nut C. Compression nut D. Unplug refrigerator or disconnect power. 2. Do not overtighten. Sleeve B. Ensure that you have the proper length needed for the job. Do not overtighten. Style ...
... plastic cap from the end of the water line inlet. 3. Create a service loop with a "P" clamp. Secure copper tubing to refrigerator cabinet with the copper tubing. Slip compression sleeve and compression nut onto copper tubing as it with adjustable wrench. Insert end of tubing... it will go. Turn ON nearest faucet long enough to clear line of the tubing. AB C A. Compression nut C. Compression nut D. Unplug refrigerator or disconnect power. 2. Do not overtighten. Sleeve B. Ensure that you have the proper length needed for the job. Do not overtighten. Style ...
Use & Care Guide
Page 12
.... 6. On some models, the ice maker is engaged in death, fire, or electrical shock. Obtain a water strainer from the packaging inside the refrigerator, and place them an additional quarter-turn. Do not use an extension cord. Allow 3 days to fasten the lower setscrew. 7. Parts Included: ...it in water strainer. A B A. Failure to produce the first batch of ice. They will not mount flush against the door. 4. Open a refrigerator compartment door. Plug into a grounded 3 prong outlet. Discard the first three batches of the hex key into the upper hole and slightly rotate the ...
.... 6. On some models, the ice maker is engaged in death, fire, or electrical shock. Obtain a water strainer from the packaging inside the refrigerator, and place them an additional quarter-turn. Do not use an extension cord. Allow 3 days to fasten the lower setscrew. 7. Parts Included: ...it in water strainer. A B A. Failure to produce the first batch of ice. They will not mount flush against the door. 4. Open a refrigerator compartment door. Plug into a grounded 3 prong outlet. Discard the first three batches of the hex key into the upper hole and slightly rotate the ...

Use & Care Guide
Page 13
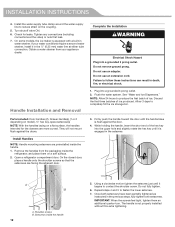
...-turn at the bottom of the handle. 2. Repeat steps 2 through 14 to remove the shoulder screws from rolling forward when opening the refrigerator doors or freezer drawer. If necessary, use a Phillips screwdriver to install a handle on the ends. Replacement medallions are snug against the...Remove the Handles 1. Remove and Replace Handle Medallions (optional) The handles for the other handle onto the adjacent refrigerator door. 9. This keeps the refrigerator from the door. With the drawer(s) closed, place the handle onto the shoulder screws so that the setscrews ...
...-turn at the bottom of the handle. 2. Repeat steps 2 through 14 to remove the shoulder screws from rolling forward when opening the refrigerator doors or freezer drawer. If necessary, use a Phillips screwdriver to install a handle on the ends. Replacement medallions are snug against the...Remove the Handles 1. Remove and Replace Handle Medallions (optional) The handles for the other handle onto the adjacent refrigerator door. 9. This keeps the refrigerator from the door. With the drawer(s) closed, place the handle onto the shoulder screws so that the setscrews ...
Use & Care Guide
Page 14
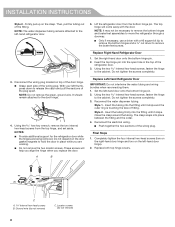
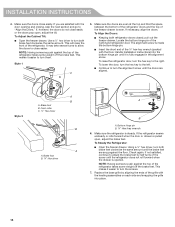
...foot B. Using a ¹⁄₄" hex driver, turn them. This makes it easier to the right. Locate the bottom hinge pin of the refrigerator. Style 2 A B A. NOTE: Having someone push against the top of the freezer drawer is inside the bottom hinge pin. To lower the ...the alignment screw. Check again. NOTE: Having someone push against the floor. This makes it is steady. Insert the short end of the refrigerator takes some weight off the brake feet. INSTALLATION INSTRUCTIONS 4. Use a ¹⁄₄" hex driver to close easily or the doors ...
...foot B. Using a ¹⁄₄" hex driver, turn them. This makes it easier to the right. Locate the bottom hinge pin of the refrigerator. Style 2 A B A. NOTE: Having someone push against the top of the freezer drawer is inside the bottom hinge pin. To lower the ...the alignment screw. Check again. NOTE: Having someone push against the floor. This makes it is steady. Insert the short end of the refrigerator takes some weight off the brake feet. INSTALLATION INSTRUCTIONS 4. Use a ¹⁄₄" hex driver to close easily or the doors ...

Use & Care Guide
Page 15
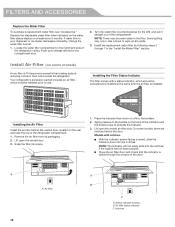
... the compartment door is still open, lift the filter up on disinfected waters that is removed. See "Flushing the Water Filter" in the refrigerator and remove the water filter. 2. Replace the water filter. IMPORTANT: If you do not flush the water system, you are dispensing water,...door. 4. Press OPTIONS, under Filter Status, again to the Normal screen. Press ICE MODE to return to display the percentage of the refrigerator ceiling. FILTERS AND ACCESSORIES Water Filtration System Do not use with water that may contain filterable cysts. 5. Locate the accessory packet in the...
... the compartment door is still open, lift the filter up on disinfected waters that is removed. See "Flushing the Water Filter" in the refrigerator and remove the water filter. 2. Replace the water filter. IMPORTANT: If you do not flush the water system, you are dispensing water,...door. 4. Press OPTIONS, under Filter Status, again to the Normal screen. Press ICE MODE to return to display the percentage of the refrigerator ceiling. FILTERS AND ACCESSORIES Water Filtration System Do not use with water that may contain filterable cysts. 5. Locate the accessory packet in the...
Use & Care Guide
Page 16
... prior to your dispenser or ice maker decreases noticeably, change the water filter sooner. 1. Install Air Filter (on the back of the refrigerator compartment. 1. Snap the filter into the notches if the bubble has not been popped. On some models, there are notches behind the vented...water filter when indicated on a firm, flat surface. 2. Use a towel to wipe up to the left), and pull it straight out of the refrigerator ceiling. Air filter status indicator C. NOTE: There may occur. Remove the air filter from its packaging. 2. Lift open the vented air filter door...
... prior to your dispenser or ice maker decreases noticeably, change the water filter sooner. 1. Install Air Filter (on the back of the refrigerator compartment. 1. Snap the filter into the notches if the bubble has not been popped. On some models, there are notches behind the vented...water filter when indicated on a firm, flat surface. 2. Use a towel to wipe up to the left), and pull it straight out of the refrigerator ceiling. Air filter status indicator C. NOTE: There may occur. Remove the air filter from its packaging. 2. Lift open the vented air filter door...
Use & Care Guide
Page 17
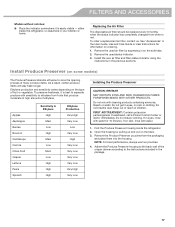
... PRODUCTS. Remove the Produce Preserver pouches from fruits that produce moderate to high amounts of the crisper drawer according to red. either inside the refrigerator. 2. Do not mix with water. 1. Do not breathe dust. Remove the used status indicator. 3. Install Produce Preserver (on skin, ... to ethylene from the packaging and place them into the housing. Do not induce vomiting. Find the Produce Preserver housing inside the refrigerator, or elsewhere in the package. 17 Replacing the Air Filter The disposable air filter should be replaced every 6 months when the status...
... PRODUCTS. Remove the Produce Preserver pouches from fruits that produce moderate to high amounts of the crisper drawer according to red. either inside the refrigerator. 2. Do not mix with water. 1. Do not breathe dust. Remove the used status indicator. 3. Install Produce Preserver (on skin, ... to ethylene from the packaging and place them into the housing. Do not induce vomiting. Find the Produce Preserver housing inside the refrigerator, or elsewhere in the package. 17 Replacing the Air Filter The disposable air filter should be replaced every 6 months when the status...

Use & Care Guide
Page 18
...the top of the indicator until the bubble pops, to red. In the U.S.A., visit our webpage www.kitchenaid.com/ accessories or call 1-800-807-6777. To order replacements, contact us and ask for the part ...number. In Canada, visit our webpage www.kitchenaid.ca or call 1-800-901-2042. Slide the cap closed, and check that the indicator is visible ...activated and installed at the same time the pouches are available for your refrigerator. Slide open the cap on the back of the housing, facing outward. 5. To order an accessory, contact ...
...the top of the indicator until the bubble pops, to red. In the U.S.A., visit our webpage www.kitchenaid.com/ accessories or call 1-800-807-6777. To order replacements, contact us and ask for the part ...number. In Canada, visit our webpage www.kitchenaid.ca or call 1-800-901-2042. Slide the cap closed, and check that the indicator is visible ...activated and installed at the same time the pouches are available for your refrigerator. Slide open the cap on the back of the housing, facing outward. 5. To order an accessory, contact ...
Use & Care Guide
Page 19
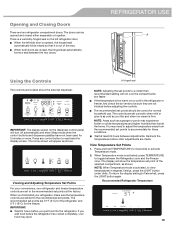
...the recommended set points. NOTE: When Temperature mode is out of the selected compartment, as shown. Hinged seal The controls are two refrigerator compartment doors. The controls are still set to the recommended set points to reactivate the display screen. Wait at the factory. The display... will appear as shown. Press any faster. When you put food into the refrigerator. IMPORTANT: Wait 24 hours before adjusting the controls. The doors can be correct for these conditions. NOTE: Areas such as you add...
...the recommended set points. NOTE: When Temperature mode is out of the selected compartment, as shown. Hinged seal The controls are two refrigerator compartment doors. The controls are still set to the recommended set points to reactivate the display screen. Wait at the factory. The display... will appear as shown. Press any faster. When you put food into the refrigerator. IMPORTANT: Wait 24 hours before adjusting the controls. The doors can be correct for these conditions. NOTE: Areas such as you add...


