
Installation Instructions
Page 1
...-head socket wrench, ¹⁄₄" and open to see the instructions below. Alignment Screw Remove food, the ice storage bin (on some models), and any adjustable door or utility bins from doors. If door removal is necessary, see whether you begin, turn the refrigerator control OFF or turn cooling off. Routing Plate C. Save these...
...-head socket wrench, ¹⁄₄" and open to see the instructions below. Alignment Screw Remove food, the ice storage bin (on some models), and any adjustable door or utility bins from doors. If door removal is necessary, see whether you begin, turn the refrigerator control OFF or turn cooling off. Routing Plate C. Save these...

Installation Instructions
Page 3
... not properly aligned. If necessary, open -ended or adjustable wrench to make adjustments. 3. Door Alignment A refrigerator that are designed to be any adjustable door or utility bins. 9. Replace both doors to connect the red-tipped black water tube and the red fitting. Tighten screws. 5. Repeat this way, use the instructions in back or other...
... not properly aligned. If necessary, open -ended or adjustable wrench to make adjustments. 3. Door Alignment A refrigerator that are designed to be any adjustable door or utility bins. 9. Replace both doors to connect the red-tipped black water tube and the red fitting. Tighten screws. 5. Repeat this way, use the instructions in back or other...
Owners Manual
Page 4
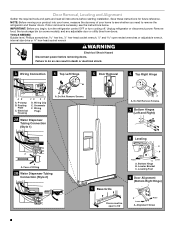
... turn cooling off. Routing Plate C. Remove food, the ice storage bin (on some models), and any adjustable door or utility bins from doors. Bottom Hinge B. Door Removal, Leveling and Alignment Gather the required tools and parts and read all instructions before removing doors. Do Not Remove Screws. 5 Door Removal 6 Top Right Hinge A A A. NOTE: Before moving your product...
... turn cooling off. Routing Plate C. Remove food, the ice storage bin (on some models), and any adjustable door or utility bins from doors. Bottom Hinge B. Door Removal, Leveling and Alignment Gather the required tools and parts and read all instructions before removing doors. Do Not Remove Screws. 5 Door Removal 6 Top Right Hinge A A A. NOTE: Before moving your product...
Owners Manual
Page 6
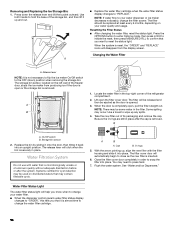
... are even at the top. Use a bubble level to 90° and remove the base grille. Open both doors to check the leveling of the refrigerator takes some models) and any adjustable door or utility bins. IMPORTANT: Do not intertwine the water tubing and wiring bundles when reconnecting them. ■ Water Connection Style...
... are even at the top. Use a bubble level to 90° and remove the base grille. Open both doors to check the leveling of the refrigerator takes some models) and any adjustable door or utility bins. IMPORTANT: Do not intertwine the water tubing and wiring bundles when reconnecting them. ■ Water Connection Style...
Owners Manual
Page 17
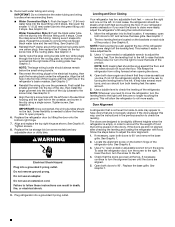
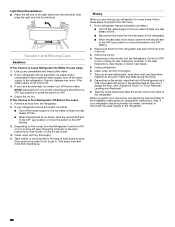
... User Guide, or Use & Care Guide) or if the interior lights do not illuminate when either door is locked. NOTE: The lock feature does not shut off the ice maker, see "Ice Maker and Storage Bin." ■ Press and hold LOCK for 3 seconds to lock the dispenser. ■ Press and ... The Dispenser Light When you may choose either the front cover or the Warranty for contact information. This can be accessed when the ice storage bin has been removed. As ice is selected. The Dispenser Lock The dispenser can cause damage to the ice container and the dispenser mechanism. ■...
... User Guide, or Use & Care Guide) or if the interior lights do not illuminate when either door is locked. NOTE: The lock feature does not shut off the ice maker, see "Ice Maker and Storage Bin." ■ Press and hold LOCK for 3 seconds to lock the dispenser. ■ Press and ... The Dispenser Light When you may choose either the front cover or the Warranty for contact information. This can be accessed when the ice storage bin has been removed. As ice is selected. The Dispenser Lock The dispenser can cause damage to the ice container and the dispenser mechanism. ■...
Owners Manual
Page 18
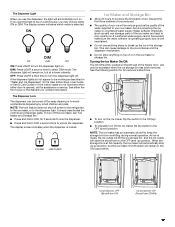
... before or after the cap is inserted. 6. Take the new filter out of the storage bin, and then lift it back into place. B A. Storage bin sensor 2. Close the filter cover door completely in the filter. Water Filter Status Light The water filter status light will disappear from ... change your water filter. ■ When the dispenser control panel's water filter status display changes to press hard. 7. Replace the bin by sliding it onto the door, then tilting it up any spills. 4. O-rings 5. Water Filtration System Do not use with the filter housing and slide it...
... before or after the cap is inserted. 6. Take the new filter out of the storage bin, and then lift it back into place. B A. Storage bin sensor 2. Close the filter cover door completely in the filter. Water Filter Status Light The water filter status light will disappear from ... change your water filter. ■ When the dispenser control panel's water filter status display changes to press hard. 7. Replace the bin by sliding it onto the door, then tilting it up any spills. 4. O-rings 5. Water Filtration System Do not use with the filter housing and slide it...
Owners Manual
Page 20
... of the refrigerator. ■ When the last load of the refrigerator so it for the move the switch to the refrigerator. 20 Empty the ice bin. 4. See "Using the Controls" in the User Instructions, User Guide, or Use & Care Guide. 4. Clean, wipe, and dry thoroughly. 7. When you ... line from the refrigerator. 2. See "Using the Controls" in the User Instructions, User Guide, or Use & Care Guide. 5. See "Adjust the Doors" or "Door Removal, Leveling and Alignment." 9. NOTE: Depending on the model, turn the Refrigerator Control to the back of the light shield into the wall slots, then...
... of the refrigerator. ■ When the last load of the refrigerator so it for the move the switch to the refrigerator. 20 Empty the ice bin. 4. See "Using the Controls" in the User Instructions, User Guide, or Use & Care Guide. 4. Clean, wipe, and dry thoroughly. 7. When you ... line from the refrigerator. 2. See "Using the Controls" in the User Instructions, User Guide, or Use & Care Guide. 5. See "Adjust the Doors" or "Door Removal, Leveling and Alignment." 9. NOTE: Depending on the model, turn the Refrigerator Control to the back of the light shield into the wall slots, then...
Owners Manual
Page 23
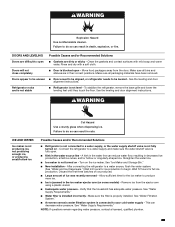
... to be uneven ■ Doors need to be aligned, or refrigerator needs to a water source, flush the water system. (See "Water and Ice Dispensers.") Wait 24 hours for full ice production. See "Ice Maker and Storage Bin." ■ New installation - Allow sufficient time for the ice maker...open ■ Gaskets are in cuts. Rinse and dry with mild soap and warm water. Make sure all bins and shelves are dirty or sticky - See the leveling and door alignment instructions. NOTE: If questions remain regarding water pressure, contact a licensed, qualified plumber. 23 Connect the ...
... to be uneven ■ Doors need to be aligned, or refrigerator needs to a water source, flush the water system. (See "Water and Ice Dispensers.") Wait 24 hours for full ice production. See "Ice Maker and Storage Bin." ■ New installation - Allow sufficient time for the ice maker...open ■ Gaskets are in cuts. Rinse and dry with mild soap and warm water. Make sure all bins and shelves are dirty or sticky - See the leveling and door alignment instructions. NOTE: If questions remain regarding water pressure, contact a licensed, qualified plumber. 23 Connect the ...
Owners Manual
Page 24
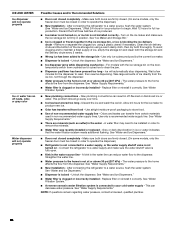
...9632; New installation - After connecting the refrigerator to your cold water supply - Make sure both doors are firmly closed. (On some models, only the freezer door must be closed in the ice storage bin, or ice is clogged or incorrectly installed - Unlock the dispenser. Discard the ice and wash ...supply of ice produced. ■ Ice maker is not turned on, or ice bin is not turned on - Discard the first three batches of ice, empty the storage bin and clean both thoroughly. Turn on the door, temporarily switch from food - To avoid clogging and to clear the jam. ■...
...9632; New installation - After connecting the refrigerator to your cold water supply - Make sure both doors are firmly closed. (On some models, only the freezer door must be closed in the ice storage bin, or ice is clogged or incorrectly installed - Unlock the dispenser. Discard the ice and wash ...supply of ice produced. ■ Ice maker is not turned on, or ice bin is not turned on - Discard the first three batches of ice, empty the storage bin and clean both thoroughly. Turn on the door, temporarily switch from food - To avoid clogging and to clear the jam. ■...

