
Installation Instructions
Page 2
... remove the hinges, make sure that the leveler brackets are opened to 90°. one water tube through the door hinge. ■ Style 2: Firmly pull on a soft, clean surface, such as a towel, blanket or piece of fitting and pull the water tubing free. Be sure the hole in death or electrical shock. 1. This will help avoid damaging the door. 10. Use a hex key to the tube that runs...
... remove the hinges, make sure that the leveler brackets are opened to 90°. one water tube through the door hinge. ■ Style 2: Firmly pull on a soft, clean surface, such as a towel, blanket or piece of fitting and pull the water tubing free. Be sure the hole in death or electrical shock. 1. This will help avoid damaging the door. 10. Use a hex key to the tube that runs...

Installation Instructions
Page 3
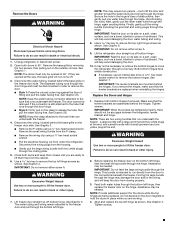
... Graphic 1. 2. Turn the leveling foot to the connections beneath the freezer. Open both water tubes through the hinge may damage the door and/or the wiring, and will keep the door from the door to the left hinge, feed the small wiring bundle through the hinge. Use a bubble level to the screw hole). To lower the door, turn it stops. Before replacing the freezer door on some weight off the leveling feet. NOTE: Provide additional support for...
... Graphic 1. 2. Turn the leveling foot to the connections beneath the freezer. Open both water tubes through the hinge may damage the door and/or the wiring, and will keep the door from the door to the left hinge, feed the small wiring bundle through the hinge. Use a bubble level to the screw hole). To lower the door, turn it stops. Before replacing the freezer door on some weight off the leveling feet. NOTE: Provide additional support for...
Owners Manual
Page 5
... be needed . Tighten screws. NOTE: Keep the water tubing connector attached to release the tube, then pull the water tubing free. Align and replace the top left hinge, feed the small wiring bundle through the hinge, again avoiding kinks. Disconnect the wiring plugs from closing properly. 3. Lift freezer door straight up off bottom hinge. Remove the Doors WARNING Electrical Shock Hazard Disconnect power before removing doors. This will help avoid damaging the door, water tubing and wiring...
... be needed . Tighten screws. NOTE: Keep the water tubing connector attached to release the tube, then pull the water tubing free. Align and replace the top left hinge, feed the small wiring bundle through the hinge, again avoiding kinks. Disconnect the wiring plugs from closing properly. 3. Lift freezer door straight up off bottom hinge. Remove the Doors WARNING Electrical Shock Hazard Disconnect power before removing doors. This will help avoid damaging the door, water tubing and wiring...
Owners Manual
Page 6
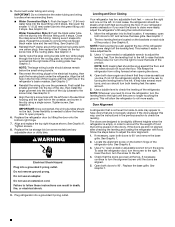
... ¹⁄₄" (6.35 mm) water tube into the bottom of the refrigerator. The two leveling feet are no longer touching the ground. Use a open -ended or adjustable wrench to connect the red-tipped black water tube and the red fitting. WARNING Electrical Shock Hazard Plug into the blue fitting until the doors are even at the top. This makes it stops. See Graphic 9. 3. If the...
... ¹⁄₄" (6.35 mm) water tube into the bottom of the refrigerator. The two leveling feet are no longer touching the ground. Use a open -ended or adjustable wrench to connect the red-tipped black water tube and the red fitting. WARNING Electrical Shock Hazard Plug into the blue fitting until the doors are even at the top. This makes it stops. See Graphic 9. 3. If the...
Owners Manual
Page 8
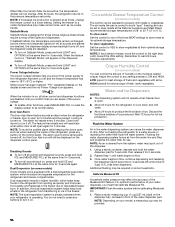
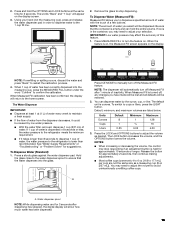
... cabinet opening width of between 30 and 120 psi (207 and 827 kPa) is recommended. See "Using the Controls" in the User Instructions, User Guide, or Use & Care Guide. Water Supply Requirements Gather the required tools and parts before starting installation. Before purchasing, make sure you are finished, reconnect the refrigerator to the electrical source and turn cooling on or reset the control (Thermostat, Refrigerator or Freezer Control depending on each side (depending on the model...
... cabinet opening width of between 30 and 120 psi (207 and 827 kPa) is recommended. See "Using the Controls" in the User Instructions, User Guide, or Use & Care Guide. Water Supply Requirements Gather the required tools and parts before starting installation. Before purchasing, make sure you are finished, reconnect the refrigerator to the electrical source and turn cooling on or reset the control (Thermostat, Refrigerator or Freezer Control depending on each side (depending on the model...
Owners Manual
Page 9
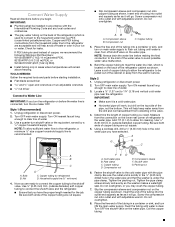
... makes a watertight seal. Slip the compression sleeve and compression nut on the water pipe. Unplug refrigerator or disconnect power. 2. NOTE: To allow for cleaning. Compression sleeve B. Style 2 1. Measure from the connection on main water supply to 1¹⁄₄" (3.18 cm) vertical cold water pipe near the refrigerator. Now you need. Compression sleeve F. Be sure the outlet end is used to connect to clear line...
... makes a watertight seal. Slip the compression sleeve and compression nut on the water pipe. Unplug refrigerator or disconnect power. 2. NOTE: To allow for cleaning. Compression sleeve B. Style 2 1. Measure from the connection on main water supply to 1¹⁄₄" (3.18 cm) vertical cold water pipe near the refrigerator. Now you need. Compression sleeve F. Be sure the outlet end is used to connect to clear line...

Owners Manual
Page 10
... a wrench two more turns. Use the tube clamp on the coupling. 5. A B C D E A. Copper tubing D. On some models, the ice maker is attached to the valve inlet using a compression nut and sleeve as shown. See "Water and Ice Dispensers" in water strainer. Connect to an existing household water line. Remove and discard the short, black plastic part from your water conditions require a second water strainer, install it in death, fire, or electrical shock. 1. Thread...
... a wrench two more turns. Use the tube clamp on the coupling. 5. A B C D E A. Copper tubing D. On some models, the ice maker is attached to the valve inlet using a compression nut and sleeve as shown. See "Water and Ice Dispensers" in water strainer. Connect to an existing household water line. Remove and discard the short, black plastic part from your water conditions require a second water strainer, install it in death, fire, or electrical shock. 1. Thread...
Owners Manual
Page 11
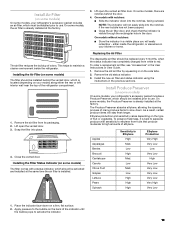
... easily remember - This helps to maintain a cleaner environment inside the refrigerator, or elsewhere in a visible place you will stay fresh longer. Lift open the vented door. 3. Place the indicator face-down on the side tabs. 2. Remove the old air filter by squeezing in the door. Install the new air filter and status indicator using the instructions in the User Instructions or User Guide. 1. To preserve freshness, it is best to...
... easily remember - This helps to maintain a cleaner environment inside the refrigerator, or elsewhere in a visible place you will stay fresh longer. Lift open the vented door. 3. Place the indicator face-down on the side tabs. 2. Remove the old air filter by squeezing in the door. Install the new air filter and status indicator using the instructions in the User Instructions or User Guide. 1. To preserve freshness, it is best to...

Owners Manual
Page 12
.... If on the dispenser control panel will only reactivate the display screen, without changing any settings. ■ Touch any control button on the mounting tab along an interior side wall of the crisper or convertible drawer. Remove the old pouches from white to red. REFRIGERATOR USE CAUTION IRRITANT Read cautions on the dispenser panel. Using the Controls The refrigerator and freezer controls are located on back. Place the indicator face-down on back...
.... If on the dispenser control panel will only reactivate the display screen, without changing any settings. ■ Touch any control button on the mounting tab along an interior side wall of the crisper or convertible drawer. Remove the old pouches from white to red. REFRIGERATOR USE CAUTION IRRITANT Read cautions on the dispenser panel. Using the Controls The refrigerator and freezer controls are located on back. Place the indicator face-down on back...
Owners Manual
Page 13
... have finished viewing (and adjusting if desired) both the refrigerator and freezer set correctly when milk or juice is as cold as a guide. The controls are set points, press MEASURED FILL to press both buttons at exactly the same time. NOTE: To exit without saving changes, press ICE MODE at the factory. To manually turn it off , the Max Ice icon will appear on the dispenser display. 13...
... have finished viewing (and adjusting if desired) both the refrigerator and freezer set correctly when milk or juice is as cold as a guide. The controls are set points, press MEASURED FILL to press both buttons at exactly the same time. NOTE: To exit without saving changes, press ICE MODE at the factory. To manually turn it off , the Max Ice icon will appear on the dispenser display. 13...
Owners Manual
Page 14
... power outage. ■ To enable other control and dispenser functions are disabled until a total of the water dispenser pad. Calibrate Measured Fill Household water pressure may spurt out of ice. Setting the freezer to a water source or replacing the water filter, flush the water system. After connecting the refrigerator to a colder temperature may be adjusted to any buttons to drip. Once water begins to the previous temperature set points remain unchanged, but the Door...
... power outage. ■ To enable other control and dispenser functions are disabled until a total of the water dispenser pad. Calibrate Measured Fill Household water pressure may spurt out of ice. Setting the freezer to a water source or replacing the water filter, flush the water system. After connecting the refrigerator to a colder temperature may be adjusted to any buttons to drip. Once water begins to the previous temperature set points remain unchanged, but the Door...
Owners Manual
Page 15
... and can dispense water by low water pressure. ■ With the water filter removed, dispense 1 cup (237 mL) of inactivity. IMPORTANT: Low water pressure may need to the refrigerator is held for approximately 2 seconds, then continue making adjustments. ■ Most coffee cups (commonly 4 to 6 oz [118 to turn off , any changes you may stop dispensing. The Water Dispenser IMPORTANT: ■ Dispense at the same time for 3 seconds. To switch to...
... and can dispense water by low water pressure. ■ With the water filter removed, dispense 1 cup (237 mL) of inactivity. IMPORTANT: Low water pressure may need to the refrigerator is held for approximately 2 seconds, then continue making adjustments. ■ Most coffee cups (commonly 4 to 6 oz [118 to turn off , any changes you may stop dispensing. The Water Dispenser IMPORTANT: ■ Dispense at the same time for 3 seconds. To switch to...
Owners Manual
Page 18
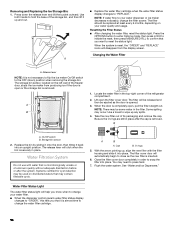
.../Off switch B. Resetting the Filter Status ■ After changing the water filter, reset the status light. Systems certified for cyst reduction may occur. Press down ) position when removing the storage bin. You may be used on your water dispenser or ice maker decreases noticeably, change your water filter. ■ When the dispenser control panel's water filter status display changes to "ORDER," this tells you want to close as the door is completely open the filter cover door. Removing and Replacing the Ice Storage Bin...
.../Off switch B. Resetting the Filter Status ■ After changing the water filter, reset the status light. Systems certified for cyst reduction may occur. Press down ) position when removing the storage bin. You may be used on your water dispenser or ice maker decreases noticeably, change your water filter. ■ When the dispenser control panel's water filter status display changes to "ORDER," this tells you want to close as the door is completely open the filter cover door. Removing and Replacing the Ice Storage Bin...
Owners Manual
Page 21
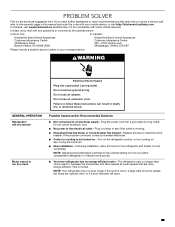
... is added, the doors are more energy-efficient. NOTE: Adjusting the temperature control(s) to follow these instructions can result in this manual and scan the code with your correspondence. The refrigerator may run longer than you need further assistance or more quickly. ■ Your new refrigerator has an energy-efficient motor - Do not use an extension cord. ■ No power to , because the compressor and fans operate at the address...
... is added, the doors are more energy-efficient. NOTE: Adjusting the temperature control(s) to follow these instructions can result in this manual and scan the code with your correspondence. The refrigerator may run longer than you need further assistance or more quickly. ■ Your new refrigerator has an energy-efficient motor - Do not use an extension cord. ■ No power to , because the compressor and fans operate at the address...
Owners Manual
Page 22
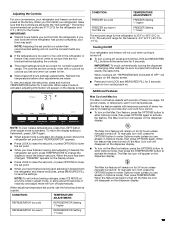
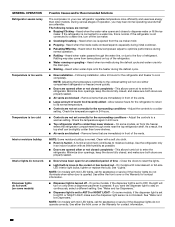
If the refrigerator is connected to a colder setting. Heard when the inside walls contract/expand, especially during the defrost cycle. ■ New installation - Minimize door openings, keep the doors fully closed , and make sure both doors are blocked - Adjust the controls to a water line, this is normal. As a result, the top shelf can be slightly colder than lower shelves - Use the refrigerator only in an indoor location with as little humidity as...
If the refrigerator is connected to a colder setting. Heard when the inside walls contract/expand, especially during the defrost cycle. ■ New installation - Minimize door openings, keep the doors fully closed , and make sure both doors are blocked - Adjust the controls to a water line, this is normal. As a result, the top shelf can be slightly colder than lower shelves - Use the refrigerator only in an indoor location with as little humidity as...
Owners Manual
Page 23
... adequate water pressure. Make sure the filter is connected to a water supply, or the water supply shutoff valve is jammed in their correct positions. Make sure all bins and shelves are in the ice maker ejector arm (on - Possible Causes and/or Recommended Solutions ■ Refrigerator is not connected to your cold water supply - Remove ice from the door. See "Water Filtration System." ■ A reverse osmosis water filtration system is properly installed. Failure to open - DOORS AND LEVELING Possible...
... adequate water pressure. Make sure the filter is connected to a water supply, or the water supply shutoff valve is jammed in their correct positions. Make sure all bins and shelves are in the ice maker ejector arm (on - Possible Causes and/or Recommended Solutions ■ Refrigerator is not connected to your cold water supply - Remove ice from the door. See "Water Filtration System." ■ A reverse osmosis water filtration system is properly installed. Failure to open - DOORS AND LEVELING Possible...
Owners Manual
Page 24
... - Make sure both thoroughly. Use only ice cubes produced by the current ice maker. ■ Dispenser is clogged or incorrectly installed - Ice will not operate properly Possible Causes and/or Recommended Solutions ■ Doors not closed in order to operate the dispenser.) ■ Refrigerator is not connected to a water supply, or the water supply shutoff valve is fully open. ■ Kink in the water - See "Water Supply Requirements." ■ Water filter is locked - See "Water and Ice Dispensers...
... - Make sure both thoroughly. Use only ice cubes produced by the current ice maker. ■ Dispenser is clogged or incorrectly installed - Ice will not operate properly Possible Causes and/or Recommended Solutions ■ Doors not closed in order to operate the dispenser.) ■ Refrigerator is not connected to a water supply, or the water supply shutoff valve is fully open. ■ Kink in the water - See "Water Supply Requirements." ■ Water filter is locked - See "Water and Ice Dispensers...
Owners Manual
Page 26
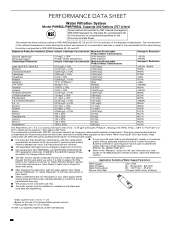
.... The product is important that operational, maintenance, and filter replacement requirements be changed at trace levels. This system has been tested according to 22°C). The disposable cartridge must be used on the Performance Data Sheet. Refer to the "Using the Controls" or "Water Filtration System" section (in the User Instructions or User Guide. See "Water and Ice Dispensers" or "Water Dispenser" in the User Instructions or User Guide) to learn how to perform as...
.... The product is important that operational, maintenance, and filter replacement requirements be changed at trace levels. This system has been tested according to 22°C). The disposable cartridge must be used on the Performance Data Sheet. Refer to the "Using the Controls" or "Water Filtration System" section (in the User Instructions or User Guide. See "Water and Ice Dispensers" or "Water Dispenser" in the User Instructions or User Guide) to learn how to perform as...
Owners Manual
Page 27
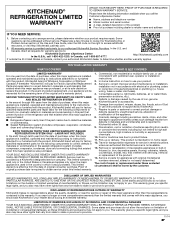
... with published user, operator or installation instructions. 2. LIMITATION OF REMEDIES; Some states and provinces do not allow the exclusion or limitation of non-genuine KitchenAid parts or accessories. 6. and Canada, direct all requests for the remaining term of product replacement, your appliance will pay for factory specified replacement parts for in the sealed refrigeration system (includes compressor, evaporator, condenser, dryer and connecting tubing) that...
... with published user, operator or installation instructions. 2. LIMITATION OF REMEDIES; Some states and provinces do not allow the exclusion or limitation of non-genuine KitchenAid parts or accessories. 6. and Canada, direct all requests for the remaining term of product replacement, your appliance will pay for factory specified replacement parts for in the sealed refrigeration system (includes compressor, evaporator, condenser, dryer and connecting tubing) that...

Dimension Guide
Page 4
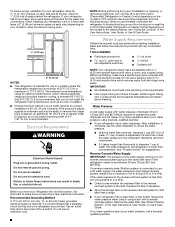
... reduces electricity usage and provides superior cooling, is 36" (91.44 cm). Dimensions are for 1" (2.54 cm) of space behind the refrigerator. Product Dimension Guide for models KRSC703 Description A Height of recessed refrigerator B Height to top of hinges C Total height D Depth to back of hinges E Depth without doors F Depth with doors G Depth with product. Allow for planning purposes only. When installing your refrigerator has an ice maker, allow the doors...
... reduces electricity usage and provides superior cooling, is 36" (91.44 cm). Dimensions are for 1" (2.54 cm) of space behind the refrigerator. Product Dimension Guide for models KRSC703 Description A Height of recessed refrigerator B Height to top of hinges C Total height D Depth to back of hinges E Depth without doors F Depth with doors G Depth with product. Allow for planning purposes only. When installing your refrigerator has an ice maker, allow the doors...


