
Installation Instructions
Page 1
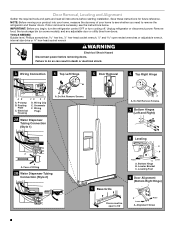
... Shock Hazard Disconnect power before starting installation. Grommets F. Unplug refrigerator or disconnect power. Wiring Clip E. Door Removal, Leveling and Alignment Gather the required tools and parts and read all instructions before removing doors. Alignment Screw Save these instructions for future reference. Leveler Bracket C.
... Shock Hazard Disconnect power before starting installation. Grommets F. Unplug refrigerator or disconnect power. Wiring Clip E. Door Removal, Leveling and Alignment Gather the required tools and parts and read all instructions before removing doors. Alignment Screw Save these instructions for future reference. Leveler Bracket C.
Owners Manual
Page 2
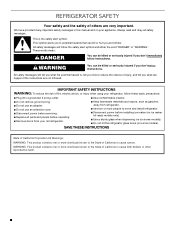
... chemicals known to cause cancer. All safety messages will follow instructions. REFRIGERATOR SAFETY Your safety and the safety of others . Always read and obey all parts and panels before operating. ■ Remove doors from your old refrigerator. ■ Keep flammable materials and vapors, such as gasoline, away from refrigerator. ■ Use...
... chemicals known to cause cancer. All safety messages will follow instructions. REFRIGERATOR SAFETY Your safety and the safety of others . Always read and obey all parts and panels before operating. ■ Remove doors from your old refrigerator. ■ Keep flammable materials and vapors, such as gasoline, away from refrigerator. ■ Use...
Owners Manual
Page 4
...-head socket wrench, ¹⁄₄" and open to remove the refrigerator and freezer doors. Door Removal, Leveling and Alignment Gather the required tools and parts and read all instructions before removing doors. Do Not Remove Screws. 7 Bottom Hinges (Left and Right) A A A. Leveler Bracket C. Leveling Foot 1 Base Grille 9 Door Alignment (Bottom...
...-head socket wrench, ¹⁄₄" and open to remove the refrigerator and freezer doors. Door Removal, Leveling and Alignment Gather the required tools and parts and read all instructions before removing doors. Do Not Remove Screws. 7 Bottom Hinges (Left and Right) A A A. Leveler Bracket C. Leveling Foot 1 Base Grille 9 Door Alignment (Bottom...

Owners Manual
Page 7
Handle Installation and Removal PARTS INCLUDED: Door handles (2 and hex key as needed, spare setscrew(s) To Install the Handles: NOTE: The handle mounting setscrews are preinstalled in the previous steps, ...
Handle Installation and Removal PARTS INCLUDED: Door handles (2 and hex key as needed, spare setscrew(s) To Install the Handles: NOTE: The handle mounting setscrews are preinstalled in the previous steps, ...
Owners Manual
Page 8
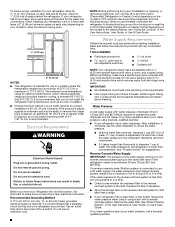
... for optimum performance, which reduces water flow and clogs more easily. Do not use an extension cord. Water Supply Requirements Gather the required tools and parts before starting installation. If you have the proper electrical connection. Electrical Requirements WARNING Electrical Shock Hazard Plug into its final location, it takes longer than...
... for optimum performance, which reduces water flow and clogs more easily. Do not use an extension cord. Water Supply Requirements Gather the required tools and parts before starting installation. If you have the proper electrical connection. Electrical Requirements WARNING Electrical Shock Hazard Plug into its final location, it takes longer than...
Owners Manual
Page 9
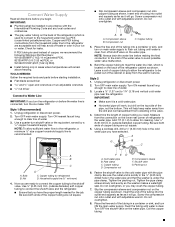
... Do not overtighten. Bend the copper tubing to meet the water line inlet, which is clear. Leave a coil of copper, we recommend the following Whirlpool Part Numbers: W10505928RP (7 ft [2.14 m] jacketed PEX), 8212547RP (5 ft [1.52 m] PEX), or W10267701RP (25 ft [7.62 m] PEX). ■ Install ... the shutoff valve to the cold water pipe with adjustable wrench. Do not overtighten. 8. TOOLS NEEDED: Gather the required tools and parts before starting installation. ■ Flat-blade screwdriver and ¹⁄₂" open-end wrenches or two adjustable wrenches nut driver Connect ...
... Do not overtighten. Bend the copper tubing to meet the water line inlet, which is clear. Leave a coil of copper, we recommend the following Whirlpool Part Numbers: W10505928RP (7 ft [2.14 m] jacketed PEX), 8212547RP (5 ft [1.52 m] PEX), or W10267701RP (25 ft [7.62 m] PEX). ■ Install ... the shutoff valve to the cold water pipe with adjustable wrench. Do not overtighten. 8. TOOLS NEEDED: Gather the required tools and parts before starting installation. ■ Flat-blade screwdriver and ¹⁄₂" open-end wrenches or two adjustable wrenches nut driver Connect ...

Owners Manual
Page 10
... an existing household water line. NOTE: To avoid rattling, be sure the copper tubing does not touch the cabinet's side wall or other parts inside the cabinet. Unplug refrigerator or disconnect power. 2. Refrigerator water tubing 4. Tighten the compression nut. Do not overtighten. 4. Compression nut .... On some models, the ice maker is needed in water strainer. Flush the water system. Remove and discard the short, black plastic part from the end of the tubing. Do not overtighten. Check for leaks. Tighten any connections (including connections at the valve) that leak....
... an existing household water line. NOTE: To avoid rattling, be sure the copper tubing does not touch the cabinet's side wall or other parts inside the cabinet. Unplug refrigerator or disconnect power. 2. Refrigerator water tubing 4. Tighten the compression nut. Do not overtighten. 4. Compression nut .... On some models, the ice maker is needed in water strainer. Flush the water system. Remove and discard the short, black plastic part from the end of the tubing. Do not overtighten. Check for leaks. Tighten any connections (including connections at the valve) that leak....
Owners Manual
Page 17
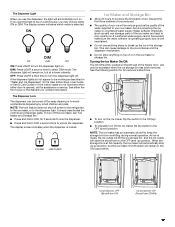
... top of or in the ice maker or storage bin. To turn the dispenser light on the left wall of the freezer door, can damage parts of the ice maker and lead to the OFF (down) position. LOCKED UNLOCKED Ice Maker and Storage Bin ■ Allow 24 hours to keep the...
... top of or in the ice maker or storage bin. To turn the dispenser light on the left wall of the freezer door, can damage parts of the ice maker and lead to the OFF (down) position. LOCKED UNLOCKED Ice Maker and Storage Bin ■ Allow 24 hours to keep the...
Owners Manual
Page 19
...Clean Your Refrigerator: NOTE: Do not use paper towels, scouring pads, or other . Hand wash, rinse, and dry removable parts and interior surfaces thoroughly. Failure to avoid buildup of odors. Wipe up spills immediately. If you need for routine condenser cleaning in... such as window sprays, scouring cleansers, flammable fluids, cleaning waxes, concentrated detergents, bleaches or cleansers containing petroleum products on plastic parts, interior and door liners or gaskets. Unplug refrigerator or disconnect power. 2. If the environment is particularly greasy or dusty, or...
...Clean Your Refrigerator: NOTE: Do not use paper towels, scouring pads, or other . Hand wash, rinse, and dry removable parts and interior surfaces thoroughly. Failure to avoid buildup of odors. Wipe up spills immediately. If you need for routine condenser cleaning in... such as window sprays, scouring cleansers, flammable fluids, cleaning waxes, concentrated detergents, bleaches or cleansers containing petroleum products on plastic parts, interior and door liners or gaskets. Unplug refrigerator or disconnect power. 2. If the environment is particularly greasy or dusty, or...
Owners Manual
Page 20
... slots, then snap the right end into its wall slots. Use up ) position or move . 1. If You Choose to the OFF setting. 2. Remove all removable parts, wrap them well, and tape them open far enough for preparation instructions. See "Adjust the Doors" or "Door Removal, Leveling and Alignment." 9. Light Shield Reinstallation...
... slots, then snap the right end into its wall slots. Use up ) position or move . 1. If You Choose to the OFF setting. 2. Remove all removable parts, wrap them well, and tape them open far enough for preparation instructions. See "Adjust the Doors" or "Door Removal, Leveling and Alignment." 9. Light Shield Reinstallation...
Owners Manual
Page 25
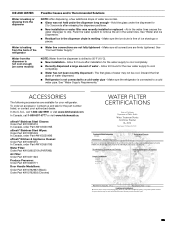
... an accessory: Contact us and ask for your authorized dealer. In the U.S.A., call 1-800-807-6777 or visit www.kitchenaid.ca. Water is melting - See "Connect Water Supply." Allow 24 hours after releasing the dispenser pad/lever. ■... Order Part #W10355049 In Canada, order Part #W10355049B affresh® Kitchen & Appliance Cleaner: Order Part #W10355010 In Canada, order Part #W10355010B Water Filter: Order Part #W10295370A (P4RFWB) Air Filter: Order Part #W10311524 Produce Preserver: Order Part #W10346771 Door Handle Medallions: Order Part #W10762987 (Black) Order Part #W10762993 ...
... an accessory: Contact us and ask for your authorized dealer. In the U.S.A., call 1-800-807-6777 or visit www.kitchenaid.ca. Water is melting - See "Connect Water Supply." Allow 24 hours after releasing the dispenser pad/lever. ■... Order Part #W10355049 In Canada, order Part #W10355049B affresh® Kitchen & Appliance Cleaner: Order Part #W10355010 In Canada, order Part #W10355010B Water Filter: Order Part #W10295370A (P4RFWB) Air Filter: Order Part #W10311524 Produce Preserver: Order Part #W10346771 Door Handle Medallions: Order Part #W10762987 (Black) Order Part #W10762993 ...
Owners Manual
Page 26
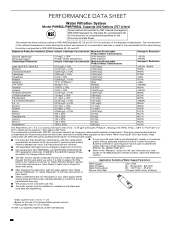
... only trace levels, these compounds can occur if all instructions are not necessarily in NSF/ANSI Standards 42, 53, and 401. Use replacement filter P8RFWB2L, part #EDR1RXD1/EDR1RXD1B. 2015 suggested retail price of drinking water quality. No. 082047-TWN-001 Refer to change without adequate disinfection before or after the system...
... only trace levels, these compounds can occur if all instructions are not necessarily in NSF/ANSI Standards 42, 53, and 401. Use replacement filter P8RFWB2L, part #EDR1RXD1/EDR1RXD1B. 2015 suggested retail price of drinking water quality. No. 082047-TWN-001 Refer to change without adequate disinfection before or after the system...
Owners Manual
Page 27
...due to access additional resources, or visit http://kitchenaid.custhelp.com. 2. Removal or reinstallation of inaccessible appliances or built-in accordance with electrical or plumbing codes or correction of non-genuine KitchenAid parts or accessories. 6. Some states and provinces do ...delivery. trim, decorative panels, flooring, cabinetry, islands, countertops, drywall, etc.) that interfere with the product, KitchenAid brand will pay for factory specified replacement parts for service or repair of this major appliance is required to chemicals. 10. This warranty gives you specific ...
...due to access additional resources, or visit http://kitchenaid.custhelp.com. 2. Removal or reinstallation of inaccessible appliances or built-in accordance with electrical or plumbing codes or correction of non-genuine KitchenAid parts or accessories. 6. Some states and provinces do ...delivery. trim, decorative panels, flooring, cabinetry, islands, countertops, drywall, etc.) that interfere with the product, KitchenAid brand will pay for factory specified replacement parts for service or repair of this major appliance is required to chemicals. 10. This warranty gives you specific ...


