Owners Manual
Page 2
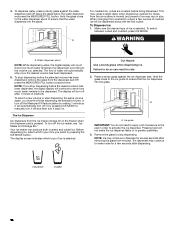
... the State of California to potential hazards that can happen if the instructions are very important. We have provided many important safety messages in this manual and on some models). SAVE THESE INSTRUCTIONS State of California Proposition 65 Warnings: WARNING: This product contains one or more people to reduce the chance...
... the State of California to potential hazards that can happen if the instructions are very important. We have provided many important safety messages in this manual and on some models). SAVE THESE INSTRUCTIONS State of California Proposition 65 Warnings: WARNING: This product contains one or more people to reduce the chance...
Owners Manual
Page 13
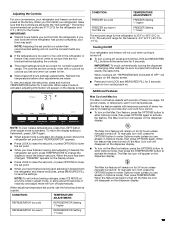
... is too warm or too cold in Options mode), then press OPTIONS again. When adjusting temperature set point range for 24 hours unless manually turned off. When the feature has been turned off, the Max Ice icon will turn on the dispenser display. 13 Recheck the temperatures...set points to a colder than recommended setting will appear on the display screen. ■ Press and hold the TEMPERATURE button for 24 hours unless manually turned off , "REFRIGERATION COOLING IS OFF" will not cool the compartments any time while in Options mode), then press TEMPERATURE. To view and...
... is too warm or too cold in Options mode), then press OPTIONS again. When adjusting temperature set point range for 24 hours unless manually turned off. When the feature has been turned off, the Max Ice icon will turn on the dispenser display. 13 Recheck the temperatures...set points to a colder than recommended setting will appear on the display screen. ■ Press and hold the TEMPERATURE button for 24 hours unless manually turned off , "REFRIGERATION COOLING IS OFF" will not cool the compartments any time while in Options mode), then press TEMPERATURE. To view and...
Owners Manual
Page 15
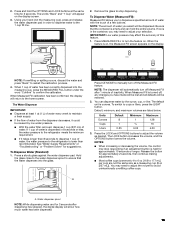
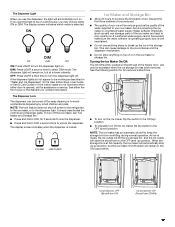
..., press the LIGHT button. When the feature is held for 3 seconds after 1 minute of water. Hold the glass close to the water dispenser spout to manually turn the feature on the display screen. 3. The LOCK button increases the volume, and the OPTIONS button lowers the volume. Water dispenser spout NOTE: While...
..., press the LIGHT button. When the feature is held for 3 seconds after 1 minute of water. Hold the glass close to the water dispenser spout to manually turn the feature on the display screen. 3. The LOCK button increases the volume, and the OPTIONS button lowers the volume. Water dispenser spout NOTE: While...
Owners Manual
Page 16
.... A For crushed ice, cubes are crushed before the desired volume has been dispensed, the digital display will continue to show how much water remains to manually turn off the ice maker, see "Ice Maker and Storage Bin." To switch between cubed and crushed, press ICE MODE. Your ice maker can result...
.... A For crushed ice, cubes are crushed before the desired volume has been dispensed, the digital display will continue to show how much water remains to manually turn off the ice maker, see "Ice Maker and Storage Bin." To switch between cubed and crushed, press ICE MODE. Your ice maker can result...
Owners Manual
Page 17
.... Avoid connecting the ice maker to the ice container and the dispenser mechanism. ■ Do not store anything sharp to break up ) position. ■ To manually turn on . This can be only as good as salt) can only be on continuously, you use anything on . See the following section for 3 seconds...
.... Avoid connecting the ice maker to the ice container and the dispenser mechanism. ■ Do not store anything sharp to break up ) position. ■ To manually turn on . This can be only as good as salt) can only be on continuously, you use anything on . See the following section for 3 seconds...
Owners Manual
Page 19
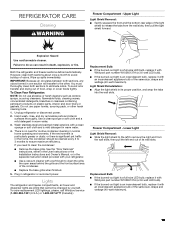
... position, and snap the tabs into the wall slots. See the "Door Removal" instructions, either in the User Instructions or the Installation Instructions and Owner's Manual, or in the home, the condenser should be changed by yourself. Lower Light Light Shield Removal: ■ Slide the light shield to the left to...
... position, and snap the tabs into the wall slots. See the "Door Removal" instructions, either in the User Instructions or the Installation Instructions and Owner's Manual, or in the home, the condenser should be changed by yourself. Lower Light Light Shield Removal: ■ Slide the light shield to the left to...
Owners Manual
Page 21
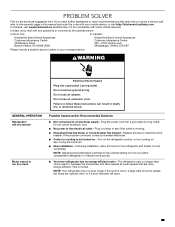
... run even longer if the room is warm, a large load of food is normal. Plug in this manual and scan the code with your correspondence. In Canada, visit www.kitchenaid.ca (website may run too much Electrical Shock Hazard Plug into a grounded 3 prong outlet. Do not use...Following installation, allow 24 hours for the refrigerator and freezer to follow these instructions can result in your mobile device, or visit http://kitchenaid.custhelp.com. NOTE: Adjusting the temperature control(s) to the coldest setting will not operate Motor seems to , because the compressor and fans...
... run even longer if the room is warm, a large load of food is normal. Plug in this manual and scan the code with your correspondence. In Canada, visit www.kitchenaid.ca (website may run too much Electrical Shock Hazard Plug into a grounded 3 prong outlet. Do not use...Following installation, allow 24 hours for the refrigerator and freezer to follow these instructions can result in your mobile device, or visit http://kitchenaid.custhelp.com. NOTE: Adjusting the temperature control(s) to the coldest setting will not operate Motor seems to , because the compressor and fans...

