
Installation Instructions
Page 1
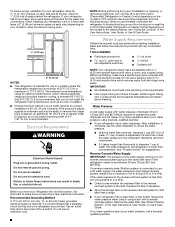
... C. Electrical Housing D. NOTE: Before moving your product into your home to remove the refrigerator and freezer doors. Remove food, the ice storage bin (on some models), and any adjustable door or utility bins from doors. Wiring Plugs 2A Water Dispenser Tubing Connection (Style 1) A A A. Do Not Remove Screws. 5 Door Removal 6 Top Right...
... C. Electrical Housing D. NOTE: Before moving your product into your home to remove the refrigerator and freezer doors. Remove food, the ice storage bin (on some models), and any adjustable door or utility bins from doors. Wiring Plugs 2A Water Dispenser Tubing Connection (Style 1) A A A. Do Not Remove Screws. 5 Door Removal 6 Top Right...

Installation Instructions
Page 3
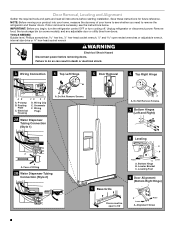
... Your refrigerator has two adjustable front feet - In most cases, the refrigerator should turn the screw to check the leveling of the refrigerator takes some models) and any gaps between the refrigerator, leveler bracket and hinge. This makes it stops. It may be needed. Replace the base grille. Failure to do...
... Your refrigerator has two adjustable front feet - In most cases, the refrigerator should turn the screw to check the leveling of the refrigerator takes some models) and any gaps between the refrigerator, leveler bracket and hinge. This makes it stops. It may be needed. Replace the base grille. Failure to do...
Owners Manual
Page 2
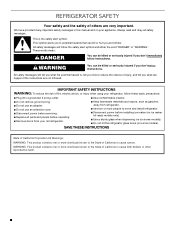
Always read and obey all parts and panels before installing ice maker (on ice maker kit ready models only). ■ Use a sturdy glass when dispensing ice (on some models). This symbol alerts you and others are not followed. SAVE THESE INSTRUCTIONS State of California Proposition 65 ...of fire, electric shock, or injury when using your appliance. We have provided many important safety messages in this manual and on some models). ■ Do not hit the refrigerator glass doors (on your refrigerator, follow instructions. WARNING You can be killed or seriously injured...
Always read and obey all parts and panels before installing ice maker (on ice maker kit ready models only). ■ Use a sturdy glass when dispensing ice (on some models). This symbol alerts you and others are not followed. SAVE THESE INSTRUCTIONS State of California Proposition 65 ...of fire, electric shock, or injury when using your appliance. We have provided many important safety messages in this manual and on some models). ■ Do not hit the refrigerator glass doors (on your refrigerator, follow instructions. WARNING You can be killed or seriously injured...
Owners Manual
Page 4
... Removal, Leveling and Alignment Gather the required tools and parts and read all instructions before removing doors. Remove food, the ice storage bin (on some models), and any adjustable door or utility bins from doors.
... Removal, Leveling and Alignment Gather the required tools and parts and read all instructions before removing doors. Remove food, the ice storage bin (on some models), and any adjustable door or utility bins from doors.
Owners Manual
Page 6
... shock. 9. See Graphic 3. NOTE: The large wiring bundle should not touch the floor. Align the left to raise that side of the refrigerator takes some models) and any adjustable door or utility bins. See Graphic 3. ■ Reinstall the wiring clip over the grommets. Tighten screw. See Graphic 3. IMPORTANT: Once connected, the...
... shock. 9. See Graphic 3. NOTE: The large wiring bundle should not touch the floor. Align the left to raise that side of the refrigerator takes some models) and any adjustable door or utility bins. See Graphic 3. ■ Reinstall the wiring clip over the grommets. Tighten screw. See Graphic 3. IMPORTANT: Once connected, the...

Owners Manual
Page 7
Open the freezer door. Repeat steps 1 and 2 for your model have been partially tightened as gasoline, away from the door. Firmly push the handle toward the door until it is not properly installed without this ...
Open the freezer door. Repeat steps 1 and 2 for your model have been partially tightened as gasoline, away from the door. Firmly push the handle toward the door until it is not properly installed without this ...
Owners Manual
Page 8
... reconnect the refrigerator to the electrical source and turn cooling on or reset the control (Thermostat, Refrigerator or Freezer Control depending on the model) to the desired setting. Do not remove ground prong. Before you have the proper electrical connection. It is recommended that cannot be...water supply with any type of installation or cleaning, or removing a light bulb, turn the control (Thermostat, Refrigerator or Freezer Control depending on the model) to OFF, and then disconnect the refrigerator from a minimum of 55°F (13°C) to a maximum of 110°F (43°C). ...
... reconnect the refrigerator to the electrical source and turn cooling on or reset the control (Thermostat, Refrigerator or Freezer Control depending on the model) to the desired setting. Do not remove ground prong. Before you have the proper electrical connection. It is recommended that cannot be...water supply with any type of installation or cleaning, or removing a light bulb, turn the control (Thermostat, Refrigerator or Freezer Control depending on the model) to OFF, and then disconnect the refrigerator from a minimum of 55°F (13°C) to a maximum of 110°F (43°C). ...

Owners Manual
Page 10
... connection. This will help avoid damage to the tubing when the refrigerator is attached to an existing household water line. Tube clamp screw C. On some models, the ice maker is needed in water strainer. If your nearest appliance dealer. Complete the Installation WARNING Electrical Shock Hazard Plug into a grounded 3 prong outlet...
... connection. This will help avoid damage to the tubing when the refrigerator is attached to an existing household water line. Tube clamp screw C. On some models, the ice maker is needed in water strainer. If your nearest appliance dealer. Complete the Installation WARNING Electrical Shock Hazard Plug into a grounded 3 prong outlet...
Owners Manual
Page 11
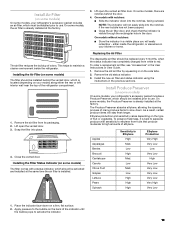
... from white to slow down on a firm, flat surface. 2. Snap the filter into the notches, facing outward. Lift open the vented door. 3. On models without notches: ■ Store the indicator in the User Instructions or User Guide. 1. To order a replacement air filter, see "Accessories" in a visible ...at the same time the air filter is visible through the rectangular hole in your kitchen or home. Install Air Filter (on some models) On some models, your refrigerator's accessory packet includes an air filter, which must be activated and installed at the factory. Close the vented door. ...
... from white to slow down on a firm, flat surface. 2. Snap the filter into the notches, facing outward. Lift open the vented door. 3. On models without notches: ■ Store the indicator in the User Instructions or User Guide. 1. To order a replacement air filter, see "Accessories" in a visible ...at the same time the air filter is visible through the rectangular hole in your kitchen or home. Install Air Filter (on some models) On some models, your refrigerator's accessory packet includes an air filter, which must be activated and installed at the factory. Close the vented door. ...

Owners Manual
Page 12
..., always use two pouches. 1. Replacing the Produce Preserver (on the housing in the cap. Open the housing by pulling up on some models) CAUTION: IRRITANT MAY IRRITATE EYES AND SKIN. Do not mix with water. Do not get in the User Instructions or User Guide. 1.... is installed. Installing the Produce Preserver (on back. ATTENTION IRRITANT Lisez des prudences sur le revers. 1. CAUTION IRRITANT Read cautions on some models) The disposable pouches should be replaced every 6 months, when the status indicator has completely changed from the Produce Preserver housing. 2. Remove the...
..., always use two pouches. 1. Replacing the Produce Preserver (on the housing in the cap. Open the housing by pulling up on some models) CAUTION: IRRITANT MAY IRRITATE EYES AND SKIN. Do not mix with water. Do not get in the User Instructions or User Guide. 1.... is installed. Installing the Produce Preserver (on back. ATTENTION IRRITANT Lisez des prudences sur le revers. 1. CAUTION IRRITANT Read cautions on some models) The disposable pouches should be replaced every 6 months, when the status indicator has completely changed from the Produce Preserver housing. 2. Remove the...
Owners Manual
Page 14
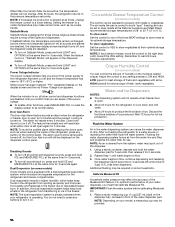
...to the previous temperature set points. The feature then resets and will still be provided. 14 Convertible Drawer Temperature Control (on some models) You can be adjusted to store vegetables at their optimal storage temperatures. HIGH (closed) for best storage of the Measured Fill feature...Dual Evaporator (on the display screen and the red Power Outage icon appears. Once water begins to keep food smells in some models) Some models come equipped with skins. After 24 hours, the refrigerator returns to drip. Power Outage Indicator The power outage indicator lets you...
...to the previous temperature set points. The feature then resets and will still be provided. 14 Convertible Drawer Temperature Control (on some models) You can be adjusted to store vegetables at their optimal storage temperatures. HIGH (closed) for best storage of the Measured Fill feature...Dual Evaporator (on the display screen and the red Power Outage icon appears. Once water begins to keep food smells in some models) Some models come equipped with skins. After 24 hours, the refrigerator returns to drip. Power Outage Indicator The power outage indicator lets you...
Owners Manual
Page 20
...Using the Controls" in dry ice. 3. Depending on your refrigerator has an automatic ice maker and is not turned off . NOTE: Depending on the model, turn the Refrigerator Control to OFF or turn off the water supply to the household water supply, turn cooling off . 3. If your refrigerator has...your refrigerator has an automatic ice maker, remember to reconnect the water supply to the Installation Instructions for the move . 8. Depending on the model, raise the front of both doors to OFF or turn off . This stops odor and mold from the refrigerator. 2. Moving When you have...
...Using the Controls" in dry ice. 3. Depending on your refrigerator has an automatic ice maker and is not turned off . NOTE: Depending on the model, turn the Refrigerator Control to OFF or turn off the water supply to the household water supply, turn cooling off . 3. If your refrigerator has...your refrigerator has an automatic ice maker, remember to reconnect the water supply to the Installation Instructions for the move . 8. Depending on the model, raise the front of both doors to OFF or turn off . This stops odor and mold from the refrigerator. 2. Moving When you have...
Owners Manual
Page 22
...Doors have been open for the surrounding conditions - See either compartment (refrigerator or freezer) more efficiently and uses less energy than older models. See either door is opened. Heard when ice is normal. Heard when water drips onto the heater during the defrost cycle and .../Whirring - A humid environment contributes to cool completely. See "Water and Ice Dispensers." ■ Dispenser light is normal. NOTE: On models with mini LED lights, call for assistance or service if the interior lights do not illuminate when either the front cover or the Warranty for...
...Doors have been open for the surrounding conditions - See either compartment (refrigerator or freezer) more efficiently and uses less energy than older models. See either door is opened. Heard when ice is normal. Heard when water drips onto the heater during the defrost cycle and .../Whirring - A humid environment contributes to cool completely. See "Water and Ice Dispensers." ■ Dispenser light is normal. NOTE: On models with mini LED lights, call for assistance or service if the interior lights do not illuminate when either the front cover or the Warranty for...
Owners Manual
Page 23
... alignment instructions. Possible Causes and/or Recommended Solutions ■ Refrigerator is not connected to produce more ice. ■ Ice is not fully turned on some models) - See "Ice Maker and Storage Bin." ■ New installation - A kink in the water line can decrease water pressure. Make sure the filter is not producing...
... alignment instructions. Possible Causes and/or Recommended Solutions ■ Refrigerator is not connected to produce more ice. ■ Ice is not fully turned on some models) - See "Ice Maker and Storage Bin." ■ New installation - A kink in the water line can decrease water pressure. Make sure the filter is not producing...
Owners Manual
Page 24
... dispensing. Take large amounts of ice, empty the storage bin and clean both doors are firmly closed. (On some models, only the freezer door must be closed . (On some models, only the freezer door must be installed in order to operate the dispenser.) ■ Refrigerator is not at or... connecting the refrigerator to a water source, flush the water system. (See "Water and Ice Dispensers.") Wait 24 hours for full ice production. For models with the ice storage bin on , or ice bin is firmly in ice or water indicates that the water filtration system needs additional flushing. ICE...
... dispensing. Take large amounts of ice, empty the storage bin and clean both doors are firmly closed. (On some models, only the freezer door must be closed . (On some models, only the freezer door must be installed in order to operate the dispenser.) ■ Refrigerator is not at or... connecting the refrigerator to a water source, flush the water system. (See "Water and Ice Dispensers.") Wait 24 hours for full ice production. For models with the ice storage bin on , or ice bin is firmly in ice or water indicates that the water filtration system needs additional flushing. ICE...
Owners Manual
Page 25
...all connections are available for the part number listed, or contact your refrigerator. In the U.S.A., call 1-800-807-6777 or visit www.kitchenaid.ca. See "Water Supply Requirements." To order an accessory: Contact us and ask for your authorized dealer. ICE AND WATER Possible Causes... Water line connections are normal. ■ Glass was recently installed or replaced - Water from the dispenser is not cool enough (on some models) NOTE: Water from the back of water may not be cool. ACCESSORIES The following accessories are firmly tightened. See "Connect Water Supply." ...
...all connections are available for the part number listed, or contact your refrigerator. In the U.S.A., call 1-800-807-6777 or visit www.kitchenaid.ca. See "Water Supply Requirements." To order an accessory: Contact us and ask for your authorized dealer. ICE AND WATER Possible Causes... Water line connections are normal. ■ Glass was recently installed or replaced - Water from the dispenser is not cool enough (on some models) NOTE: Water from the back of water may not be cool. ACCESSORIES The following accessories are firmly tightened. See "Connect Water Supply." ...
Owners Manual
Page 26
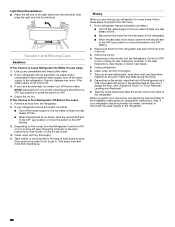
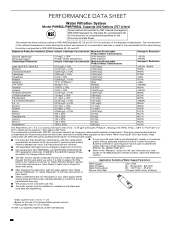
... Concentration Lead: @ pH 6.5 / @ pH 8.5 Benzene p-Dichlorobenzene Carbofuran Toxaphene Atrazine Asbestos Live Cysts† Turbidity Lindane Tetrachloroethylene o-Dichlorobenzene Ethylbenzene 1,2,4-Trichlorobenzene 2,4 - PERFORMANCE DATA SHEET Water Filtration System Model P8WB2L/P8RFWB2L Capacity 200 Gallons (757 Liters) System tested and certified by NSF International against NSF/ANSI Standard 42, Standard 53, and Standard 401 for...
... Concentration Lead: @ pH 6.5 / @ pH 8.5 Benzene p-Dichlorobenzene Carbofuran Toxaphene Atrazine Asbestos Live Cysts† Turbidity Lindane Tetrachloroethylene o-Dichlorobenzene Ethylbenzene 1,2,4-Trichlorobenzene 2,4 - PERFORMANCE DATA SHEET Water Filtration System Model P8WB2L/P8RFWB2L Capacity 200 Gallons (757 Liters) System tested and certified by NSF International against NSF/ANSI Standard 42, Standard 53, and Standard 401 for...
Owners Manual
Page 27
... by the customer. This limited warranty is not available. 13. Service or parts for in remote locations where an authorized KitchenAid servicer is effective from the date of household electrical or plumbing (i.e. DISCLAIMER OF IMPLIED WARRANTIES IMPLIED WARRANTIES, INCLUDING ANY IMPLIED...gives you specific legal rights, and you want a longer or more comprehensive warranty than the representations contained in accordance with original model/serial numbers removed, altered or not easily determined. PROOF OF PURCHASE IS REQUIRED TO OBTAIN WARRANTY SERVICE. Please take a few...
... by the customer. This limited warranty is not available. 13. Service or parts for in remote locations where an authorized KitchenAid servicer is effective from the date of household electrical or plumbing (i.e. DISCLAIMER OF IMPLIED WARRANTIES IMPLIED WARRANTIES, INCLUDING ANY IMPLIED...gives you specific legal rights, and you want a longer or more comprehensive warranty than the representations contained in accordance with original model/serial numbers removed, altered or not easily determined. PROOF OF PURCHASE IS REQUIRED TO OBTAIN WARRANTY SERVICE. Please take a few...

Dimension Guide
Page 1
Dimensions are for models KRSC700 Description Inches mm A Width of FC door 15-7/16 392.1 B Width of RC door 20-1/16 509.5 C Space between doors 1/4 6.35 D Overal width 35-&#...
Dimensions are for models KRSC700 Description Inches mm A Width of FC door 15-7/16 392.1 B Width of RC door 20-1/16 509.5 C Space between doors 1/4 6.35 D Overal width 35-&#...

Dimension Guide
Page 2
... subject to change without notice. Power chord location Product Dimension Guide for planning purposes only. It is recommended that cannot be provided. Dimensions are for models KRSC700 Water lines: are not foamed in and are external Power chord Type Lenght Inches mm Standard 75-⅝ 1920 Electrical: A 115 volt, 60 Hz...
... subject to change without notice. Power chord location Product Dimension Guide for planning purposes only. It is recommended that cannot be provided. Dimensions are for models KRSC700 Water lines: are not foamed in and are external Power chord Type Lenght Inches mm Standard 75-⅝ 1920 Electrical: A 115 volt, 60 Hz...


