Use & Care Guide
Page 2
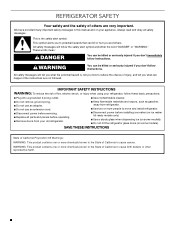
... instructions. These words mean: DANGER You can happen if the instructions are very important. This is , tell you how to move and install refrigerator. ■ Disconnect power before installing ice maker (on ice maker kit ready models only). ■ Use a sturdy glass when dispensing ice (on... some models). ■ Do not hit the refrigerator glass doors (on some models). All safety messages will tell you what can be killed or seriously injured if you don't immediately follow these basic...
... instructions. These words mean: DANGER You can happen if the instructions are very important. This is , tell you how to move and install refrigerator. ■ Disconnect power before installing ice maker (on ice maker kit ready models only). ■ Use a sturdy glass when dispensing ice (on... some models). ■ Do not hit the refrigerator glass doors (on some models). All safety messages will tell you what can be killed or seriously injured if you don't immediately follow these basic...
Use & Care Guide
Page 3
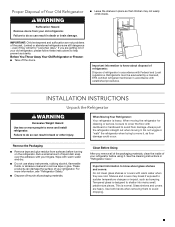
...If you remove all packaging materials. When moving it , as bumping. Always pull the refrigerator straight out when moving the refrigerator for cleaning or service, be evacuated by a licensed, EPA certified refrigerant technician in accordance with warm water when they will sit for "just a few days." ...past. Clean Before Using After you are still dangerous - IMPORTANT: Child entrapment and suffocation are heavy. Wipe with your old refrigerator, please follow these instructions to remove tape or glue. See the cleaning instructions in place so that children may break if ...
...If you remove all packaging materials. When moving it , as bumping. Always pull the refrigerator straight out when moving the refrigerator for cleaning or service, be evacuated by a licensed, EPA certified refrigerant technician in accordance with warm water when they will sit for "just a few days." ...past. Clean Before Using After you are still dangerous - IMPORTANT: Child entrapment and suffocation are heavy. Wipe with your old refrigerator, please follow these instructions to remove tape or glue. See the cleaning instructions in place so that children may break if ...
Use & Care Guide
Page 4
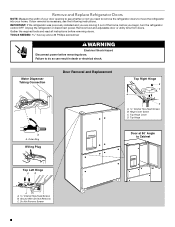
...Cover D. Do Not Remove Screws 4 Remove and Replace Refrigerator Doors NOTE: Measure the width of the home, before removing doors. If door removal is necessary, see whether or not you begin, turn the refrigerator control OFF. Gather the required tools and read all ...instructions before you need to remove the refrigerator doors to see the following instructions. Unplug the refrigerator or disconnect power. Top Hinge A A. TOOLS NEEDED hex key...
...Cover D. Do Not Remove Screws 4 Remove and Replace Refrigerator Doors NOTE: Measure the width of the home, before removing doors. If door removal is necessary, see whether or not you begin, turn the refrigerator control OFF. Gather the required tools and read all ...instructions before you need to remove the refrigerator doors to see the following instructions. Unplug the refrigerator or disconnect power. Top Hinge A A. TOOLS NEEDED hex key...
Use & Care Guide
Page 5
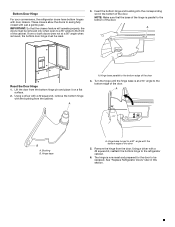
...the corresponding slot in this section. 5 Lift the door from the door. The hinge is parallel to the bottom of the door. See "Replace Refrigerator Doors" later in the bottom of the door 4. Turn the hinge until the hinge base is at a 90° angle when removed, the bottom... door hinge must be removed only when open to a 90° angle to the refrigerator cabinet. 6. A 90˚ Reset the Door Hinge 1. Bushing B. Using a driver with the bushing from the cabinet. Using a driver with a #2 square bit, remove ...
...the corresponding slot in this section. 5 Lift the door from the door. The hinge is parallel to the bottom of the door. See "Replace Refrigerator Doors" later in the bottom of the door 4. Turn the hinge until the hinge base is at a 90° angle when removed, the bottom... door hinge must be removed only when open to a 90° angle to the refrigerator cabinet. 6. A 90˚ Reset the Door Hinge 1. Bushing B. Using a driver with the bushing from the cabinet. Using a driver with a #2 square bit, remove ...
Use & Care Guide
Page 6
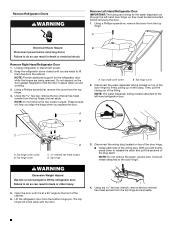
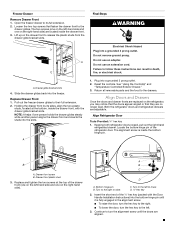
... hinge cover 2. Top hinge cover screw B. Top hinge WARNING Excessive Weight Hazard Use two or more people to the left-hand refrigerator door. Lift the refrigerator door from the cabinet. A Electrical Shock Hazard Disconnect power before removing the door. 1. B A. Disconnect the water dispenser tubing located... on the clasp. NOTE: Do not remove the two locator screws. NOTE: The water dispenser tubing remains attached to lift the refrigerator door. With your left -hand door hinge, so they must be disconnected before removing doors. Failure to do so can result ...
... hinge cover 2. Top hinge cover screw B. Top hinge WARNING Excessive Weight Hazard Use two or more people to the left-hand refrigerator door. Lift the refrigerator door from the cabinet. A Electrical Shock Hazard Disconnect power before removing the door. 1. B A. Disconnect the water dispenser tubing located... on the clasp. NOTE: Do not remove the two locator screws. NOTE: The water dispenser tubing remains attached to lift the refrigerator door. With your left -hand door hinge, so they must be disconnected before removing doors. Failure to do so can result ...
Use & Care Guide
Page 7
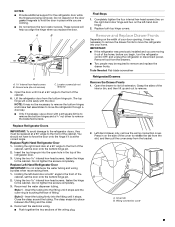
...your door opening, it is touching the face of the cabinet. 6. Reconnect the electrical wiring. ■ Push together the two sections of the refrigerator door. 3. Left-hand drawer only, remove the wiring connection cover. Cover tab B. Wiring connection cover 7 These screws will come away with a... hinge pin. Press in the top of the wiring plug. Do not tighten the screws completely. 3. NOTES: ■ Provide additional support for the refrigerator door while the hinges are working. ■ Do not remove the two locator screws. A B C A Internal hex-head screws B. Do not ...
...your door opening, it is touching the face of the cabinet. 6. Reconnect the electrical wiring. ■ Push together the two sections of the refrigerator door. 3. Left-hand drawer only, remove the wiring connection cover. Cover tab B. Wiring connection cover 7 These screws will come away with a... hinge pin. Press in the top of the wiring plug. Do not tighten the screws completely. 3. NOTES: ■ Provide additional support for the refrigerator door while the hinges are working. ■ Do not remove the two locator screws. A B C A Internal hex-head screws B. Do not ...
Use & Care Guide
Page 8
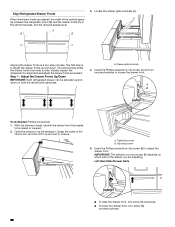
..., as shown. Replace the wiring cover. Drawer glide bracket B. Insert the drawer front bracket into the refrigerator. Faces back of refrigerator 8 A B A. Replace the Drawer Fronts 1. Faces front of refrigerator (insert first) B. NOTE: The drawer front of the drawer glide bracket to release the drawer front ...specific front and rear. Remove the drawer front. ■ Push up on the lever at the bottom of the left-hand refrigerated drawer is completely seated. The bins are designed with the rear side of the bin facing the back of the wiring connector ...
..., as shown. Replace the wiring cover. Drawer glide bracket B. Insert the drawer front bracket into the refrigerator. Faces back of refrigerator 8 A B A. Replace the Drawer Fronts 1. Faces front of refrigerator (insert first) B. NOTE: The drawer front of the drawer glide bracket to release the drawer front ...specific front and rear. Remove the drawer front. ■ Push up on the lever at the bottom of the left-hand refrigerated drawer is completely seated. The bins are designed with the rear side of the bin facing the back of the wiring connector ...
Use & Care Guide
Page 9
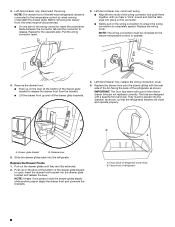
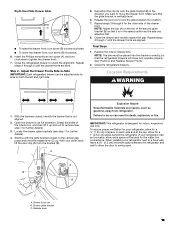
... the doors appear angled or that fasten the drawer front to lower. Both the refrigerator doors and refrigerated drawers are no longer level. Keeping both refrigerator doors closed, pull out the right-hand refrigerated drawer. The alignment screw is fully engaged in death, fire, or electrical shock....screws (one on the left to the drawer glides. Lift up on the right-hand side). B A. C. Bottom hinge pin B. Align Refrigerator Door Tools Provided: ¹⁄₈" hex key 1. Holding the drawer front by its full extension. 2. Drawer front plastic stud 3. ...
... the doors appear angled or that fasten the drawer front to lower. Both the refrigerator doors and refrigerated drawers are no longer level. Keeping both refrigerator doors closed, pull out the right-hand refrigerated drawer. The alignment screw is fully engaged in death, fire, or electrical shock....screws (one on the left to the drawer glides. Lift up on the right-hand side). B A. C. Bottom hinge pin B. Align Refrigerator Door Tools Provided: ¹⁄₈" hex key 1. Holding the drawer front by its full extension. 2. Drawer front plastic stud 3. ...
Use & Care Guide
Page 10
...To raise the drawer front, turn screw (B) clockwise. ■ To lower the drawer front, turn counterclockwise to adjust the drawer front. Align Refrigerated Drawer Fronts When the drawer fronts are adjusting. Locate the drawer glide brackets (A). The first step is to remove. Adjust the Drawer Fronts ...Up/Down IMPORTANT: Each refrigerated drawer can be raised or lowered. 2. With the drawers closed, identify the drawer front that needs to be adjusted up and down ...
...To raise the drawer front, turn screw (B) clockwise. ■ To lower the drawer front, turn counterclockwise to adjust the drawer front. Align Refrigerated Drawer Fronts When the drawer fronts are adjusting. Locate the drawer glide brackets (A). The first step is to remove. Adjust the Drawer Fronts ...Up/Down IMPORTANT: Each refrigerated drawer can be raised or lowered. 2. With the drawers closed, identify the drawer front that needs to be adjusted up and down ...
Use & Care Guide
Page 11
...(A) on the top of the interior bin, and then lift it is designed for the other hand, lift the door clip (A) from refrigerator. With the drawers closed, identify the drawer that it up . A Explosion Hazard Keep flammable materials and vapors, such as the side ...the drawer fronts are level. Close the drawer and visually inspect the gap. Final Steps 1. See "Remove and Replace Drawer Fronts." 2. IMPORTANT: This refrigerator is in the direction you adjusted first 8. Right-Hand Side Drawer Glide ■ To raise the drawer front, turn screw (B) counterclockwise. ■ ...
...(A) on the top of the interior bin, and then lift it is designed for the other hand, lift the door clip (A) from refrigerator. With the drawers closed, identify the drawer that it up . A Explosion Hazard Keep flammable materials and vapors, such as the side ...the drawer fronts are level. Close the drawer and visually inspect the gap. Final Steps 1. See "Remove and Replace Drawer Fronts." 2. IMPORTANT: This refrigerator is in the direction you adjusted first 8. Right-Hand Side Drawer Glide ■ To raise the drawer front, turn screw (B) counterclockwise. ■ ...
Use & Care Guide
Page 12
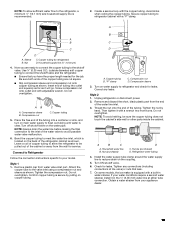
..., the water pressure to the reverse osmosis system needs to be installed in the reverse osmosis system is recommended that you do not install the refrigerator near a heat source, such as an oven or radiator. ¹⁄₂" (1.25 cm) 3³⁄₄" (9.5 cm) Electrical ...blocked. or 20-amp fused, grounded electrical supply is connected to see whether the sediment filter in accordance with a reverse osmosis system. Unplug refrigerator or disconnect power. 2. If a reverse osmosis water filtration system is required. Turn ON nearest faucet long enough to clear line of 40...
..., the water pressure to the reverse osmosis system needs to be installed in the reverse osmosis system is recommended that you do not install the refrigerator near a heat source, such as an oven or radiator. ¹⁄₂" (1.25 cm) 3³⁄₄" (9.5 cm) Electrical ...blocked. or 20-amp fused, grounded electrical supply is connected to see whether the sediment filter in accordance with a reverse osmosis system. Unplug refrigerator or disconnect power. 2. If a reverse osmosis water filtration system is required. Turn ON nearest faucet long enough to clear line of 40...
Use & Care Guide
Page 13
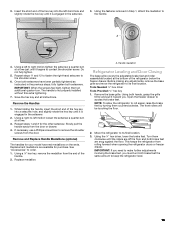
...plastic cap from your water conditions require a second water strainer, install it in water strainer. Confirm copper tubing is clear. Compression nut D. Unplug refrigerator or disconnect power. 2. Do not overtighten. A B C A. Check for leaks. Avoid kinks when coiling the copper tubing. Use ¹⁄...: To avoid rattling, be pulled out of the tubing into outlet end squarely as far as shown. Attach the copper tube to refrigerator) D. Household water line B. Ferrule (purchased) D. Obtain a water strainer from water valve inlet port. Create a service loop with...
...plastic cap from your water conditions require a second water strainer, install it in water strainer. Confirm copper tubing is clear. Compression nut D. Unplug refrigerator or disconnect power. 2. Do not overtighten. A B C A. Check for leaks. Avoid kinks when coiling the copper tubing. Use ¹⁄...: To avoid rattling, be pulled out of the tubing into outlet end squarely as far as shown. Attach the copper tube to refrigerator) D. Household water line B. Ferrule (purchased) D. Obtain a water strainer from water valve inlet port. Create a service loop with...
Use & Care Guide
Page 14
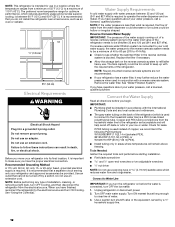
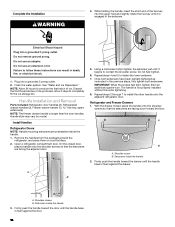
... until the handle base is flush against the door. 14 Do not remove ground prong. Handle Installation and Removal Parts Included: Refrigerator door handles (2), Refrigerated drawer handles (2), Freezer drawer handle (1 hex key, spare setscrew(s) NOTE: The freezer drawer handle is not properly installed without this...it begins to follow these instructions can result in death, fire, or electrical shock. 1. See "Water and Ice Dispensers." Open a refrigerator compartment door. While holding the handle, insert the short end of ice produced. Do not use an adapter. Flush the water system....
... until the handle base is flush against the door. 14 Do not remove ground prong. Handle Installation and Removal Parts Included: Refrigerator door handles (2), Refrigerated drawer handles (2), Freezer drawer handle (1 hex key, spare setscrew(s) NOTE: The freezer drawer handle is not properly installed without this...it begins to follow these instructions can result in death, fire, or electrical shock. 1. See "Water and Ice Dispensers." Open a refrigerator compartment door. While holding the handle, insert the short end of ice produced. Do not use an adapter. Flush the water system....
Use & Care Guide
Page 15
... lower the brake feet. Using the fastener removed in the setscrew. 2. Slowly pull the handle away from rolling forward when opening the refrigerator doors or freezer drawer. The front rollers will be touching the floor. 2. Turn them an additional quarter-turn both setscrews. Using a ...roll easier, raise the brake feet by turning them counterclockwise. Remove the Handles 1. Replacement medallions are snug against the floor. Move the refrigerator to the handle. The handle is engaged in Step 1, attach the medallion to its final location. Using a right-to make further...
... lower the brake feet. Using the fastener removed in the setscrew. 2. Slowly pull the handle away from rolling forward when opening the refrigerator doors or freezer drawer. The front rollers will be touching the floor. 2. Turn them an additional quarter-turn both setscrews. Using a ...roll easier, raise the brake feet by turning them counterclockwise. Remove the Handles 1. Replacement medallions are snug against the floor. Move the refrigerator to the handle. The handle is engaged in Step 1, attach the medallion to its final location. Using a right-to make further...
Use & Care Guide
Page 16
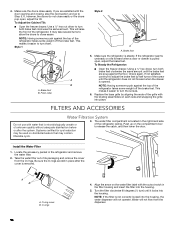
... not use with water that may take several turns to allow the doors to adjust the brake feet by aligning the ends of the refrigerator ceiling. Be sure the O-rings are satisfied with the cutout notch in place after the system. O-ring cover B. Water will not ... easily. This makes it easier to Step 5. Front roller Style 2 ¹⁄₄" A A. Make sure the refrigerator is located in the refrigerator and remove the water filter. 2. To Steady the Refrigerator: ■ Open the freezer drawer. Use a ¹⁄₄" hex nut driver to turn ) until it easier...
... not use with water that may take several turns to allow the doors to adjust the brake feet by aligning the ends of the refrigerator ceiling. Be sure the O-rings are satisfied with the cutout notch in place after the system. O-ring cover B. Water will not ... easily. This makes it easier to Step 5. Front roller Style 2 ¹⁄₄" A A. Make sure the refrigerator is located in the refrigerator and remove the water filter. 2. To Steady the Refrigerator: ■ Open the freezer drawer. Use a ¹⁄₄" hex nut driver to turn ) until it easier...
Use & Care Guide
Page 17
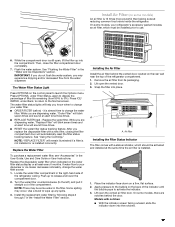
...flow from the water dispenser. After you are notches behind the vented door, located on the rear wall near the top of the refrigerator ceiling. Remove the air filter from 99% to change the water filter. Air filter Installing the Filter Status Indicator The filter comes ... automatically reset the filter status tracking feature. Install the replacement water filter by following steps 2 through 7 in the right-hand side of the refrigerator compartment. 1. Lift open the vented air filter door. Press OPTIONS, under Back, to return to change the water filter sooner. 1. Then,...
...flow from the water dispenser. After you are notches behind the vented door, located on the rear wall near the top of the refrigerator ceiling. Remove the air filter from 99% to change the water filter. Air filter Installing the Filter Status Indicator The filter comes ... automatically reset the filter status tracking feature. Install the replacement water filter by following steps 2 through 7 in the right-hand side of the refrigerator compartment. 1. Lift open the vented air filter door. Press OPTIONS, under Back, to return to change the water filter sooner. 1. Then,...
Use & Care Guide
Page 18
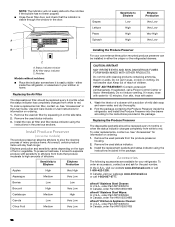
... the used air filter by squeezing in on skin or clothing. In the U.S.A., visit our website www.kitchenaid.com or call 1-800-807-6777. In Canada, visit our webpage www.kitchenaid.ca or call 1-800-422-1230. See "Accessories" in the User Guide, Use and Care Guide or...air filter and filter status indicator using the instructions included in the previous sections. To order an accessory, contact us and ask for your refrigerator. Sensitivity to red. Replacing the Air Filter The disposable air filter should be replaced every 6 months when the status indicator has completely ...
... the used air filter by squeezing in on skin or clothing. In the U.S.A., visit our website www.kitchenaid.com or call 1-800-807-6777. In Canada, visit our webpage www.kitchenaid.ca or call 1-800-422-1230. See "Accessories" in the User Guide, Use and Care Guide or...air filter and filter status indicator using the instructions included in the previous sections. To order an accessory, contact us and ask for your refrigerator. Sensitivity to red. Replacing the Air Filter The disposable air filter should be replaced every 6 months when the status indicator has completely ...
Use & Care Guide
Page 19
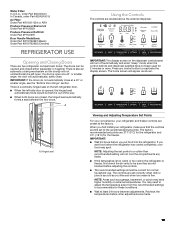
... forms a seal between adjustments. IMPORTANT: If the doors do not automatically close . A Using the Controls The controls are two refrigerator compartment doors. The home screen will not unintentionally be sure they are not blocked before other adjustments are preset at a 40°...P1UB6S1 Produce Preserver Refill kit: Order Part #P1KC6R1 Door Handle Medallions: Order Part #W10762987 (Black) Order Part #W10762993 (Chrome) REFRIGERATOR USE Opening and Closing Doors There are located above the external dispenser. The doors can be correct for normal household use. There ...
... forms a seal between adjustments. IMPORTANT: If the doors do not automatically close . A Using the Controls The controls are two refrigerator compartment doors. The home screen will not unintentionally be sure they are not blocked before other adjustments are preset at a 40°...P1UB6S1 Produce Preserver Refill kit: Order Part #P1KC6R1 Door Handle Medallions: Order Part #W10762987 (Black) Order Part #W10762993 (Chrome) REFRIGERATOR USE Opening and Closing Doors There are located above the external dispenser. The doors can be correct for normal household use. There ...
Use & Care Guide
Page 20
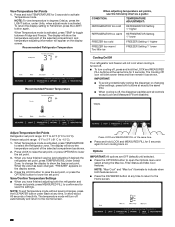
...Cooling Off icon will blink seven times and then remain lit as a guide: CONDITION: TEMPERATURE ADJUSTMENT: REFRIGERATOR too cold REFRIGERATOR Setting 1° higher REFRIGERATOR too warm REFRIGERATOR Setting 1° lower FREEZER too cold FREEZER Setting 1° higher FREEZER too warm / Too little ... time for 3 seconds again to show the temperature set points, use the following chart as shown. Recommended Refrigerator Temperature Recommended Freezer Temperature When adjusting temperature set point of the selected compartment, and temperature adjusting information will turn...
...Cooling Off icon will blink seven times and then remain lit as a guide: CONDITION: TEMPERATURE ADJUSTMENT: REFRIGERATOR too cold REFRIGERATOR Setting 1° higher REFRIGERATOR too warm REFRIGERATOR Setting 1° lower FREEZER too cold FREEZER Setting 1° higher FREEZER too warm / Too little ... time for 3 seconds again to show the temperature set points, use the following chart as shown. Recommended Refrigerator Temperature Recommended Freezer Temperature When adjusting temperature set point of the selected compartment, and temperature adjusting information will turn...
Use & Care Guide
Page 21
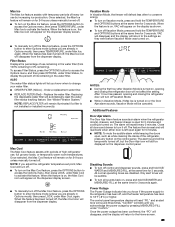
...Max Ice icon will turn off Vacation Mode. ■ While in the water filter. After 1 hour has passed, opening and closing the refrigerator door will appear on the dispenser display screen. The alarm sound will disappear from 100% remaining to enter Options mode (unless you are already ...same time for 24 hours unless manually turned off . Additional Features Door Ajar Alarm The Door Ajar Alarm feature sounds an alarm when the refrigerator door(s), drawers, and freezer drawer is turned on the Max Ice feature, press the OPTIONS button to access the Options menu, then press...
...Max Ice icon will turn off Vacation Mode. ■ While in the water filter. After 1 hour has passed, opening and closing the refrigerator door will appear on the dispenser display screen. The alarm sound will disappear from 100% remaining to enter Options mode (unless you are already ...same time for 24 hours unless manually turned off . Additional Features Door Ajar Alarm The Door Ajar Alarm feature sounds an alarm when the refrigerator door(s), drawers, and freezer drawer is turned on the Max Ice feature, press the OPTIONS button to access the Options menu, then press...


