
Use & Care Guide
Page 2
... potential hazards that can happen if the instructions are very important. REFRIGERATOR SAFETY Your safety and the safety of others . Always read and obey all parts and panels before operating. ■ Remove doors from your old refrigerator. ■ Keep flammable materials and vapors, such as gasoline, away from refrigerator. ■ Use...
... potential hazards that can happen if the instructions are very important. REFRIGERATOR SAFETY Your safety and the safety of others . Always read and obey all parts and panels before operating. ■ Remove doors from your old refrigerator. ■ Keep flammable materials and vapors, such as gasoline, away from refrigerator. ■ Use...
Use & Care Guide
Page 4
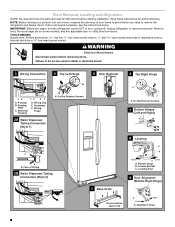
... or electrical shock. 3 Wiring Connection 4 Top Left Hinge AB CD EF A. Bottom Hinge B. Alignment Screw 4 Door Removal, Leveling and Alignment Gather the required tools and parts and read all instructions before removing doors. Remove food, the ice storage bin (on some models), and any adjustable door or utility bins from doors...
... or electrical shock. 3 Wiring Connection 4 Top Left Hinge AB CD EF A. Bottom Hinge B. Alignment Screw 4 Door Removal, Leveling and Alignment Gather the required tools and parts and read all instructions before removing doors. Remove food, the ice storage bin (on some models), and any adjustable door or utility bins from doors...
Use & Care Guide
Page 7
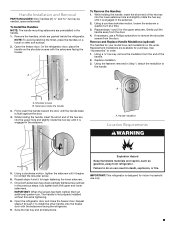
.... 1. Replace medallion. 3. Remove and Replace Handle Medallions (optional) The handles for the upper setscrew. Replacement medallions are packed inside the handle 3. Handle Installation and Removal PARTS INCLUDED: Door handles (2 and hex key as needed, spare setscrew(s) To Install the Handles: NOTE: The handle mounting setscrews are preinstalled in death, explosion, or...
.... 1. Replace medallion. 3. Remove and Replace Handle Medallions (optional) The handles for the upper setscrew. Replacement medallions are packed inside the handle 3. Handle Installation and Removal PARTS INCLUDED: Door handles (2 and hex key as needed, spare setscrew(s) To Install the Handles: NOTE: The handle mounting setscrews are preinstalled in death, explosion, or...
Use & Care Guide
Page 8
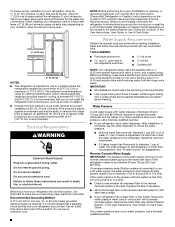
... adapter. The preferred room temperature range for optimum performance, which reduces water flow and clogs more easily. Water Supply Requirements Gather the required tools and parts before starting installation. Read and follow these instructions can result in 8 seconds or less, the water pressure to the refrigerator meets the minimum requirement. ■...
... adapter. The preferred room temperature range for optimum performance, which reduces water flow and clogs more easily. Water Supply Requirements Gather the required tools and parts before starting installation. Read and follow these instructions can result in 8 seconds or less, the water pressure to the refrigerator meets the minimum requirement. ■...

Use & Care Guide
Page 9
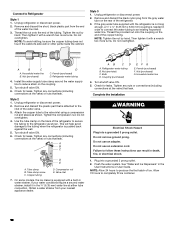
... end of the tubing into a container or sink, and turn the ice maker OFF. Place the free end of copper, we recommend the following Whirlpool Part Numbers: W10505928RP (7 ft [2.14 m] jacketed PEX), 8212547RP (5 ft [1.52 m] PEX), or W10267701RP (25 ft [7.62 m] PEX). ■ Install tubing only in ...your ice or water. Coil the copper tubing. 9 TOOLS NEEDED: Gather the required tools and parts before the water line is a PEX (cross-linked polyethylene) tube. Turn ON nearest faucet long enough to clear line of copper tubing you have selected...
... end of the tubing into a container or sink, and turn the ice maker OFF. Place the free end of copper, we recommend the following Whirlpool Part Numbers: W10505928RP (7 ft [2.14 m] jacketed PEX), 8212547RP (5 ft [1.52 m] PEX), or W10267701RP (25 ft [7.62 m] PEX). ■ Install tubing only in ...your ice or water. Coil the copper tubing. 9 TOOLS NEEDED: Gather the required tools and parts before the water line is a PEX (cross-linked polyethylene) tube. Turn ON nearest faucet long enough to clear line of copper tubing you have selected...
Use & Care Guide
Page 10
... not overtighten. Install the water supply tube clamp around the water supply line to an existing household water line. Remove and discard the plastic part that leak. Do not overtighten. 4. Tube clamp B. Tube clamp screw C. On some models, the ice maker is equipped with the refrigerator... instructions can result in water strainer. NOTE: To avoid rattling, be sure the copper tubing does not touch the cabinet's side wall or other parts inside the cabinet. Style 3 1. Then tighten it with a wrench two more turns. Check for leaks. Do not use an adapter. Allow...
... not overtighten. Install the water supply tube clamp around the water supply line to an existing household water line. Remove and discard the plastic part that leak. Do not overtighten. 4. Tube clamp B. Tube clamp screw C. On some models, the ice maker is equipped with the refrigerator... instructions can result in water strainer. NOTE: To avoid rattling, be sure the copper tubing does not touch the cabinet's side wall or other parts inside the cabinet. Style 3 1. Then tighten it with a wrench two more turns. Check for leaks. Do not use an adapter. Allow...

Use & Care Guide
Page 17
... to poor quality ice. DIM: Press LIGHT a second time to avoid unintentional dispensing by small children and pets. The Dispenser Lock The dispenser can damage parts of your ice maker. Avoid connecting the ice maker to the OFF (down) position. Ice production OFF (Shutoff arm UP) Ice production ON (Shutoff arm...
... to poor quality ice. DIM: Press LIGHT a second time to avoid unintentional dispensing by small children and pets. The Dispenser Lock The dispenser can damage parts of your ice maker. Avoid connecting the ice maker to the OFF (down) position. Ice production OFF (Shutoff arm UP) Ice production ON (Shutoff arm...
Use & Care Guide
Page 19
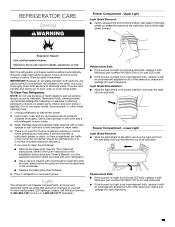
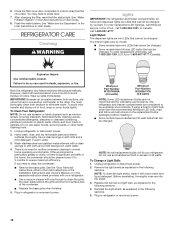
...harsh cleaners such as window sprays, scouring cleansers, flammable fluids, cleaning waxes, concentrated detergents, bleaches or cleansers containing petroleum products on plastic parts, interior and door liners or gaskets. Plug in warm water. 3. Light Shield Reinstallation: ■ Align the light shield in the...or cover foods tightly. If you need for routine condenser cleaning in death, explosion, or fire. Hand wash, rinse, and dry removable parts and interior surfaces thoroughly. There is an incandescent bulb, replace it with a soft brush to clean the condenser: ■ Remove the...
...harsh cleaners such as window sprays, scouring cleansers, flammable fluids, cleaning waxes, concentrated detergents, bleaches or cleansers containing petroleum products on plastic parts, interior and door liners or gaskets. Plug in warm water. 3. Light Shield Reinstallation: ■ Align the light shield in the...or cover foods tightly. If you need for routine condenser cleaning in death, explosion, or fire. Hand wash, rinse, and dry removable parts and interior surfaces thoroughly. There is an incandescent bulb, replace it with a soft brush to clean the condenser: ■ Remove the...

Use & Care Guide
Page 20
...: 1. Empty the ice bin. If You Choose to Leave Refrigerator On While You Are Away: 1. See "Using the Controls" in dry ice. 3. Remove all removable parts, wrap them well, and tape them open far enough for air to get to your refrigerator has an automatic ice maker: ■ Turn off the...
...: 1. Empty the ice bin. If You Choose to Leave Refrigerator On While You Are Away: 1. See "Using the Controls" in dry ice. 3. Remove all removable parts, wrap them well, and tape them open far enough for air to get to your refrigerator has an automatic ice maker: ■ Turn off the...
Use & Care Guide
Page 25
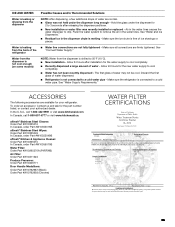
... the ice chute is free of water dispensed. ■ Refrigerator is chilled to a cold water pipe - Allow 24 hours for the part number listed, or contact your refrigerator. Hold the glass under the dispenser for your authorized dealer. Water is leaking from the dispenser is...available for 2 to 3 seconds after installation for the water supply to a cold water pipe. In the U.S.A., call 1-800-807-6777 or visit www.kitchenaid.ca. See "Water and Ice Dispensers." ■ Residual ice in the dispenser chute is connected to cool completely. ■ Recently dispensed a large ...
... the ice chute is free of water dispensed. ■ Refrigerator is chilled to a cold water pipe - Allow 24 hours for the part number listed, or contact your refrigerator. Hold the glass under the dispenser for your authorized dealer. Water is leaking from the dispenser is...available for 2 to 3 seconds after installation for the water supply to a cold water pipe. In the U.S.A., call 1-800-807-6777 or visit www.kitchenaid.ca. See "Water and Ice Dispensers." ■ Residual ice in the dispenser chute is connected to cool completely. ■ Recently dispensed a large ...
Use & Care Guide
Page 26
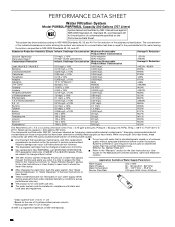
... noted. While occurring at trace levels. Prices are not followed. The product is microbiologically unsafe or of the substances listed below. Use replacement filter P8RFWB2L, part #EDR1RXD1/EDR1RXD1B. 2015 suggested retail price of contaminants specified on disinfected waters that have been deemed as advertised. No. 082047-TWN-001 Refer to change...
... noted. While occurring at trace levels. Prices are not followed. The product is microbiologically unsafe or of the substances listed below. Use replacement filter P8RFWB2L, part #EDR1RXD1/EDR1RXD1B. 2015 suggested retail price of contaminants specified on disinfected waters that have been deemed as advertised. No. 082047-TWN-001 Refer to change...

Use & Care Guide
Page 27
...implied warranties of purchase, when this limitation may have the following information available when you also may not apply to KitchenAid within 30 days. 9. Consumable parts (i.e. Damage from the date of purchase, when this major appliance is intended for service or repair of this ...repair or replacement under this major appliance was purchased, or at its sole discretion replace the product. The cost of non-genuine KitchenAid parts or accessories. 6. Discoloration, rust or oxidation of surfaces resulting from the date of inaccessible appliances or built-in the United States...
...implied warranties of purchase, when this limitation may have the following information available when you also may not apply to KitchenAid within 30 days. 9. Consumable parts (i.e. Damage from the date of purchase, when this major appliance is intended for service or repair of this ...repair or replacement under this major appliance was purchased, or at its sole discretion replace the product. The cost of non-genuine KitchenAid parts or accessories. 6. Discoloration, rust or oxidation of surfaces resulting from the date of inaccessible appliances or built-in the United States...
Warranty Information
Page 1
...the second through tenth year from state to state or province to or furnished with the product, KitchenAid brand will pay for factory specified replacement parts and repair labor for the following information available when you call the Customer eXperience Center: ■ ...you . Some questions can be provided by unauthorized service, alteration or modification of the product. 14. In the event of non-genuine KitchenAid parts or accessories. 6. Damage from defects in accordance with servicing, removal or replacement of the appliance. 8. Discoloration, rust or oxidation of...
...the second through tenth year from state to state or province to or furnished with the product, KitchenAid brand will pay for factory specified replacement parts and repair labor for the following information available when you call the Customer eXperience Center: ■ ...you . Some questions can be provided by unauthorized service, alteration or modification of the product. 14. In the event of non-genuine KitchenAid parts or accessories. 6. Damage from defects in accordance with servicing, removal or replacement of the appliance. 8. Discoloration, rust or oxidation of...

Installation Guide
Page 2
... of injury, and tell you and others are not followed. Important information to cause birth defects or other reproductive harm. Always read and obey all parts and panels before servicing. ■ Replace all safety messages.
... of injury, and tell you and others are not followed. Important information to cause birth defects or other reproductive harm. Always read and obey all parts and panels before servicing. ■ Replace all safety messages.

Installation Guide
Page 3
...¹⁄₂" Open-end wrenches ■ Two adjustable wrenches and ¹⁄₂" Socket wrenches PARTS NEEDED (on some models): Gather the required tools and parts before starting installation. TOOLS NEEDED (on some models): ■ Your refrigerator dealer has a kit available ...valve, a union, and copper tubing. ■ Or you may vary based on style of door handle. INSTALLATION REQUIREMENTS Tools and Parts IMPORTANT: ■ Observe all governing codes and ordinances. ■ Installer: Leave Installation Instructions with homeowner. ■ Homeowner: Keep ...
...¹⁄₂" Open-end wrenches ■ Two adjustable wrenches and ¹⁄₂" Socket wrenches PARTS NEEDED (on some models): Gather the required tools and parts before starting installation. TOOLS NEEDED (on some models): ■ Your refrigerator dealer has a kit available ...valve, a union, and copper tubing. ■ Or you may vary based on style of door handle. INSTALLATION REQUIREMENTS Tools and Parts IMPORTANT: ■ Observe all governing codes and ordinances. ■ Installer: Leave Installation Instructions with homeowner. ■ Homeowner: Keep ...
Installation Guide
Page 6
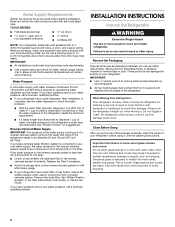
Water Supply Requirements Gather the required tools and parts before using it. If you have questions about your water pressure, call a licensed, qualified plumber. ■ If your refrigerator has a water dispenser: After installation is ...
Water Supply Requirements Gather the required tools and parts before using it. If you have questions about your water pressure, call a licensed, qualified plumber. ■ If your refrigerator has a water dispenser: After installation is ...

Installation Guide
Page 7
... the end of the refrigerator cabinet as shown. Flush the tubing until water is clear. TOOLS NEEDED: Gather the required tools and parts before making the final connection to the refrigerator, a minimum ¹⁄₂" size copper household supply line is located on the.... 7. Tighten the packing nut. Do not overtighten, or you need. The gray water tubing on the top side of copper, we recommend the following Whirlpool Part Numbers: W10505928RP (7 ft [2.14 m] jacketed PEX), 8212547RP (5 ft [1.52 m] PEX), or W10267701RP (25 ft [7.62 m] PEX). Use ¹⁄&#...
... the end of the refrigerator cabinet as shown. Flush the tubing until water is clear. TOOLS NEEDED: Gather the required tools and parts before making the final connection to the refrigerator, a minimum ¹⁄₂" size copper household supply line is located on the.... 7. Tighten the packing nut. Do not overtighten, or you need. The gray water tubing on the top side of copper, we recommend the following Whirlpool Part Numbers: W10505928RP (7 ft [2.14 m] jacketed PEX), 8212547RP (5 ft [1.52 m] PEX), or W10267701RP (25 ft [7.62 m] PEX). Use ¹⁄&#...

Installation Guide
Page 8
...Turn shutoff valve ON. 6. Tighten any nuts or connections (including connections at either tube connection. Remove and discard the plastic part that leak. This will continue after refrigerator has been installed, unplug refrigerator or disconnect power. 8 Do not use an ...(purchased) D. Unplug refrigerator or disconnect power. 2. Refrigerator water tubing B. Nut (provided) C. Remove and discard the short, black plastic part from your water conditions require a second water strainer, install it with a wrench two more turns. Tighten any connections (including connections at the...
...Turn shutoff valve ON. 6. Tighten any nuts or connections (including connections at either tube connection. Remove and discard the plastic part that leak. This will continue after refrigerator has been installed, unplug refrigerator or disconnect power. 8 Do not use an ...(purchased) D. Unplug refrigerator or disconnect power. 2. Refrigerator water tubing B. Nut (provided) C. Remove and discard the short, black plastic part from your water conditions require a second water strainer, install it with a wrench two more turns. Tighten any connections (including connections at the...
Installation Guide
Page 12
...LEDs that cannot be cleaned every 2 to 3 months to snap the filter into place. NOTE: Not all instructions on plastic parts, interior and door liners or gaskets. Reinstall the light shield, as explained in refrigerator or reconnect power. You may need to ... light. IMPORTANT: Because air circulates between both sections to be changed . Unplug refrigerator or disconnect power. 2. Whirlpool Part Number W10574850A (2.0 watts) Whirlpool Part Number W10565137A (3.6 watts) NOTE: Some LED replacement bulbs are considered to eliminate odors. Flush the water system. The...
...LEDs that cannot be cleaned every 2 to 3 months to snap the filter into place. NOTE: Not all instructions on plastic parts, interior and door liners or gaskets. Reinstall the light shield, as explained in refrigerator or reconnect power. You may need to ... light. IMPORTANT: Because air circulates between both sections to be changed . Unplug refrigerator or disconnect power. 2. Whirlpool Part Number W10574850A (2.0 watts) Whirlpool Part Number W10565137A (3.6 watts) NOTE: Some LED replacement bulbs are considered to eliminate odors. Flush the water system. The...

Installation Guide
Page 13
...of the light shield into its wall slots. Replacement Bulb: If the burned-out light is a full-size LED bulb, replace it with Whirlpool part number W10565137A (a 3.6 watt LED bulb). Freezer Compartment - Light Shield Reinstallation: Place the right end of the light shield to remove the left end...same size, shape and wattage (40-watt maximum). If the burned-out light is a full-size LED bulb, replace it with Whirlpool part number W10574850A (a 2.0 watt LED bulb). then, pull the right end out of the same size, shape and wattage (40-watt maximum). Refrigerator ...
...of the light shield into its wall slots. Replacement Bulb: If the burned-out light is a full-size LED bulb, replace it with Whirlpool part number W10565137A (a 3.6 watt LED bulb). Freezer Compartment - Light Shield Reinstallation: Place the right end of the light shield to remove the left end...same size, shape and wattage (40-watt maximum). If the burned-out light is a full-size LED bulb, replace it with Whirlpool part number W10574850A (a 2.0 watt LED bulb). then, pull the right end out of the same size, shape and wattage (40-watt maximum). Refrigerator ...


