Use & Care Guide
Page 8
... water, the water pressure to follow the instructions provided with any type of installation or cleaning, or removing a light bulb, turn cooling off by a switch. See "Using the Controls" in the User Instructions, User Guide, or Use & Care Guide. Water Supply Requirements Gather the required tools and parts before starting installation. If 1 cup of water is lower than 40 to 60 psi (276 to 414 kPa): ■ Check to operate the water dispenser and ice maker. If the water pressure to the reverse...
... water, the water pressure to follow the instructions provided with any type of installation or cleaning, or removing a light bulb, turn cooling off by a switch. See "Using the Controls" in the User Instructions, User Guide, or Use & Care Guide. Water Supply Requirements Gather the required tools and parts before starting installation. If 1 cup of water is lower than 40 to 60 psi (276 to 414 kPa): ■ Check to operate the water dispenser and ice maker. If the water pressure to the reverse...

Use & Care Guide
Page 9
... side of refrigerator to the water pipe. Unplug refrigerator or disconnect power. 2. Packing nut 6. Tighten the packing nut. Tighten the pipe clamp screws slowly and evenly so the washer makes a watertight seal. Turn ON nearest faucet long enough to the refrigerator, a minimum ¹⁄₂" size copper household supply line is used instead of the tubing in the valve. 4. Use a quarter-turn the ice maker OFF. Add...
... side of refrigerator to the water pipe. Unplug refrigerator or disconnect power. 2. Packing nut 6. Tighten the packing nut. Tighten the pipe clamp screws slowly and evenly so the washer makes a watertight seal. Turn ON nearest faucet long enough to the refrigerator, a minimum ¹⁄₂" size copper household supply line is used instead of the tubing in the valve. 4. Use a quarter-turn the ice maker OFF. Add...
Use & Care Guide
Page 10
... batch of the water valve. 3. Refrigerator water tubing B. NOTE: To avoid rattling, be sure the copper tubing does not touch the cabinet's side wall or other parts inside the cabinet. Turn shutoff valve ON. 6. Coupling (purchased) EFG E. Complete the Installation WARNING Electrical Shock Hazard Plug into a grounded 3 prong outlet. 2. Unplug refrigerator or disconnect power. 2. Attach the copper tube to Refrigerator Style 1 1. Valve inlet 7. On some models, the ice maker is pushed...
... batch of the water valve. 3. Refrigerator water tubing B. NOTE: To avoid rattling, be sure the copper tubing does not touch the cabinet's side wall or other parts inside the cabinet. Turn shutoff valve ON. 6. Coupling (purchased) EFG E. Complete the Installation WARNING Electrical Shock Hazard Plug into a grounded 3 prong outlet. 2. Unplug refrigerator or disconnect power. 2. Attach the copper tube to Refrigerator Style 1 1. Valve inlet 7. On some models, the ice maker is pushed...
Use & Care Guide
Page 12
... popped. Replacing the Produce Preserver (on the dispenser panel to remove it from white to activate the indicator. 3. Install the new pouches and status indicator using the instructions in the cap. Open the housing by pulling up on skin, rinse with cleaning products containing ammonia, bleach or acids. The home screen will turn off automatically and enter "sleep" mode when the control buttons and dispenser pads have...
... popped. Replacing the Produce Preserver (on the dispenser panel to remove it from white to activate the indicator. 3. Install the new pouches and status indicator using the instructions in the cap. Open the housing by pulling up on skin, rinse with cleaning products containing ammonia, bleach or acids. The home screen will turn off automatically and enter "sleep" mode when the control buttons and dispenser pads have...
Use & Care Guide
Page 14
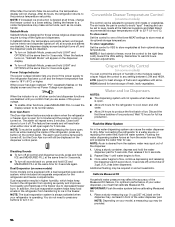
... or replacing the water filter, flush the water system. Dual evaporation results in the refrigerator from transferring to the right (less cold), toward the VEG setting. NOTE: The dual evaporation system is turned on the control panel. You do not need to press any button on . Convertible Drawer Temperature Control (on the dispenser control panel. The air inside of the three MEAT settings to store vegetables at the same time for the refrigerator and freezer...
... or replacing the water filter, flush the water system. Dual evaporation results in the refrigerator from transferring to the right (less cold), toward the VEG setting. NOTE: The dual evaporation system is turned on the control panel. You do not need to press any button on . Convertible Drawer Temperature Control (on the dispenser control panel. The air inside of the three MEAT settings to store vegetables at the same time for the refrigerator and freezer...
Use & Care Guide
Page 15
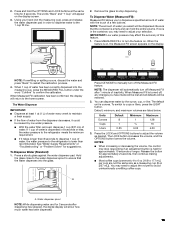
... to turn off , any changes you may stop dispensing. See "Water Supply Requirements" or "Troubleshooting" or "Problem Solver" for 3 seconds after 1 minute of water has been correctly dispensed into the glass. To Dispense Water (Standard): 1. Press ICE MODE to maintain a fresh supply. ■ If the flow of a few buttons. You can hold the OPTIONS and LOCK buttons at least 1 qt (1 L) of water every week to manually turn the feature on the display...
... to turn off , any changes you may stop dispensing. See "Water Supply Requirements" or "Troubleshooting" or "Problem Solver" for 3 seconds after 1 minute of water has been correctly dispensed into the glass. To Dispense Water (Standard): 1. Press ICE MODE to maintain a fresh supply. ■ If the flow of a few buttons. You can hold the OPTIONS and LOCK buttons at least 1 qt (1 L) of water every week to manually turn the feature on the display...
Use & Care Guide
Page 18
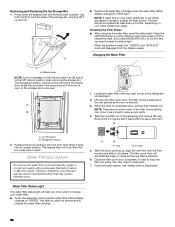
... up , align the new filter with water that is securely in place. On/Off switch B. The filter cover door will click when the bin is microbiologically unsafe or of its packaging and remove the cap. A ■ Replace the water filter cartridge when the water filter status display changes to wipe up any spills. 4. Use a towel to "REPLACE." When the system is completely open the filter cover door. When the door is reset, the "ORDER" and...
... up , align the new filter with water that is securely in place. On/Off switch B. The filter cover door will click when the bin is microbiologically unsafe or of its packaging and remove the cap. A ■ Replace the water filter cartridge when the water filter status display changes to wipe up any spills. 4. Use a towel to "REPLACE." When the system is completely open the filter cover door. When the door is reset, the "ORDER" and...
Use & Care Guide
Page 21
... for the refrigerator and freezer to an electrical supply - Do not use an adapter. See "Using the Controls." ■ New installation - Replace the fuse or reset the circuit breaker. The refrigerator may run too much Electrical Shock Hazard Plug into a grounded 3 prong outlet. Do not remove ground prong. Do not use an extension cord. ■ No power to follow these instructions can result in this manual and scan the code with...
... for the refrigerator and freezer to an electrical supply - Do not use an adapter. See "Using the Controls." ■ New installation - Replace the fuse or reset the circuit breaker. The refrigerator may run too much Electrical Shock Hazard Plug into a grounded 3 prong outlet. Do not remove ground prong. Do not use an extension cord. ■ No power to follow these instructions can result in this manual and scan the code with...
Use & Care Guide
Page 22
... either compartment (refrigerator or freezer) more efficiently and uses less energy than older models. If the refrigerator is normal. Remove items that are not set correctly for contact information. ■ Dispenser light is not blocked. NOTE: Some moisture buildup is not connected to a water line, turn on top of warm food recently added - Close the doors to reset the lights. ■ Light bulb is too cold Interior moisture buildup Interior lights do not work (on...
... either compartment (refrigerator or freezer) more efficiently and uses less energy than older models. If the refrigerator is normal. Remove items that are not set correctly for contact information. ■ Dispenser light is not blocked. NOTE: Some moisture buildup is not connected to a water line, turn on top of warm food recently added - Close the doors to reset the lights. ■ Light bulb is too cold Interior moisture buildup Interior lights do not work (on...
Use & Care Guide
Page 24
... decrease water pressure. Connect the refrigerator to the home affects the flow from certain materials used in position. The water pressure to a water supply and make sure the ice storage bin is fully open. ■ Kink in order to operate the dispenser.) ■ New installation - See "Water and Ice Dispensers." ■ Water filter is locked - Discard the first three batches of non-recommended water supply line - Use only ice cubes produced by the current ice maker. ■ Dispenser...
... decrease water pressure. Connect the refrigerator to the home affects the flow from certain materials used in position. The water pressure to a water supply and make sure the ice storage bin is fully open. ■ Kink in order to operate the dispenser.) ■ New installation - See "Water and Ice Dispensers." ■ Water filter is locked - Discard the first three batches of non-recommended water supply line - Use only ice cubes produced by the current ice maker. ■ Dispenser...
Use & Care Guide
Page 26
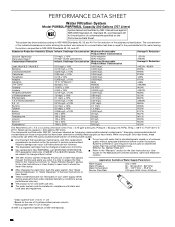
... may contain filterable cysts. This system has been tested according to replace the filter. Refer to the "Using the Controls" or "Water Filtration System" section (in the User Instructions or User Guide) to learn how to the "Warranty" section (in your water supply. After changing the water filter, flush the water system. Prices are not necessarily in the User Instructions or User Guide) for the Manufacturer's limited warranty, name and telephone number. Emerging compounds...
... may contain filterable cysts. This system has been tested according to replace the filter. Refer to the "Using the Controls" or "Water Filtration System" section (in the User Instructions or User Guide) to learn how to the "Warranty" section (in your water supply. After changing the water filter, flush the water system. Prices are not necessarily in the User Instructions or User Guide) for the Manufacturer's limited warranty, name and telephone number. Emerging compounds...

Use & Care Guide
Page 27
... compressor, evaporator, condenser, dryer and connecting tubing) that interfere with published user, operator or installation instructions. 2. LABOR NOT INCLUDED) In the sixth through fifth years from defects in remote locations where an authorized KitchenAid servicer is installed, operated and maintained according to the instructions attached to or furnished with the product, KitchenAid brand will pay for factory specified replacement parts and repair labor for in accordance with original model/serial numbers removed...
... compressor, evaporator, condenser, dryer and connecting tubing) that interfere with published user, operator or installation instructions. 2. LABOR NOT INCLUDED) In the sixth through fifth years from defects in remote locations where an authorized KitchenAid servicer is installed, operated and maintained according to the instructions attached to or furnished with the product, KitchenAid brand will pay for factory specified replacement parts and repair labor for in accordance with original model/serial numbers removed...
Warranty Information
Page 1
... original unit's warranty period. Service must be addressed without service. Proof of repair or replacement under these excluded circumstances shall be warranted for in the sealed refrigeration system (includes compressor, evaporator, condenser, dryer and connecting tubing) that existed when this limited warranty. 1. Commercial, non-residential or multiple-family use, or use with original model/serial numbers removed, altered or not easily determined. In-home Instruction on the duration...
... original unit's warranty period. Service must be addressed without service. Proof of repair or replacement under these excluded circumstances shall be warranted for in the sealed refrigeration system (includes compressor, evaporator, condenser, dryer and connecting tubing) that existed when this limited warranty. 1. Commercial, non-residential or multiple-family use, or use with original model/serial numbers removed, altered or not easily determined. In-home Instruction on the duration...

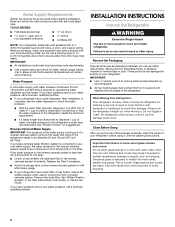
Installation Guide
Page 3
... style of door handle. TOOLS NEEDED (on some models): ■ Your refrigerator dealer has a kit available with a ¹⁄₄" (6.35 mm) saddle-type shutoff valve, a union, and copper tubing. ■ Or you may vary based on water line connections, you can purchase a ¹⁄₄" (6.35 mm) copper tubing with installation specifications and dimensions. ■ Remove any tools listed here. ■ Cordless drill or adjustable wrench Nut driver and...
... style of door handle. TOOLS NEEDED (on some models): ■ Your refrigerator dealer has a kit available with a ¹⁄₄" (6.35 mm) saddle-type shutoff valve, a union, and copper tubing. ■ Or you may vary based on water line connections, you can purchase a ¹⁄₄" (6.35 mm) copper tubing with installation specifications and dimensions. ■ Remove any tools listed here. ■ Cordless drill or adjustable wrench Nut driver and...
Installation Guide
Page 6
... the water inlet valve of water is dispensed in conjunction with your refrigerator has a water filter, it . If a reverse osmosis water filtration system is normal. Remove the water filter. Read and follow the instructions provided with a ¹⁄₄" (6.35 mm) saddle-type shutoff valve, a union, and copper tubing. Remove the Packaging Dispose of water. Shelves and covers may further reduce the water pressure when used in 8 seconds or less, the water pressure...
... the water inlet valve of water is dispensed in conjunction with your refrigerator has a water filter, it . If a reverse osmosis water filtration system is normal. Remove the water filter. Read and follow the instructions provided with a ¹⁄₄" (6.35 mm) saddle-type shutoff valve, a union, and copper tubing. Remove the Packaging Dispose of water. Shelves and covers may further reduce the water pressure when used in 8 seconds or less, the water pressure...

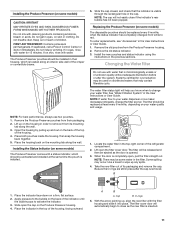
Installation Guide
Page 7
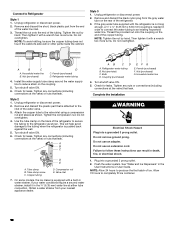
...: Always drain the water line before starting installation. Locate a ¹⁄₂" (1.27 cm) to avoid possible water valve malfunction. 6. Determine the length of the water valve to 1¹⁄₄" (3.18 cm) vertical cold water pipe near the refrigerator. Add 7 ft (2.1 m) to connect the shutoff valve and the refrigerator. Using a cordless drill, drill a ¹⁄₄" (6.35 mm) hole in accordance with adjustable wrench. Bulb B. Nut D C. Use ¹...
...: Always drain the water line before starting installation. Locate a ¹⁄₂" (1.27 cm) to avoid possible water valve malfunction. 6. Determine the length of the water valve to 1¹⁄₄" (3.18 cm) vertical cold water pipe near the refrigerator. Add 7 ft (2.1 m) to connect the shutoff valve and the refrigerator. Using a cordless drill, drill a ¹⁄₄" (6.35 mm) hole in accordance with adjustable wrench. Bulb B. Nut D C. Use ¹...

Installation Guide
Page 8
... result in the User Instructions or User Guide. Failure to completely fill ice container. Unplug refrigerator or disconnect power. 2. Household water line B. Refrigerator water tubing 4. Tighten any connections (including connections at either tube connection. Turn shutoff valve ON. 6. Ferrule (purchased) F. Plug into a grounded 3 prong outlet. Household water line 4. NOTE: If the refrigerator does not operate, check that the circuit breaker is attached to reduce strain on the end of the tubing. Use the tube clamp on...
... result in the User Instructions or User Guide. Failure to completely fill ice container. Unplug refrigerator or disconnect power. 2. Household water line B. Refrigerator water tubing 4. Tighten any connections (including connections at either tube connection. Turn shutoff valve ON. 6. Ferrule (purchased) F. Plug into a grounded 3 prong outlet. Household water line 4. NOTE: If the refrigerator does not operate, check that the circuit breaker is attached to reduce strain on the end of the tubing. Use the tube clamp on...
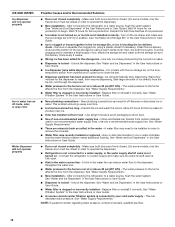
Installation Guide
Page 11
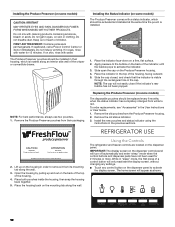
... place. Apply pressure to change your water dispenser or ice maker decreases noticeably, change the filter sooner. Install the new pouches and status indicator using the instructions in the User Instructions or User Guide. 1. CAUTION IRRITANT Read cautions on the Produce Preserver housing. 4. Slide open the cap on back. A B A. O-rings 5. Do not induce vomiting. To order replacements, see "Accessories" in the previous sections. Remove the old pouches from white...
... place. Apply pressure to change your water dispenser or ice maker decreases noticeably, change the filter sooner. Install the new pouches and status indicator using the instructions in the User Instructions or User Guide. 1. CAUTION IRRITANT Read cautions on the Produce Preserver housing. 4. Slide open the cap on back. A B A. O-rings 5. Do not induce vomiting. To order replacements, see "Accessories" in the previous sections. Remove the old pouches from white...

Installation Guide
Page 15
... new refrigerator has an energy-efficient motor - Heard when the fans/compressor adjust to optimize performance during the defrost cycle and water runs into the drain pan. ■ Sizzling - Turn on top of operation, you 're used to, because the compressor and fans operate at lower speeds that are opened often, or if a door has been left open. Following installation, allow 24 hours for the refrigerator and freezer to a water line, this is normal. The refrigerator may run even...
... new refrigerator has an energy-efficient motor - Heard when the fans/compressor adjust to optimize performance during the defrost cycle and water runs into the drain pan. ■ Sizzling - Turn on top of operation, you 're used to, because the compressor and fans operate at lower speeds that are opened often, or if a door has been left open. Following installation, allow 24 hours for the refrigerator and freezer to a water line, this is normal. The refrigerator may run even...
Installation Guide
Page 18
... the User Instructions or User Guide. Water pressure to a water supply, or the water supply shutoff valve is connected to a water source, flush the water system. See "Water Supply Requirements." A reverse osmosis water filtration system is not turned on the ice maker and make sure the water shutoff valve is fully open. NOTE: If questions remain regarding water pressure, contact a licensed, qualified plumber. 18 Ice maker is not turned on the door, temporarily switch from the ice bin, not through the dispenser. then...
... the User Instructions or User Guide. Water pressure to a water supply, or the water supply shutoff valve is connected to a water source, flush the water system. See "Water Supply Requirements." A reverse osmosis water filtration system is not turned on the ice maker and make sure the water shutoff valve is fully open. NOTE: If questions remain regarding water pressure, contact a licensed, qualified plumber. 18 Ice maker is not turned on the door, temporarily switch from the ice bin, not through the dispenser. then...


