

Warranty Information
Page 1
... wiring, fuses or water inlet hoses). 4. The cost of Whirlpool Corporation or Whirlpool Canada LP (hereafter "KitchenAid") will pay for Factory Specified Replacement Parts and repair labor to you want a longer or more comprehensive warranty than the representations contained in the sealed ...workmanship and is installed, operated and maintained according to instructions attached to or furnished with the product, KitchenAid brand will pay for factory specified replacement parts for warranty service to product failure. 10. Please take a few minutes to review the Troubleshooting or...
... wiring, fuses or water inlet hoses). 4. The cost of Whirlpool Corporation or Whirlpool Canada LP (hereafter "KitchenAid") will pay for Factory Specified Replacement Parts and repair labor to you want a longer or more comprehensive warranty than the representations contained in the sealed ...workmanship and is installed, operated and maintained according to instructions attached to or furnished with the product, KitchenAid brand will pay for factory specified replacement parts for warranty service to product failure. 10. Please take a few minutes to review the Troubleshooting or...
Use & Care Guide
Page 3
... if you what the potential hazard is the safety alert symbol. REFRIGERATOR SAFETY Your safety and the safety of others . Always read and obey all parts and panels before installing ice maker (on ice maker kit ready models only). ■ Use a sturdy glass when dispensing ice (on some models). This is...
... if you what the potential hazard is the safety alert symbol. REFRIGERATOR SAFETY Your safety and the safety of others . Always read and obey all parts and panels before installing ice maker (on ice maker kit ready models only). ■ Use a sturdy glass when dispensing ice (on some models). This is...
Use & Care Guide
Page 8
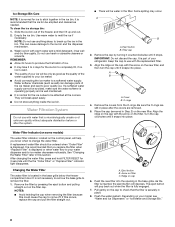
...may occur. It is securely in the base grille below the freezer compartment door. A B A. O-rings 4. Pull gently on the filter. This can damage parts of the water supplied to your ice maker. ■ Avoid connecting the ice maker to change the water filter. They will be attached at the... water filter indicator, located on the cap with warm water and a mild detergent, rinse well and dry thoroughly. Eject button B. It is part of unknown quality without adequate disinfection before or after the covers are removed. 5. Place the cap (removed in the ice bin. Slide the ice...
...may occur. It is securely in the base grille below the freezer compartment door. A B A. O-rings 4. Pull gently on the filter. This can damage parts of the water supplied to your ice maker. ■ Avoid connecting the ice maker to change the water filter. They will be attached at the... water filter indicator, located on the cap with warm water and a mild detergent, rinse well and dry thoroughly. Eject button B. It is part of unknown quality without adequate disinfection before or after the covers are removed. 5. Place the cap (removed in the ice bin. Slide the ice...
Use & Care Guide
Page 9
... items. The freezer drawer is not removable. Your ice will make sure it has been replaced properly. 9 IMPORTANT: Do not discard the cap. It is part of time the refrigerator door is in a horizontal position. Shelves and covers may break if exposed to make sure it has been replaced properly. Deli...
... items. The freezer drawer is not removable. Your ice will make sure it has been replaced properly. 9 IMPORTANT: Do not discard the cap. It is part of time the refrigerator door is in a horizontal position. Shelves and covers may break if exposed to make sure it has been replaced properly. Deli...
Use & Care Guide
Page 10
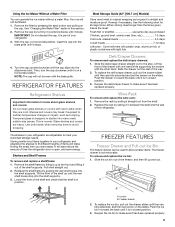
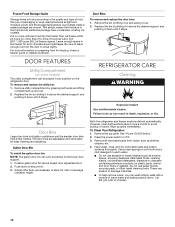
...the storage temperature. To Clean Your Refrigerator: 1. DOOR FEATURES Utility Compartment (on some models) The utility compartment can be placed on plastic parts, interior and door liners or gaskets. Door Bins Large door bins hold gallon containers and the smaller door bins hold 2-liter bottles. The... door bins are normal. Remove all removable parts from inside the package have condensed, creating ice crystals. Use a clean sponge or soft cloth and a mild detergent in warm water. ...
...the storage temperature. To Clean Your Refrigerator: 1. DOOR FEATURES Utility Compartment (on some models) The utility compartment can be placed on plastic parts, interior and door liners or gaskets. Door Bins Large door bins hold gallon containers and the smaller door bins hold 2-liter bottles. The... door bins are normal. Remove all removable parts from inside the package have condensed, creating ice crystals. Use a clean sponge or soft cloth and a mild detergent in warm water. ...
Use & Care Guide
Page 11
... completely, use the manufacturer's approved Stainless Steel Cleaner and Polish. Empty the ice bin. 5. Clean the exterior surfaces. If unintentional contact does occur, clean plastic part with any perishables and freeze other items. 2. Replace the top grille. If You Choose to the OFF (arm up any plastic... parts such as the trim pieces, dispenser covers or door gaskets. If your model) to ON. 7. See "Power On/Off Switch." 4. In Canada call for 2 to ...
... completely, use the manufacturer's approved Stainless Steel Cleaner and Polish. Empty the ice bin. 5. Clean the exterior surfaces. If unintentional contact does occur, clean plastic part with any perishables and freeze other items. 2. Replace the top grille. If You Choose to the OFF (arm up any plastic... parts such as the trim pieces, dispenser covers or door gaskets. If your model) to ON. 7. See "Power On/Off Switch." 4. In Canada call for 2 to ...
Use & Care Guide
Page 14
... LP Customer eXperience Centre toll free 1-800-807-6777 or visit our website at www.kitchenaid.com. For Further Assistance If you need to order replacement parts, we recommend that you can write to KitchenAid Canada LP with : ■ Features and specifications on our full line of appliances. ■ Referrals to the warranty...
... LP Customer eXperience Centre toll free 1-800-807-6777 or visit our website at www.kitchenaid.com. For Further Assistance If you need to order replacement parts, we recommend that you can write to KitchenAid Canada LP with : ■ Features and specifications on our full line of appliances. ■ Referrals to the warranty...
Use & Care Guide
Page 16
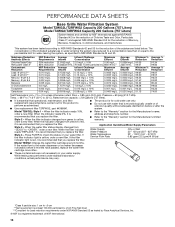
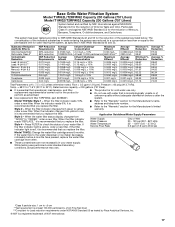
.... When the water filter status display changes from yellow to the permissible limit for water leaving the system, as advertised. ■ Use replacement filter T2RFWG2, part #4396841. ■ The product is microbiologically unsafe or of unknown quality without adequate disinfection before 6 months have passed, replace the water filter cartridge more often...
.... When the water filter status display changes from yellow to the permissible limit for water leaving the system, as advertised. ■ Use replacement filter T2RFWG2, part #4396841. ■ The product is microbiologically unsafe or of unknown quality without adequate disinfection before 6 months have passed, replace the water filter cartridge more often...
Use & Care Guide
Page 17
.... When the water filter status display changes from yellow to the permissible limit for water leaving the system, as advertised. ■ Use replacement filter T2RFWG2, part #4396841. ■ The product is recommended that you replace the filter. Press FILTER to "ORDER," order a new filter. When the filter indicator reads "REPLACE," it...
.... When the water filter status display changes from yellow to the permissible limit for water leaving the system, as advertised. ■ Use replacement filter T2RFWG2, part #4396841. ■ The product is recommended that you replace the filter. Press FILTER to "ORDER," order a new filter. When the filter indicator reads "REPLACE," it...

Use & Care Guide
Page 18
... other than the limited warranty that vary from state to state or province to KitchenAid within 30 days. 8. This product is reported to province. 4/14 18 Service or parts for service or repair of household electrical or plumbing (i.e. DISCLAIMER OF IMPLIED WARRANTIES ...major appliance is installed, operated and maintained according to instructions attached to or furnished with the product, KitchenAid brand will pay for factory specified replacement parts for service in the sealed refrigeration system (includes compressor, evaporator, condenser, dryer and connecting tubing) that...
... other than the limited warranty that vary from state to state or province to KitchenAid within 30 days. 8. This product is reported to province. 4/14 18 Service or parts for service or repair of household electrical or plumbing (i.e. DISCLAIMER OF IMPLIED WARRANTIES ...major appliance is installed, operated and maintained according to instructions attached to or furnished with the product, KitchenAid brand will pay for factory specified replacement parts for service in the sealed refrigeration system (includes compressor, evaporator, condenser, dryer and connecting tubing) that...

Installation Guide
Page 6
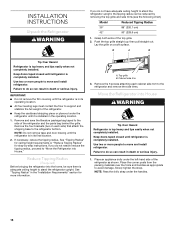
... between cabinets or installed at the end of Acument Intellectual Properties, LLC. 6 Tools Needed Gather the required tools and parts before starting installation. Read and follow the instructions provided with the homeowner. ■ Homeowner: Keep Installation Instructions for side... cabinetmaker or carpenter to make the panels. Removal of ¹⁄₂" (1.3 cm) must be braced. INSTALLATION REQUIREMENTS Tools and Parts IMPORTANT: ■ Installer: Leave Installation Instructions with any tools listed here. ■ Cordless drill ■ Torx®† T15...
... between cabinets or installed at the end of Acument Intellectual Properties, LLC. 6 Tools Needed Gather the required tools and parts before starting installation. Read and follow the instructions provided with the homeowner. ■ Homeowner: Keep Installation Instructions for side... cabinetmaker or carpenter to make the panels. Removal of ¹⁄₂" (1.3 cm) must be braced. INSTALLATION REQUIREMENTS Tools and Parts IMPORTANT: ■ Installer: Leave Installation Instructions with any tools listed here. ■ Cordless drill ■ Torx®† T15...
Installation Guide
Page 15
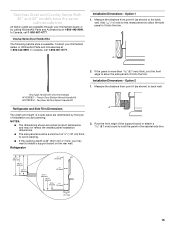
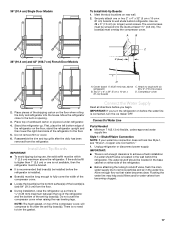
...wall. Option 2 1. Two Door Bottom Mount Handle Kit Refrigerator and Side Trim Dimensions The width and height of a side panel are available through your KitchenAid dealer or KitchenAid Parts and Accessories at 1-800-442-9991. Rout the front edge of the support board or attach a 8.7 mm) board to fit into the trim. Stainless... Steel and Overlay Series Both 36" and 42" models have the same cabinet side trim All factory parts are determined by calling KitchenAid Parts and Accessories at 1-800-442-9991. In Canada, call 1-800-807-6777.
...wall. Option 2 1. Two Door Bottom Mount Handle Kit Refrigerator and Side Trim Dimensions The width and height of a side panel are available through your KitchenAid dealer or KitchenAid Parts and Accessories at 1-800-442-9991. Rout the front edge of the support board or attach a 8.7 mm) board to fit into the trim. Stainless... Steel and Overlay Series Both 36" and 42" models have the same cabinet side trim All factory parts are determined by calling KitchenAid Parts and Accessories at 1-800-442-9991. In Canada, call 1-800-807-6777.
Installation Guide
Page 16
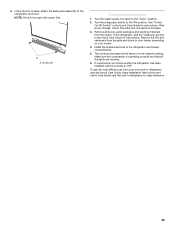
... is in its final location. 2. See "Tipping Radius" in the operating location. 1. Failure to support and stabilize the full weight of the refrigerator and the parts bag behind the grille. Push the top grille straight up; Use two or more people to the side of the refrigerator. ■ Keep the cardboard...
... is in its final location. 2. See "Tipping Radius" in the operating location. 1. Failure to support and stabilize the full weight of the refrigerator and the parts bag behind the grille. Push the top grille straight up; Use two or more people to the side of the refrigerator. ■ Keep the cardboard...
Installation Guide
Page 17
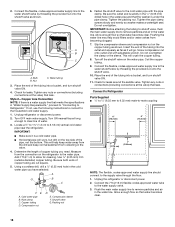
.... 6. Do not crush the compressor cover when raising the rear leveling legs. Stand the refrigerator up so there is not enough clearance to Water Line Parts Needed ■ Minimum 7 ft (2.13 m) flexible, codes-approved water supply line Style 1-Shutoff Valve Connection NOTE: If your water line connection does not look like...
.... 6. Do not crush the compressor cover when raising the rear leveling legs. Stand the refrigerator up so there is not enough clearance to Water Line Parts Needed ■ Minimum 7 ft (2.13 m) flexible, codes-approved water supply line Style 1-Shutoff Valve Connection NOTE: If your water line connection does not look like...
Installation Guide
Page 18
... of the tubing into a bucket, and turn shutoff valve ON. 4. Insert the end of copper tubing are cut square. 5. This will go. Connect to Refrigerator Parts Supplied to ¹⁄₄" (6.35 mm to 6.35 mm) male-to-male coupling 6" (15.2 cm) 6" (15.2 cm) 7" (17.78 cm) 1" (2.54 cm) NOTE: The...
... of the tubing into a bucket, and turn shutoff valve ON. 4. Insert the end of copper tubing are cut square. 5. This will go. Connect to Refrigerator Parts Supplied to ¹⁄₄" (6.35 mm to 6.35 mm) male-to-male coupling 6" (15.2 cm) 6" (15.2 cm) 7" (17.78 cm) 1" (2.54 cm) NOTE: The...
Installation Guide
Page 25
... Instructions and Use & Care Guide near the built-in the refrigerator and freezer compartments. 5. Make sure the compressor is operating properly and that all boxes, parts packages and packing materials from the interior of the refrigerator. Check the water line connections for instructions. Install the shelves and bins in refrigerator for...
... Instructions and Use & Care Guide near the built-in the refrigerator and freezer compartments. 5. Make sure the compressor is operating properly and that all boxes, parts packages and packing materials from the interior of the refrigerator. Check the water line connections for instructions. Install the shelves and bins in refrigerator for...


