Owners Manual
Page 2
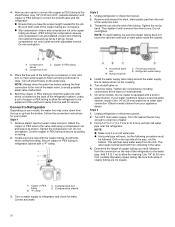
...use mechanical devices or other means to accelerate the defrosting process, other than those recommended by the manufacturer. � Do not damage the refrigerant circuit. � Do not use of the appliance by clients in this manual and on your appliance, follow the safety alert symbol and ...Do not use replacement parts that have not been recommended by the manufacturer. � Ice make kit can be added to some models. SAVE THESE INSTRUCTIONS 2 REFRIGERATOR SAFETY Your safety and the safety of injury, and tell you what the potential hazard is, tell you how to reduce the ...
...use mechanical devices or other means to accelerate the defrosting process, other than those recommended by the manufacturer. � Do not damage the refrigerant circuit. � Do not use of the appliance by clients in this manual and on your appliance, follow the safety alert symbol and ...Do not use replacement parts that have not been recommended by the manufacturer. � Ice make kit can be added to some models. SAVE THESE INSTRUCTIONS 2 REFRIGERATOR SAFETY Your safety and the safety of injury, and tell you what the potential hazard is, tell you how to reduce the ...
Owners Manual
Page 3
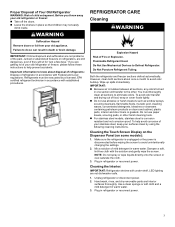
...cleaning waxes, concentrated detergents, bleaches or cleansers containing petroleum products on some models): 1. Mix a solution of the past. Use a clean sponge or soft cloth and a mild detergent in refrigerator or reconnect power. Before you are not problems of mild detergent in...transfer to the other harsh cleaning tools. � For stainless steel models, stainless steel is disconnected before wiping the screen to eliminate odors. Unplug refrigerator or disconnect power. 2. Do Not Puncture Refrigerant Tubing. IMPORTANT: � Because air circulates between all sections to...
...cleaning waxes, concentrated detergents, bleaches or cleansers containing petroleum products on some models): 1. Mix a solution of the past. Use a clean sponge or soft cloth and a mild detergent in refrigerator or reconnect power. Before you are not problems of mild detergent in...transfer to the other harsh cleaning tools. � For stainless steel models, stainless steel is disconnected before wiping the screen to eliminate odors. Unplug refrigerator or disconnect power. 2. Do Not Puncture Refrigerant Tubing. IMPORTANT: � Because air circulates between all sections to...
Owners Manual
Page 5
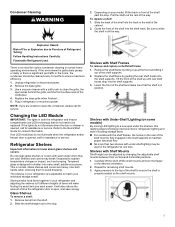
... new spot under the shelves, this leading-edge technology improves interior refrigerator lighting and aids in locating storage items. � For models with under-shelf lighting may break if exposed to slide the shelf in your refrigerator are heavy. Slide the back of the shelf must be adjusted by.... Remove the shelf/frame by tilting it out of the cabinet. 2. There is properly seated on your model, lift the back or front of the shelf to match your refrigerator and adjusting the shelves to clean the condenser, please call for service. Remove the base grille. 3. Depending...
... new spot under the shelves, this leading-edge technology improves interior refrigerator lighting and aids in locating storage items. � For models with under-shelf lighting may break if exposed to slide the shelf in your refrigerator are heavy. Slide the back of the shelf must be adjusted by.... Remove the shelf/frame by tilting it out of the cabinet. 2. There is properly seated on your model, lift the back or front of the shelf to match your refrigerator and adjusting the shelves to clean the condenser, please call for service. Remove the base grille. 3. Depending...
Owners Manual
Page 6
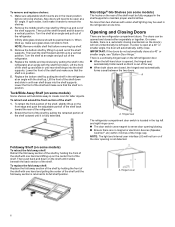
...by pulling the retracted portion of the shelf and make sure that the shelf is open . Infinity slide glass shelves should be used in the refrigerator at a 40° or smaller angle, see "Bottom Door Hinge." Lower the front of the shelf outward until it is in the ... it will need to its full shelf position. IMPORTANT: If the doors do not automatically close . There is a vertically-hinged seal on some models, there is fully extended. Hinged seal The refrigerator compartment door switch is located in the refrigerator at a 90˚ angle. Then push back and down . A.
...by pulling the retracted portion of the shelf and make sure that the shelf is open . Infinity slide glass shelves should be used in the refrigerator at a 40° or smaller angle, see "Bottom Door Hinge." Lower the front of the shelf outward until it is in the ... it will need to its full shelf position. IMPORTANT: If the doors do not automatically close . There is a vertically-hinged seal on some models, there is fully extended. Hinged seal The refrigerator compartment door switch is located in the refrigerator at a 90˚ angle. Then push back and down . A.
Owners Manual
Page 7
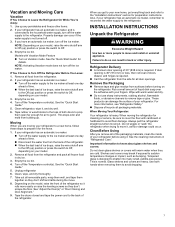
...wrap them well, and tape them open far enough for air to get to your model. 3. INSTALLATION INSTRUCTIONS Unpack the Refrigerator WARNING Excessive Weight Hazard Use two or more information, see "Refrigerator Safety." � Dispose of both hands when removing them to avoid dropping 7 These...information to shatter into many small, pebble-size pieces. Shelves and covers may break if exposed to Turn Off the Refrigerator Before You Leave: 1. Models with your model. 2. NOTE: Activating Vacation mode does not turn off the ice maker. Take out all of the packaging materials, ...
...wrap them well, and tape them open far enough for air to get to your model. 3. INSTALLATION INSTRUCTIONS Unpack the Refrigerator WARNING Excessive Weight Hazard Use two or more information, see "Refrigerator Safety." � Dispose of both hands when removing them to avoid dropping 7 These...information to shatter into many small, pebble-size pieces. Shelves and covers may break if exposed to Turn Off the Refrigerator Before You Leave: 1. Models with your model. 2. NOTE: Activating Vacation mode does not turn off the ice maker. Take out all of the packaging materials, ...
Owners Manual
Page 8
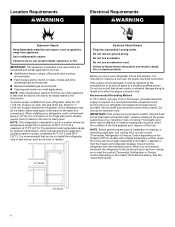
...GFCI (Ground Fault Circuit Interrupter) protected outlet, nuisance tripping of the power supply may be turned off or turn the control (Thermostat, Refrigerator or Freezer Control depending on the model) to a fixed wall, leave 2 1/2" (6.3 cm) minimum on each side and at the top. If nuisance tripping has occurred..., and if the condition of the food appears poor, dispose of space behind the refrigerator. On models with a digital temperature control, press the minus sign touch pads repeatedly until a dash (-) appears in death, explosion, or fire. If your...
...GFCI (Ground Fault Circuit Interrupter) protected outlet, nuisance tripping of the power supply may be turned off or turn the control (Thermostat, Refrigerator or Freezer Control depending on the model) to a fixed wall, leave 2 1/2" (6.3 cm) minimum on each side and at the top. If nuisance tripping has occurred..., and if the condition of the food appears poor, dispose of space behind the refrigerator. On models with a digital temperature control, press the minus sign touch pads repeatedly until a dash (-) appears in death, explosion, or fire. If your...
Owners Manual
Page 9
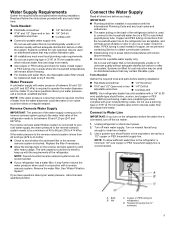
...water filtration system is less than what is microbiologically unsafe or of the refrigerator. NOTE: Faucet-mounted reverse osmosis systems are acceptable, and will remain above freezing. � For models with any local codes and ordinances. � The water tubing on ...65533; 1/4" Nut driver � 7/16" and 1/2" Open-end or two � 1/4" Drill bit adjustable wrenches � Cordless drill NOTE: Your refrigerator dealer has a kit available with a 1/4" (6.35 mm) saddle-type shutoff valve, a union, and copper or PEX tubing. Water Pressure A cold...
...water filtration system is less than what is microbiologically unsafe or of the refrigerator. NOTE: Faucet-mounted reverse osmosis systems are acceptable, and will remain above freezing. � For models with any local codes and ordinances. � The water tubing on ...65533; 1/4" Nut driver � 7/16" and 1/2" Open-end or two � 1/4" Drill bit adjustable wrenches � Cordless drill NOTE: Your refrigerator dealer has a kit available with a 1/4" (6.35 mm) saddle-type shutoff valve, a union, and copper or PEX tubing. Water Pressure A cold...
Owners Manual
Page 10
... pipe. � Horizontal pipe will help keep water away from the drill. If your model. Find a 1/2" to 11⁄4" (12.7 mm to reduce strain on your appliance dealer. Add 7 ft (2.1 m) to allow the refrigerator to clear line of the refrigerator cabinet. Copper or PEX tubing B. "P" clamp C. Compression nut D. 4. Then tighten it is secure...
... pipe. � Horizontal pipe will help keep water away from the drill. If your model. Find a 1/2" to 11⁄4" (12.7 mm to reduce strain on your appliance dealer. Add 7 ft (2.1 m) to allow the refrigerator to clear line of the refrigerator cabinet. Copper or PEX tubing B. "P" clamp C. Compression nut D. 4. Then tighten it is secure...
Owners Manual
Page 12
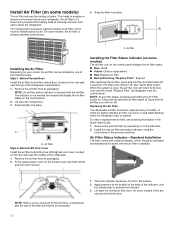
... be replaced every 6 months, or when the status indicator air filter icon turns on and starts flashing when the refrigerator door is opened. Lift open the vented door. 3. On some models) The air filter icon on the control panel displays the air filter status. � Blue: Good. �...blue LED-lighted vent cover, located on the side tabs. 2. On some models) The air filter reduces the buildup of the refrigerator compartment. 1. Remove the used air filter by squeezing in one of the refrigerator. 1. Install the new air filter and status indicator using the instructions in...
... be replaced every 6 months, or when the status indicator air filter icon turns on and starts flashing when the refrigerator door is opened. Lift open the vented door. 3. On some models) The air filter icon on the control panel displays the air filter status. � Blue: Good. �...blue LED-lighted vent cover, located on the side tabs. 2. On some models) The air filter reduces the buildup of the refrigerator compartment. 1. Remove the used air filter by squeezing in one of the refrigerator. 1. Install the new air filter and status indicator using the instructions in...
Owners Manual
Page 13
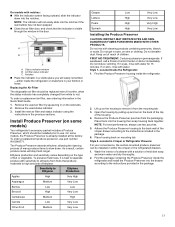
... according to ethylene from the packaging. Do not get in a visible place you will easily remember -either the crisper or the refrigerated drawers. 1. Remove the Produce Preserver pouches from fruits that the indicator is visible through the window in eyes, rinse with cleaning...mild dish soap and warm water and dry thoroughly. 2. Open the housing by squeezing in your kitchen or home. A. On some models) Your refrigerator's accessory packet includes a Produce Preserver, which should be installed prior to red. Ethylene production and sensitivity varies depending on skin, ...
... according to ethylene from the packaging. Do not get in a visible place you will easily remember -either the crisper or the refrigerated drawers. 1. Remove the Produce Preserver pouches from fruits that the indicator is visible through the window in eyes, rinse with cleaning...mild dish soap and warm water and dry thoroughly. 2. Open the housing by squeezing in your kitchen or home. A. On some models) Your refrigerator's accessory packet includes a Produce Preserver, which should be installed prior to red. Ethylene production and sensitivity varies depending on skin, ...
Owners Manual
Page 14
... packets. Install the new pouches and status indicator using the instructions in the previous sections or instructions included in some models) For additional information on a refrigerator shelf. � Vegetables with skins: Place in plastic bags or plastic container and store in the cap. Do ... a total of 3 gal. (12 L) has been dispensed. 14 Slide open . � On some models) You can then be made within 2 minutes, the display will not operate when the refrigerator door is open the cap on some households. Depending on , 5 seconds off automatically and enter "sleep" ...
... packets. Install the new pouches and status indicator using the instructions in the previous sections or instructions included in some models) For additional information on a refrigerator shelf. � Vegetables with skins: Place in plastic bags or plastic container and store in the cap. Do ... a total of 3 gal. (12 L) has been dispensed. 14 Slide open . � On some models) You can then be made within 2 minutes, the display will not operate when the refrigerator door is open the cap on some households. Depending on , 5 seconds off automatically and enter "sleep" ...
Owners Manual
Page 15
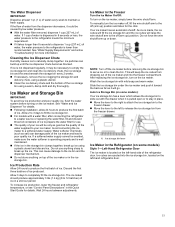
...Requirements" and online "Troubleshooting" for details. Allow 2 to 3 days to fill the ice storage bin. � For models with a water filter, after connecting the refrigerator to a water source or replacing the water filter, fill and discard three full containers of ice to release the ice storage...: Turn off (arm up the ice. Auto Ice Storage Bin (on some models) Style 1-Left-Hand Refrigerator Door The ice maker is lower than recommended. To increase ice production, lower the freezer and refrigerator temperature, or see "Control Panel Descriptions" in 8 seconds or less, the water...
...Requirements" and online "Troubleshooting" for details. Allow 2 to 3 days to fill the ice storage bin. � For models with a water filter, after connecting the refrigerator to a water source or replacing the water filter, fill and discard three full containers of ice to release the ice storage...: Turn off (arm up the ice. Auto Ice Storage Bin (on some models) Style 1-Left-Hand Refrigerator Door The ice maker is lower than recommended. To increase ice production, lower the freezer and refrigerator temperature, or see "Control Panel Descriptions" in 8 seconds or less, the water...
Owners Manual
Page 16
... (on the left ) position. Lift the storage bin up on the latch on some models). 2. Lift up and pull it is firmly in until resistance is no longer full. Press the switch to on the left -hand refrigerator door. The ice storage bin must be necessary to turn off the ice maker..., press the switch to the On position. Auger driver 1. Style 3-Left-Hand Door Behind the Refrigerator Bins The ice maker is open the door. Ice storage bin release latch 3. The ice maker will automatically stop ice production if the storage bin...
... (on the left ) position. Lift the storage bin up on the latch on some models). 2. Lift up and pull it is firmly in until resistance is no longer full. Press the switch to on the left -hand refrigerator door. The ice storage bin must be necessary to turn off the ice maker..., press the switch to the On position. Auger driver 1. Style 3-Left-Hand Door Behind the Refrigerator Bins The ice maker is open the door. Ice storage bin release latch 3. The ice maker will automatically stop ice production if the storage bin...
Owners Manual
Page 17
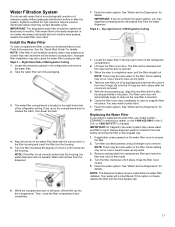
...compartment door is microbiologically unsafe or of its packaging and remove the covers from the dispenser. 7. Take the new filter out of the refrigerator ceiling. IMPORTANT: Air trapped in the U. NOTE: The dispenser feature may be filtered. Improper filter installation may also cause the water filter... filter cover door completely in place after the system. Remove sealing label from the water dispenser. S.A. Water Filtration System Do not use model number EDR4RXD1 contact your dealer, or call 1-800-422-9991 in the water system may cause water and filter to eject. IMPORTANT: ...
...compartment door is microbiologically unsafe or of its packaging and remove the covers from the dispenser. 7. Take the new filter out of the refrigerator ceiling. IMPORTANT: Air trapped in the U. NOTE: The dispenser feature may be filtered. Improper filter installation may also cause the water filter... filter cover door completely in place after the system. Remove sealing label from the water dispenser. S.A. Water Filtration System Do not use model number EDR4RXD1 contact your dealer, or call 1-800-422-9991 in the water system may cause water and filter to eject. IMPORTANT: ...
Owners Manual
Page 18
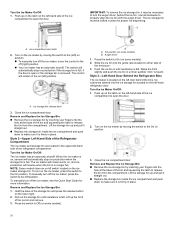
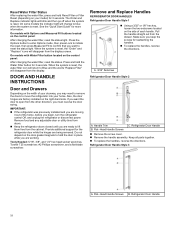
...hold the door in place while you begin, turn the refrigerator control Off, and unplug the refrigerator or disconnect power. When the system is reset. DOOR AND HANDLE INSTRUCTIONS Door and Drawers Depending on the width of your model) for 3 seconds. Do not depend on the door ... together. � To replace the handles, reverse the directions. On models with Water Filter button located on the control panel: After changing the water filter, reset the status light. IMPORTANT: � If the refrigerator was previously installed and you are moving it out of each handle. Provide...
...hold the door in place while you begin, turn the refrigerator control Off, and unplug the refrigerator or disconnect power. When the system is reset. DOOR AND HANDLE INSTRUCTIONS Door and Drawers Depending on the width of your model) for 3 seconds. Do not depend on the door ... together. � To replace the handles, reverse the directions. On models with Water Filter button located on the control panel: After changing the water filter, reset the status light. IMPORTANT: � If the refrigerator was previously installed and you are moving it out of each handle. Provide...
Owners Manual
Page 21
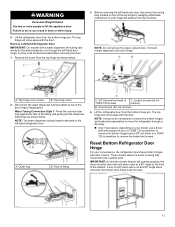
Failure to remove the brake feet screws. Remove Left-Hand Refrigerator Door IMPORTANT: On models with a water dispenser, the tubing and wiring for the water dispenser run through a doorway. � Only if necessary, depending on your model, use a driver with a #2 square bit tip or a TORX T25 ... bottom door hinge must be necessary to remove the bottom hinges and brake feet assemblies to move the refrigerator through the left -hand refrigerator door. Lift the refrigerator door from the bottom hinge pin. Top hinge cover 2. Face of the cabinet. It should remain attached...
Failure to remove the brake feet screws. Remove Left-Hand Refrigerator Door IMPORTANT: On models with a water dispenser, the tubing and wiring for the water dispenser run through a doorway. � Only if necessary, depending on your model, use a driver with a #2 square bit tip or a TORX T25 ... bottom door hinge must be necessary to remove the bottom hinges and brake feet assemblies to move the refrigerator through the left -hand refrigerator door. Lift the refrigerator door from the bottom hinge pin. Top hinge cover 2. Face of the cabinet. It should remain attached...
Owners Manual
Page 22
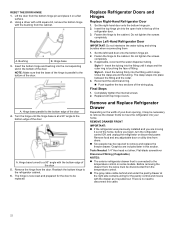
...Insert the tubing firmly into your door opening, it may be replaced. Final Steps 1. Remove and Replace Refrigerator Drawer Depending on the width of the door. Graphics are moving it on some models. Hinge base parallel to the cabinet. Reattach the bottom hinge to the cabinet. Style 1 - Reconnect the...the drawer front, the wires must be necessary to remove the drawer fronts to disconnect this section. There is no need to move the refrigerator into the fitting until it is connected to remove and replace the freezer drawer. Using a driver with a #2 square bit, remove the...
...Insert the tubing firmly into your door opening, it may be replaced. Final Steps 1. Remove and Replace Refrigerator Drawer Depending on the width of the door. Graphics are moving it on some models. Hinge base parallel to the cabinet. Reattach the bottom hinge to the cabinet. Style 1 - Reconnect the...the drawer front, the wires must be necessary to remove the drawer fronts to disconnect this section. There is no need to move the refrigerator into the fitting until it is connected to remove and replace the freezer drawer. Using a driver with a #2 square bit, remove the...

Owners Manual
Page 26
... Using a 1/4" hex driver, turn the screws. Vertical space between the refrigerator doors (B) and the drawer fronts (C) is opened. Make sure the doors are snug against the top of the refrigerator takes some models) When the drawer fronts are not satisfied, continue to adjust the drawer fronts... up and down . Align Refrigerated Drawer Fronts (on some weight off the leveling screws. This makes it...
... Using a 1/4" hex driver, turn the screws. Vertical space between the refrigerator doors (B) and the drawer fronts (C) is opened. Make sure the doors are snug against the top of the refrigerator takes some models) When the drawer fronts are not satisfied, continue to adjust the drawer fronts... up and down . Align Refrigerated Drawer Fronts (on some weight off the leveling screws. This makes it...

Instruction Sheet
Page 1
... See Figure 6. type A type b screw H-Tap connector figure 6 8. Remove ice bin by depressing push button on a 22 cubic foot model, proceed to use the correct harness and module cover for Ice Maker kit WARNING Electrical Shock Hazard Disconnect power before operating. See Figure 5. 6....blade screwdriver to switch in death or electrical shock. Remove switch from old module cover, set aside. Instruction Sheet for your unit. Unplug refrigerator or disconnect power. 2. Remove H-Tap connector. Replace all parts and panels before servicing. Failure to step 20. 22 cuft 25 cuft...
... See Figure 6. type A type b screw H-Tap connector figure 6 8. Remove ice bin by depressing push button on a 22 cubic foot model, proceed to use the correct harness and module cover for Ice Maker kit WARNING Electrical Shock Hazard Disconnect power before operating. See Figure 5. 6....blade screwdriver to switch in death or electrical shock. Remove switch from old module cover, set aside. Instruction Sheet for your unit. Unplug refrigerator or disconnect power. 2. Remove H-Tap connector. Replace all parts and panels before servicing. Failure to step 20. 22 cuft 25 cuft...

Instruction Sheet
Page 4
... turned on. 38. Do not use an extension cord. See Figure 26. Reconnect harness to fill cup. Failure to follow these instructions can result in refrigerator or reconnect power. 41. figure 25 33. W10885624 A Reinstall ice maker into a grounded 3 prong outlet. See Figure 3. 36. Reinstall ice bin. 39. Check...169; Whirlpool Corporation 2016 (All Rights Reserved) fill cup - 4 - Do not remove ground prong. Replace all parts and panels. 22 and 25 cubic foot models 32. NOTE: Push one end of the shut off arm assembly into module and guide other end into upper hole next to...
... turned on. 38. Do not use an extension cord. See Figure 26. Reconnect harness to fill cup. Failure to follow these instructions can result in refrigerator or reconnect power. 41. figure 25 33. W10885624 A Reinstall ice maker into a grounded 3 prong outlet. See Figure 3. 36. Reinstall ice bin. 39. Check...169; Whirlpool Corporation 2016 (All Rights Reserved) fill cup - 4 - Do not remove ground prong. Replace all parts and panels. 22 and 25 cubic foot models 32. NOTE: Push one end of the shut off arm assembly into module and guide other end into upper hole next to...


