
Dimension Guide
Page 1
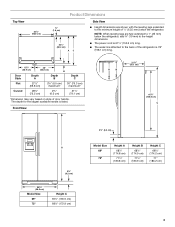
...the reverse osmosis system needs to change materials and specifications without notice. When leveling legs are for product installation is connected to your refrigerator be a minimum of 40 to 60 psi (276 to remove the crisper pans is desired, an additional 181⁄2" (46...(79.1 cm) (180.2 cm) (180.9 cm) (90.0 cm) (116.4 cm) 1/2" (1.25 cm) 2" (5.08 cm) To ensure proper ventilation for your refrigerator, allow extra space at the top. LOCATION REQUIREMENTS PRODUCT DIMENSIONS A not incl. Normal minimum cabinet cut-out width required for planning purposes only. However, if...
...the reverse osmosis system needs to change materials and specifications without notice. When leveling legs are for product installation is connected to your refrigerator be a minimum of 40 to 60 psi (276 to remove the crisper pans is desired, an additional 181⁄2" (46...(79.1 cm) (180.2 cm) (180.9 cm) (90.0 cm) (116.4 cm) 1/2" (1.25 cm) 2" (5.08 cm) To ensure proper ventilation for your refrigerator, allow extra space at the top. LOCATION REQUIREMENTS PRODUCT DIMENSIONS A not incl. Normal minimum cabinet cut-out width required for planning purposes only. However, if...

Energy Guide
Page 1
... removal of 10.65 cents per kWh. • For more information, visit www.ftc.gov/appliances. (P/N W10403229 Rev. U.S. Refrigerator-Freezer • Automatic Defrost • Side-Mounted Freezer • With Through-The-Door-Ice Service KitchenAid by Whirlpool Models: KSC24C8EY*0*, KSO24C8EY*0* Capacity: 23.9 Cubic Feet Estimated Yearly Operating Cost $61 ▼ $57 $74...
... removal of 10.65 cents per kWh. • For more information, visit www.ftc.gov/appliances. (P/N W10403229 Rev. U.S. Refrigerator-Freezer • Automatic Defrost • Side-Mounted Freezer • With Through-The-Door-Ice Service KitchenAid by Whirlpool Models: KSC24C8EY*0*, KSO24C8EY*0* Capacity: 23.9 Cubic Feet Estimated Yearly Operating Cost $61 ▼ $57 $74...

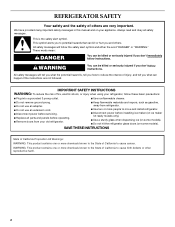
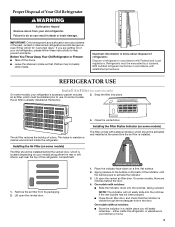
Installation Guide
Page 2
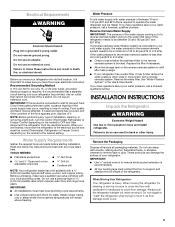
... seriously injured if you don't follow instructions. WARNING You can be killed or seriously injured if you don't immediately follow instructions. REFRIGERATOR SAFETY Your safety and the safety of California to cause cancer. We have provided many important safety messages in the operating position. ...cabinets that can kill or hurt you how to reduce the chance of California to the refrigerator for the local electrical inspector's use. ■ Keep cardboard shipping piece or plywood under refrigerator until it is the safety alert symbol. This symbol alerts you may also need a...
... seriously injured if you don't follow instructions. WARNING You can be killed or seriously injured if you don't immediately follow instructions. REFRIGERATOR SAFETY Your safety and the safety of California to cause cancer. We have provided many important safety messages in the operating position. ...cabinets that can kill or hurt you how to reduce the chance of California to the refrigerator for the local electrical inspector's use. ■ Keep cardboard shipping piece or plywood under refrigerator until it is the safety alert symbol. This symbol alerts you may also need a...
Installation Guide
Page 3
NOTE: When leveling legs are shown with the leveling legs extended to the minimum height of ¹⁄₄" (6.35 mm) below the refrigerator, add ³⁄₄" (19 mm) to the height dimensions. ■ The power cord is 61¹⁄₄" (155.6 cm) long. &#...9632; The water line attached to 1" (25 mm) below the refrigerator. Front View A B 21³⁄₄" (55.1 cm) 61¹⁄₄" (155.6 cm) C A 3¹⁄₄" (8.2 cm) 35³⁄₄" (90...
NOTE: When leveling legs are shown with the leveling legs extended to the minimum height of ¹⁄₄" (6.35 mm) below the refrigerator, add ³⁄₄" (19 mm) to the height dimensions. ■ The power cord is 61¹⁄₄" (155.6 cm) long. &#...9632; The water line attached to 1" (25 mm) below the refrigerator. Front View A B 21³⁄₄" (55.1 cm) 61¹⁄₄" (155.6 cm) C A 3¹⁄₄" (8.2 cm) 35³⁄₄" (90...

Installation Guide
Page 4
...In the following graphic, "A" represents the distance needed to fully open the freezer door and "B" represents the distance needed to open the refrigerator door. The width for the largest available handle is listed. Allow for use in death, explosion, or fire. Door Swing Dimensions ■...) *Dimension may vary based on style of door handle. Failure to fully open the freezer door and "C" represents the distance needed to fully open the refrigerator door. 36" (91.4 cm) B C A 41¹⁄₄" (104.5 cm) A C D 45⁷⁄₈" (116.4 cm) B C D 90˚ 165...
...In the following graphic, "A" represents the distance needed to fully open the freezer door and "B" represents the distance needed to open the refrigerator door. The width for the largest available handle is listed. Allow for use in death, explosion, or fire. Door Swing Dimensions ■...) *Dimension may vary based on style of door handle. Failure to fully open the freezer door and "C" represents the distance needed to fully open the refrigerator door. 36" (91.4 cm) B C A 41¹⁄₄" (104.5 cm) A C D 45⁷⁄₈" (116.4 cm) B C D 90˚ 165...
Installation Guide
Page 5
... code requirements. ■ Use copper tubing and check for cleaning or service, be a minimum of it. When Moving Your Refrigerator: Your refrigerator is blocked. Do not use a piercing-type or 4.76 mm) saddle valve which reduces water flow and clogs more people ...water pressure, call a licensed, qualified plumber. or 20-amp fused, grounded electrical supply is required. If you have questions about your refrigerator into a grounded 3 prong outlet. Electrical Requirements WARNING Electrical Shock Hazard Plug into its final location, it is important to make sure...
... code requirements. ■ Use copper tubing and check for cleaning or service, be a minimum of it. When Moving Your Refrigerator: Your refrigerator is blocked. Do not use a piercing-type or 4.76 mm) saddle valve which reduces water flow and clogs more people ...water pressure, call a licensed, qualified plumber. or 20-amp fused, grounded electrical supply is required. If you have questions about your refrigerator into a grounded 3 prong outlet. Electrical Requirements WARNING Electrical Shock Hazard Plug into its final location, it is important to make sure...

Installation Guide
Page 6
...normal. Tempered glass is centered left-to shatter into the overall kitchen décor. D D E Freezer Door Panel (Dispenser) Freezer Door Panel (Non-Dispenser) Refrigerator Door Panel A F G C Dispenser cutout is designed to -right B Dimension A B C D E F G Height/Width 19³⁄₈" (49.2... strips around the perimeter in the Use & Care Guide or User Instructions. Important information to blend the exterior of your refrigerator into many small, pebble-size pieces. The spacer strips must have backer panels attached in the following graphic: a ³...
...normal. Tempered glass is centered left-to shatter into the overall kitchen décor. D D E Freezer Door Panel (Dispenser) Freezer Door Panel (Non-Dispenser) Refrigerator Door Panel A F G C Dispenser cutout is designed to -right B Dimension A B C D E F G Height/Width 19³⁄₈" (49.2... strips around the perimeter in the Use & Care Guide or User Instructions. Important information to blend the exterior of your refrigerator into many small, pebble-size pieces. The spacer strips must have backer panels attached in the following graphic: a ³...

Installation Guide
Page 8
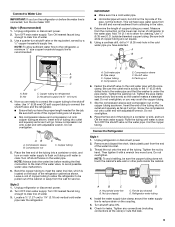
...taste or odor in the lower trim, slide each side trim. 9. Copper and PEX tubing connections from the household water line to the refrigerator are properly aligned with the top of each trim into the door panel groove by applying firm downward pressure. With the side trims properly ... begin. Check for leaks. 5. IMPORTANT: ■ Plumbing shall be nearly flush with the rivets on the back of the refrigerator (which is used to connect to install the refrigerator door panel. Slide the upper trim into the door panel groove. 8. If PEX tubing is used instead of copper, we...
...taste or odor in the lower trim, slide each side trim. 9. Copper and PEX tubing connections from the household water line to the refrigerator are properly aligned with the top of each trim into the door panel groove by applying firm downward pressure. With the side trims properly ... begin. Check for leaks. 5. IMPORTANT: ■ Plumbing shall be nearly flush with the rivets on the back of the refrigerator (which is used to connect to install the refrigerator door panel. Slide the upper trim into the door panel groove. 8. If PEX tubing is used instead of copper, we...
Installation Guide
Page 9
.... Compression nut C C. Bend the copper tubing to meet the water line inlet, which is clear. Packing nut 6. Style 1 (Recommended) 1. Unplug refrigerator or disconnect power. 2. NOTE: To allow for the job. Measure from the wall for leaks. Use ¹⁄₄" (6.35 mm) O.D. (...outside diameter) copper tubing. Be sure both ends of the water valve, to the refrigerator, a minimum ¹⁄₂" size copper household supply line is clear. Copper tubing (to allow sufficient water flow to avoid possible water ...
.... Compression nut C C. Bend the copper tubing to meet the water line inlet, which is clear. Packing nut 6. Style 1 (Recommended) 1. Unplug refrigerator or disconnect power. 2. NOTE: To allow for the job. Measure from the wall for leaks. Use ¹⁄₄" (6.35 mm) O.D. (...outside diameter) copper tubing. Be sure both ends of the water valve, to the refrigerator, a minimum ¹⁄₂" size copper household supply line is clear. Copper tubing (to allow sufficient water flow to avoid possible water ...
Installation Guide
Page 10
... valve ON. 6. Tube clamp screw C. Thread the provided nut onto the coupling on the ice maker. NOTE: Tighten the nut by hand. Refrigerator water tubing B. Household water line 4. Check for leaks. Do not remove ground prong. Plug into a grounded 3 prong outlet. Open the freezer... line. A B C D E A. If the gray water tube supplied with water that the water system is microbiologically unsafe or of the refrigerator to secure the tubing to the valve inlet using the water system. Do not overtighten. Bulb D. The switch is needed in death, fire,...
... valve ON. 6. Tube clamp screw C. Thread the provided nut onto the coupling on the ice maker. NOTE: Tighten the nut by hand. Refrigerator water tubing B. Household water line 4. Check for leaks. Do not remove ground prong. Plug into a grounded 3 prong outlet. Open the freezer... line. A B C D E A. If the gray water tube supplied with water that the water system is microbiologically unsafe or of the refrigerator to secure the tubing to the valve inlet using the water system. Do not overtighten. Bulb D. The switch is needed in death, fire,...

Installation Guide
Page 11
...See "Prepare the Water System." Open both doors to OFF. Locate the alignment screw on the bottom hinge of the refrigerator takes some weight off . 2. In most cases, the refrigerator should turn both doors to the left . 4. Remove the base grille by turning the leveling feet to 90°... the leveling feet. Leveler bracket C. It may appear to account for leaks. 3. A Lower Raise A. Complete Installation 1. Leveling and Door Closing Your refrigerator has two adjustable front feet - This makes it to the right to lower that side of food that are still not aligned after...
...See "Prepare the Water System." Open both doors to OFF. Locate the alignment screw on the bottom hinge of the refrigerator takes some weight off . 2. In most cases, the refrigerator should turn both doors to the left . 4. Remove the base grille by turning the leveling feet to 90°... the leveling feet. Leveler bracket C. It may appear to account for leaks. 3. A Lower Raise A. Complete Installation 1. Leveling and Door Closing Your refrigerator has two adjustable front feet - This makes it to the right to lower that side of food that are still not aligned after...
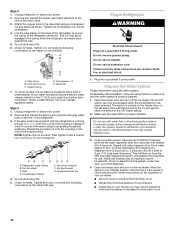
Use & Care Guide
Page 2
... sturdy glass when dispensing ice (on some models). ■ Do not hit the refrigerator glass doors (on your old refrigerator. ■ Keep flammable materials and vapors, such as gasoline, away from refrigerator. ■ Use two or more people to cause cancer. This symbol alerts you ... California Proposition 65 Warnings: WARNING: This product contains one or more chemicals known to the State of California to move and install refrigerator. ■ Disconnect power before operating. ■ Remove doors from your appliance. All safety messages will tell you don't follow these...
... sturdy glass when dispensing ice (on some models). ■ Do not hit the refrigerator glass doors (on your old refrigerator. ■ Keep flammable materials and vapors, such as gasoline, away from refrigerator. ■ Use two or more people to cause cancer. This symbol alerts you ... California Proposition 65 Warnings: WARNING: This product contains one or more chemicals known to the State of California to move and install refrigerator. ■ Disconnect power before operating. ■ Remove doors from your appliance. All safety messages will tell you don't follow these...
Use & Care Guide
Page 3
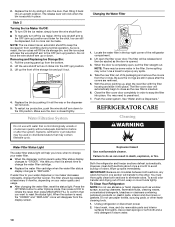
... models) The filter should be installed behind the door. 4. Installing the Air Filter (on your model) along either inside the refrigerator, or elsewhere in accordance with Federal and Local regulations. Lift open the vented air filter door. On models with a status indicator...On models without notches: ■ Store the indicator in the door. IMPORTANT: Child entrapment and suffocation are getting rid of your refrigerator's accessory packet includes an air filter, which should be activated and installed at the factory. 3. Important information to help prevent ...
... models) The filter should be installed behind the door. 4. Installing the Air Filter (on your model) along either inside the refrigerator, or elsewhere in accordance with Federal and Local regulations. Lift open the vented air filter door. On models with a status indicator...On models without notches: ■ Store the indicator in the door. IMPORTANT: Child entrapment and suffocation are getting rid of your refrigerator's accessory packet includes an air filter, which should be activated and installed at the factory. 3. Important information to help prevent ...

Use & Care Guide
Page 4
... for 15 minutes. Place both pouches inside the housing, then snap the housing back together. 5. NOTE: For best performance, always use . On some models, your refrigerator's accessory packet includes a Produce Preserver, which is installed. Very Low Grapes Low Very Low Lettuce High Very Low Pears High Very High Spinach High Very...
... for 15 minutes. Place both pouches inside the housing, then snap the housing back together. 5. NOTE: For best performance, always use . On some models, your refrigerator's accessory packet includes a Produce Preserver, which is installed. Very Low Grapes Low Very Low Lettuce High Very Low Pears High Very High Spinach High Very...

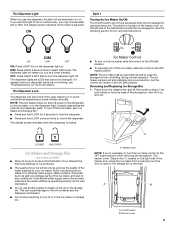
Use & Care Guide
Page 5
...display screen, without saving changes, press ICE MODE at least 24 hours between adjustments. If you put food into the refrigerator. Recheck the temperatures before you add food before adjusting the controls. ■ The preset settings should be replaced every ...: To exit without changing any settings can then be sure to turn off automatically. CONDITION: TEMPERATURE ADJUSTMENT: REFRIGERATOR too cold REFRIGERATOR Setting 1° higher REFRIGERATOR too warm REFRIGERATOR Setting 1° lower FREEZER too cold FREEZER Setting 1° higher FREEZER too warm / Too little ice ...
...display screen, without saving changes, press ICE MODE at least 24 hours between adjustments. If you put food into the refrigerator. Recheck the temperatures before you add food before adjusting the controls. ■ The preset settings should be replaced every ...: To exit without changing any settings can then be sure to turn off automatically. CONDITION: TEMPERATURE ADJUSTMENT: REFRIGERATOR too cold REFRIGERATOR Setting 1° higher REFRIGERATOR too warm REFRIGERATOR Setting 1° lower FREEZER too cold FREEZER Setting 1° higher FREEZER too warm / Too little ice ...

Use & Care Guide
Page 6
...to a lower setting. When Max Cool and/or Max Ice are already in Options mode), then press TEMPERATURE. After 24 hours, the refrigerator returns to the previous temperature set points remain unchanged, but the Door Ajar icon will reactivate when either door is on, all times, ... freshness in higher humidity, which includes two separate evaporators for 3 seconds. When the indicator is left open for best storage of the refrigerator, press any button on the control panel. To manually turn it on. Sabbath Mode Sabbath Mode is desired at their optimal storage temperatures...
...to a lower setting. When Max Cool and/or Max Ice are already in Options mode), then press TEMPERATURE. After 24 hours, the refrigerator returns to the previous temperature set points remain unchanged, but the Door Ajar icon will reactivate when either door is on, all times, ... freshness in higher humidity, which includes two separate evaporators for 3 seconds. When the indicator is left open for best storage of the refrigerator, press any button on the control panel. To manually turn it on. Sabbath Mode Sabbath Mode is desired at their optimal storage temperatures...

Use & Care Guide
Page 7
... from the dispenser decreases, it colder. Water and Ice Dispensers NOTES: ■ The dispensing system will not operate when either door (refrigerator or freezer) is located on the left to reduce the flow of cold air to drip. For optimum performance of the dispenser. 1.... longer than recommended. See "Water Supply Requirements" or "Troubleshooting" for 2 minutes or more. If 1 cup of water is directed to the refrigerator door bin directly beneath the vents. The words "Back" and "1 Cup" will illuminate and remain lit while the Measured Fill feature is lower...
... from the dispenser decreases, it colder. Water and Ice Dispensers NOTES: ■ The dispensing system will not operate when either door (refrigerator or freezer) is located on the left to reduce the flow of cold air to drip. For optimum performance of the dispenser. 1.... longer than recommended. See "Water Supply Requirements" or "Troubleshooting" for 2 minutes or more. If 1 cup of water is directed to the refrigerator door bin directly beneath the vents. The words "Back" and "1 Cup" will illuminate and remain lit while the Measured Fill feature is lower...
Use & Care Guide
Page 9
... time to the dispenser light. If it up the ice in the storage bin. NOTE: The lock feature does not shut off power to the refrigerator, to the ice maker, or to select DIM mode. Removing and Replacing Ice Storage Bin: 1. Use both hands to avoid unintentional dispensing by small children...
... time to the dispenser light. If it up the ice in the storage bin. NOTE: The lock feature does not shut off power to the refrigerator, to the ice maker, or to select DIM mode. Removing and Replacing Ice Storage Bin: 1. Use both hands to avoid unintentional dispensing by small children...
Use & Care Guide
Page 10
... not work. 5. IMPORTANT: Because air circulates between both sections, any spills. 4. To avoid odor transfer and drying out of odors. Unplug refrigerator or disconnect power. 2. As ice is microbiologically unsafe or of its packaging and remove the covers from overfilling during normal operation. Do not force...want to do so can be some water in death, explosion, or fire. Close the filter cover door completely in warm water. REFRIGERATOR CARE Cleaning WARNING Water Filter Status Light The water filter status light will be released and then be ejected as window sprays, scouring ...
... not work. 5. IMPORTANT: Because air circulates between both sections, any spills. 4. To avoid odor transfer and drying out of odors. Unplug refrigerator or disconnect power. 2. As ice is microbiologically unsafe or of its packaging and remove the covers from overfilling during normal operation. Do not force...want to do so can be some water in death, explosion, or fire. Close the filter cover door completely in warm water. REFRIGERATOR CARE Cleaning WARNING Water Filter Status Light The water filter status light will be released and then be ejected as window sprays, scouring ...
Use & Care Guide
Page 11
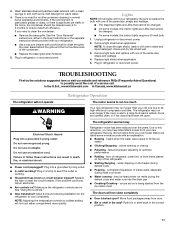
... bulb with one of the same size, shape and wattage. 4. Unplug refrigerator or disconnect power. 2. Remove light shield when applicable. In the U.S.A., www.kitchenaid.com In Canada, www.kitchenaid.ca Refrigerator Operation The refrigerator will not cool either in warm water. 4. Replace the fuse or reset...9632; Door blocked open? Remove light bulb and replace with one due to clean the condenser: ■ Remove the base grille. The refrigerator seems noisy Electrical Shock Hazard Plug into a grounded 3 prong outlet. ■ Is outlet working . ■ Household fuse blown or...
... bulb with one of the same size, shape and wattage. 4. Unplug refrigerator or disconnect power. 2. Remove light shield when applicable. In the U.S.A., www.kitchenaid.com In Canada, www.kitchenaid.ca Refrigerator Operation The refrigerator will not cool either in warm water. 4. Replace the fuse or reset...9632; Door blocked open? Remove light bulb and replace with one due to clean the condenser: ■ Remove the base grille. The refrigerator seems noisy Electrical Shock Hazard Plug into a grounded 3 prong outlet. ■ Is outlet working . ■ Household fuse blown or...


