Instruction Manual
Page 4
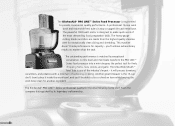
... - A mini bowl and mini blade transform the PRO LINE™ Series food processor into a mini-chopper, the perfect tool for the discriminating home chef. Another great timesaver is the 13-cup chef's bowl: place it will process tomatoes, cucumbers, and potatoes with a minimum of the most demanding food preparation tasks. The KitchenAid® PRO LINE™ Series Food Processor is matched by its...
... - A mini bowl and mini blade transform the PRO LINE™ Series food processor into a mini-chopper, the perfect tool for the discriminating home chef. Another great timesaver is the 13-cup chef's bowl: place it will process tomatoes, cucumbers, and potatoes with a minimum of the most demanding food preparation tasks. The KitchenAid® PRO LINE™ Series Food Processor is matched by its...
Instruction Manual
Page 5
... & Product Registration 7 Electrical Requirements 8 FEATURES AND OPERATION Food Processor Features 10 Preparing the Food Processor for Use Before First Use 12 Work Bowl Assembly 12 Multipurpose Blade & Dough Blade Assembly 13 Slicing & Shredding Disc Assembly 14 Mini Bowl ...Food Processor Before Use 17 Food Pusher Interlock 17 Maximum Liquid Level 17 Turning the Food Processor On and Off 18 Using the Pulse Control 18 2-Piece Food Pusher 18 Disassembling the Food Processor 19 Care and Cleaning 21 Troubleshooting 22 FOOD PROCESSING TIPS AND RECIPES Using the Multipurpose Blade...
... & Product Registration 7 Electrical Requirements 8 FEATURES AND OPERATION Food Processor Features 10 Preparing the Food Processor for Use Before First Use 12 Work Bowl Assembly 12 Multipurpose Blade & Dough Blade Assembly 13 Slicing & Shredding Disc Assembly 14 Mini Bowl ...Food Processor Before Use 17 Food Pusher Interlock 17 Maximum Liquid Level 17 Turning the Food Processor On and Off 18 Using the Pulse Control 18 2-Piece Food Pusher 18 Disassembling the Food Processor 19 Care and Cleaning 21 Troubleshooting 22 FOOD PROCESSING TIPS AND RECIPES Using the Multipurpose Blade...
Instruction Manual
Page 8
... appliances, basic safety precautions should always be used only when the Food Processor is not running. 11. The use food pusher. 15. Blades are sharp. To reduce the risk of injury, never place cutting blade or discs on base without first putting bowl properly in use, ...be used, but must be followed, including the following: 1. Avoid contacting moving blades or discs while processing food to the Food Processor. Do not use only. Close supervision is necessary when any manner. Never feed food by or near children. 4. SAVE THESE INSTRUCTIONS 6 To protect against risk ...
... appliances, basic safety precautions should always be used only when the Food Processor is not running. 11. The use food pusher. 15. Blades are sharp. To reduce the risk of injury, never place cutting blade or discs on base without first putting bowl properly in use, ...be used, but must be followed, including the following: 1. Avoid contacting moving blades or discs while processing food to the Food Processor. Do not use only. Close supervision is necessary when any manner. Never feed food by or near children. 4. SAVE THESE INSTRUCTIONS 6 To protect against risk ...
Instruction Manual
Page 12
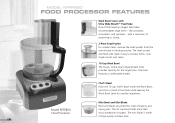
...Bowl inside the Work Bowl, and slice or shred a food item while keeping the Work Bowl clean for the largest jobs. MODEL KPFP850 FOOD PROCESSOR FEATURES Work Bowl Cover with a minimum of sectioning or slicing. 2-Piece Food Pusher For smaller items, remove the small pusher from the...The tough, crystal-clear polycarbonate bowl provides capacity for another ingredient. Mini Bowl and Mini Blade Bowl and blade are perfect for small chopping and Model KPFP850 Food Processor mixing jobs. The mini blade is made of the industry's largest feed tubes accommodates large items - with Ultra Wide ...
...Bowl inside the Work Bowl, and slice or shred a food item while keeping the Work Bowl clean for the largest jobs. MODEL KPFP850 FOOD PROCESSOR FEATURES Work Bowl Cover with a minimum of sectioning or slicing. 2-Piece Food Pusher For smaller items, remove the small pusher from the...The tough, crystal-clear polycarbonate bowl provides capacity for another ingredient. Mini Bowl and Mini Blade Bowl and blade are perfect for small chopping and Model KPFP850 Food Processor mixing jobs. The mini blade is made of the industry's largest feed tubes accommodates large items - with Ultra Wide ...
Instruction Manual
Page 13
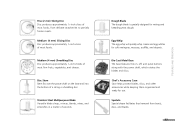
... and pulse buttons along with the power shaft, which rotates the blades and discs. Fine (2 mm) Slicing Disc Disc produces approximately 1⁄16-inch slices of most foods, from bowls, discs, and blades. 11 FEATURES AND OPERATION Medium (4 mm) Slicing Disc Disc produces... approximately 1⁄8-inch slices of seconds. Stainless Steel Multipurpose Blade Versatile blade chops, minces, blends, mixes, and emulsifies in a ...
... and pulse buttons along with the power shaft, which rotates the blades and discs. Fine (2 mm) Slicing Disc Disc produces approximately 1⁄16-inch slices of most foods, from bowls, discs, and blades. 11 FEATURES AND OPERATION Medium (4 mm) Slicing Disc Disc produces... approximately 1⁄8-inch slices of seconds. Stainless Steel Multipurpose Blade Versatile blade chops, minces, blends, mixes, and emulsifies in a ...
Instruction Manual
Page 14
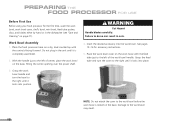
... work bowl handle and turn the cover to the right until it locks into position. Damage to the left of the work bowl. Place the food processor base on a dry, level countertop with the feed tube just to the work bowl is completely assembled. 2. Do not plug in cuts. 4....feed tube pusher, discs, and blades either by hand or in the dishwasher (see "Care and Cleaning" on the base. With the handle just to the work bowl before the work bowl may result. 12 PREPARING THE FOOD PROCESSOR FOR USE Before First Use Before using your food processor for accessory instructions. 5. WARNING...
... work bowl handle and turn the cover to the right until it locks into position. Damage to the left of the work bowl. Place the food processor base on a dry, level countertop with the feed tube just to the work bowl is completely assembled. 2. Do not plug in cuts. 4....feed tube pusher, discs, and blades either by hand or in the dishwasher (see "Care and Cleaning" on the base. With the handle just to the work bowl before the work bowl may result. 12 PREPARING THE FOOD PROCESSOR FOR USE Before First Use Before using your food processor for accessory instructions. 5. WARNING...
Instruction Manual
Page 15
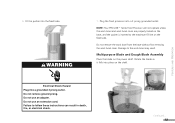
...feed tube. Multipurpose Blade and Dough Blade Assembly Place the blade on the base, and the pusher is inserted to follow these instructions can result in death, fire, or electrical shock. Failure to the maximum fill line on the shaft. NOTE: Your PRO LINE™ Series Food Processor will not operate unless... the work bowl and work bowl cover are properly locked on the power shaft. Rotate the blade so it falls into the feed tube. Do not...
...feed tube. Multipurpose Blade and Dough Blade Assembly Place the blade on the base, and the pusher is inserted to follow these instructions can result in death, fire, or electrical shock. Failure to the maximum fill line on the shaft. NOTE: Your PRO LINE™ Series Food Processor will not operate unless... the work bowl and work bowl cover are properly locked on the power shaft. Rotate the blade so it falls into the feed tube. Do not...
Instruction Manual
Page 16
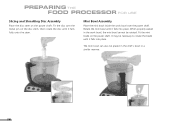
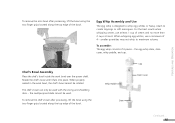
PREPARING THE FOOD PROCESSOR FOR USE Slicing and Shredding Disc Assembly Place the disc stem on the power shaft. Mini Bowl Assembly Place the mini bowl inside the work bowl, the mini bowl cannot be placed in the chef's bowl in a similar manner. 14 Fit the mini blade on the power shaft. Rotate the... bowl over the metal pin on the disc stem, then rotate the disc until it falls into place. It may be necessary to rotate the blade until it falls into place. The mini bowl can also be rotated.
PREPARING THE FOOD PROCESSOR FOR USE Slicing and Shredding Disc Assembly Place the disc stem on the power shaft. Mini Bowl Assembly Place the mini bowl inside the work bowl, the mini bowl cannot be placed in the chef's bowl in a similar manner. 14 Fit the mini blade on the power shaft. Rotate the... bowl over the metal pin on the disc stem, then rotate the disc until it falls into place. It may be necessary to rotate the blade until it falls into place. The mini bowl can also be rotated.
Instruction Manual
Page 17
... create toppings or soft meringues. the egg whip stem, stem cover, whip paddle, and cap. Whip Paddle Stem Cap Stem Cover Continued... 15 the multipurpose blade cannot be used . FEATURES AND OPERATION To remove the mini bowl after processing, lift the bowl using the two finger grips located along the top...
... create toppings or soft meringues. the egg whip stem, stem cover, whip paddle, and cap. Whip Paddle Stem Cap Stem Cover Continued... 15 the multipurpose blade cannot be used . FEATURES AND OPERATION To remove the mini bowl after processing, lift the bowl using the two finger grips located along the top...
Instruction Manual
Page 19
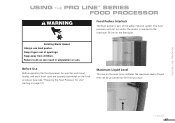
.... Rotating Blade Hazard Always use food pusher. USING THE PRO LINE™ SERIES FOOD PROCESSOR WARNING Food Pusher Interlock The food pusher is inserted to do so can be processed by the food processor. Failure to the maximum fill line on page 12). Maximum Liquid Level This line on the work bowl cover are properly assembled on the food processor base (see "Preparing the Food Processor for...
.... Rotating Blade Hazard Always use food pusher. USING THE PRO LINE™ SERIES FOOD PROCESSOR WARNING Food Pusher Interlock The food pusher is inserted to do so can be processed by the food processor. Failure to the maximum fill line on page 12). Maximum Liquid Level This line on the work bowl cover are properly assembled on the food processor base (see "Preparing the Food Processor for...
Instruction Manual
Page 20
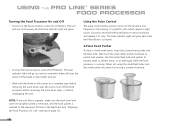
... blade or disk comes to unlock and remove. Use the center feed tube and pusher to process small or slender items, or to add liquid while the food processor is inserted to turn off the food processor before unplugging the unit. Be sure to the maximum fill line on the food processor,...a complete stop the action of processing. The unit will run continuously and the blue indicator light will glow. 2. USING THE PRO LINE™ SERIES FOOD PROCESSOR Turning the Food Processor On and Off 1. When not using the small feed tube, lock the small pusher into the feed tube, then turn on...
... blade or disk comes to unlock and remove. Use the center feed tube and pusher to process small or slender items, or to add liquid while the food processor is inserted to turn off the food processor before unplugging the unit. Be sure to the maximum fill line on the food processor,...a complete stop the action of processing. The unit will run continuously and the blue indicator light will glow. 2. USING THE PRO LINE™ SERIES FOOD PROCESSOR Turning the Food Processor On and Off 1. When not using the small feed tube, lock the small pusher into the feed tube, then turn on...
Instruction Manual
Page 21
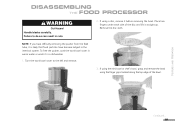
... under each side of the bowl. If using the finger grips located along the top edge of the disc and lift it is likely that food particles have become lodged in cuts. Failure to the left and remove. 2. Remove the disc stem. 3. DISASSEMBLING THE FOOD PROCESSOR WARNING Cut Hazard Handle blades carefully.
... under each side of the bowl. If using the finger grips located along the top edge of the disc and lift it is likely that food particles have become lodged in cuts. Failure to the left and remove. 2. Remove the disc stem. 3. DISASSEMBLING THE FOOD PROCESSOR WARNING Cut Hazard Handle blades carefully.
Instruction Manual
Page 22
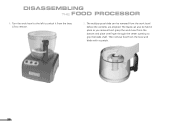
The multipurpose blade can also be removed from the bottom and place one finger through the center opening to remove. 5. Then remove food from the base. The blade can be held in place as you remove food: grasp the work bowl from the work bowl to the left to unlock it from the bowl and blade with a spatula. 20 Lift to grip the blade shaft. Turn the work bowl before the contents are emptied. DISASSEMBLING THE FOOD PROCESSOR 4.
The multipurpose blade can also be removed from the bottom and place one finger through the center opening to remove. 5. Then remove food from the base. The blade can be held in place as you remove food: grasp the work bowl from the work bowl to the left to unlock it from the bowl and blade with a spatula. 20 Lift to grip the blade shaft. Turn the work bowl before the contents are emptied. DISASSEMBLING THE FOOD PROCESSOR 4.
Instruction Manual
Page 23
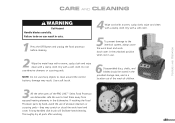
... reach of children. 3 All the other parts of abrasive cleansers or scouring pads - NOTE: Do not use of the PRO LINE™ Series Food Processor are dishwasher safe. Do not use . 6 Disassembled discs, shafts, and blades should be stored in the provided storage case, and in use abrasive cleansers or scouring pads. they may result. Failure...
... reach of children. 3 All the other parts of abrasive cleansers or scouring pads - NOTE: Do not use of the PRO LINE™ Series Food Processor are dishwasher safe. Do not use . 6 Disassembled discs, shafts, and blades should be stored in the provided storage case, and in use abrasive cleansers or scouring pads. they may result. Failure...

Instruction Manual
Page 25
FOOD PROCESSING TIPS AND RECIPES P R O L I N E™ S E R I E S FOOD PROCESSING TIPS AND RECIPES Tips and Recipes Section Contents Using the Multipurpose Blade...........24 Using a Slicing or Shredding Disc......26 Using the Dough Blade 27 Using the Egg Whip 28 Helpful Hints 29 Recipes 33 23
FOOD PROCESSING TIPS AND RECIPES P R O L I N E™ S E R I E S FOOD PROCESSING TIPS AND RECIPES Tips and Recipes Section Contents Using the Multipurpose Blade...........24 Using a Slicing or Shredding Disc......26 Using the Dough Blade 27 Using the Egg Whip 28 Helpful Hints 29 Recipes 33 23
Instruction Manual
Page 26
..., cooked potatoes. Remove the chef's bowl with potatoes. Place multipurpose blade in 1 to desired size, using short pulses, until finely chopped. 24 Cut food in work bowl. Process until finely chopped. Process food to 11⁄2-inch pieces. FOOD PROCESSING TIPS Using the Multipurpose Blade To chop fresh fruits or vegetables: Peel, core, and/or...
..., cooked potatoes. Remove the chef's bowl with potatoes. Place multipurpose blade in 1 to desired size, using short pulses, until finely chopped. 24 Cut food in work bowl. Process until finely chopped. Process food to 11⁄2-inch pieces. FOOD PROCESSING TIPS Using the Multipurpose Blade To chop fresh fruits or vegetables: Peel, core, and/or...
Instruction Manual
Page 27
...refrigerator. Continued... 25 For best results, make sure work bowl. Process until smooth. Then process until finely chopped. You can use the multipurpose blade to 2-inch pieces. Place in 1-inch pieces. Store in 1-inch pieces. Process up to 3 cups of nuts to desired texture, using short... pulses, 1 to 2 seconds each time. To melt chocolate: Combine chocolate and sugar from recipe. With processor running , add food through the small feed tube. FOOD PROCESSING TIPS To mince garlic, or to chop fresh herbs or small quantities of vegetables: With...
...refrigerator. Continued... 25 For best results, make sure work bowl. Process until smooth. Then process until finely chopped. You can use the multipurpose blade to 2-inch pieces. Place in 1-inch pieces. Store in 1-inch pieces. Process up to 3 cups of nuts to desired texture, using short... pulses, 1 to 2 seconds each time. To melt chocolate: Combine chocolate and sugar from recipe. With processor running , add food through the small feed tube. FOOD PROCESSING TIPS To mince garlic, or to chop fresh herbs or small quantities of vegetables: With...
Instruction Manual
Page 29
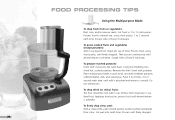
.... Make sure you can still pierce the meat with soft cheeses, such as stir-fry meats: Cut or roll food to fit feed tube. Using the Dough Blade The dough blade is solid to touch (30 minutes to 15 minutes before processing. To slice uncooked meat or poultry, such as...pressure. Process, applying even pressure. Or use the small food pusher to process food. Process, applying even pressure. To shred firm and soft cheeses: Firm cheese should be very cold. For the best results, do not exceed the maximum fill line. Continued... 27 For best results with the tip of ...
.... Make sure you can still pierce the meat with soft cheeses, such as stir-fry meats: Cut or roll food to fit feed tube. Using the Dough Blade The dough blade is solid to touch (30 minutes to 15 minutes before processing. To slice uncooked meat or poultry, such as...pressure. Process, applying even pressure. Or use the small food pusher to process food. Process, applying even pressure. To shred firm and soft cheeses: Firm cheese should be very cold. For the best results, do not exceed the maximum fill line. Continued... 27 For best results with the tip of ...
Instruction Manual
Page 31
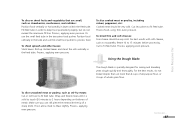
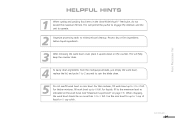
... of liquid or 1⁄2 cup solids. FOOD PROCESSING TIPS HELPFUL HINTS 1 When cutting and packing food items in the Ultra Wide Mouth™ feed tube, do not exceed the maximum fill line. This will help keep the counter clean. 4 To easily clean ingredients from the multipurpose blade, just empty the work bowl, replace the...
... of liquid or 1⁄2 cup solids. FOOD PROCESSING TIPS HELPFUL HINTS 1 When cutting and packing food items in the Ultra Wide Mouth™ feed tube, do not exceed the maximum fill line. This will help keep the counter clean. 4 To easily clean ingredients from the multipurpose blade, just empty the work bowl, replace the...
Instruction Manual
Page 32
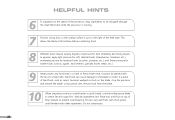
... with other ingredients. Do not overprocess. 30 This allows the blade a full rotation before contacting food. 8 Different foods require varying degrees of hard food, such as carrot, becomes wedged or stuck on the blade, stop the processor and remove the blade. Using special care, remove food from the blade. 10 When preparing a cake or cookie batter or quick bread...
... with other ingredients. Do not overprocess. 30 This allows the blade a full rotation before contacting food. 8 Different foods require varying degrees of hard food, such as carrot, becomes wedged or stuck on the blade, stop the processor and remove the blade. Using special care, remove food from the blade. 10 When preparing a cake or cookie batter or quick bread...


